Introduction
InModularization by using Oracle Database Containers and PDBs on Docker Engine we discussed using a Docker image for Oracle Database 12c. A Docker image is built from a Dockerfile, which may need to updated frequently. Having a user build a Docker image each time a modification, or a set of modifications, is/are made to source code would be too involved a process. For build automation of source code to Docker image, Continuous Integration is recommended. We introduced Continuous Integration in these earlier articles: Continuous Integration from AWS CodeCommit to Docker Hub with AWS CodeBuild and Continuous Integration from AWS Code Commit to Amazon ECR with AWS CodeBuild.
Problem
When multiple developers are developing code for software, such as a Docker image for a database, the source code repository, for instance GitHub, would have multiple branches to which each developer would commit changes. Subsequently the source code has to be built and tested and deployed to a staging or testing environment, and thereafter to the production environment, as illustrated in Figure 1. Having to build and deploy a Docker image periodically requires automation for high availability of a deployment.
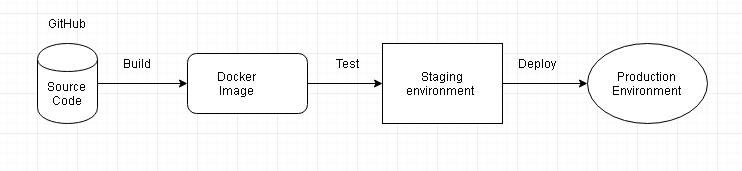
Figure 1. GitHub to Deployment
Solution
Automated Continuous Deployment may be used to deploy software continuously to a production environment starting from source code. In automated Code Integration developers make frequent code commits to a central repository such as GitHub or CodeCommit and a new build is created and tested on an OS platform such as CoreOS, all automatically. AutomatedContinuous Delivery goes further than Code Integration in automation. In addition to creating a new build and testing the build, the build is deployed to a preproduction testing or staging environment. A developer has to explicitly deploy the production-ready build release, either by an approval mechanism or by downloading the software from a repository such as Docker Hub. Continuous Deployment goes further than Continuous Delivery. The complete process, from integrating source code into a central repository, compiling the code into a build, testing the build, deploying the build to a testing environment and deploying the build release (the end software) to a production environment, all automatically, is called continuous deployment. Continuous Integration, Continuous Delivery, and Continuous Deployment are illustrated in Figure 2.
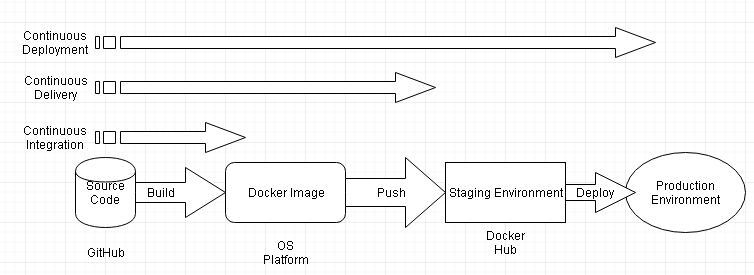
Figure 2. Continuous Integration, Continuous Delivery and Continuous Deployment
In this article we shall use Continuous Deployment to deploy a Docker image to production starting from source code in GitHub. We shall use an AWS CodePipeline for continuous deployment. CodePipeline is an AWS DevOps tool used to build, test and deploy software (a Docker image, in the context of Docker) every time a code change is made on the source code repository. For source code, a code repo such as GitHub or CodeCommit could be used. We shall use a GitHub repository. For build, a build tool such as Jenkins or CodeBuild could be used. We shall skip the build process in this article, but shall include build in a subsequent article. For deployment we shall use Elastic Beanstalk, as illustrated in Figure 3. A No Build CodePipeline does not imply a code build is not made, as the source code is still required to be built into a deployable Docker image. The source code is built during deployment to Elastic Beanstalk. A No Build implies that the source code is not built into a Docker image using a build tool such as CodeBuild or Jenkins. Using a Build tool such Jenkins also makes it feasible to test the build. Skipping the build in a CodePipeline skips any build testing. If the source code has any errors the deployment fails when the CodePipeline is run. CodePipeline with No Build is recommended if it has been ascertained that code builds without error and does not require a separate build and test tool.
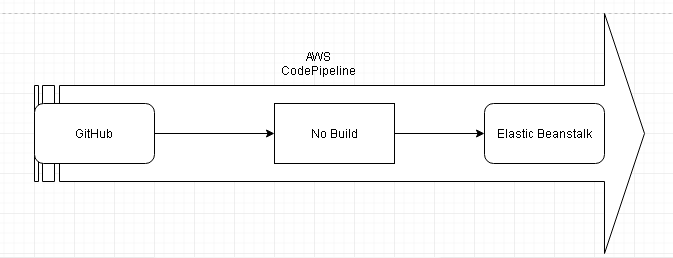
Figure 3. AWS CodePipeline
This article has the following sections.
- Setting the Environment
- Creating a Github Repository
- Creating a AWS Elastic Beanstalk
- Creating a AWS CodePipeline
- Running a CodePipeline
- Getting Application Logs
- Deleting a CodePipeline
Setting the Environment
As we shall be making use of AWS services, AWS CodePipeline and AWS Elastic Beanstalk, create an AWS account if not already created. Also create a GitHub account. We shall use a source code example in this article or a Node Server application. In the Node Server example the Dockerfile makes use of a resource file server.js. A Docker container that is created from a Docker image from the source code does not exit.
Creating a Github Repository
In this section we shall create a GitHub repo for the Node Server example, for which the Dockerfile for the application is listed:
FROM node:4.4
COPY server.js .
EXPOSE 8080
CMD ["node","server.js"]
The server.js for the Node server application is also listed.
var http = require('http');
var handleRequest = function (request, response) {
  response.writeHead(200);
  response.end('Hello World!');
};
var www = http.createServer(handleRequest);
www.listen(8080);
Create a GitHub repo (dvohra/docker-node-server is repo used in this article, but would be different for different users) for the Node Server example. Upload the two files (Dockerfile and server.js) to the repo as shown in Figure 4.
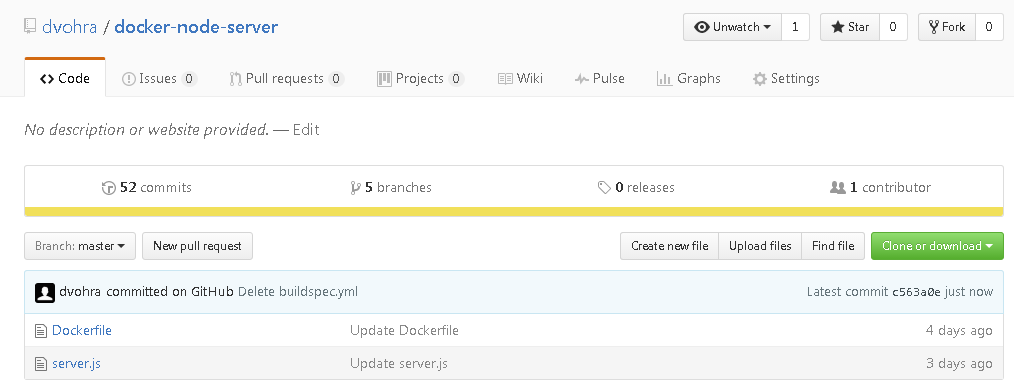
Figure 4. Source Code for Docker Image on GitHub
The Dockerfile in the GitHub repo is listed in Figure 5.
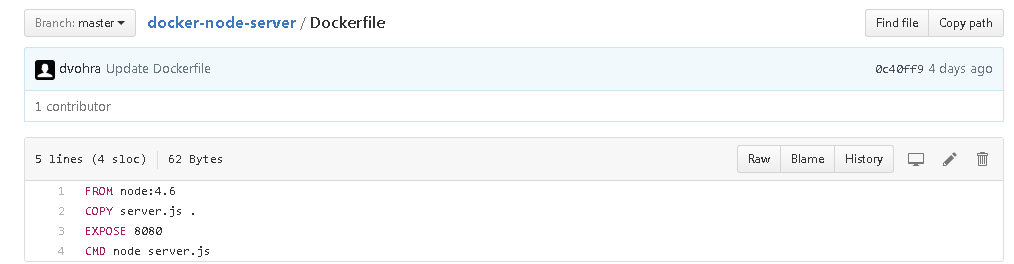
Figure 5. Dockerfile
The server.js in the GitHub repo is shown in Figure 6.
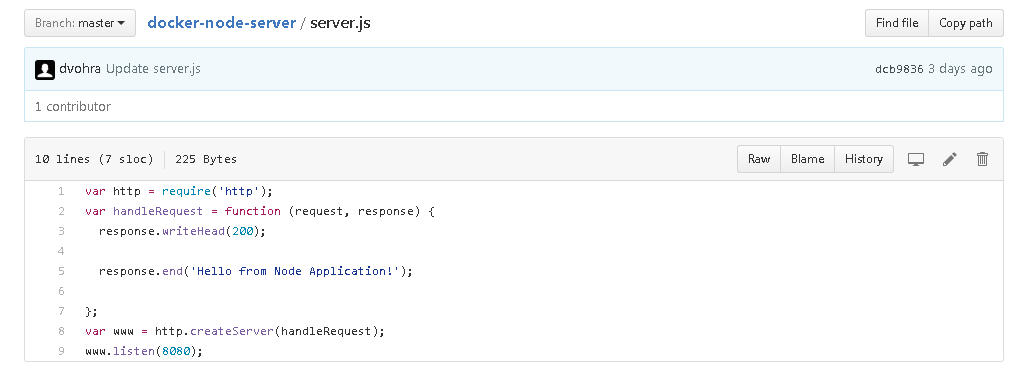
Figure 6. The server.js
Creating an AWS Elastic Beanstalk
In this section we shall create an Elastic AWS Beanstalk application. For the node server example click on Create New Application as shown in Figure 7.

Figure 7. Create New Application
Specify an Application Name (NodeServerApp) in the Create New Application dialog. Click on Create as shown in Figure 8.
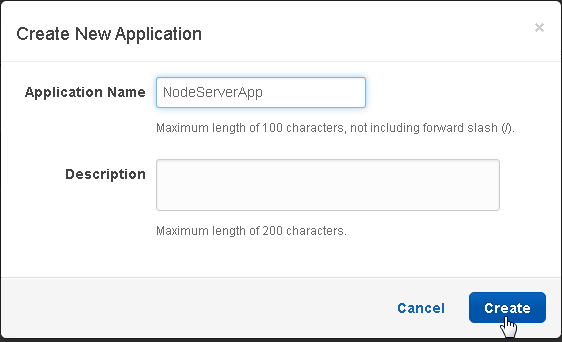
Figure 8. Create New Application
Click on Actions>Create New Environment to create a new environment, as shown in Figure 9.
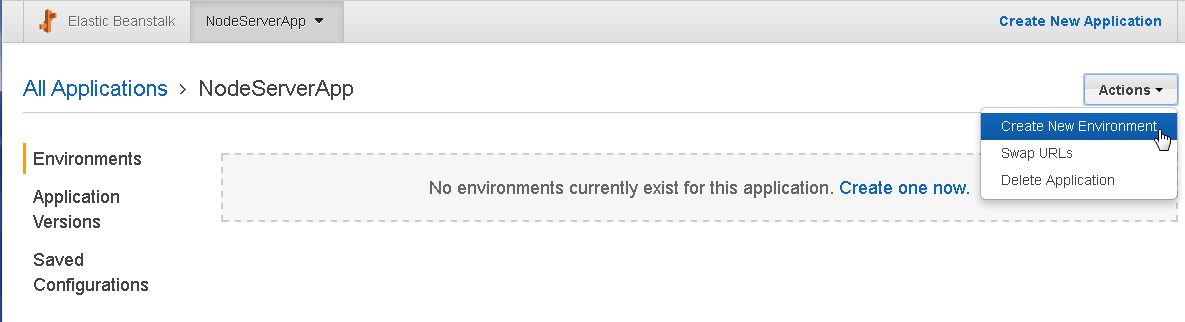
Figure 9. Create New Environment
In the Choose an environment tier dialog select Worker environment and click on Select as shown in Figure 10.
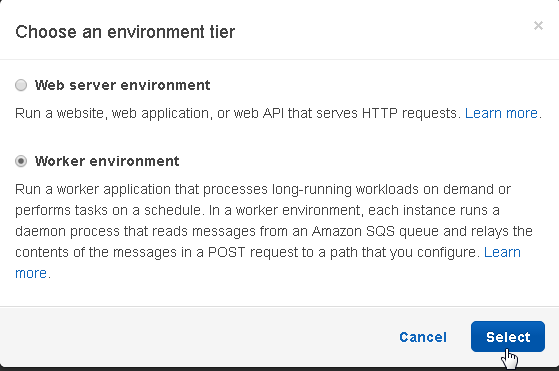
Figure 10. Selecting an Environment
In the Create a new environment dialog select Platform as Docker and select Application code as Sample application as shown in Figure 11.
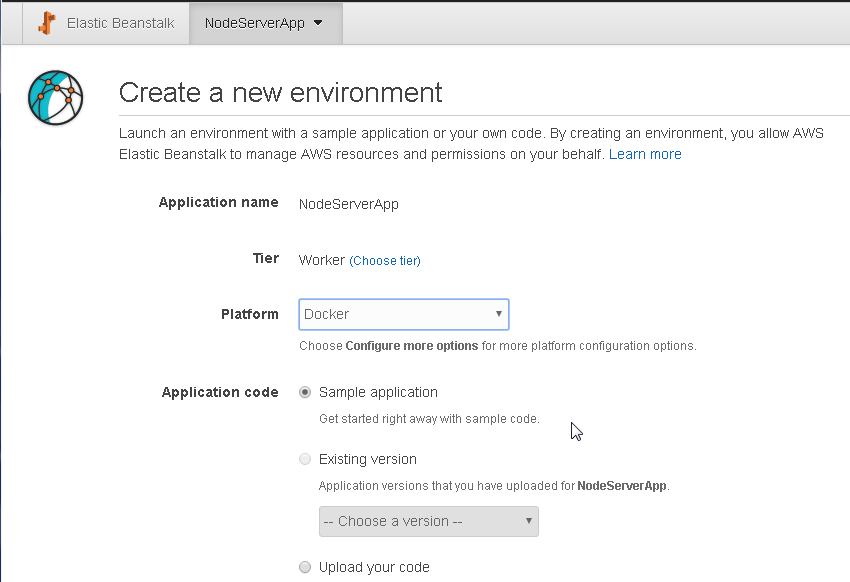
Figure 11. Create new Environment
We don't need to upload the application code, as the application shall be deployed when the CodePipeline is run. Click on Create environment as shown in Figure 12 to create an environment.
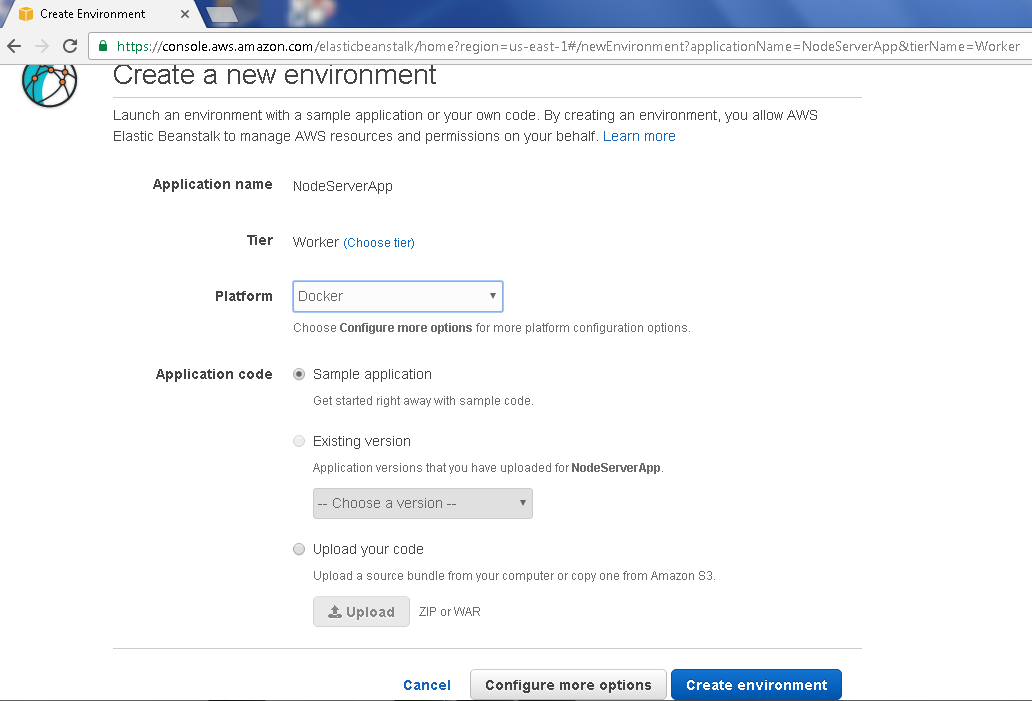
Figure 12. Create environment
An environment starts to get created, as shown in Figure 13.
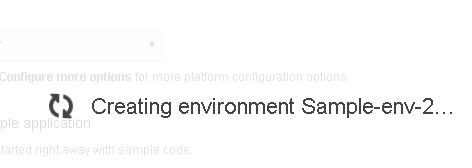
Figure 13. Creating Environment
The output from the environment getting created is listed in a console, as shown in Figure 14.
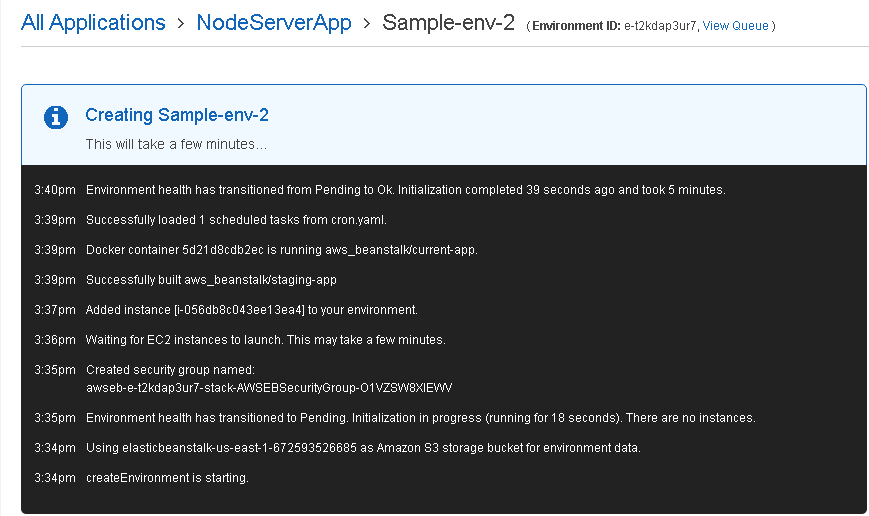
Figure 14. Output from Creating a new Environment
A new environment gets created for the NodeServerApp application, as shown in Figure 15.
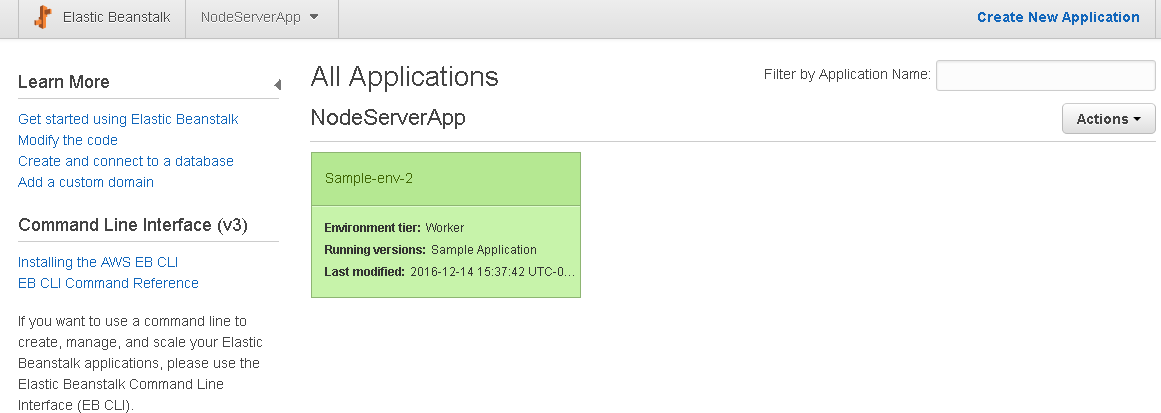
Figure 15. New Environment gets created
Click on the Sample-env-2 environment link as shown in Figure 16.
Figure 16. Environment link
A dashboard displays the environment detail such as Configuration, Logs and Events. The Overview lists the application environment as running on Docker platform, as shown in Figure 17.
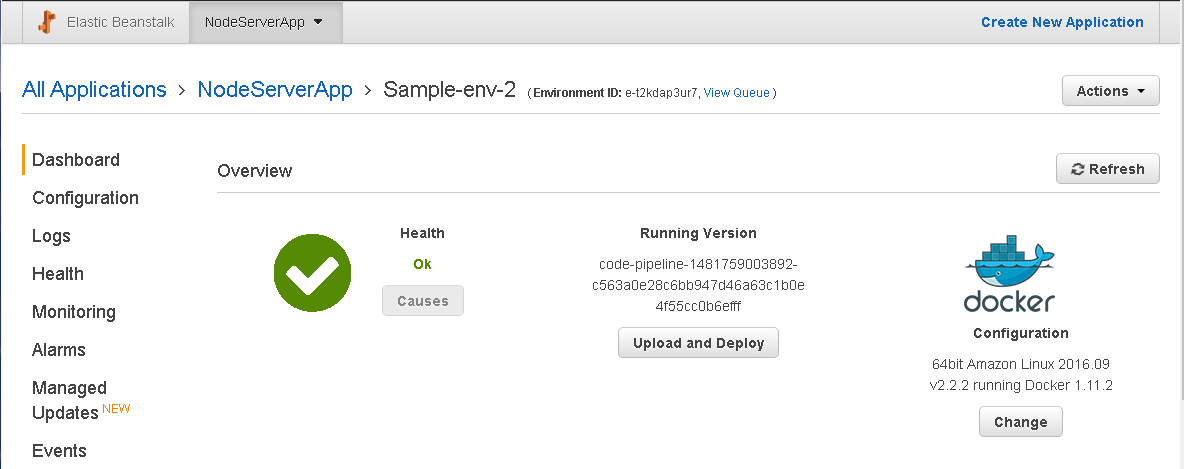
Figure 17. Environment Detail
The Events listed indicate that a Docker container is running and a EC2 instance has been provisioned, as shown in Figure 18.
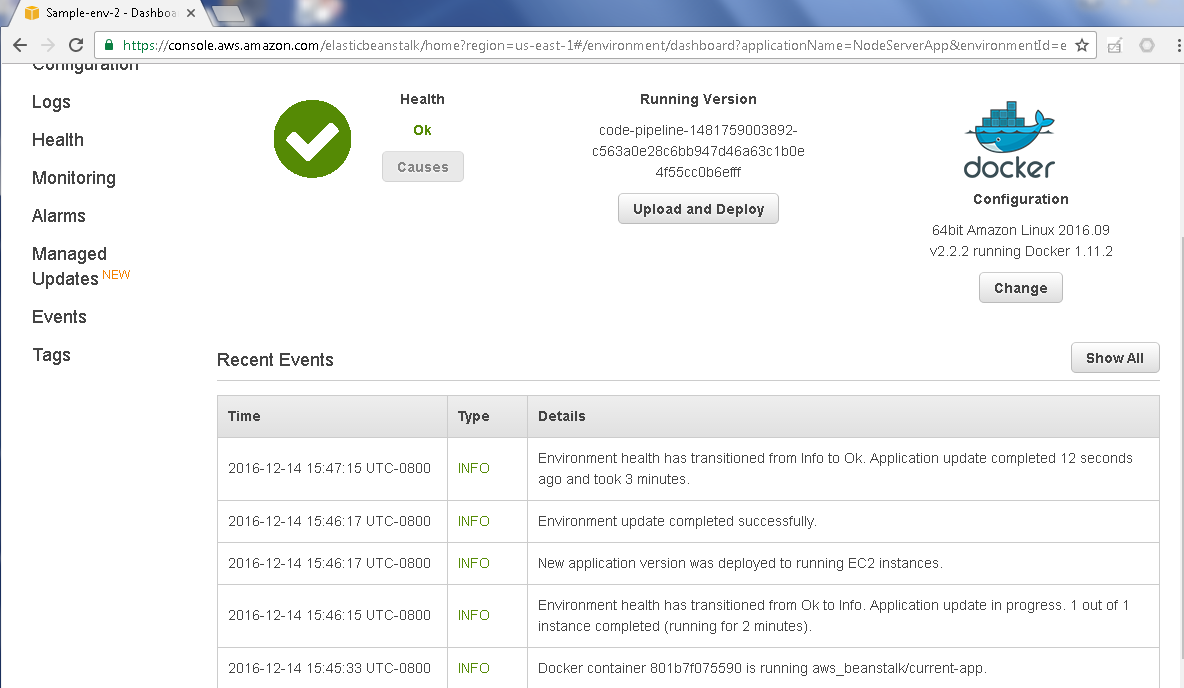
Figure 18. Events
Creating an AWS CodePipeline
In this section we shall create an AWS CodePipeline for the Node Server example. Select Services>Developer Tools>CodePipeline and click on Get started to create a CodePipeline as shown in Figure 19.
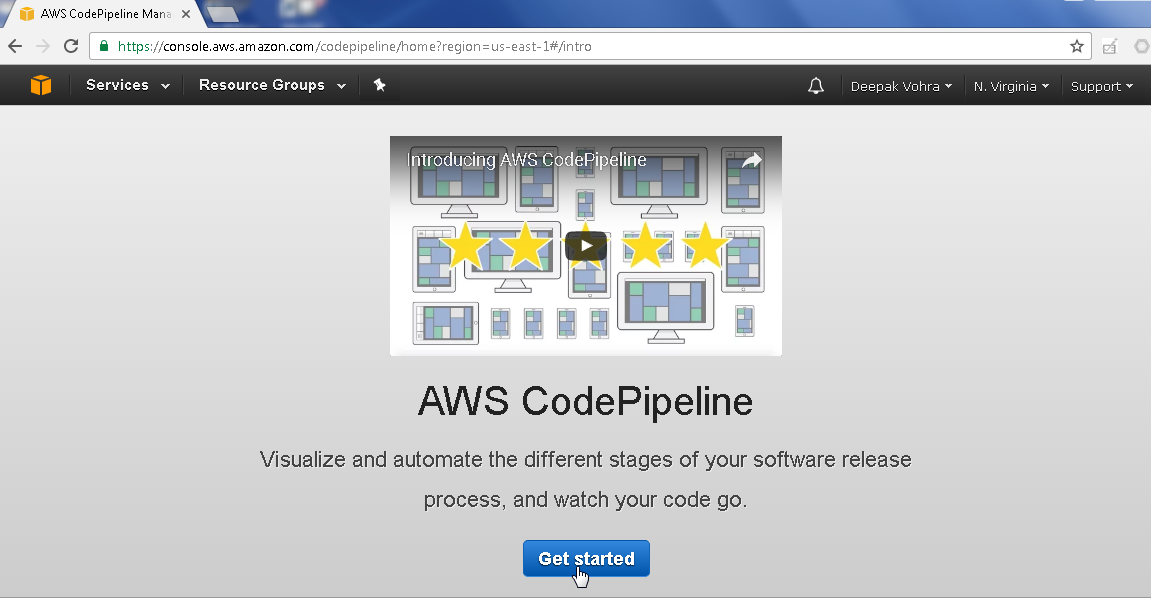
Figure 19. Getting Started with AWS CodePipeline
In the Create pipeline dialog specify a Pipeline name (NodeServerCodePipeline) and click on Next step as shown in Figure 20.
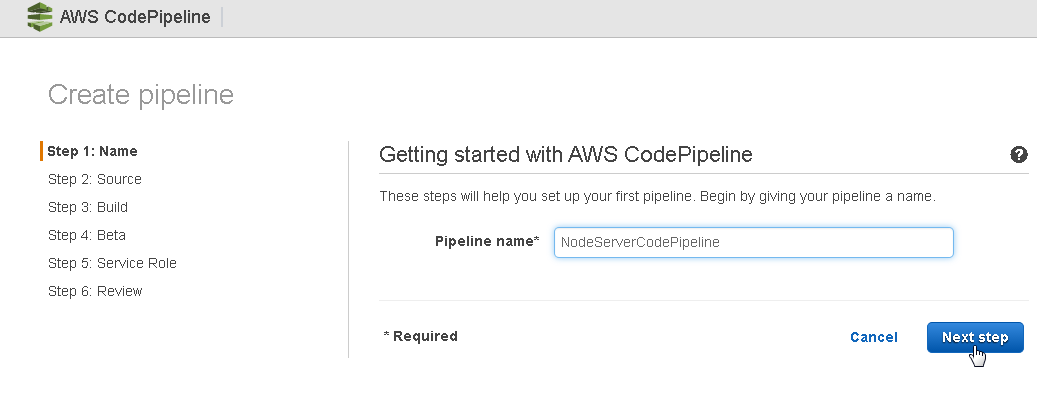
Figure 20. Create Pipeline
In Source location select Source provider as GitHub as shown in Figure 21.
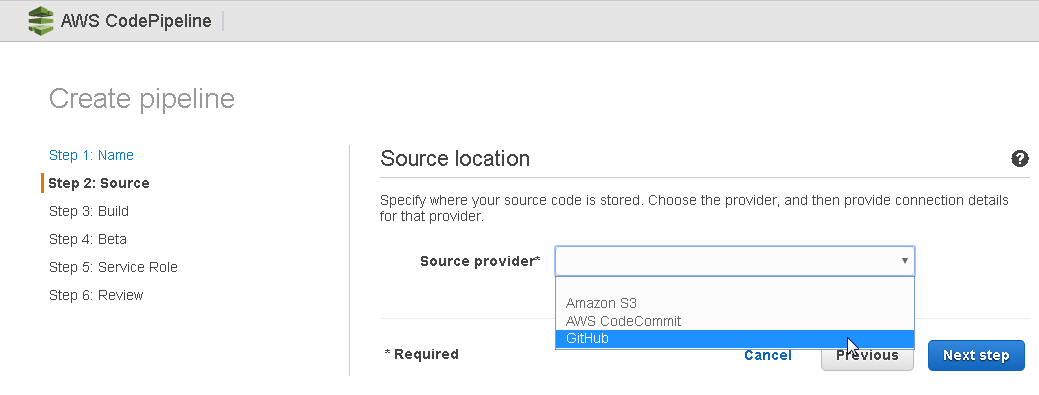
Figure 21. Selecting Source Provider as GitHub
Click on Connect to GitHub as shown in Figure 22.
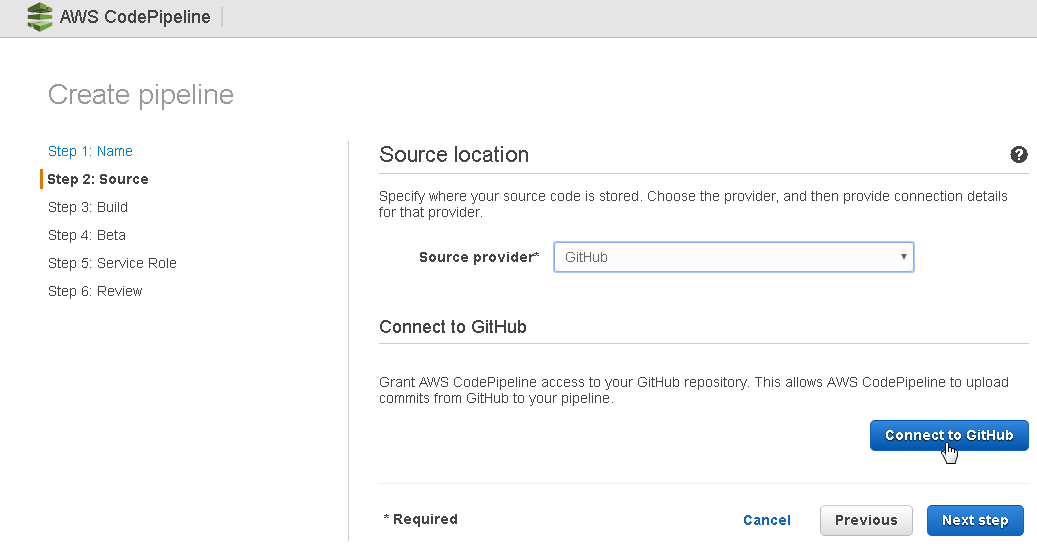
Figure 22. Connect to GitHub
Select the dvohra/docker-node-server repository in the Repository field as shown in Figure 23. The repo name would be different for different users.
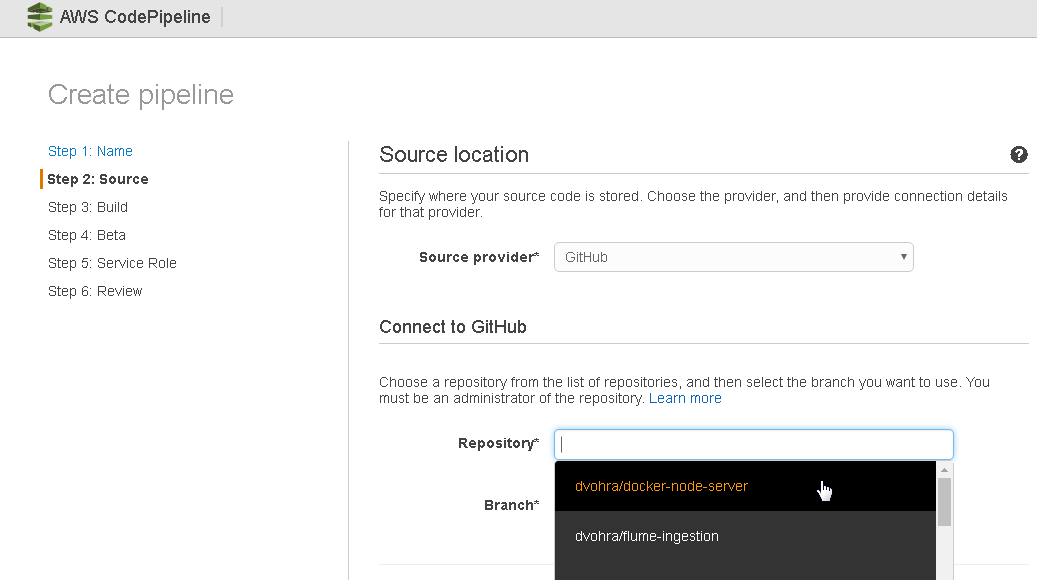
Figure 23. Selecting Repository
In the Branch field select a GitHub branch from the drop-down list as shown in Figure 24.
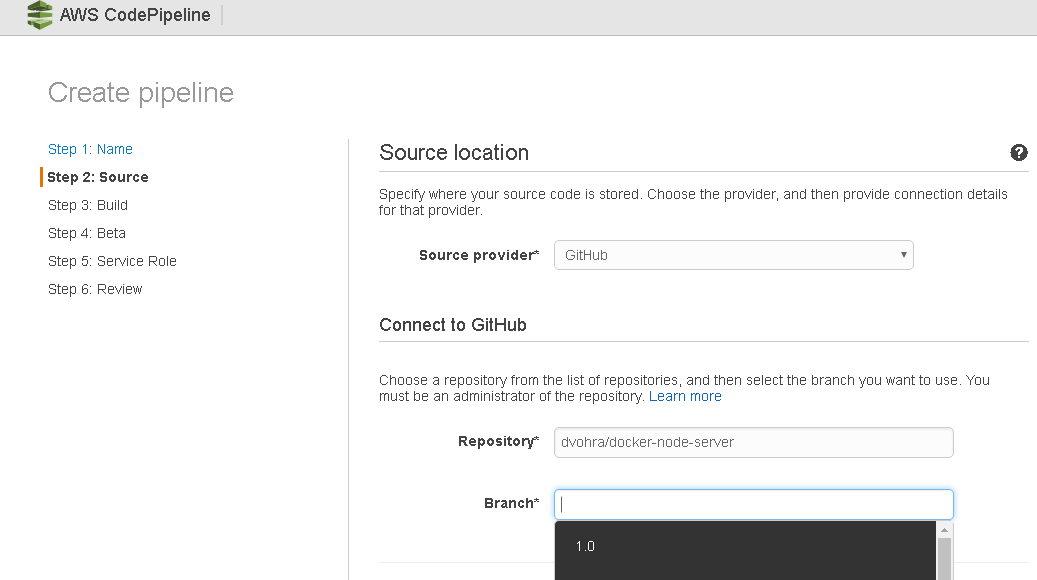
Figure 24. Selecting Repo Branch
Select the “master” branch and click on Next step as shown in Figure 25.

Figure 25. Create pipeline>Source>Next step
In Build select “No Build” and click on Next step as shown in Figure 26.
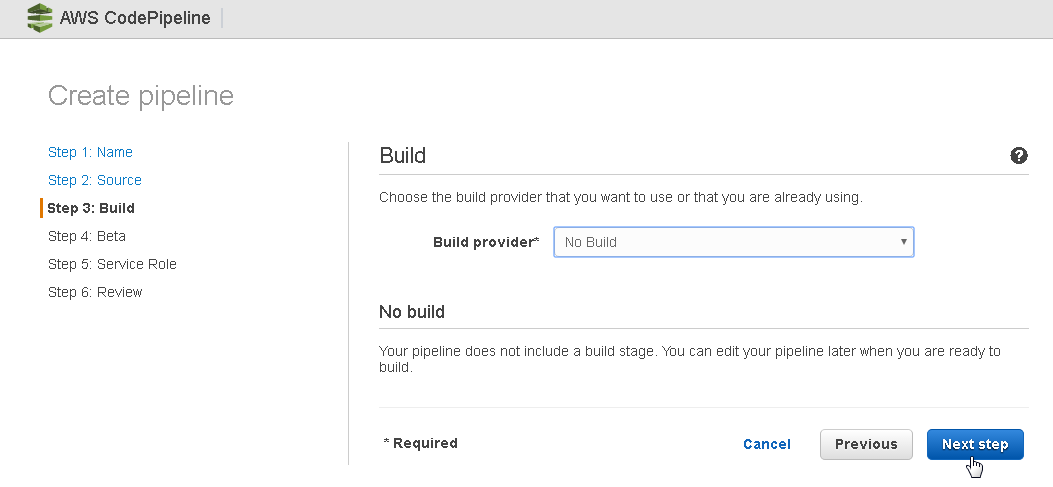
Figure 26. Selecting No Build Option
In Beta select Deployment provider as AWS Elastic Beanstalk as shown in Figure 27. The other options are No Deplyoment, AWS CloudFormation, AWS CodeDeploy and AWS OpsWorks.
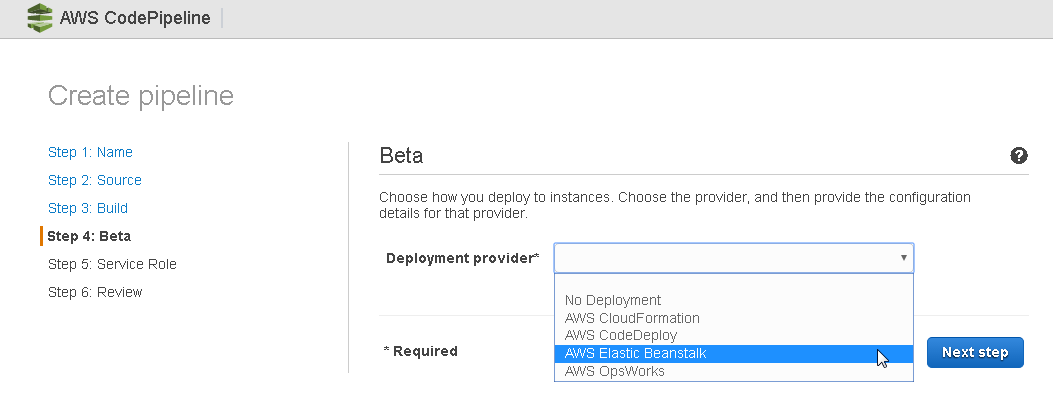
Figure 27. Selecting Deployment Provider as AWS Elastic Beanstalk
Select Application name as NodeServerApp and Environment name as Sample-env-2. Click on Next step as shown in Figure 28.
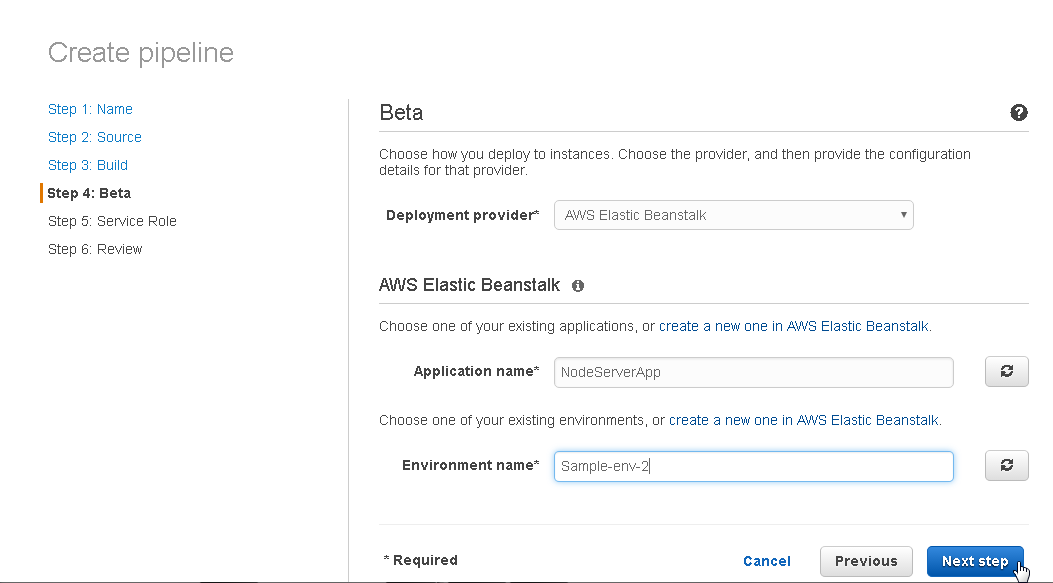
Figure 28. Create Pipeline>Beta>Next step
In Add Service Role click on Create role to create a new service role, as shown in Figure 29.
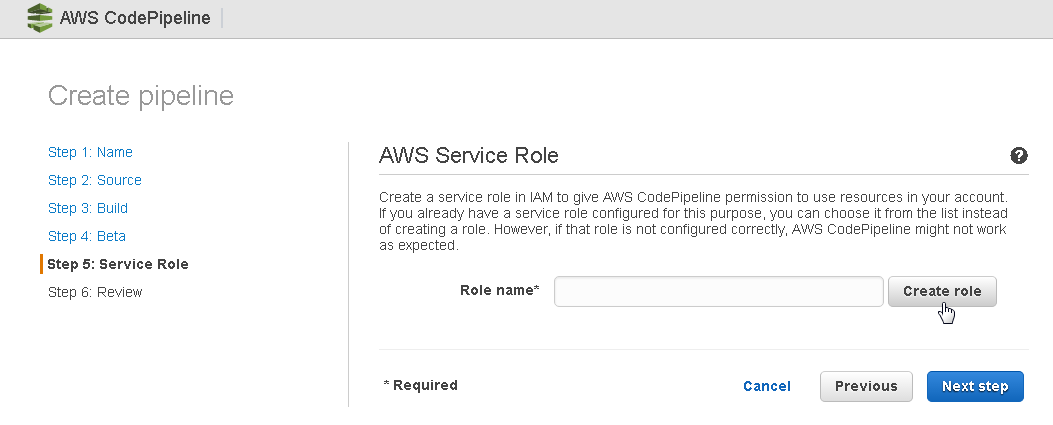
Figure 29. AWS Service Role
The IAM service gets connected to. Select IAM Role as AWS-CodePipeline-Service and Policy Name as Create a new Role Policy as shown in Figure 30. Click on Allow.
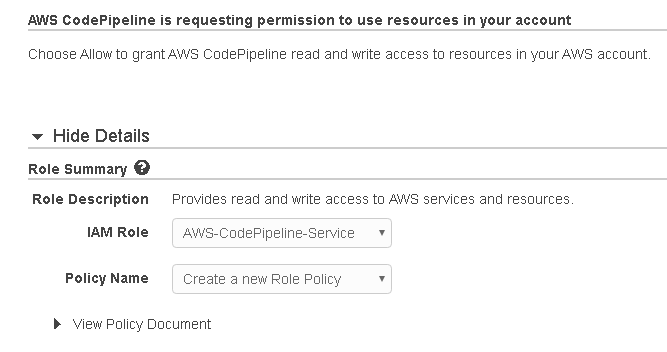
Figure 30. Role Summary
The new service role gets created and selected as shown in Figure 31. Click on Next step.
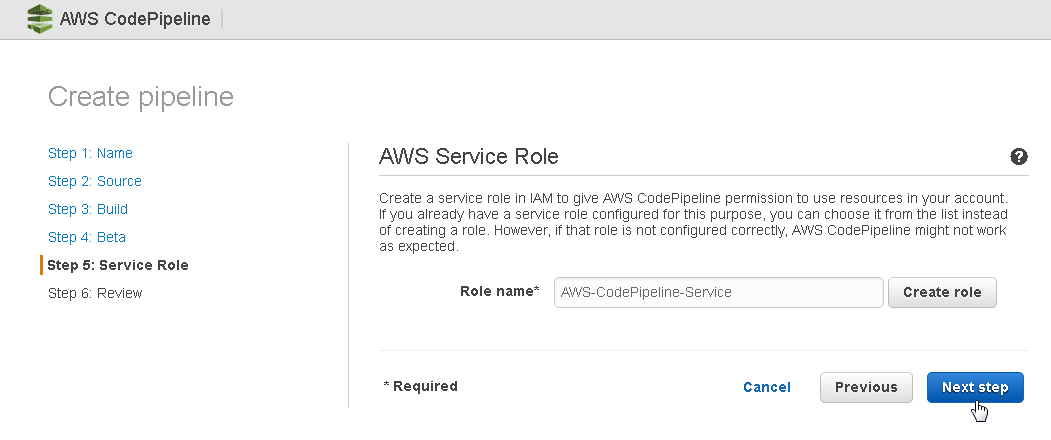
Figure 31. New Service Role
The Review lists the summary of the pipeline. Scroll down for Pipeline settings including the Artifact location on S3. Click on Create Pipeline as shown in Figure 32.
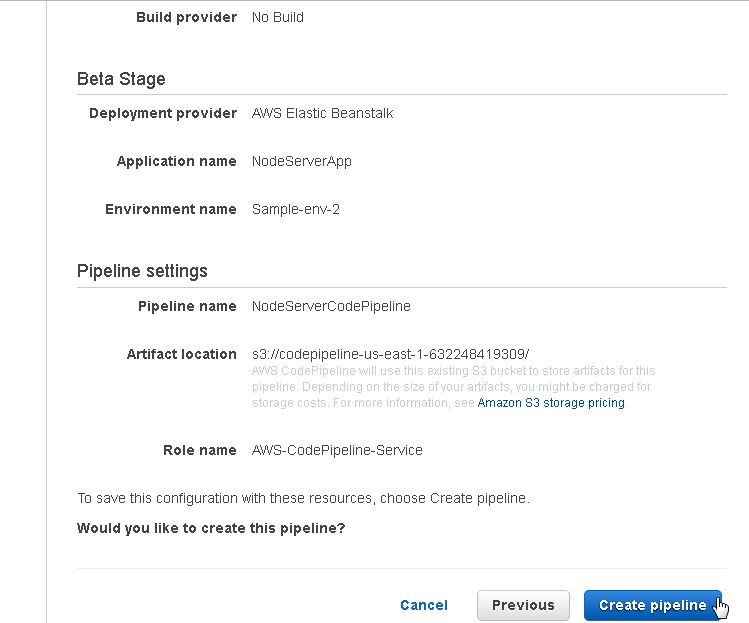
Figure 32. Create Pipeline
The NodeServerCodePipeline gets created as shown in Figure 33.

Figure 33. New Pipeline
Running a CodePipeline
In this section we shall run the CodePipeline. After a CodePipeline has been created it gets started automatically. The Source stage of the NodeServerCodePipeline is shown to be “In Progress”, as shown in Figure 34. The subsequent Pipeline stages are not started till the preceding stages have completed successfully, and if a stage fails the CodePipeline fails and subsequent stages are not run.
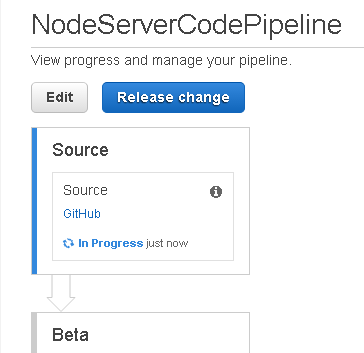
Figure 34. CodePipeline Source stage In Progress
After the Source stage has “Succeeded” the Beta stage starts and is shown to be “In Progress”, as shown in Figure 35.
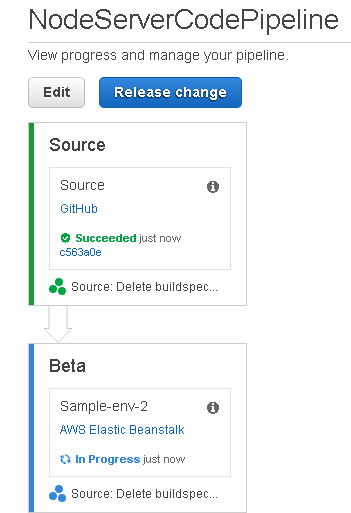
Figure 35. CodePipeline>Beta
After the Beta stage also completes it is also listed as Succeeded, as shown in Figure 36.
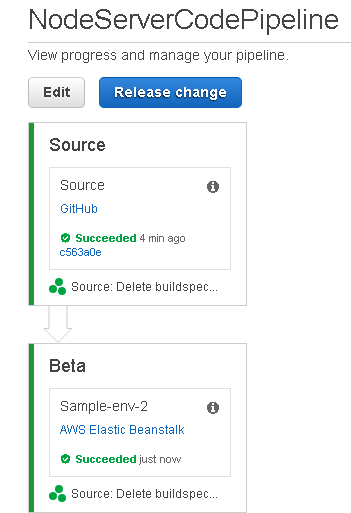
Figure 36. CodePipeline Succeeded
The CodePipeline continues to run. Each time a code change is made to the GitHub code the CodePipeline runs again.
Getting Application Logs
To get CodePipeline Logs select logs in the navigation bar in the margin. In Logs select Request Logs>Full Logs as shown in Figure 37.
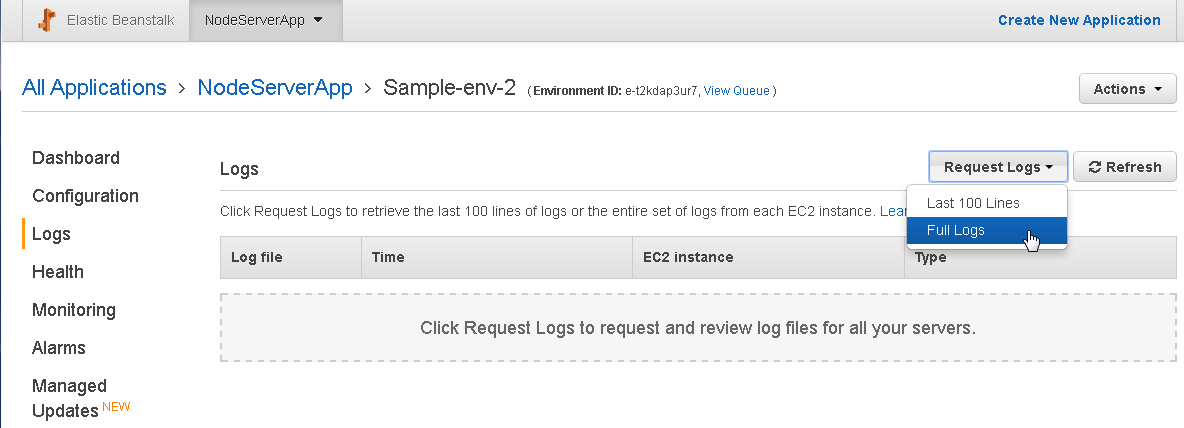
Figure 37. Full Logs
Click on the Download link to download the logs as shown in Figure 38.
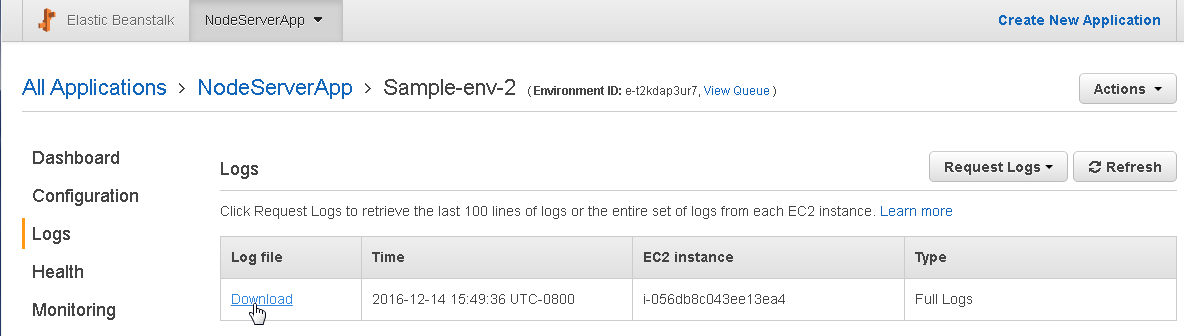
Figure 38. Download link for Full Logs
Deleting a CodePipeline
To delete a CodePipeline click on Edit as shown in Figure 39.
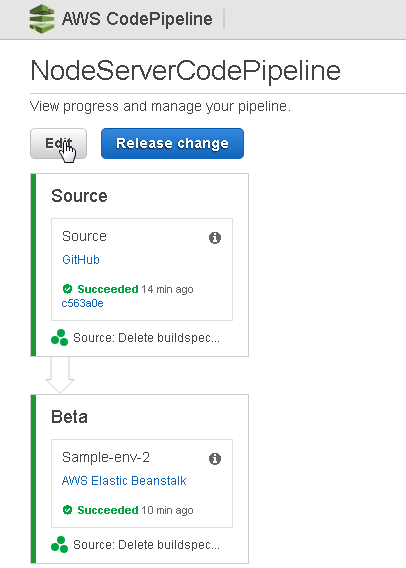
Figure 39. CodePipeline>Edit
Click on Delete as shown in Figure 40.
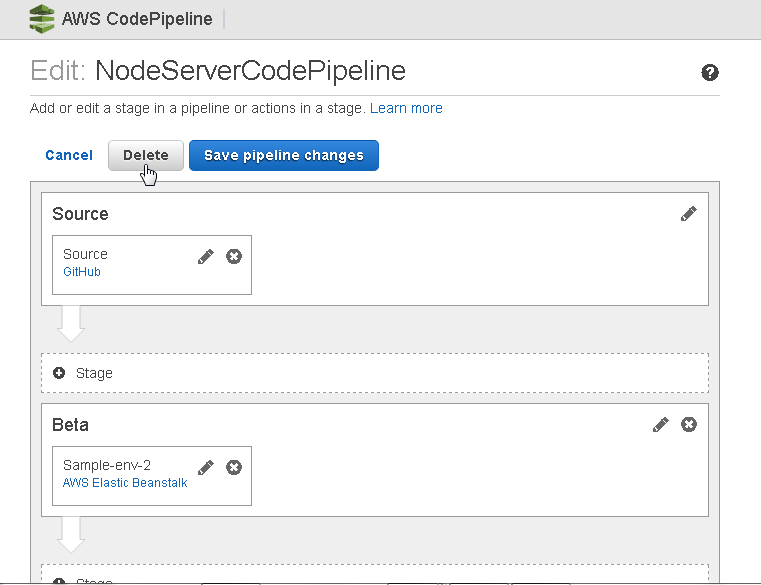
Figure 40. Delete
In the Delete Application click on Delete as shown in Figure 41.
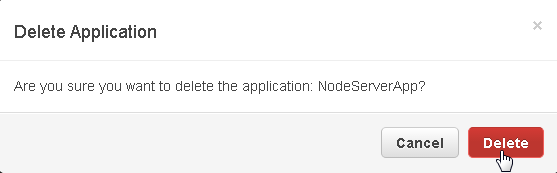
Figure 41. Delete Application
Copy and paste the pipeline name to confirm deletion as shown in Figure 42. Click on Delete to delete the pipeline.
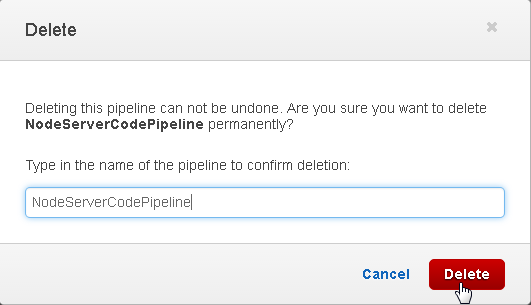
Figure 42. Confirmation dialog for Deleting an Application
To delete the Beanstalk application select Actions>Delete Application in the Elastic Beanstalk dashboard as shown in Figure 43.

Figure 43. Beanstalk>Delete Application
The Elastic Beanstalk environment begins to get terminated, as shown in Figure 44.
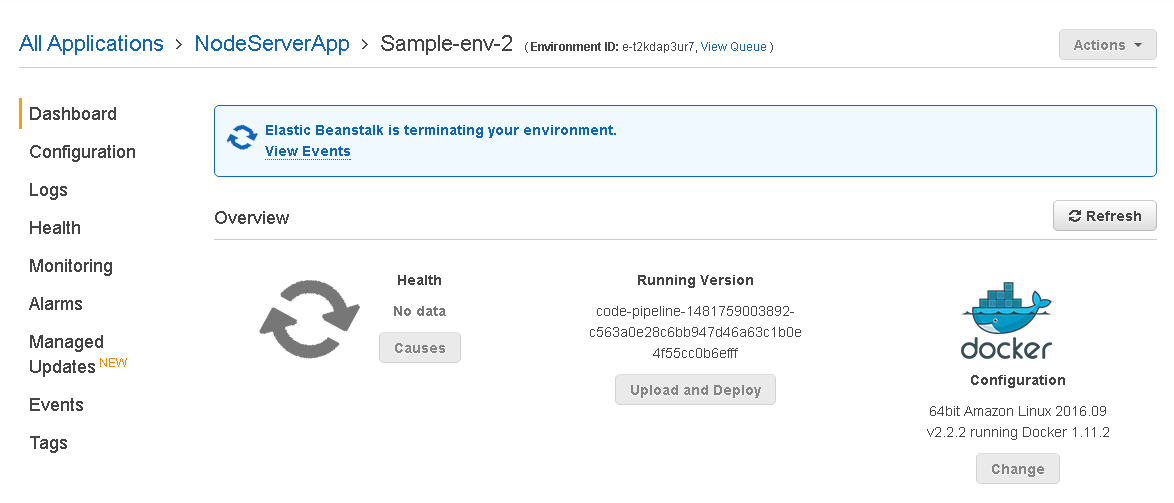
Figure 44. Beanstalk Environment terminating
After the Beanstalk environment has been terminated the Beanstalk application environment is listed as “Terminated”, as shown in Figure 45.
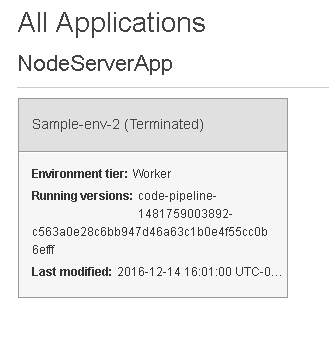
Figure 45. Beanstalk Environment Terminated
Conclusion
In this article we introduced the AWS CodePipeline. We created a No Build CodePipeline to continuously integrate source code from GitHub for a Node server application and deploy a built Docker image to Elastic Beanstalk environment. The same approach may be used to build and integrate source code for a Docker image for a database such as the Docker image for Oracle Database 12c. Automating code build reduces the development-to-deployment lead time.
Start the discussion at forums.toadworld.com