Oracle Database Cloud Service is a managed service for Oracle Database on the Oracle Cloud Platform. Being a managed service, most of its administrative tasks, including installation, network access, and backup and recovery, are managed by the Oracle Cloud Platform. The Oracle Database Cloud Service supports pluggable databases and also includes a demo PDB. Toad DevOps Toolkit requires two database instances, a source and a target. In this article, we shall create two instances of Oracle Database Cloud Service and use them with Toad DevOps Toolkit. Toad DevOps Toolkit (TDT) and its benefits are introduced in earlier articles: Toad DevOps Toolkit – An Overview, Installing and Configuring Toad DevOps Toolkit, and Getting Started with Toad DevOps Toolkit – Running the PowerShell Demos. The present article has the following sections.
- Setting the Environment
- Creating the Source Oracle Database
- Creating the Target Oracle Database
- Configuring TNSNames.ora
- Connecting to PowerShell
- Starting Toad DevOps Toolkit
- Running Install
- Running Validation Checks
- Running Compare Databases
- Running Compare Schemas
- Uninstalling the DEMO
- Deleting the Oracle Databases
Setting the Environment
The following software is required to be downloaded and installed on the local machine:
Set or modify the environment variables listed in Table 1.
Table 1. Environment Variables to Set or Modify
|
Environment Variable |
Description |
Value |
|
ORACLE_HOME |
The directory in which Oracle Database client software is installed. |
C:\oraclexe\app\oracle\product\11.2.0\server |
|
TNS_ADMIN |
Specifies the SQL* Net configuration files tnsnames.ora and sqlnet.ora are located. |
C:\oraclexe\app\oracle\product\11.2.0\server\network\ADMIN |
|
PATH |
Add the directory path to the sqlplus.exe application. |
C:\oraclexe\app\oracle\product\11.2.0\server\bin |
To be able to use the Oracle Database Cloud Service, create an Oracle Cloud Services account; a free account may be created at https://cloud.oracle.com/tryit.
Creating the Source Oracle Database
Log in to the Oracle Cloud Services account URL (https://myservices.us.oraclecloud.com/mycloud/cloudportal/dashboard), which is sent to a user after registering for a new account. Click on Create Instance as shown in Figure 1.
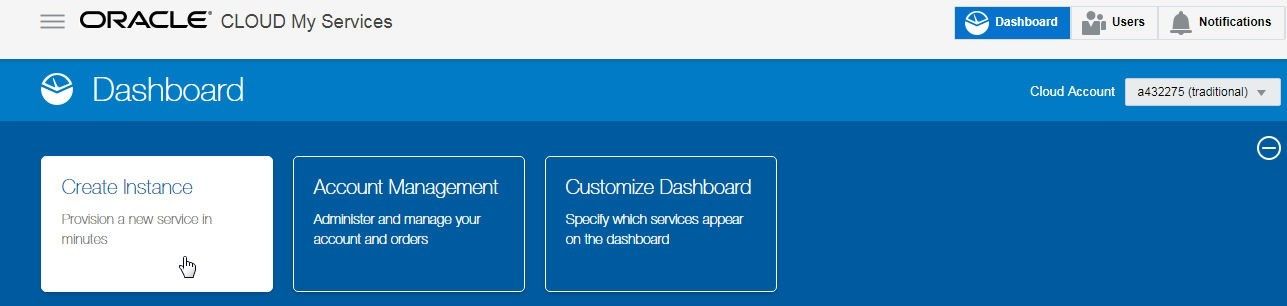
Figure 1. Create Instance
In the Create Instance dialog select the All services tab and click on Create for Database service as shown in Figure 2.
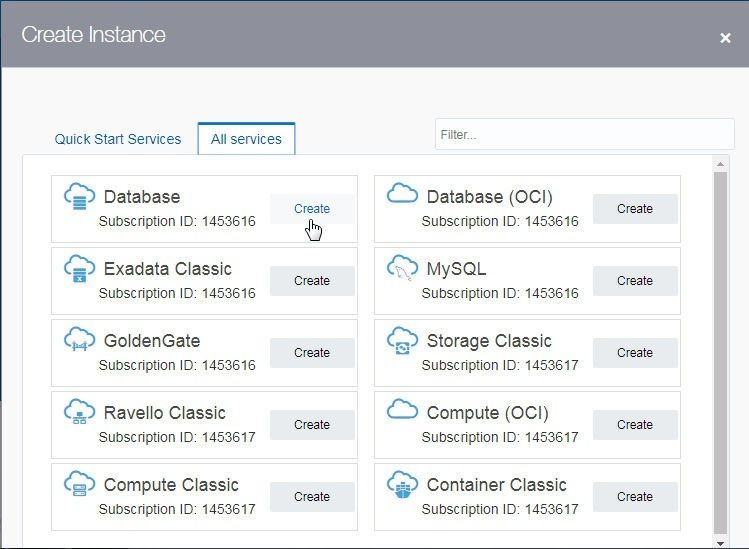
Figure 2. All services>Database>Create
In the Oracle Database Cloud Service>Services page click on Create Service as shown in Figure 3 to start the wizard to create a new service.
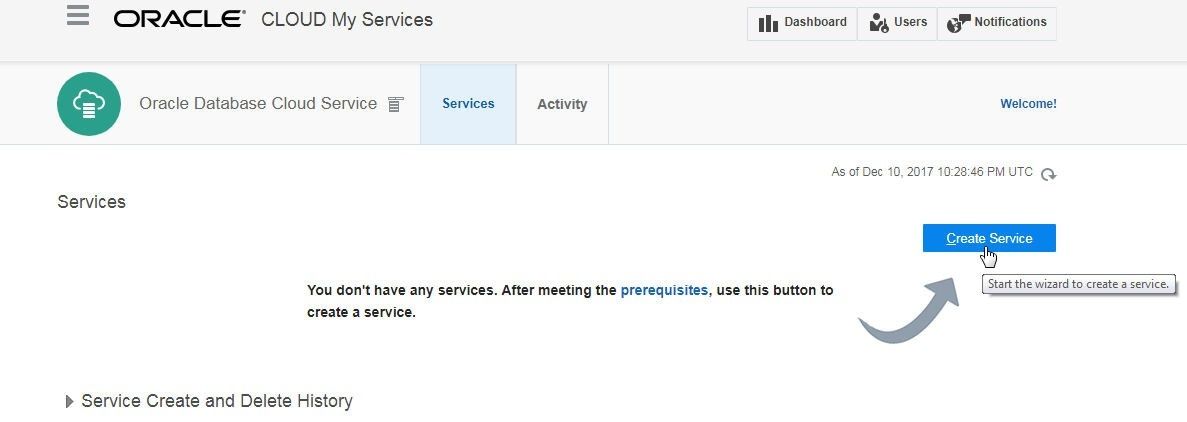
Figure 3. Services>Create Service
On the Service page provide basic service instance information as shown in Figure 4. The required fields are indicated with an asterisk. Specify a Service Name (ORCL) and select the default settings for the other fields if suitable, and click on Next. The different options for each of the required fields, other than the Service Name, may be selected from a dropdown for each of the fields. All the listed Software Releases are supported by Toad DevOps Toolkit. Oracle Database 12c Release 1 is shown as selected in Figure 4.
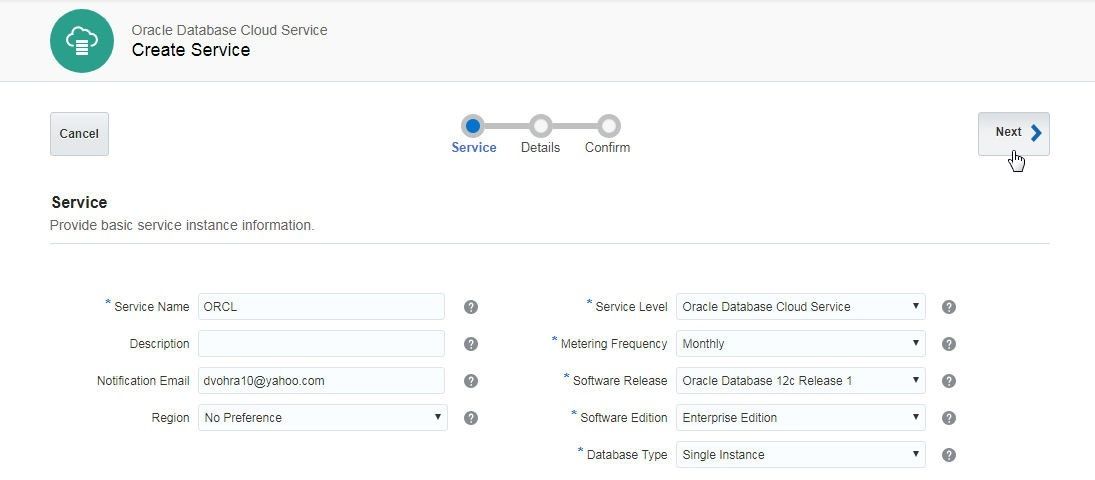
Figure 4. Service dialog to provide basic service information
In Service Details provide details about the Oracle Database Cloud Service instance, as shown in Figure 5. Some of the fields have default values. DB Name gets set to the same value as the Service Name in Figure 4 by default and PDB Name gets set to PDB1 by default. The Administrator password for SYS and SYSTEM schemas has requirements that may be displayed in a callout, as shown in Figure 5.
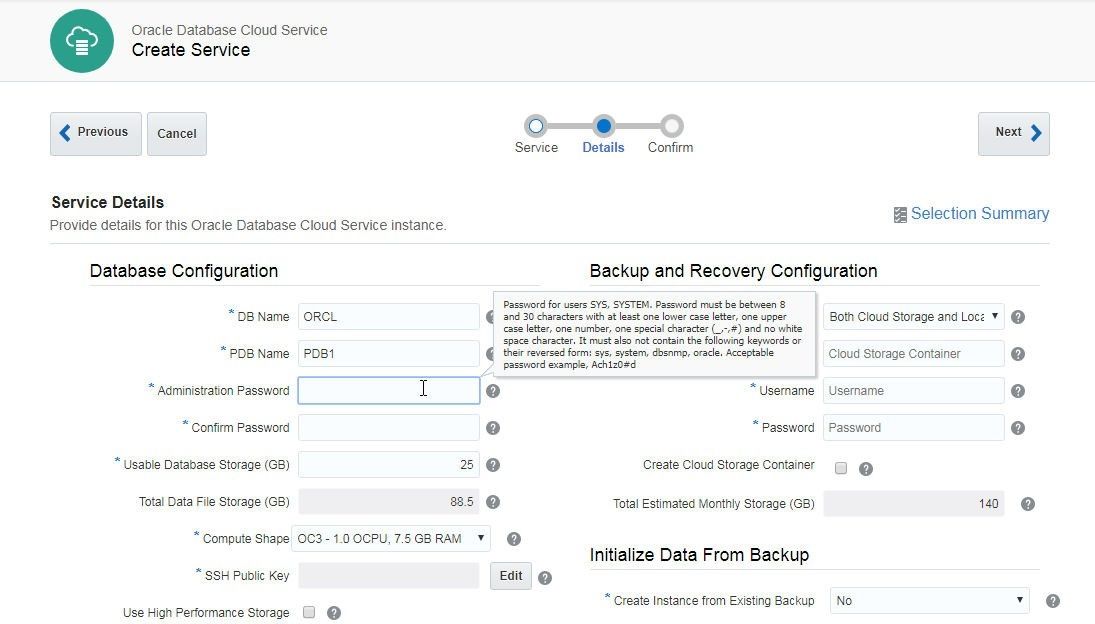
Figure 5. Service Details
An SSH Public Key must be generated to create a new Oracle Database Cloud service instance, even though the public key is not required with Toad DevOps Toolkit. Click on the Edit button as shown in Figure 6.
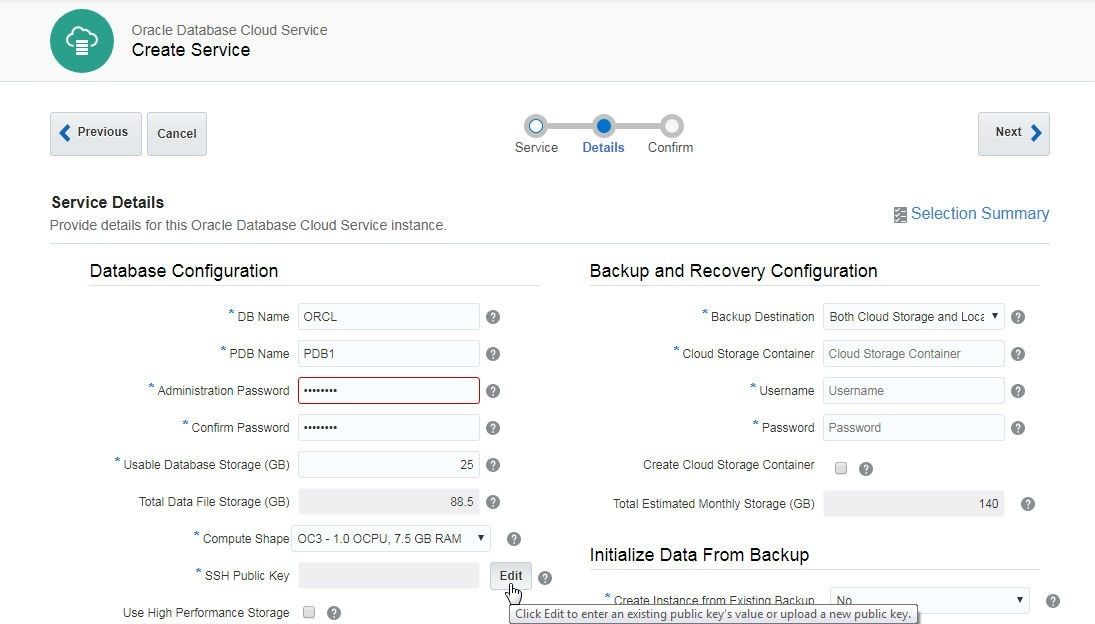
Figure 6. SSH Public Key>Edit
In the SSH Public Key for VM Access Dialog select the Create a New Key option and click on Enter as shown in Figure 7.
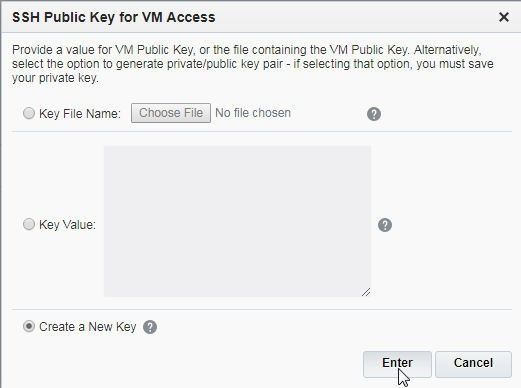
Figure 7. SSH Public Key for VM Access
A SSH Key pair gets created, as indicated the Download Keys dialog message in Figure 8. Click on Download to download the public/private key pair.
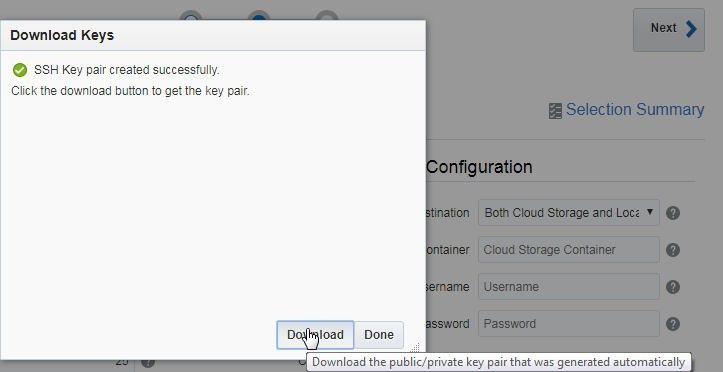
Figure 8. Download Keys
In Backup and Recovery Configuration select Backup Destination as None as shown in Figure 9. In Advanced Settings select the option to include the “Demos” PDB. All other Database Configuration and Advanced Settings may be kept to the default.

Figure 9. Database Configuration and Advanced Settings
After configuring the entire required settings click on Next, as shown in Figure 10.
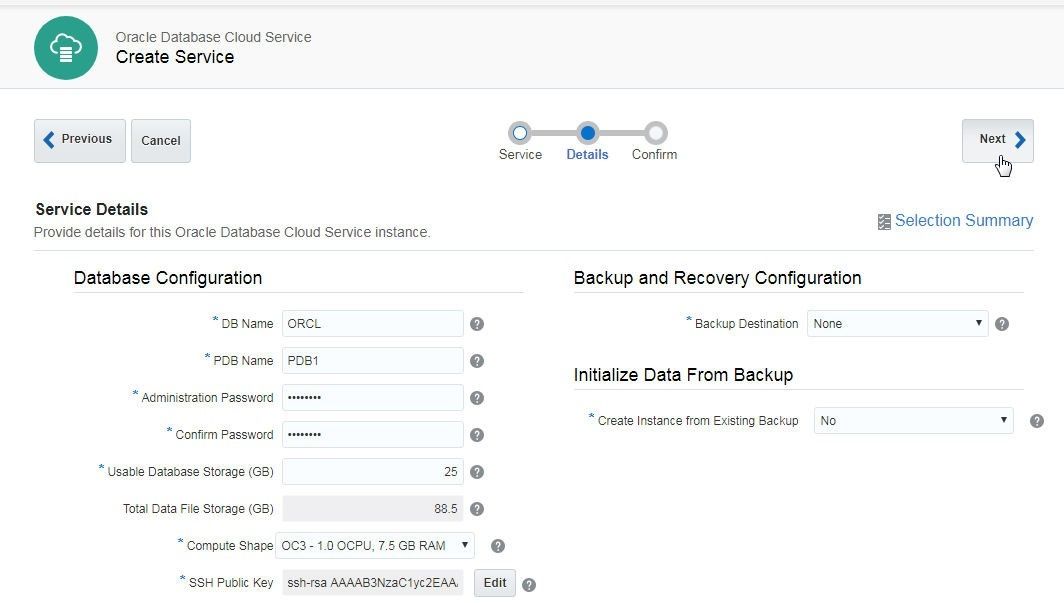
Figure 10. Service Details>Next
In Confirmation click on Create as shown in Figure 11.
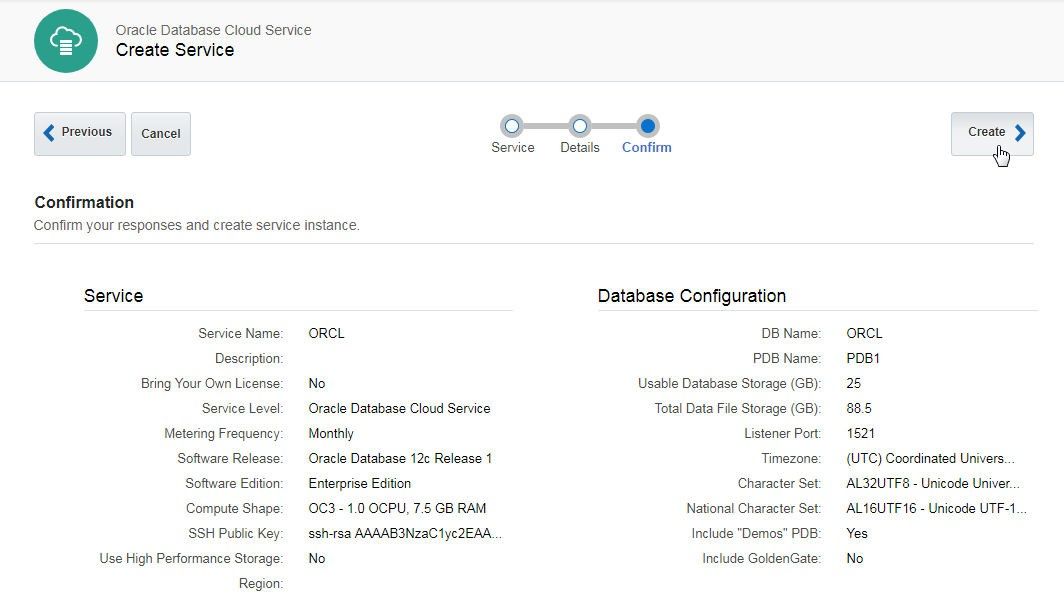
Figure 11. Confirmation>Create
A new Oracle Database cloud service starts to get created, as shown in Figure 12. Click on Refresh this page as shown in Figure 12 to refresh the service status. If a notification email is provided when creating the service (Figure 4) a message is sent to the user when the service has been completed.
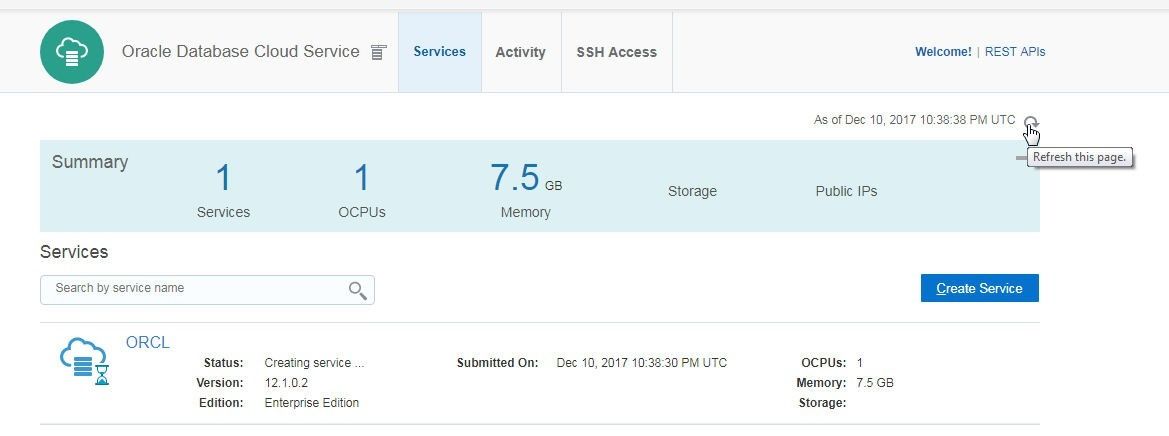
Figure 12. A new service starts to get created
Creating the Target Oracle Database
Start to create the target Oracle Database service instance even before the source database instance has been created completely. Click on Create Service as shown in Figure 13 to start the wizard to create another database service.
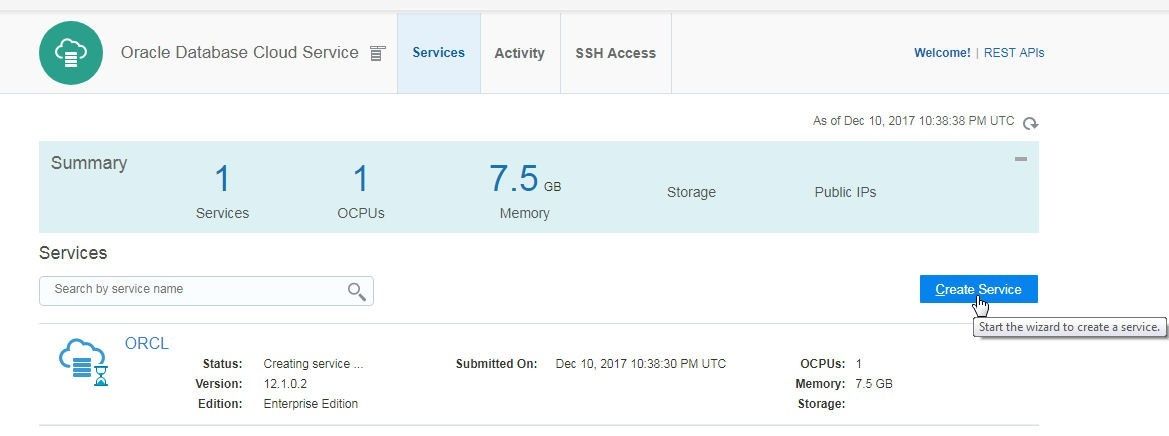
Figure 13. Create Service
For the Target database a Service Name (ORCLDB) different than that of the first service is required. A different Software Edition may be selected, as shown in Figure 14, in which Oracle Database 12c Release 2 is selected. Subsequently click on Next.

Figure 14. Specifying Service Name and selecting Software Edition
In the Service Details page the DB Name (ORCLDB) is the same as the Service Name, as shown in Figure 15. The PDB Name is PDB1, the same as for the first service, but a different PDB Name is not required because it is not used in the connect descriptor to connect to the service. Click on Edit for SSH Public Key to create and download a public/private key pair, as discussed for the first service. Select Backup Destination as None, also as we did for the first service. Click on Next, as shown in Figure 15.
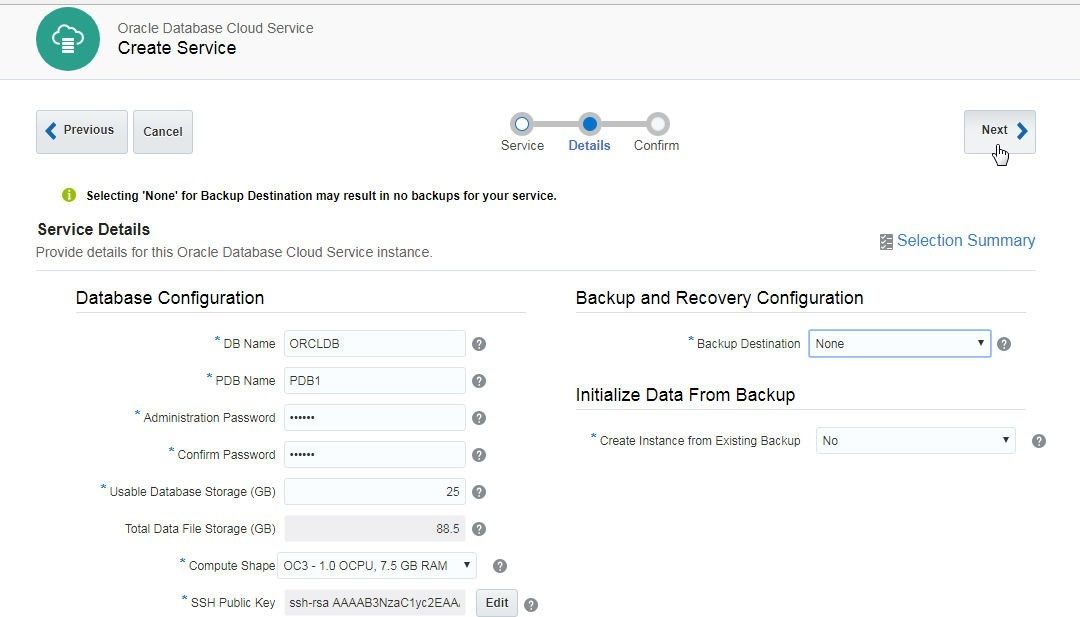
Figure 15. Service Details>Next
Click on Create in the Summary page as shown in Figure 16.
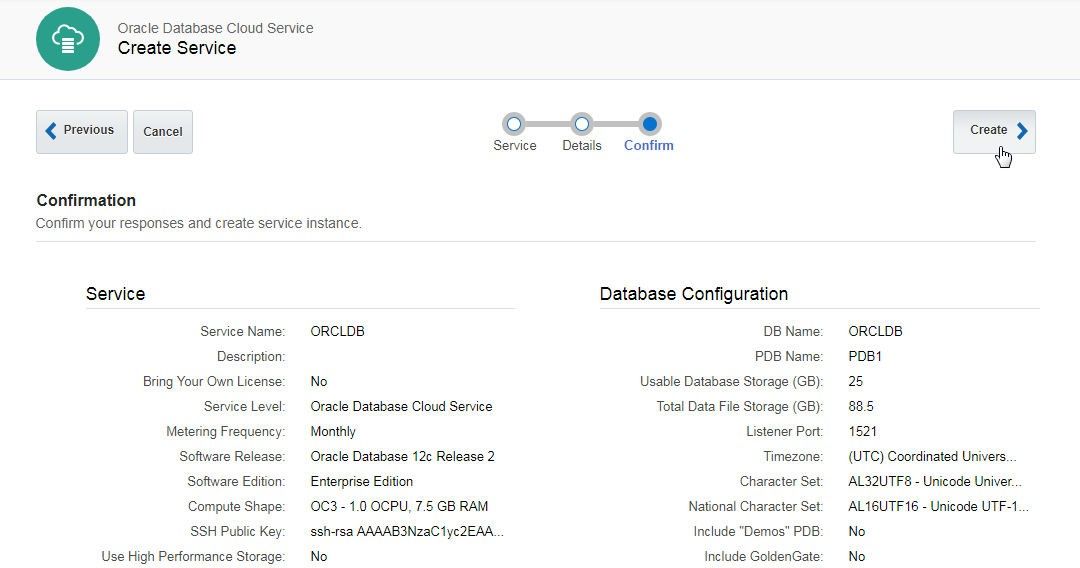
Figure 16. Summary>Create
Figure 17 shows that both the Source and Target Oracle Database cloud services are being created.
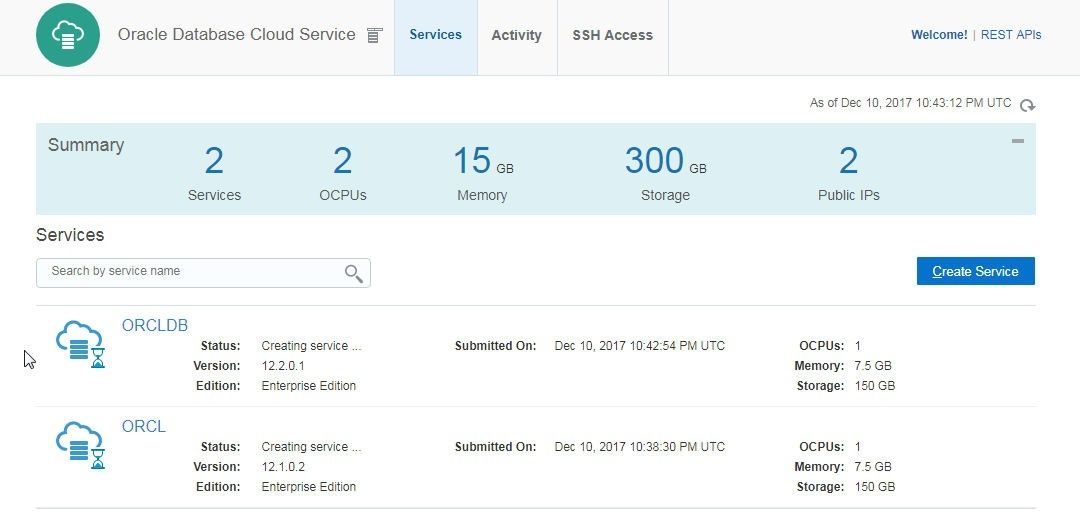
Figure 17. Creating Source and Target Oracle Database Cloud Services
Both the Source and Target Oracle Database cloud services are shown to have been created in Figure 18. A Created On timestamp gets added to service.
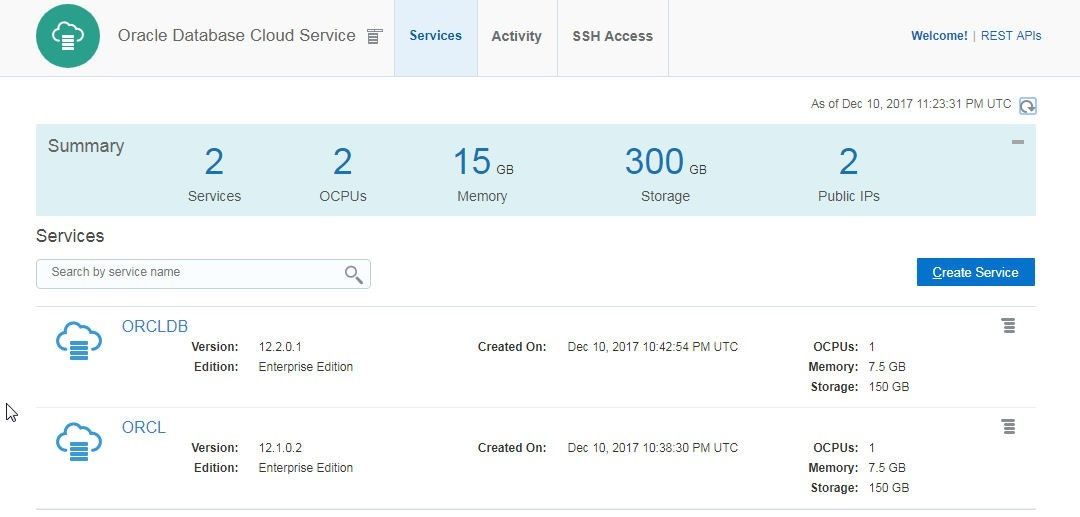
Figure 18. Oracle Database Cloud Service created
Modifying Access Rules
By default, a new Oracle Database cloud service cannot be accessed on the public internet, including by Toad DevOps Toolkit on a local or public machine. To enable public internet access for an Oracle Database Cloud service, click on the icon to manage the service and select Access Rules, as shown in Figure 19, for the ORCL service.
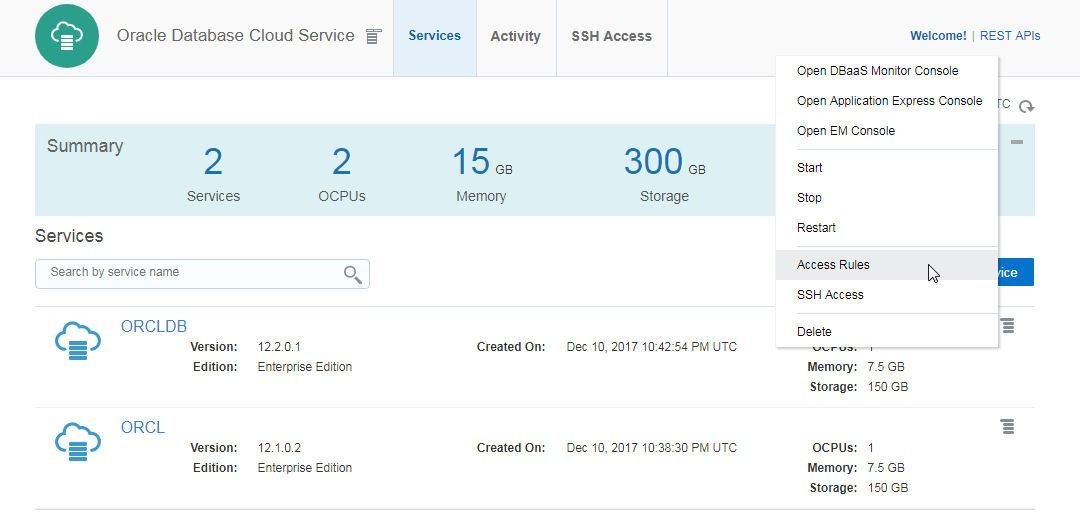
Figure 19. ORCL>Access Rules
In Access Rules click on the icon to manage the ora_p2_dblistener access rule and select Enable as shown in Figure 20.
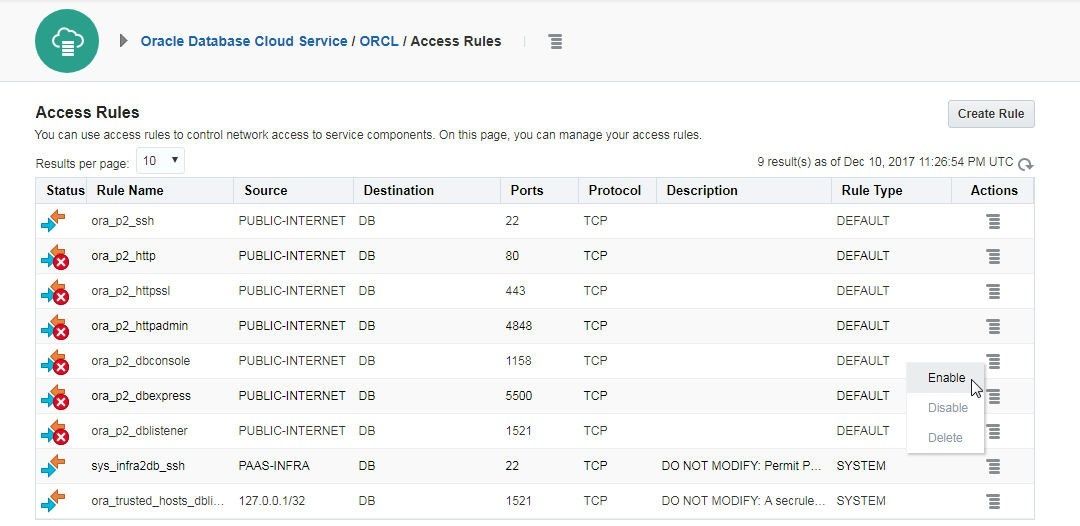
Figure 20. ORCL>Access Rules> ora_p2_dblistener>Enable
In Enable Access Rule dialog click on Enable as shown in Figure 21.
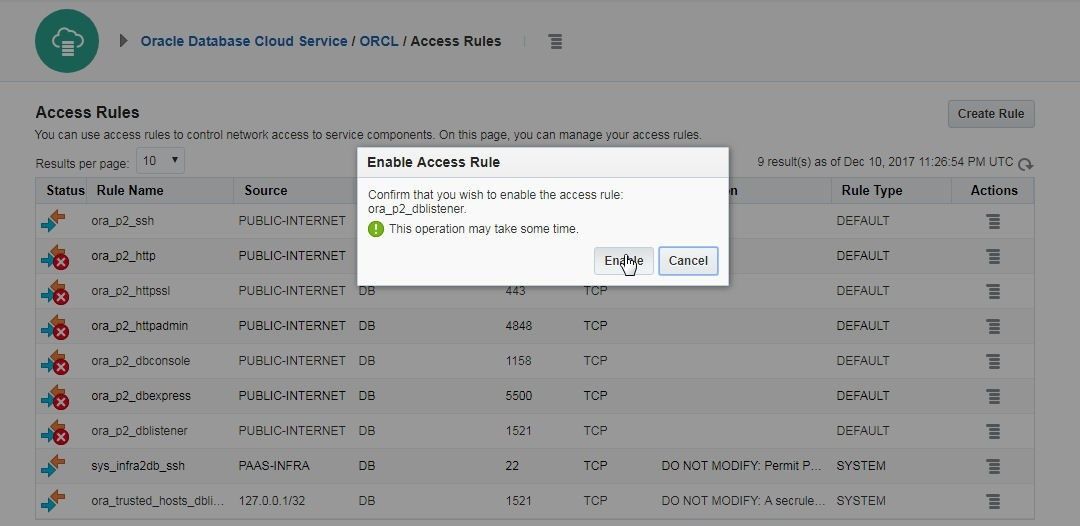
Figure 21. Enable Access Rules>Enable
The ora_p2_dblistener access rule gets enabled, as shown in Figure 22.
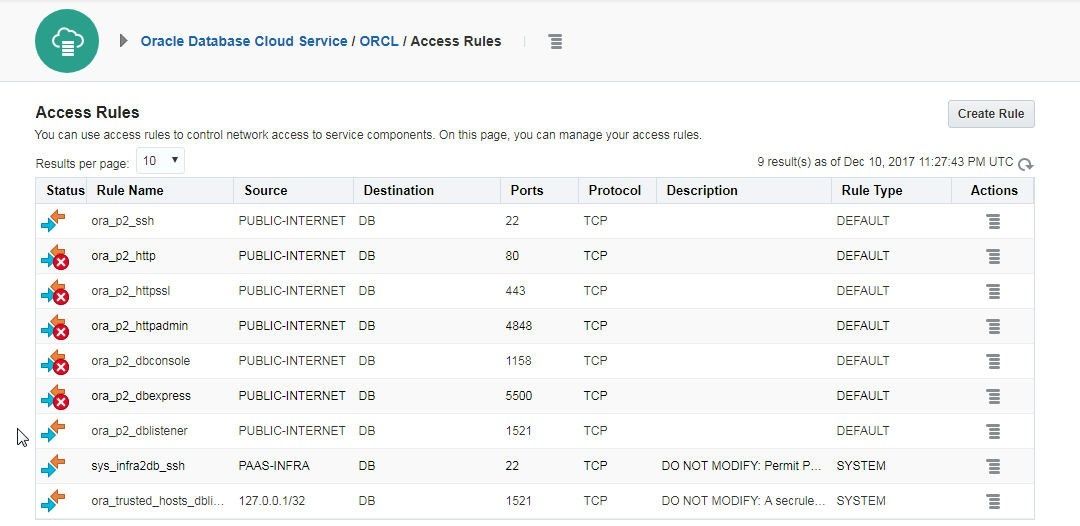
Figure 22. ORCL>Access Rules> ora_p2_dblistener>Enabled
Similarly, enable the ora_p2_dblistener access rule for the ORCLDB service, as shown in Figure 23.
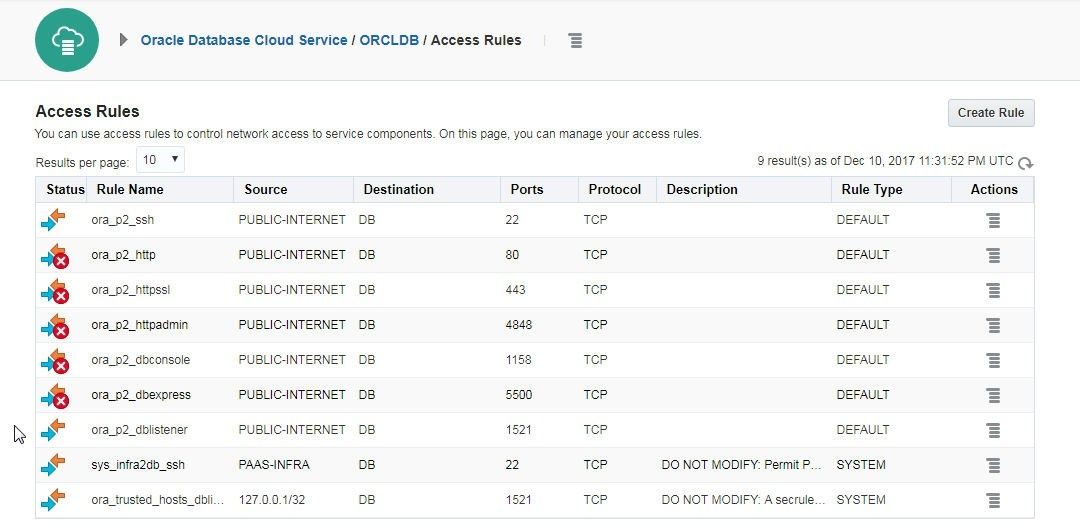
Figure 23. ORCLDB>Access Rules> ora_p2_dblistener>Enabled
Configuring TNSNames.ora
How is Toad DevOps Toolkit on a local machine able to connect with an Oracle Database Cloud service on the Oracle Cloud Platform? Earlier, we configured environment variables TNS_ADMIN and ORACLE_HOME and also added the directory path to thesqlplus.exeapplication to the PATH environment variable. From the PATH environment variable, Toad DevOps Toolkit finds the SQL*Plus application to start. From the TNS_ADMIN, Toad DevOps Toolkit finds the tnsnames.ora configuration file in which the connect descriptors are listed. A tnsnames.ora file specifies a mapping of the net service names to connect descriptors in the following syntax.
SVC1 =
  (DESCRIPTION =
    (ADDRESS = (PROTOCOL=TCP)(HOST=<Public IP>)(PORT=1521))
    (CONNECT_DATA=
      (SERVICE_NAME=<Service Name>)
    )
  )

SVC2 =
  (DESCRIPTION =
    (ADDRESS = (PROTOCOL = TCP)(HOST=<Public IP>)(PORT = 1521))
    (CONNECT_DATA =
      (SERVICE_NAME = <Service Name>)
    )
  )
Add two net service names mappings to the tnsnames.ora as listed in the preceding listing, which has variables defined with <>. Next, we shall add values for the variables. To obtain the service detail for ORCL service, click on the ORCL link as shown in Figure 24.
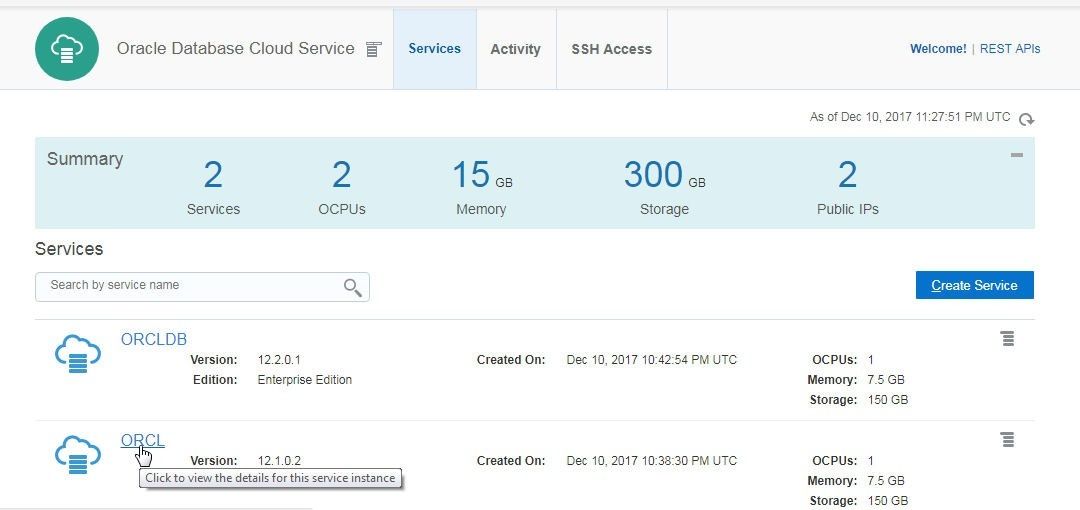
Figure 24. ORCL Service link
In the Service Overview, copy the Public IP listed in the Resources section as shown in Figure 25.
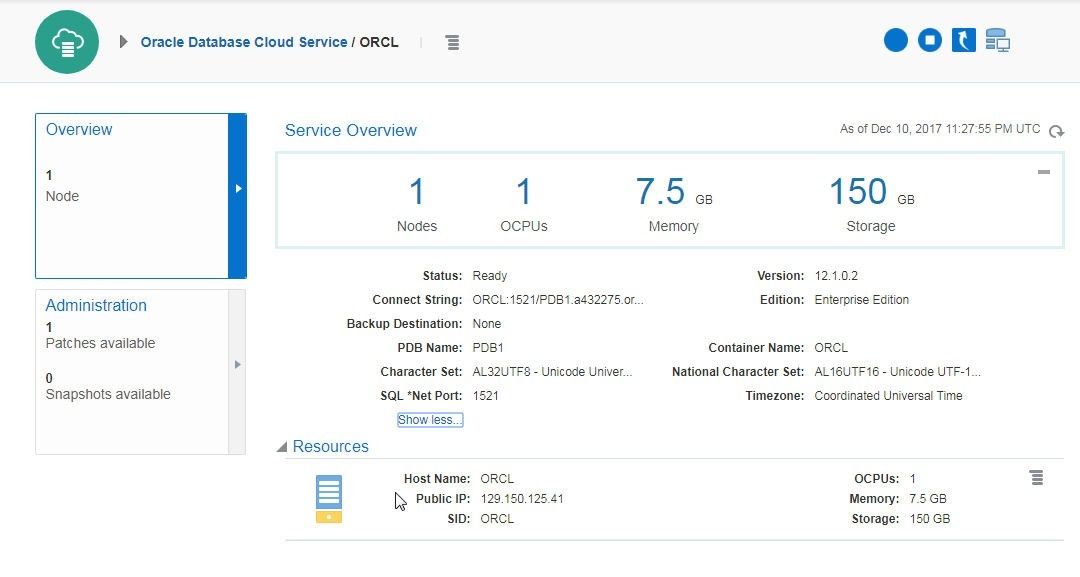
Figure 25. Obtaining the Public IP for the ORCL Service
Specify the Public IP to substitute the <Public IP> variable for the SVC1 net service name in the tnsnames.ora file. Similarly, click on the ORCLDB service link as shown in Figure 26.
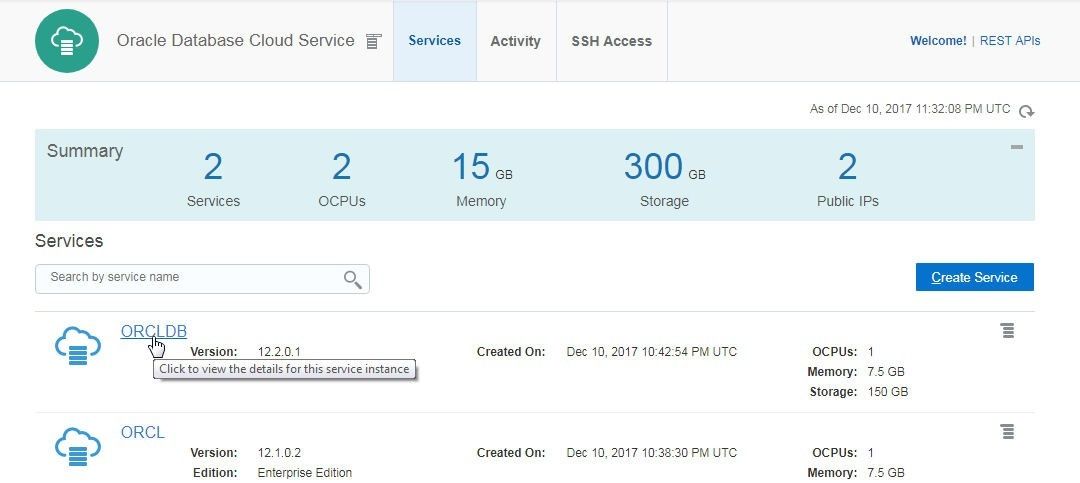
Figure 26. ORCLB Service link
Copy the Public IP from the Resources section as shown in Figure 27.
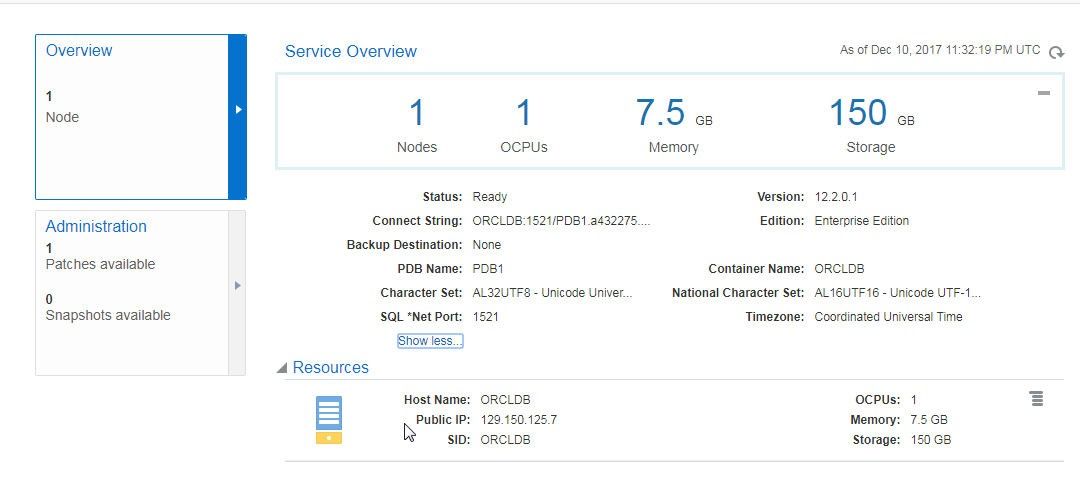
Figure 27. Public IP for ORCLDB
Specify the Public IP to substitute the <Public IP> variable for the SVC2 net service name in the tnsnames.ora file. Next, we shall obtain the SERVICE_NAME for each of the two services to configure in the tnsnames.ora file.
For the ORCL service select the Connect String sub-string after the “/” in the Service Overview section, as shown in Figure 28.
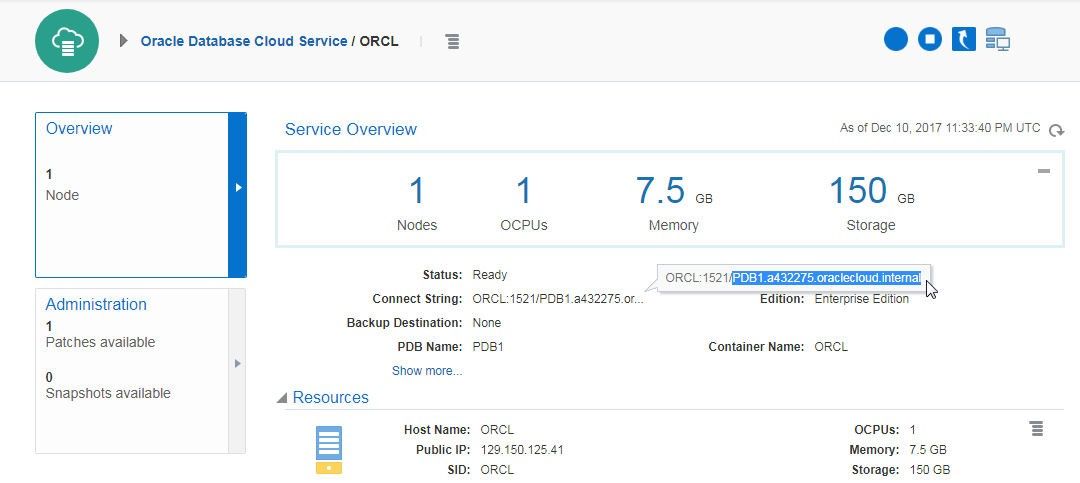
Figure 28. Selecting the Service name as a sub-string of the Connect String
Right-click and select Copy as shown in Figure 29.
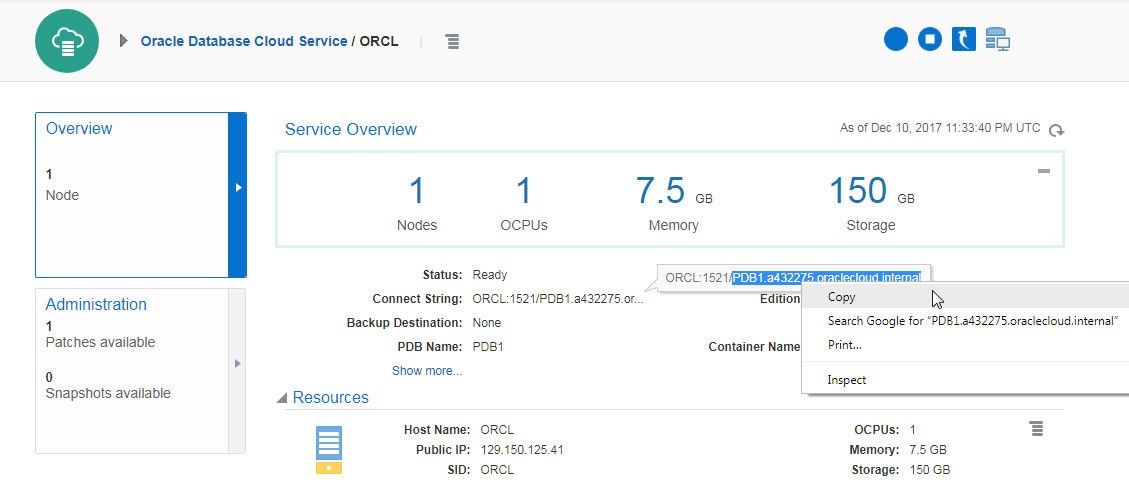
Figure 29. Copying Sub-string to be used as SERVICE_NAME for SVC1 in tnsnames.ora
Specify the sub-string as a value to the SERVICE_NAME in the CONNECT_DATA for SVC1 in tnsnames.ora. Similarly, for the ORCLDB service select the Connect String sub-string after the “/” in the Service Overview section for the ORCLDB service as shown in Figure 30.
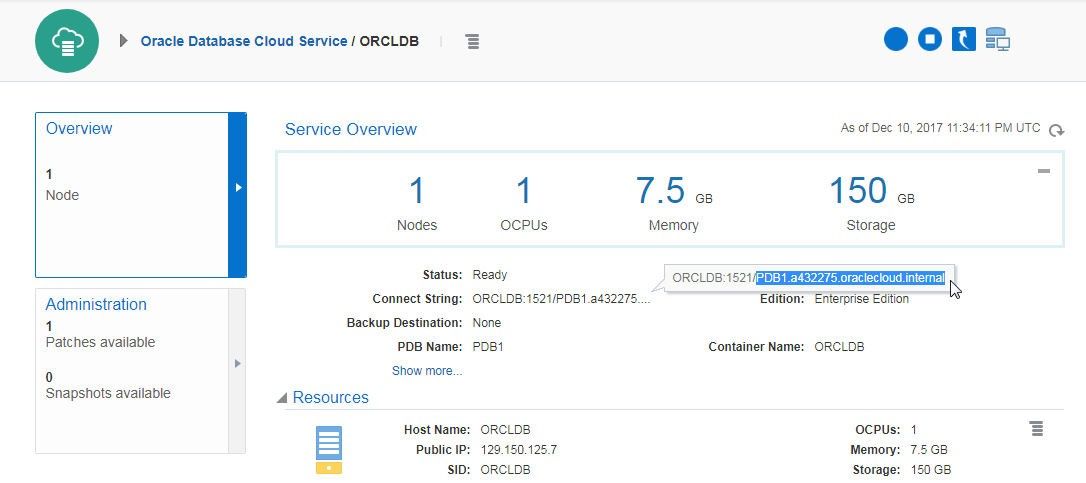
Figure 30. Obtaining Sub-string to be used as SERVICE_NAME for SVC2 in tnsnames.ora
Add the following net service names configuration for two services SVC1 and SVC2 to thetnsnames.ora file.
SVC1 =
  (DESCRIPTION =
    (ADDRESS = (PROTOCOL=TCP)(HOST=129.150.125.41)(PORT=1521))
    (CONNECT_DATA=
      (SERVICE_NAME=PDB1.a432275.oraclecloud.internal)
    )
  )

SVC2 =
  (DESCRIPTION =
    (ADDRESS = (PROTOCOL = TCP)(HOST=129.150.125.7)(PORT = 1521))
    (CONNECT_DATA =
      (SERVICE_NAME = PDB1.a432275.oraclecloud.internal)
    )
  )
Starting Windows PowerShell
To start Power Shell right-click on the application icon and select Run as administrator as shown in Figure 31.
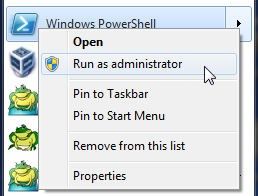
Figure 31. Windows PowerShell>Run as administrator
Windows PowerShell gets started, as shown in Figure 32.

Figure 32. Windows PowerShell
Starting Toad DevOps Toolkit
To start Toad DevOps Toolkit create an instance of Toad.ToadAutoObject.
$TDT = New-Object -ComObject Toad.ToadAutoObject
The $TDT instance gets created and the command does not generate any output, as shown in Figure 33. Subsequently, the components of the instance created may be listed by invoking $TDT as shown in Figure 33.
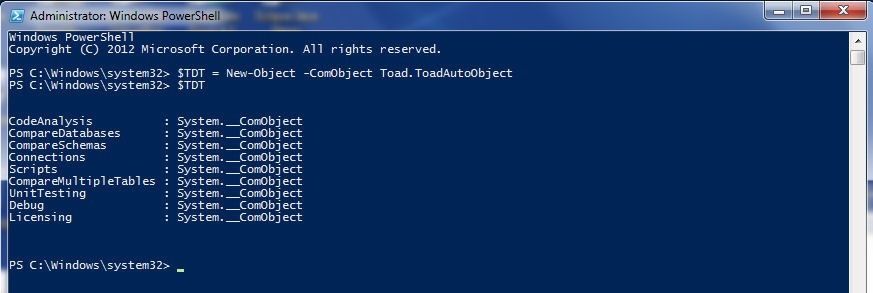
Figure 33. Creating a $TDT Object for Toad DevOps Toolkit
Running the Install Script
In this section we shall install the DEMO schema on the source and target Oracle Databases using the INSTALL script in the PowerShell examples directory C:\Program Files\Quest Software\Toad DevOps Toolkit\Toad DevOps Toolkit 1.0\examples\PowerShell. Change directory (cd) to the C:\Program Files\Quest Software\Toad DevOps Toolkit\Toad DevOps Toolkit 1.0\examples\PowerShell directory, as shown in Figure 34.
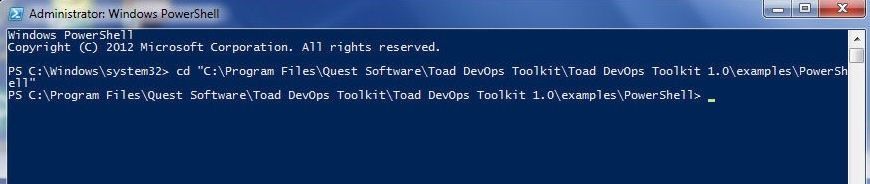
Figure 34. Setting current directory as C:\Program Files\Quest Software\Toad DevOps Toolkit\Toad DevOps Toolkit 1.0\examples\PowerShell
Run the INSTALL batch script with the./INSTALL command as shown in Figure 35. The first prompt for user input is Enter Source Database Name: .
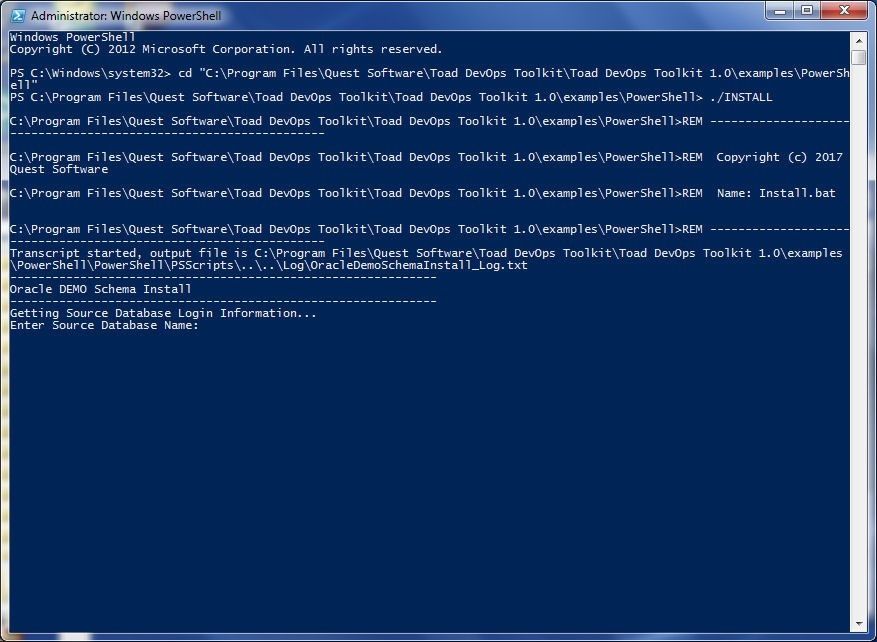
Figure 35. Running INSTALL Script
Specify Source Database Name as SVC1 as shown in Figure 36. Select Enter on the keyboard after specifying a value at each command prompt. Specify Source Database Username as SYS and also specify the password for SYS. The SYS user is used because a user with SYSDBA privileges is required. Next, the user is prompted to provide the login information for the target database with Enter Target Database Name:.
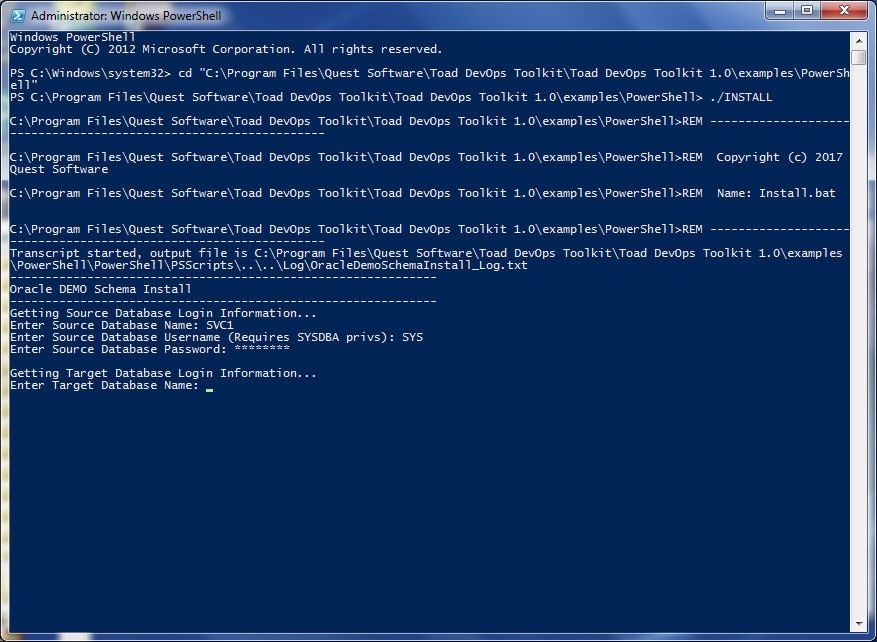
Figure 36. Enter Target Database Name
Specify the Target Database Name as SVC2 and click on Enter. Specify Username for the target database as SYS and also specify the password for the SYS user. Next, a message, DEMO schema will be created on SVC1 and SVC2. Continue [Y/N]?: is displayed. Specify Y as shown in Figure 37.
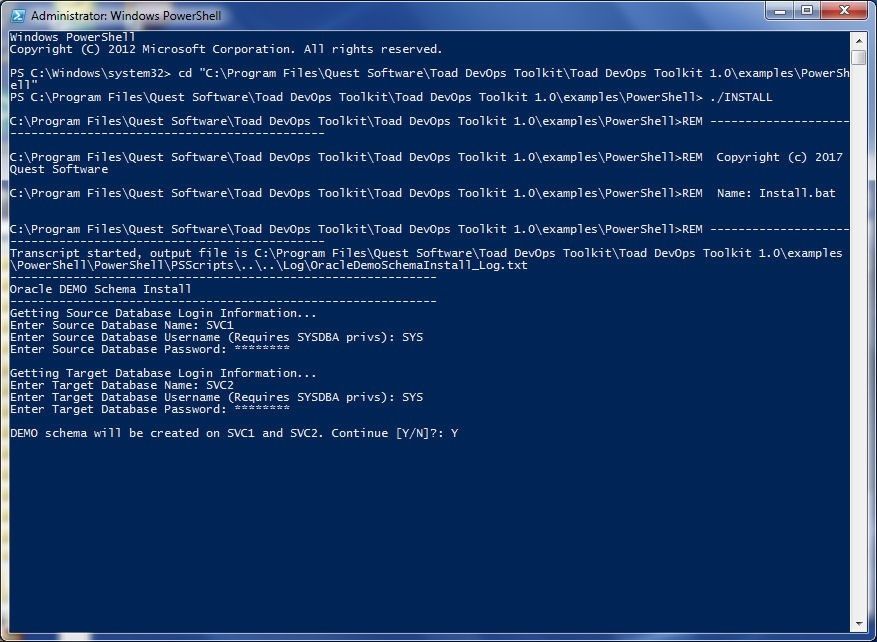
Figure 37. DEMO schema will be created on SVC1 and SVC2. Continue [Y/N]?:
The install.sql script starts to run, as shown in Figure 38.
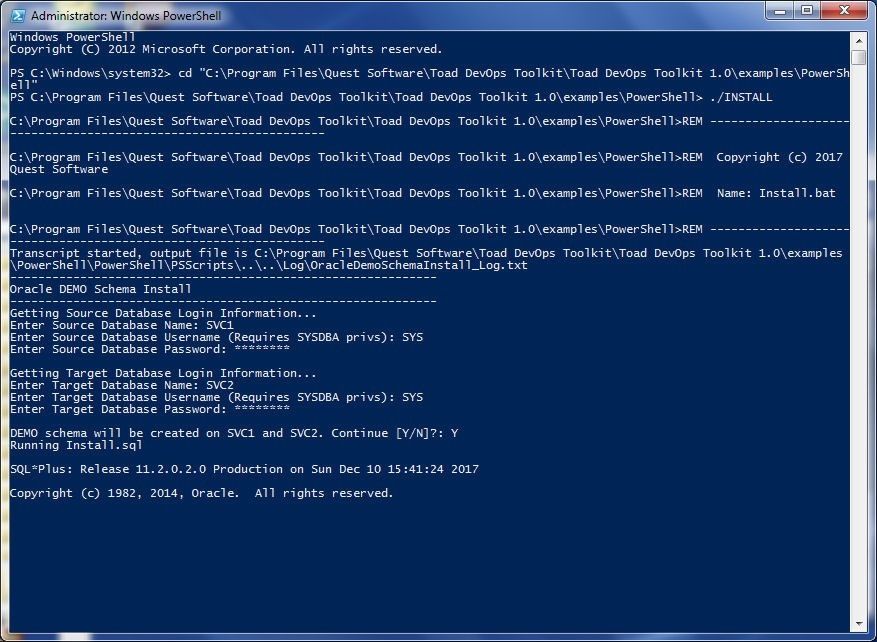
Figure 38. Running install.sql
First, the source database gets connected to, as shown in Figure 39.
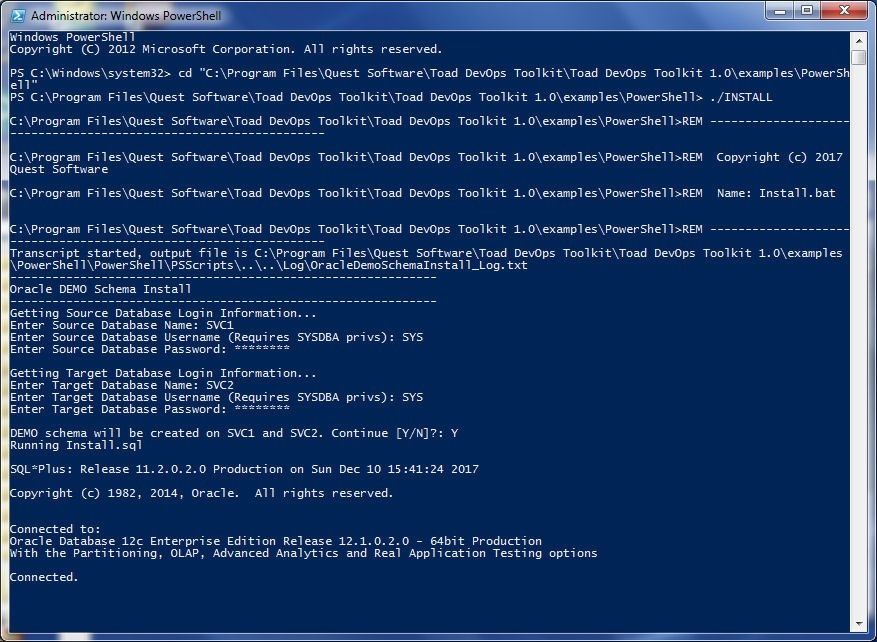
Figure 39. Connected to Source Database
The DEMO table gets created on the Source database, as indicated by the “Table created” message in Figure 40. The required permissions get granted. Subsequently, the target database gets connected to, as shown in Figure 40.

Figure 40. Table created in Source Database and Connected to target database
After the DEMO table has been created in both the source and target databases and the required permissions have been granted, the connections with source and target databases get disconnected, as shown in Figure 41. An output log file is created.
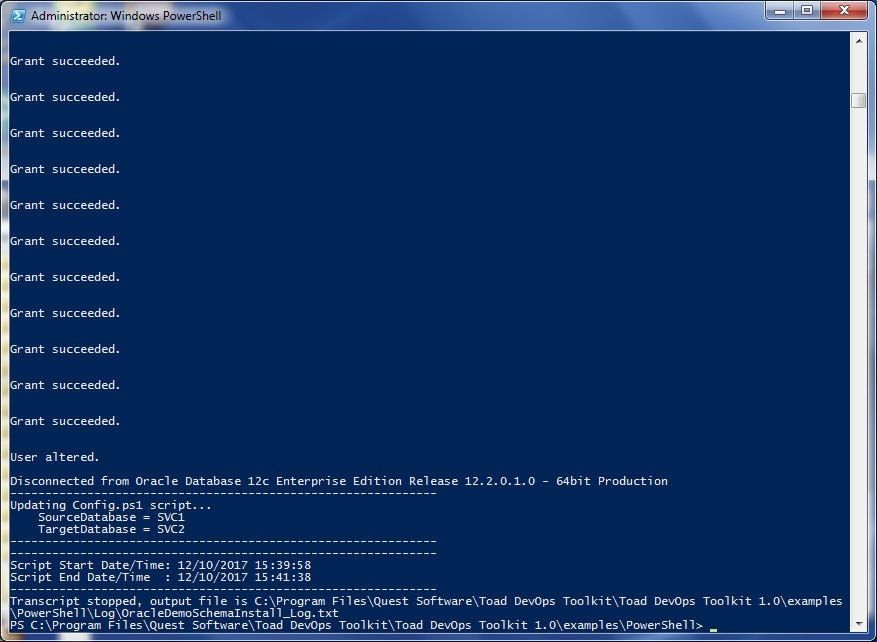
Figure 41. INSTALL Script completed
Running Validation Checks
The first script to run after installing the DEMO schema on the source and target databases is theValidationChecks script with the./ValidationChecks command to validate (verify) the connectivity of the databases. The output from ValidationChecks (Figure 42) indicates that the Toad.ToadAutoObject object exists and gets started and that both the source and target databases get connected to and get disconnected from.
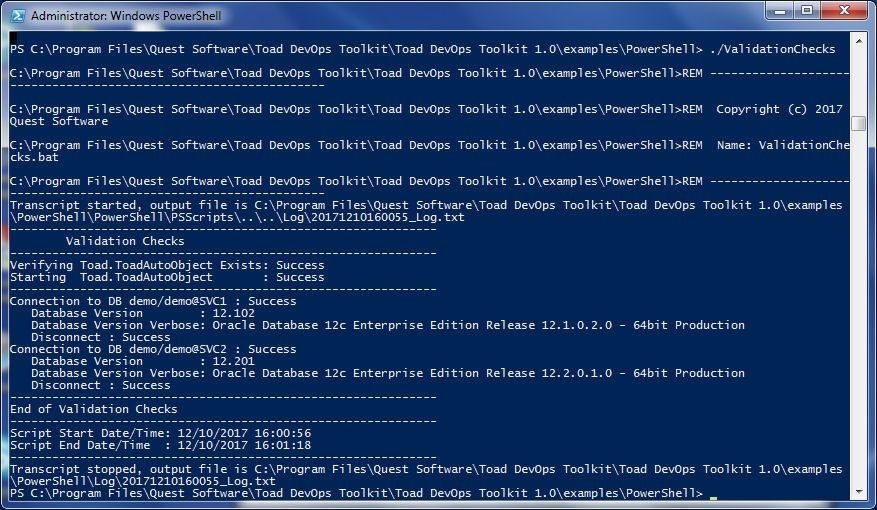
Figure 42. Output from ./ValidationChecks
Running Compare Databases
To compare the source and target databases, run the CompareDatabases script with the ./CompareDatabases command as shown in Figure 43.
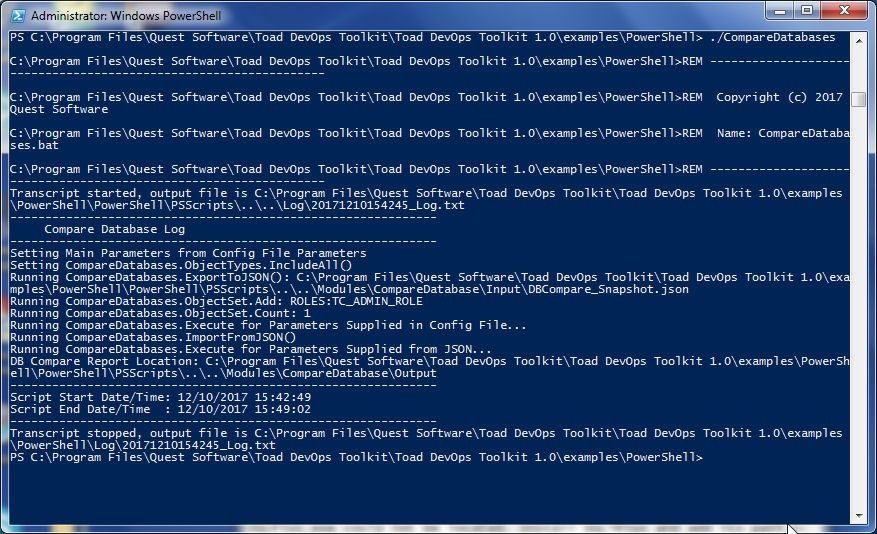
Figure 43. Running the CompareDatabases script
Output scripts get generated in the C:\Program Files\Quest Software\Toad DevOps Toolkit\Toad DevOps Toolkit 1.0\examples\PowerShell\Modules\CompareDatabase\Output directory, as shown in Figure 44.
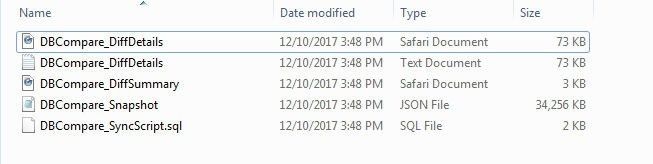
Figure 44. Output Scripts from running CompareDatabases script
Open the DBCompare_DiffDetails.html file in a browser, as shown in Figure 45. In addition to listing the databases, schemas ,and timestamp, Objects in Both with Differences, Objects in Source Only, and Objects in Target Only information is also provided in the report output, as shown in Figure 45.
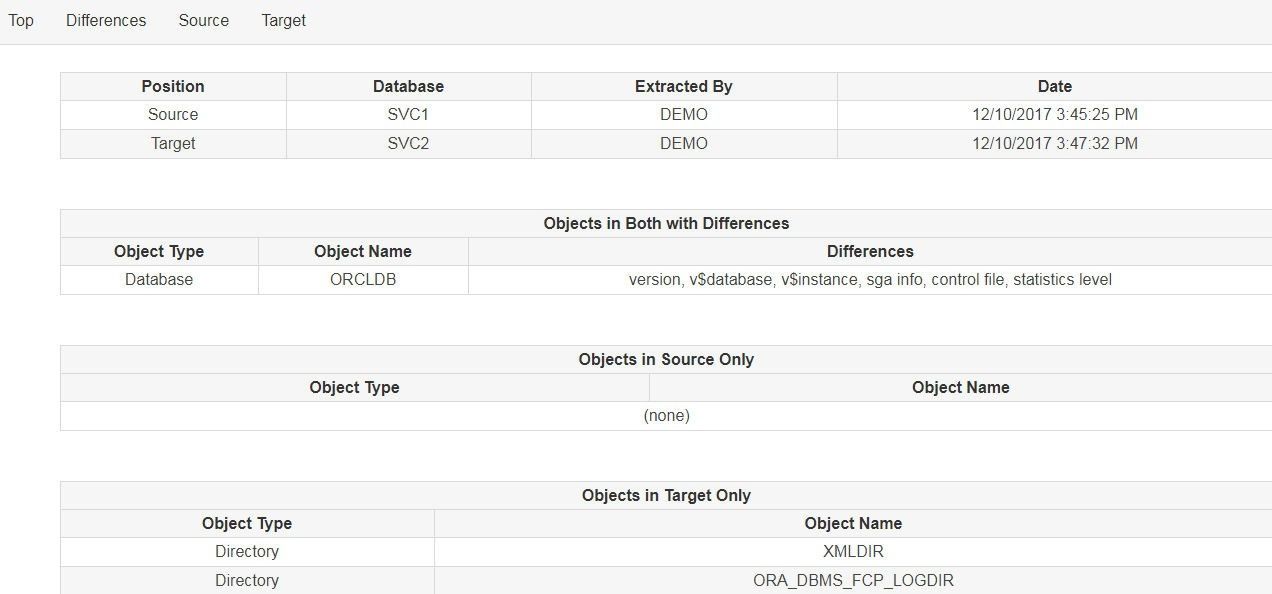
Figure 45. DBCompare_DiffDetails.html script
Running Compare Schemas
Next, run the CompareSchemas PowerShell script with the./CompareSchemas command as shown in Figure 46.
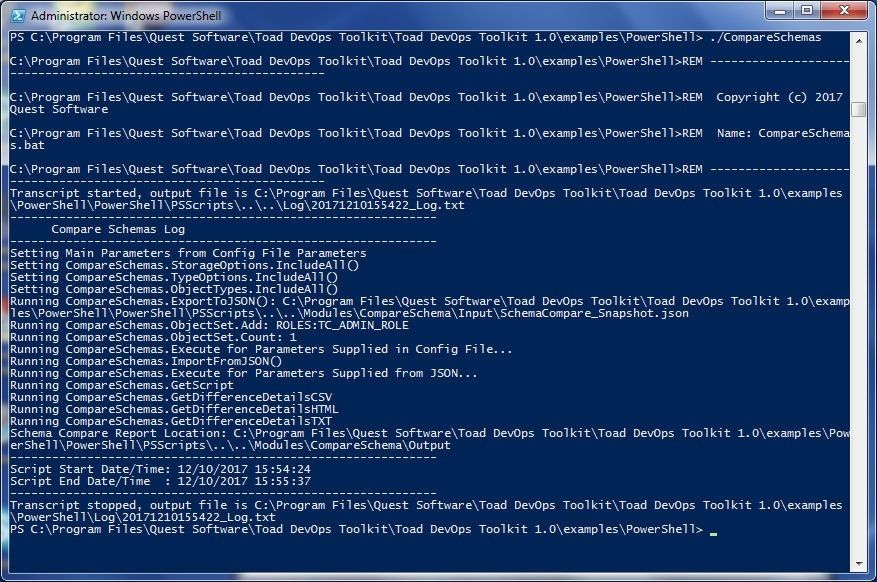
Figure 46. Running the CompareSchemas Script
The CompareSchemas script generates output scripts in the C:\Program Files\Quest Software\Toad DevOps Toolkit\Toad DevOps Toolkit 1.0\examples\PowerShell\Modules\CompareSchema directory as shown in Figure 47.
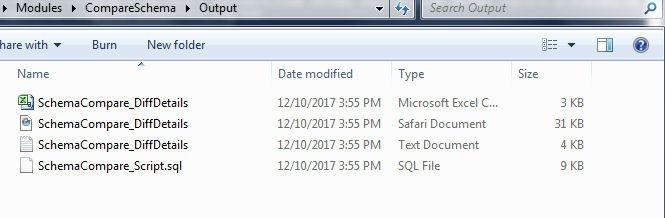
Figure 47. Output Scripts from CompareSchemas
The SchemaCompare_DiffDetails.csv report generated is shown in Figure 48. The CSV has columns for Object Name, Object Type, Exists in Both, Exists in Target, and Differs By.
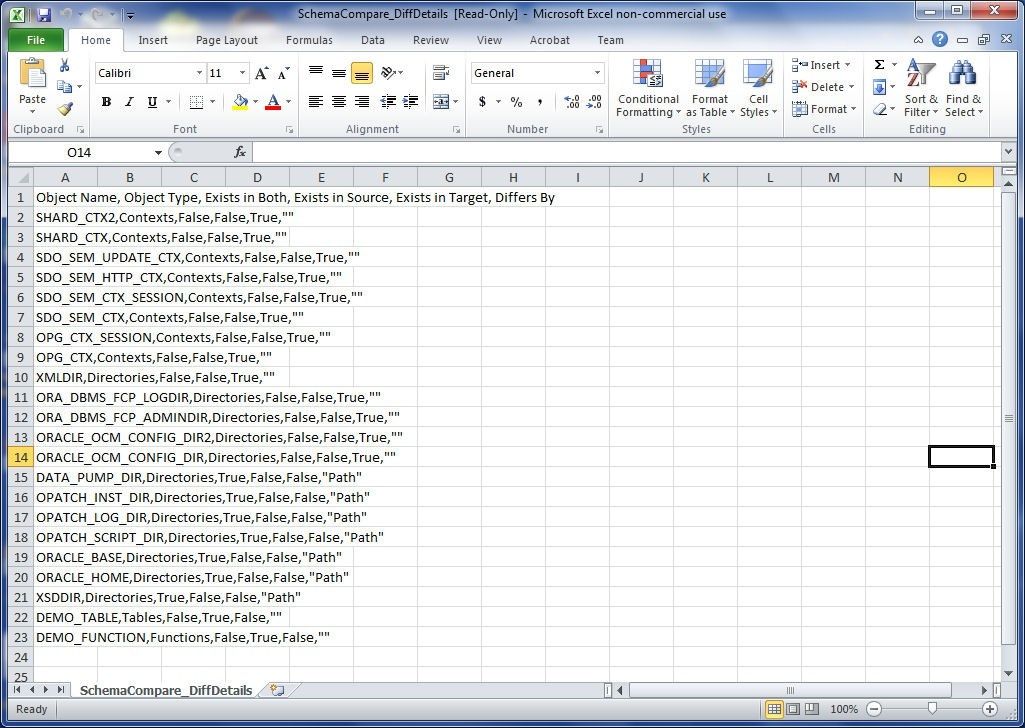
Figure 48. SchemaCompare_DiffDetails.csv report
The HTML reportSchemaCompare_DiffDetails with the same columns and information is shown in Figure 49.
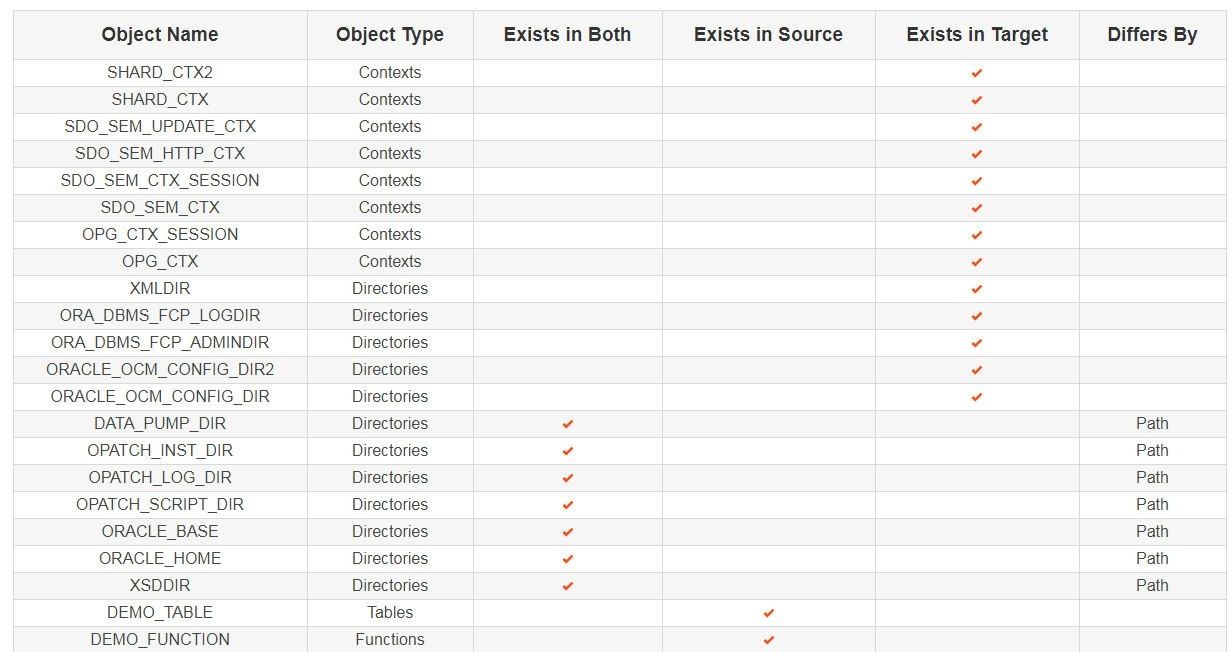
Figure 49. The HTML report SchemaCompare_DiffDetails
Uninstalling the DEMO
To uninstall the DEMO schema from the source and target databases run the ./UNINSTALL command as shown in Figure 50. Provide the same login information for the source and target databases as was provided when installing the DEMO schema and specify Y at the Continue prompt.
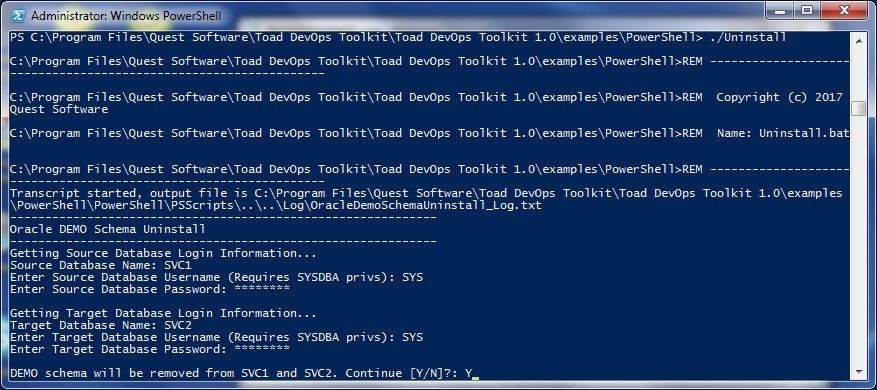
Figure 50. Running the Uninstall Script
As the output in Figure 51 indicates, the source and target databases get connected to and the DEMO user gets dropped.
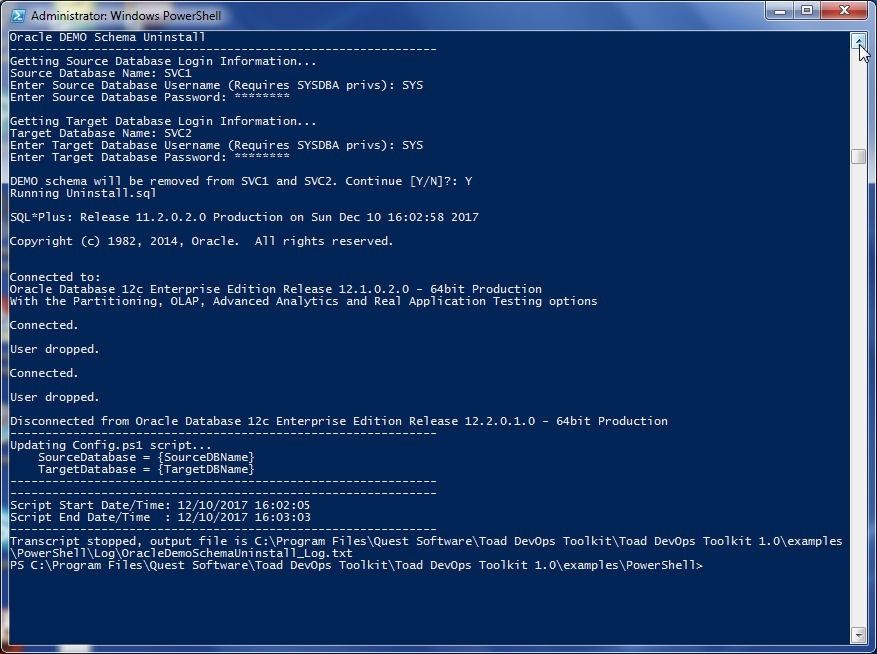
Figure 51. Databases Connected and User Dropped
Deleting the Oracle Database Cloud Services
To delete an Oracle Database Cloud Service, click on the icon to manage the service and select Delete, as shown in Figure 52.
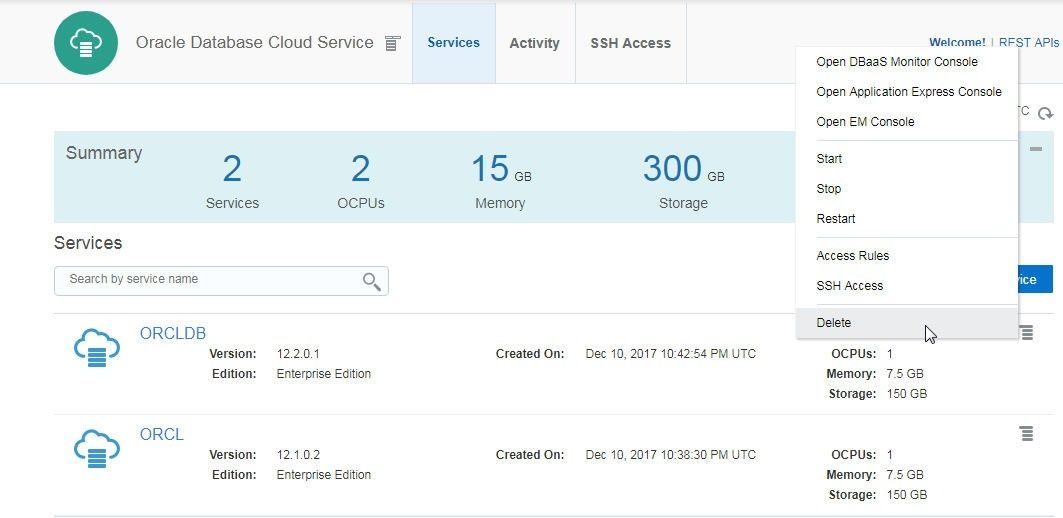
Figure 52. Selecting Delete
Click on Delete in the Delete Service dialog as shown in Figure 53.
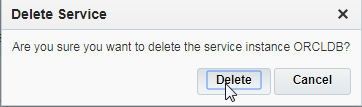
Figure 53. Delete Service
The selected Oracle Database Cloud service starts to get deleted, as shown in Figure 54. Similarly delete the other service.
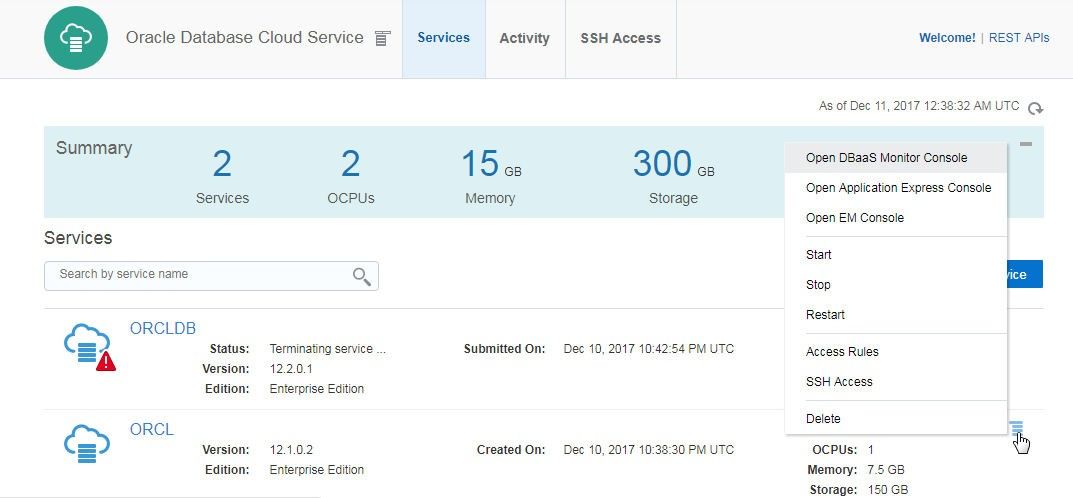
Figure 54. Oracle Database Cloud Service getting deleted
Both the Oracle Database Cloud services are shown to be getting deleted in Figure 55.
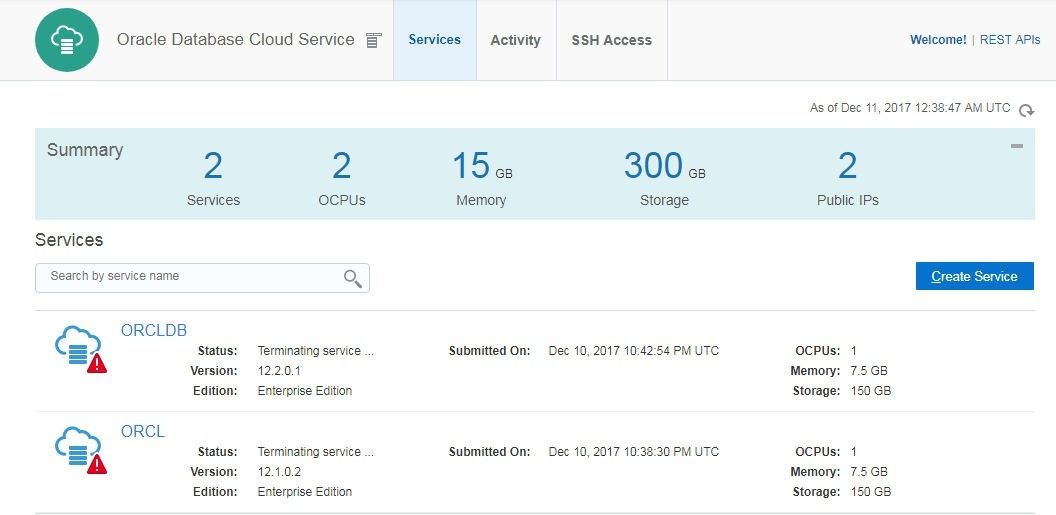
Figure 55. Oracle Database Cloud Services getting deleted
Conclusion
In this article we discussed using Toad DevOps Toolkit with Oracle Database Cloud service. First, we created database services for the source and target demo databases for running Toad DevOps Toolkit. Subsequently, we configured thetnsnames.ora file with the net service names and connect descriptors for the two database services. Having created and configured the database services, we started an instance of Toad DevOps Toolkit and installed theDEMO schema on both the source and target databases with theINSTALL script. We also ran theCompareDatabases and CompareSchemas scripts to compare the databases and schemas in the source and target databases. The example PowerShell scripts may be used as such or customized as required. Toad DevOps Toolkit is also supported with Oracle Database instances running on Amazon EC2 and with Oracle Database instances in Docker containers.
Start the discussion at forums.toadworld.com