Introduction
In the first part of this two-article tutorial on integrating an AWS CodePipeline with a Jenkins pipeline we introduced the importance of using a Jenkins pipeline to build and test code before deploying. We started by creating a Jenkins project. In this continuation article we shall create an AWS CodePipeline that is integrated with the Jenkins pipeline and run the CodePipeline to demonstrate Continuous Integration, Continuous Testing, Continuous Delivery and Continuous Deployment.
This article has the following sections.
- Creating an AWS CodePipeline
- Running the CodePipeline
- Switching Between Continuous Deployment Continuous Delivery
- Deleting the CodePipeline
- Deleting the Beanstalk Application
- Deleting the Jenkins Project
Creating an AWS CodePipeline
In this section we shall create an AWS CodePipeline to integrate code from GitHub, test and build code in Jenkins project, and deploy the resulting artifact, which is a Docker image to an Elastic Beanstalk application environment built for Docker platform. Click on Get started in the AWS CodePipeline console to create an AWS CodePipeline as shown in Figure 1.
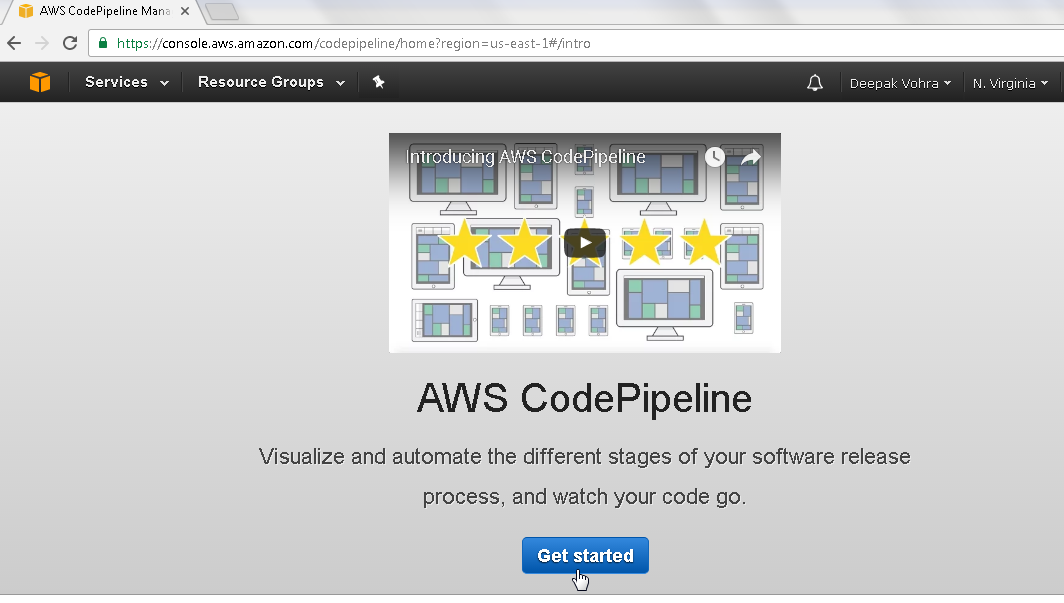
Figure 1. AWS Code Pipeline>Get started
In Create Pipeline window specify a pipeline name, NodeServerCodePipeline, and click on Next step as shown in Figure 2.

Figure 2. Create pipeline
In Sourcelocation select a Source provider from the drop-down list as shown in Figure 3. Select GitHub, the other options being Amazon S3 and AWS CodeCommit.
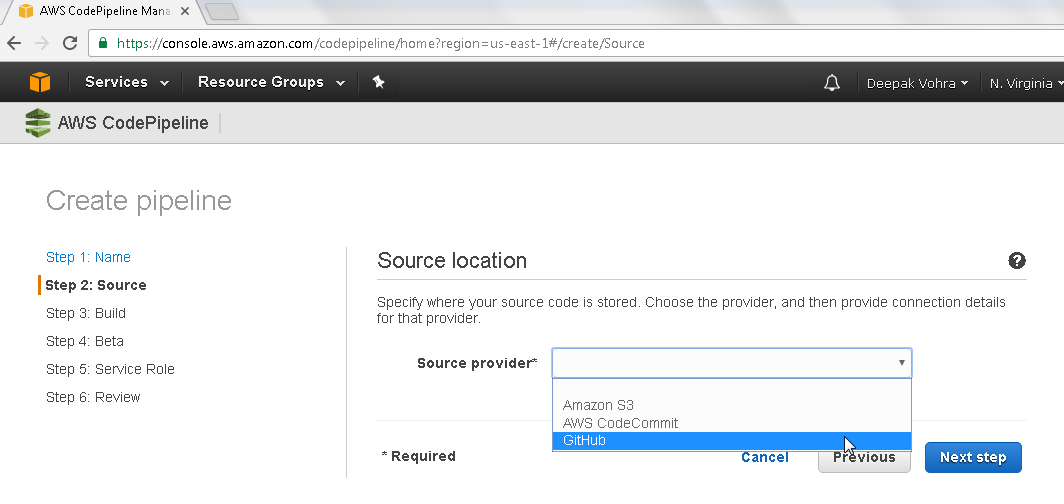
Figure 3. Selecting Source Provider
In Connect To GitHub configuration click on Connect to GitHub as shown in Figure 4.
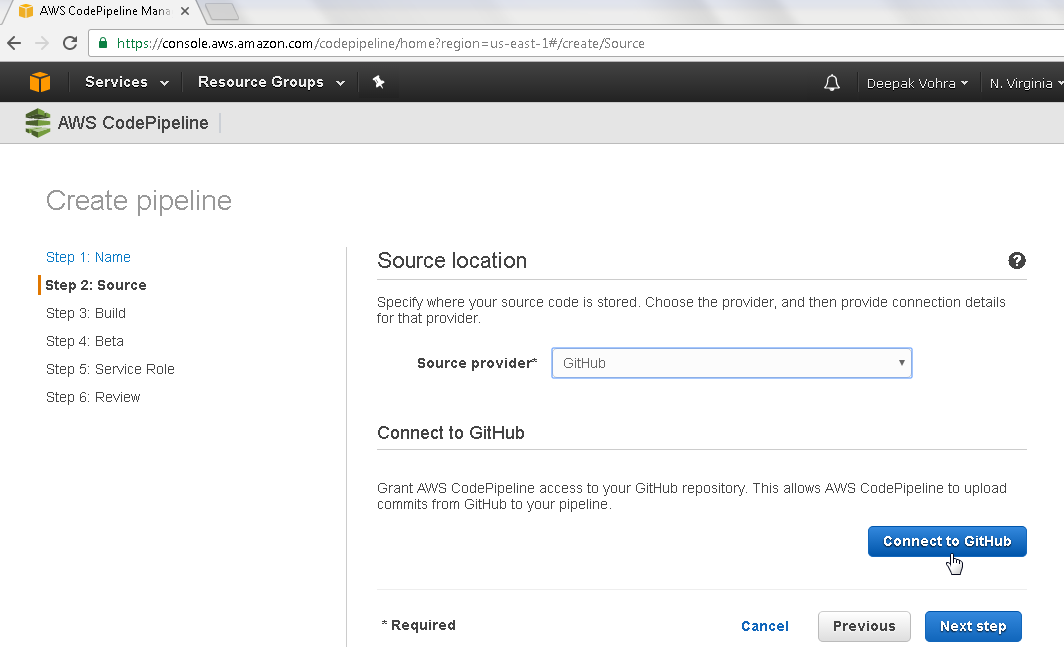
Figure 4. Connect to GitHub
In Repository select the dvohra/docker-node-server repo as shown in Figure 5.

Figure 5. Selecting Repository
In Branch select the “master” branch as shown in Figure 6.
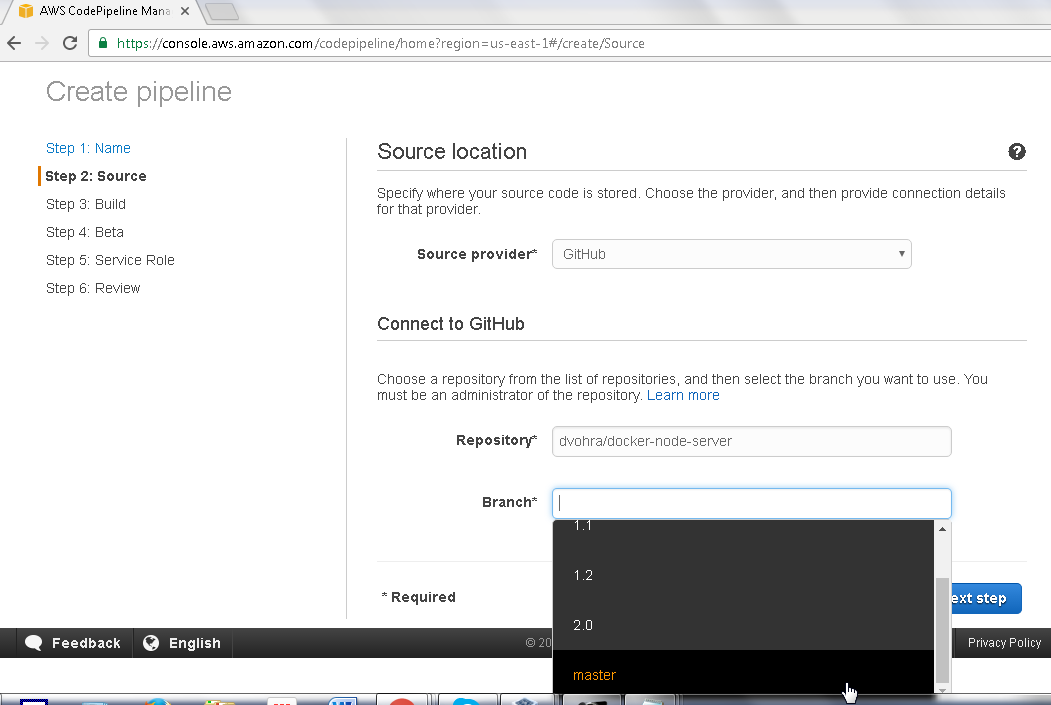
Figure 6. Selecting Branch as master
Click on Next step as shown in Figure 7.

Figure 7. Source>Next
In Build configuration select a Build provider. Select Add Jenkins as shown in Figure 8 to configure Jenkins as the build provider.
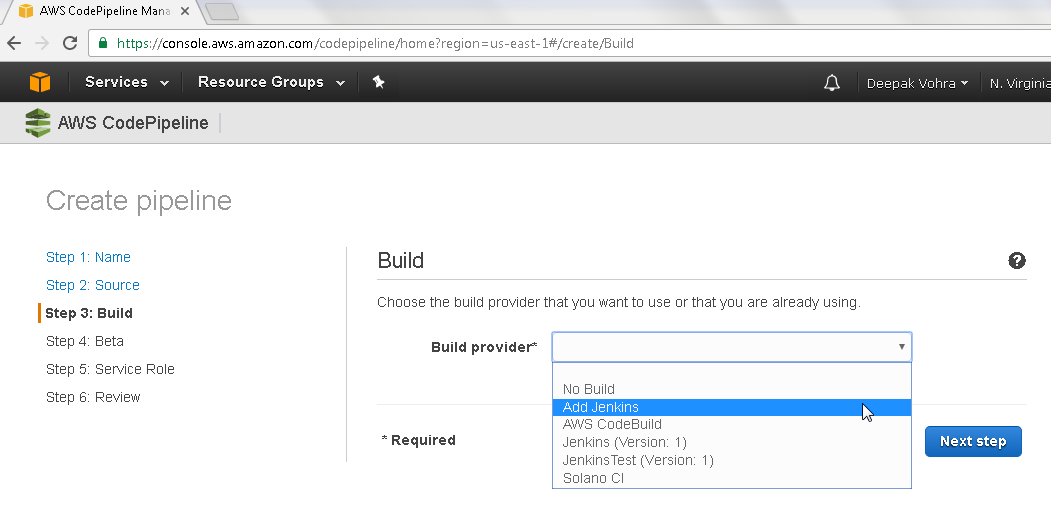
Figure 8. Selecting Build provider as Add Jenkins
When configuring a Jenkins project we had configured a CodePipeline Action Type of Category Test with Provider as JenkinsTestProvider as shown in Figure 9.

Figure 9. JenkinsTestProvider
In the Build configuration for the CodePipeline specify Provider name as JenkinsTestProvider as shown in Figure 10. Specify a Server URL in the format http://PubliDNS:8080. Obtain the Public DNS name for the Jenkins server instance from the EC2 Console. Specify Project name as NodeServerJenkins, which is the Jenkins project configured earlier. Click on Next step.
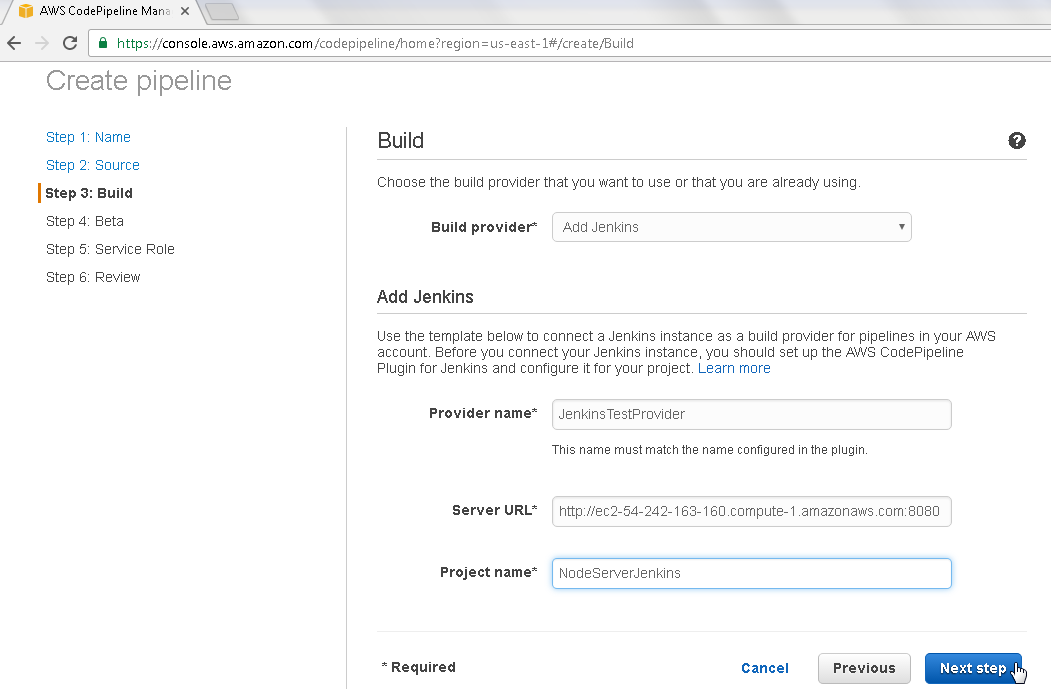
Figure 10. Configuring Jenkins as the Build Provider
In Beta deployment select a Deployment provider from the drop-down list. Select AWS Elastic Beanstalk as shown in Figure 11.
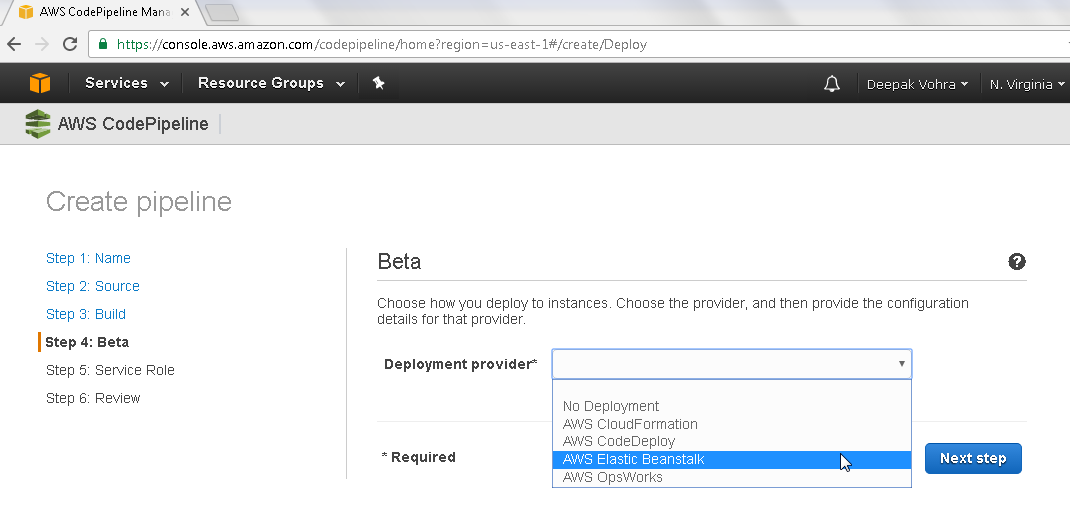
Figure 11. Selecting Deployment Provider
In AWS Elastic Beanstalk configuration select Application name as NodeServerApp as shown in Figure 12.
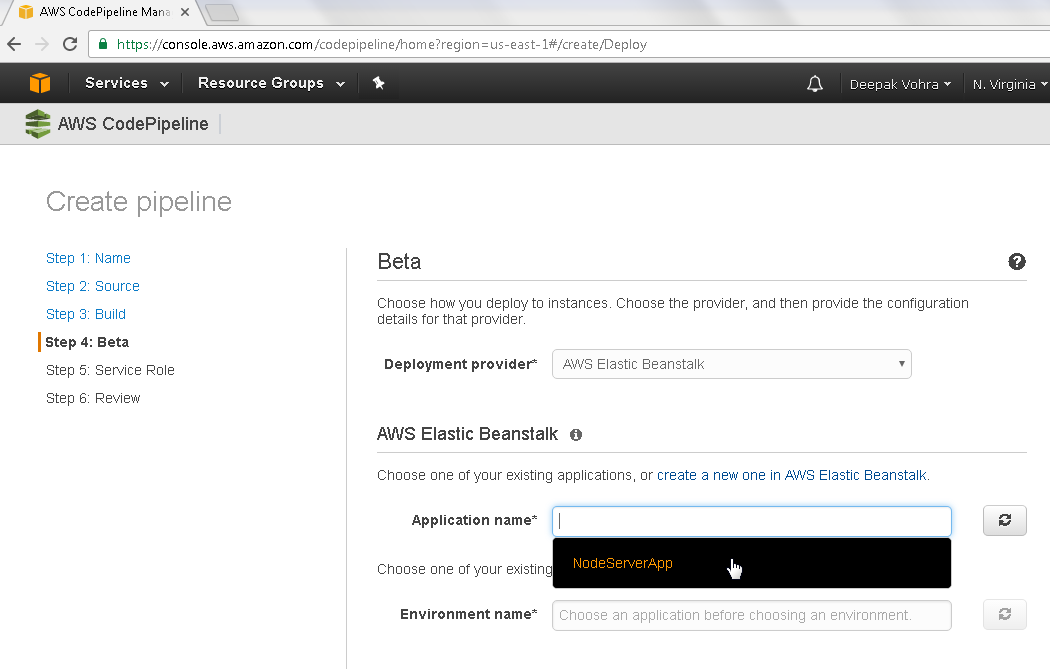
Figure 12. Selecting AWS Beanstalk Application Name
Select Environment name as the Sample-env created earlier as shown in Figure 13.
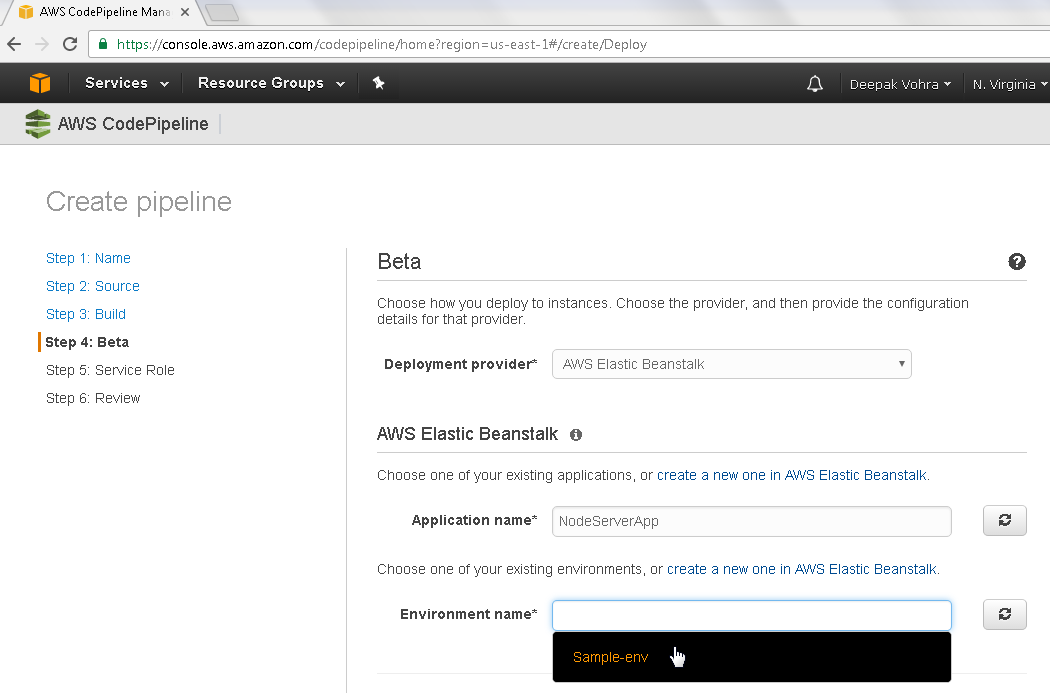
Figure 13. Selecting Environment
Click on Next step as shown in Figure 14.
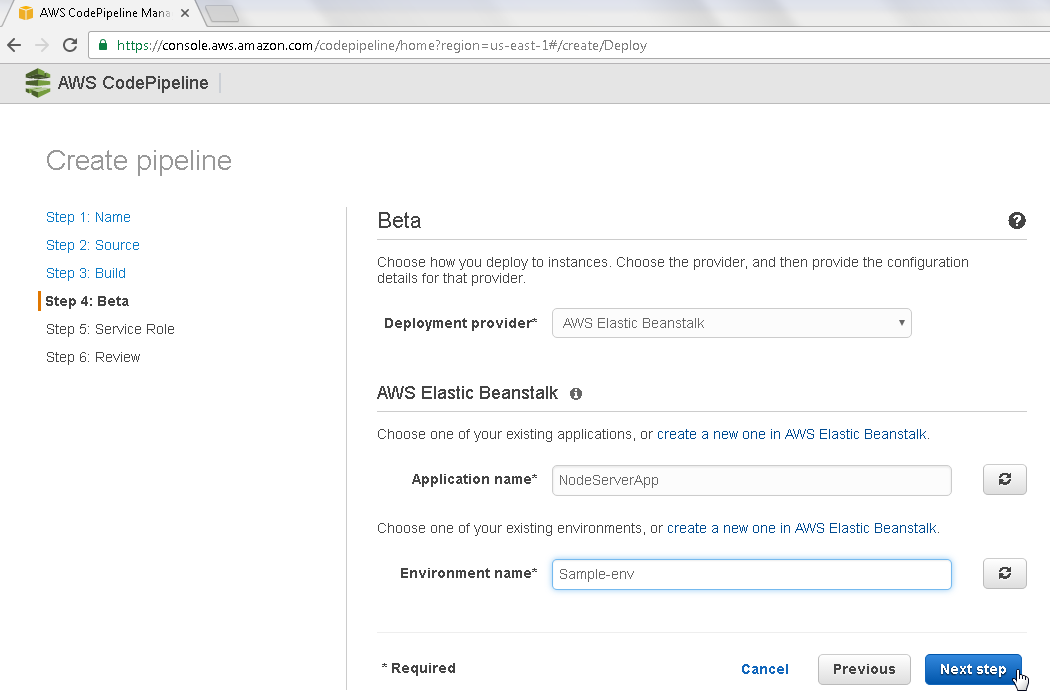
Figure 14. Beta>Next step
In AWS Service Role click on Create role as shown in Figure 15.
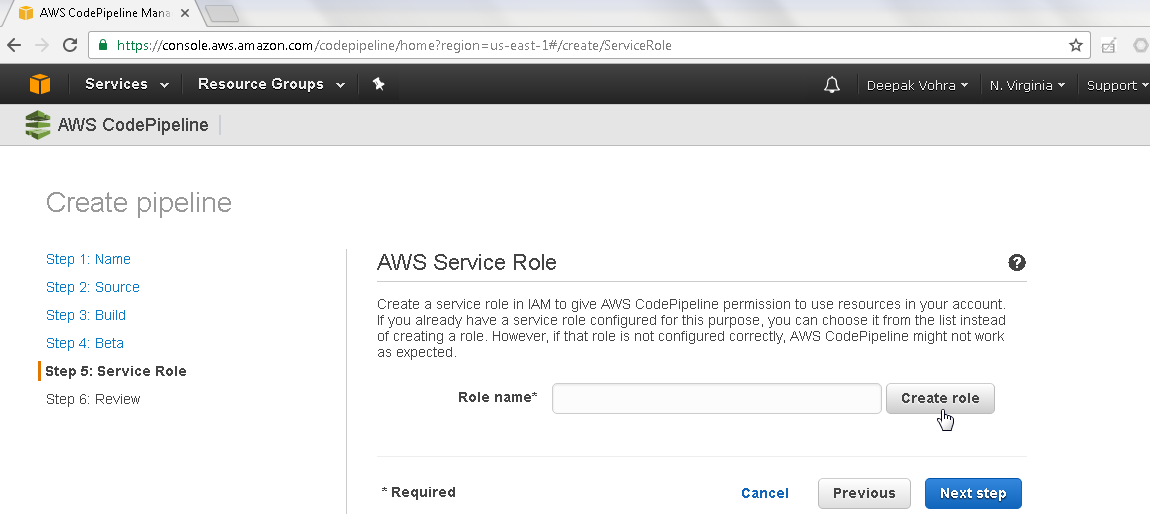
Figure 15. AWS Service Role
The IAM service gets connected to an IAM Role called AWS-CodePipeline-Service gets configured as shown in Figure 16.
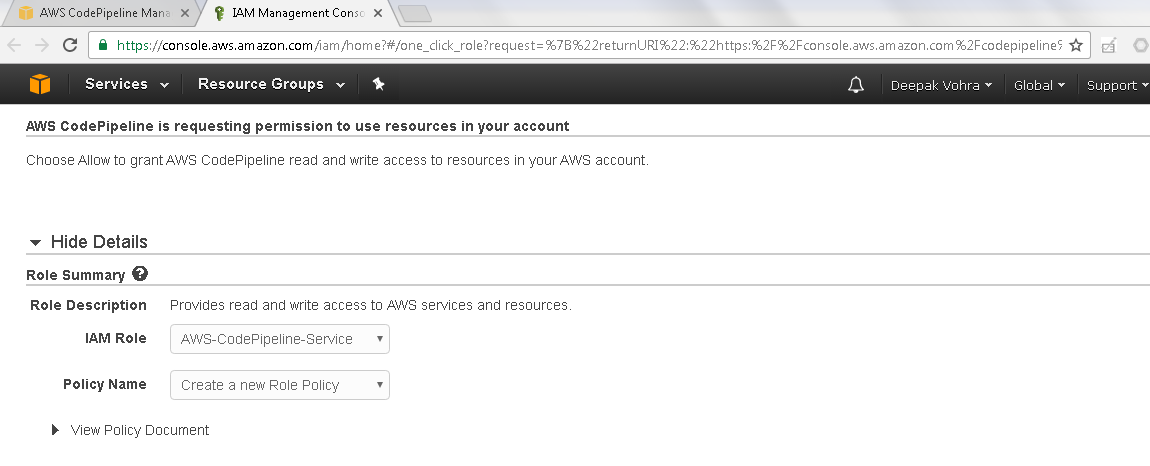
Figure 16. AWS CodePipeline accessing IAM to create an AWS-CodePipeline-Service Role
Select the service role in Role name field as shown in Figure 17 Click on Next step.
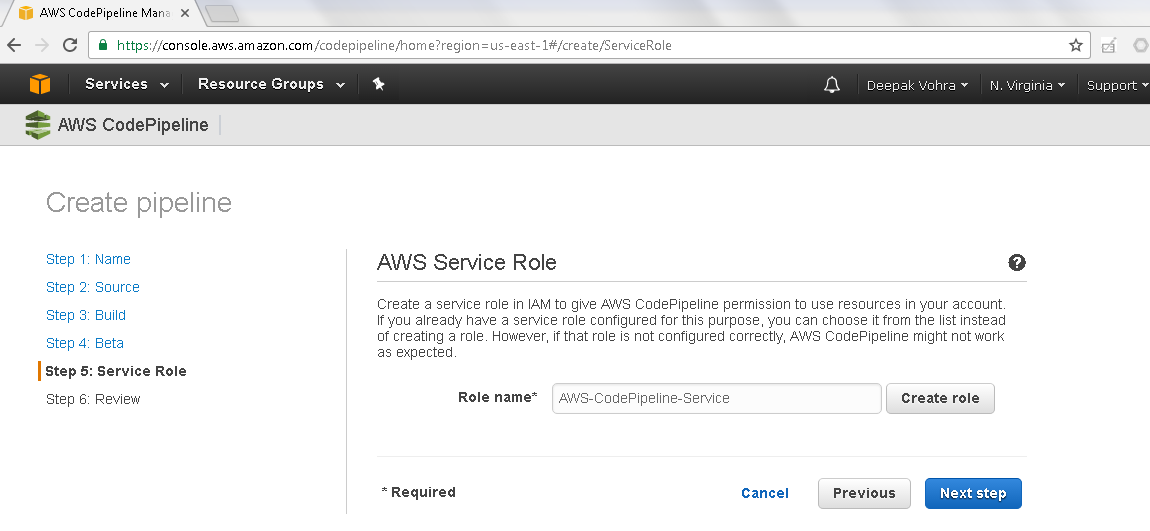
Figure 17. AWS Service Role
Review the CodePipeline as shown in Figure 18.
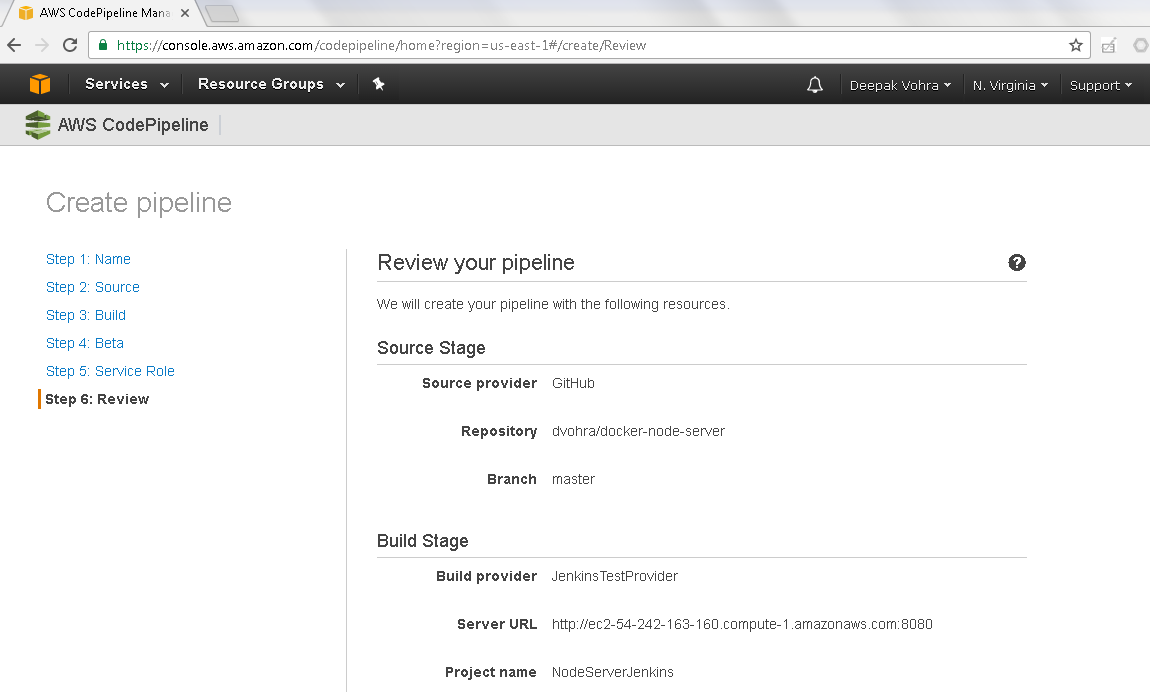
Figure 18. Review Pipeline
The S3 Artifact location is configured automatically and is not user selected. Click on Create pipeline as shown in Figure 19.
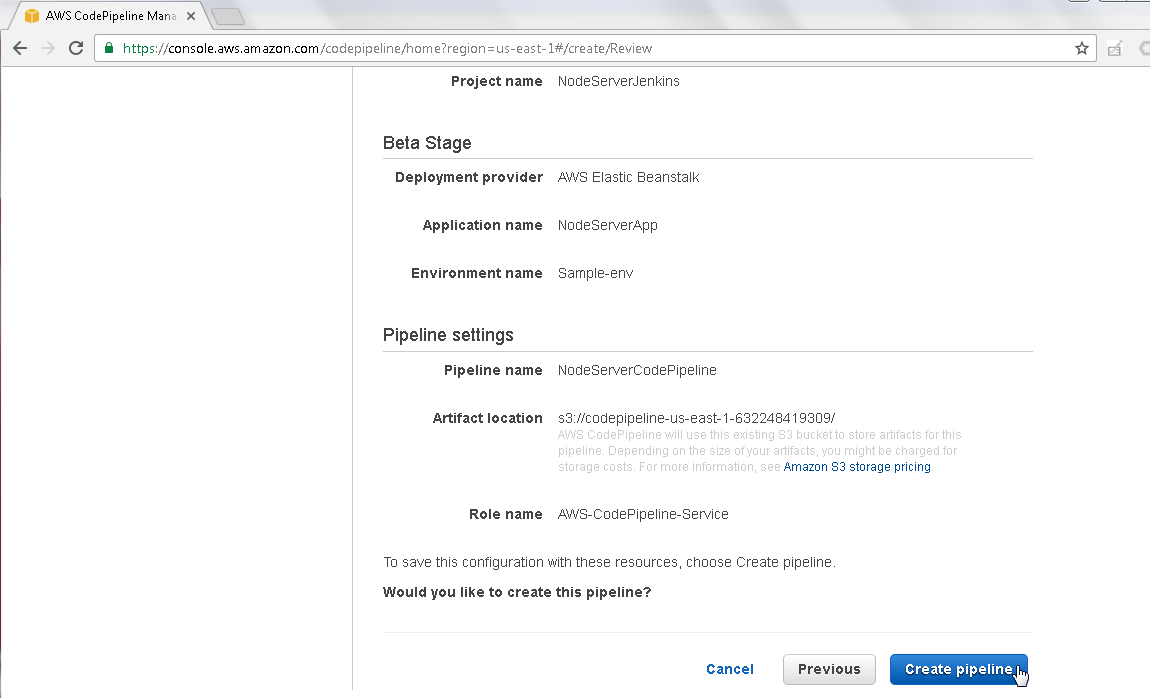
Figure 19. Create pipeline
A CodePipeline gets created as shown in Figure 20.
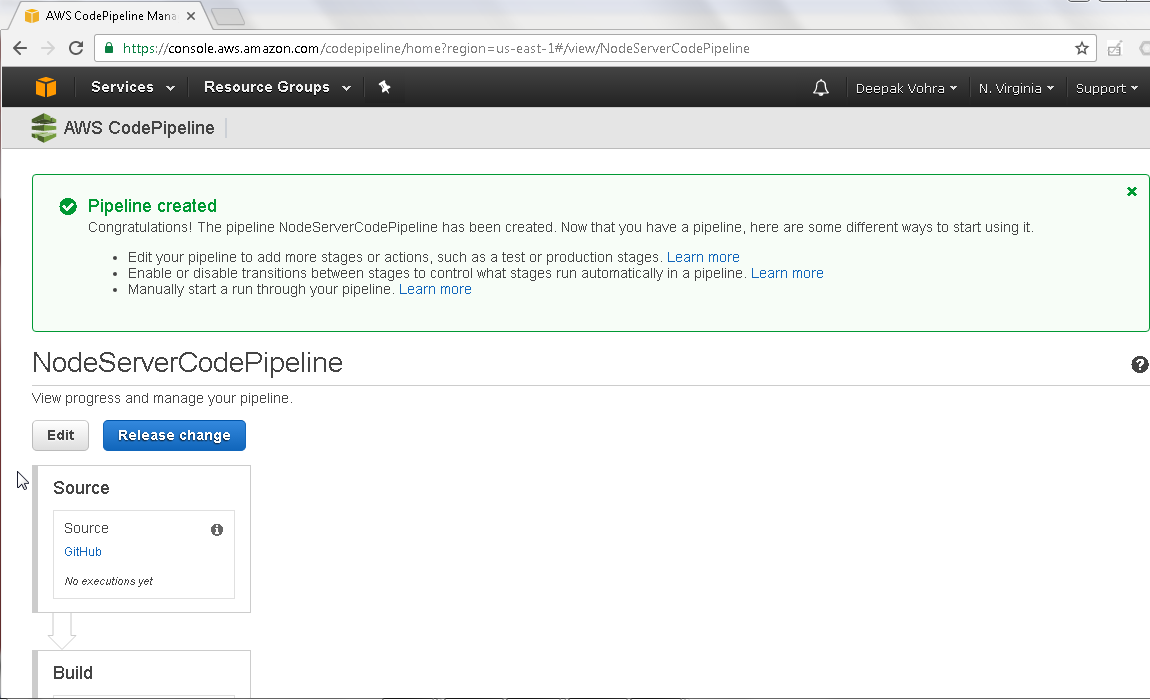
Figure 20. CodePipeline created
Before we are able to run the CodePipeline we need to edit to make slight modifications. Click on Edit as shown in Figure 21.
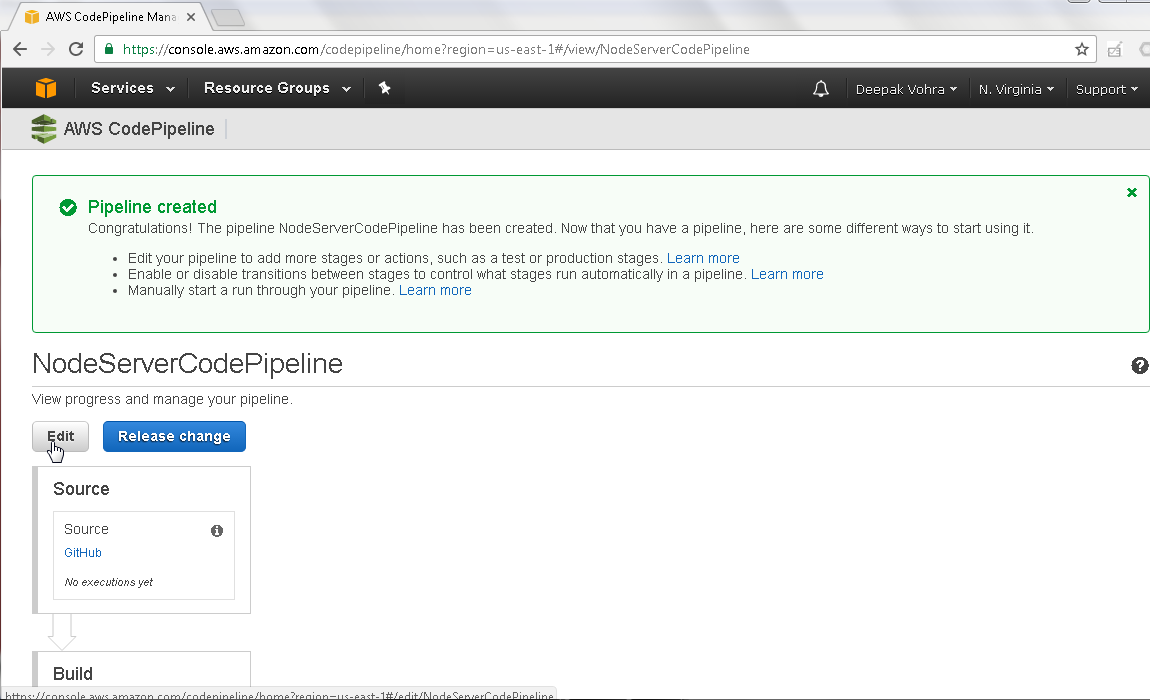
Figure 21. NodeServerCodePipeline>Edit
The different stages of the CodePipeline get displayed. First, click on the Edit icon for the Source phase as shown in Figure 22.
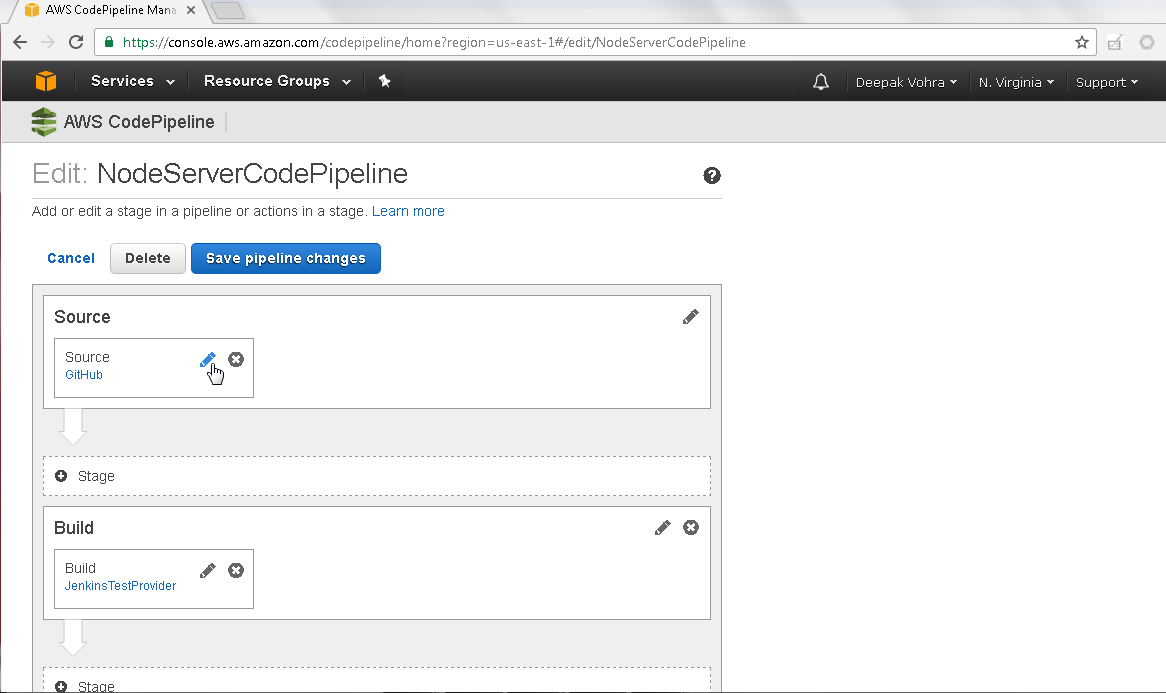
Figure 22. Source>Edit
The Source action detail gets displayed as shown in Figure 23.
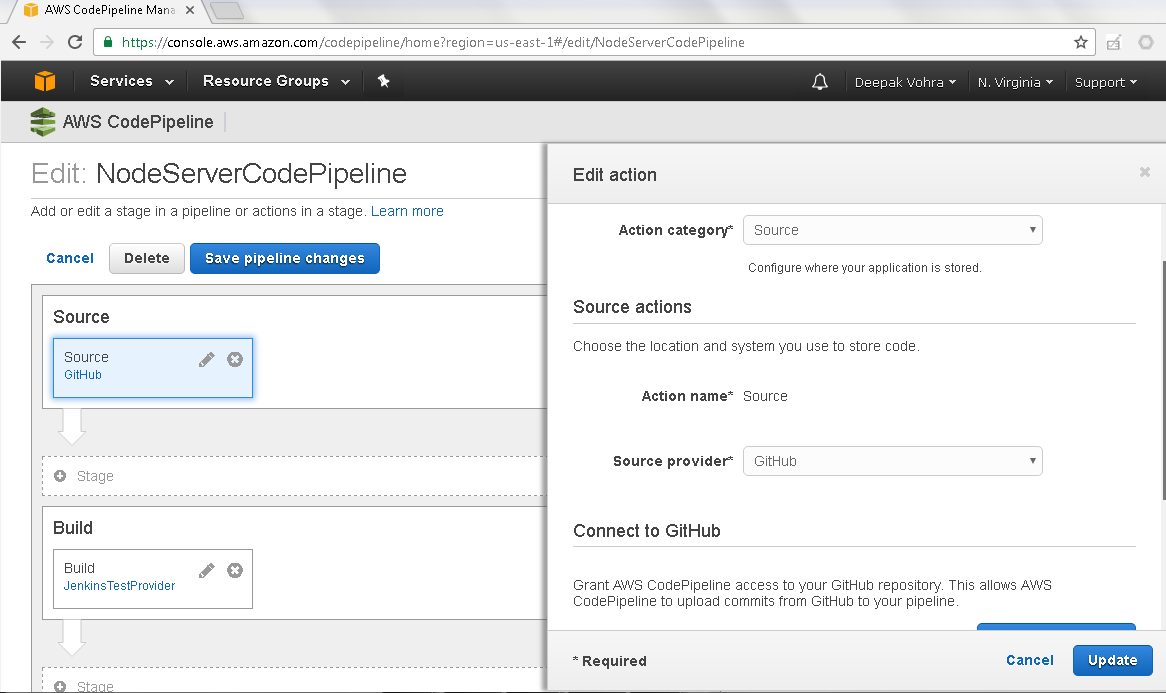
Figure 23. Edit action detail page
Two modifications need to be made.
1. Add an Output artifact #1
2. Configure Connect to GitHub
Specify Output artifact #1 as NodeServerApp as shown in Figure 24.
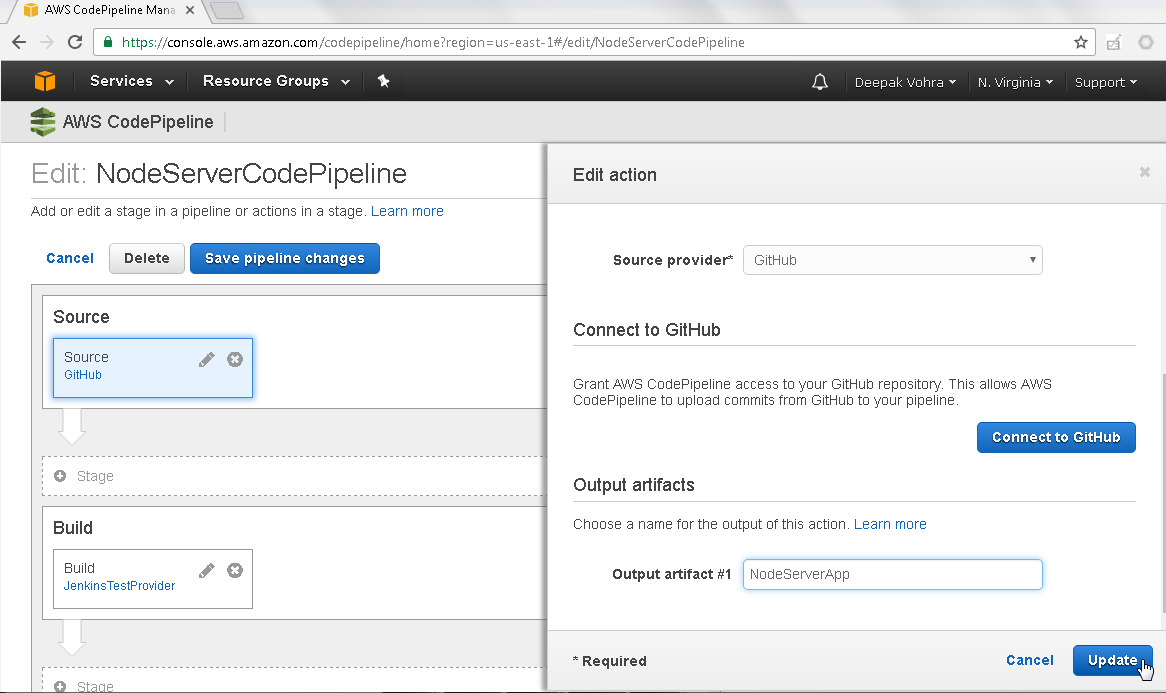
Figure 24. Specifying Output artifact #1
Click on Connect to GiHub to configure a GitHub connection as shown in Figure 25. Specify Repository as dvohra/docker-node-server. Also select a Branch.
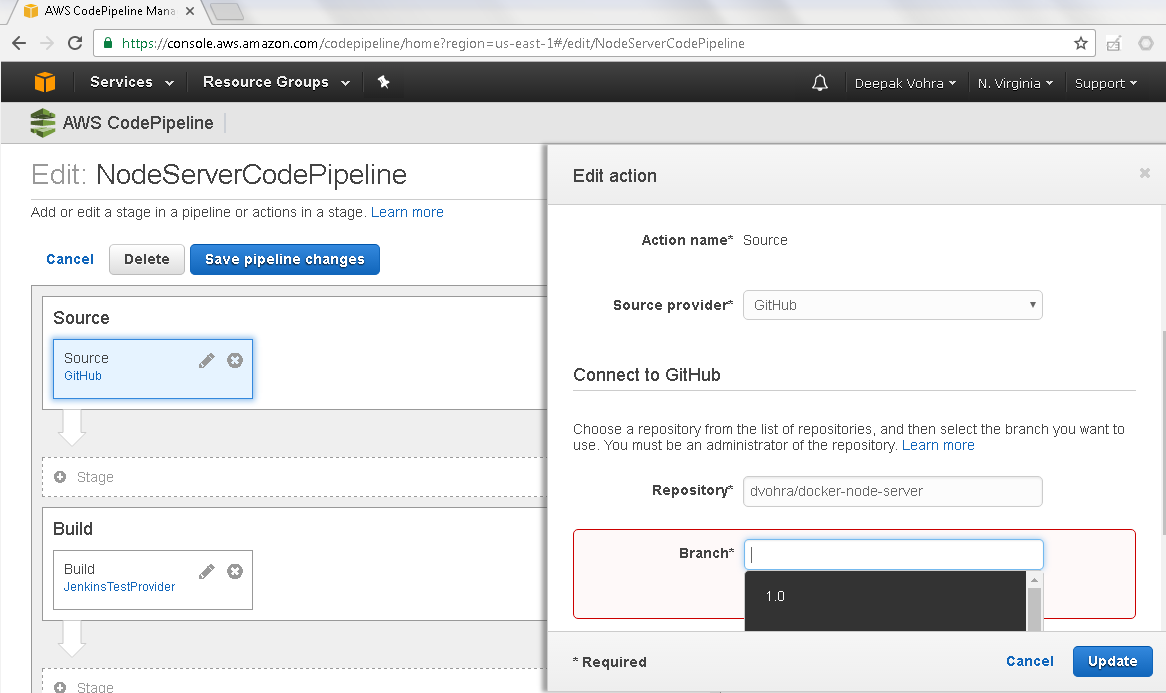
Figure 25. Connect to GitHub Configuration
Select Branch as master. Click on Update as shown in Figure 26.
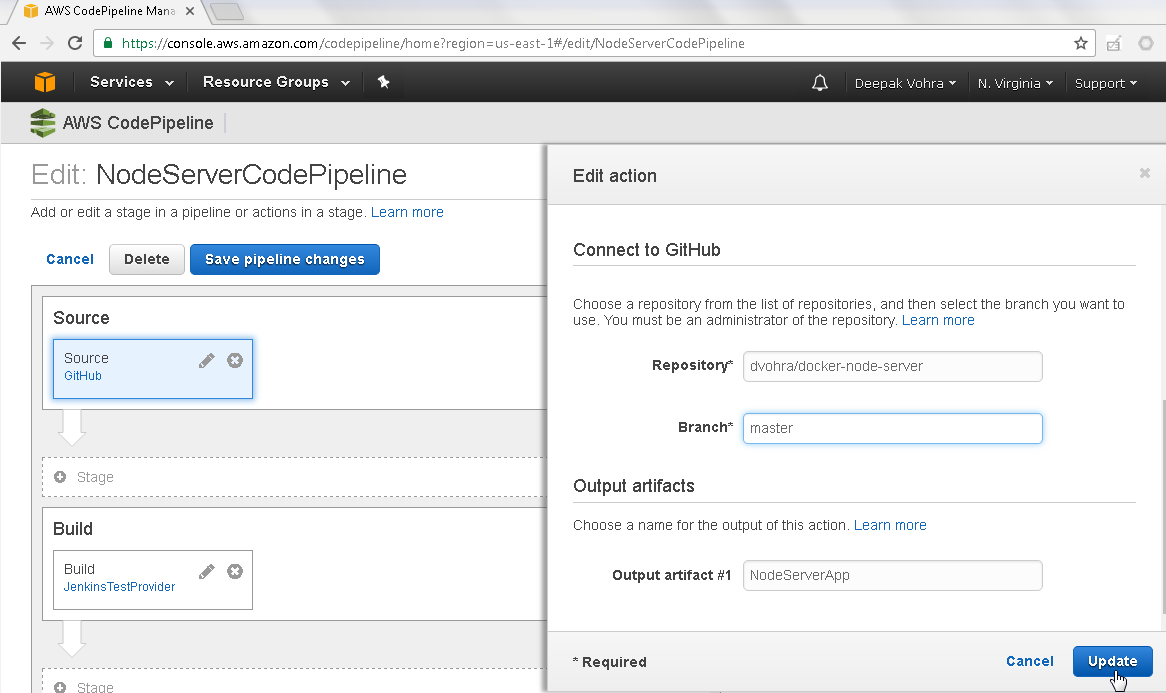
Figure 26. Edit action>Update
The Source action gets updated as shown in Figure 27.
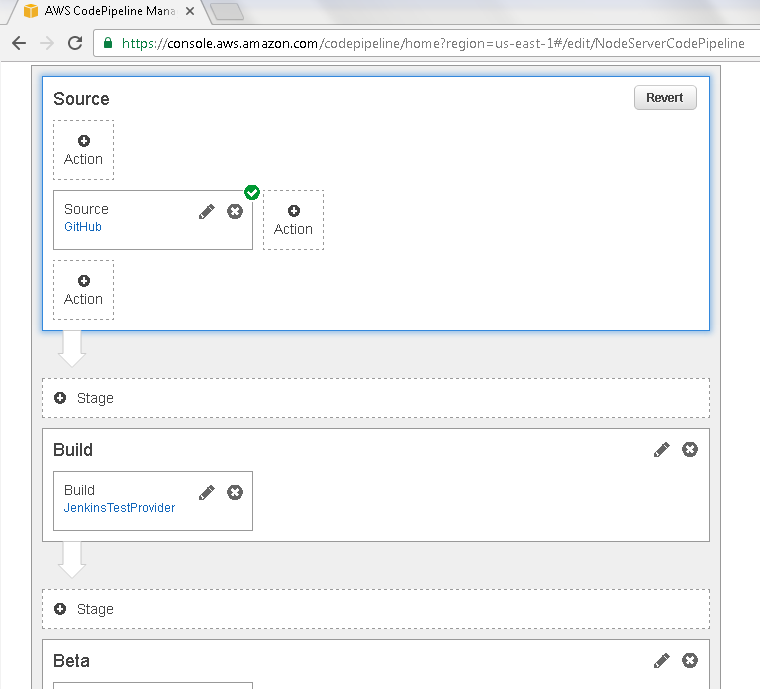
Figure 27. Source Action Updated
Next click on the icon to edit the Build project as shown in Figure 28.
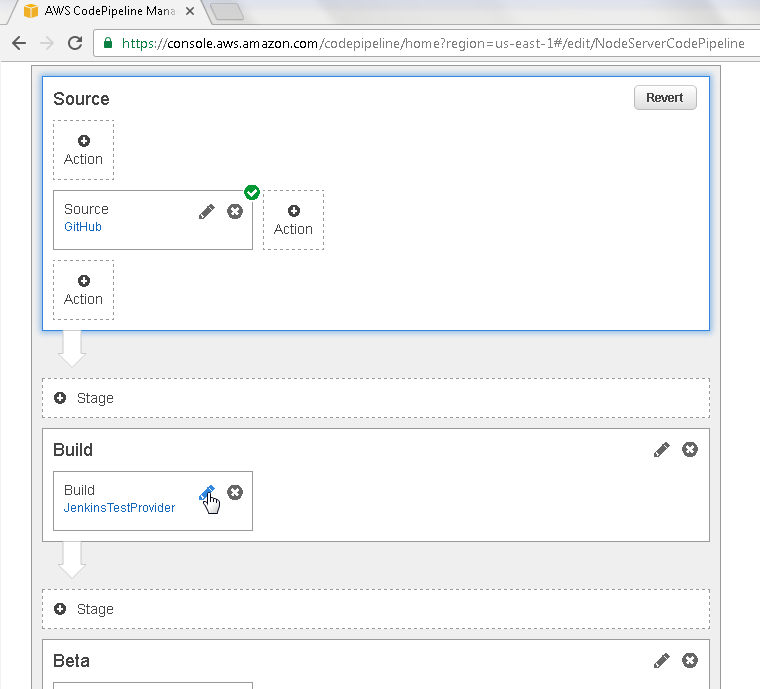
Figure 28. Build>Edit
In Edit action select Action category as Test as shown in Figure 29.

Figure 29. Action category>Test
Specify Action name as “Test” and select the Test provider as JenkinsTestProvider as shown in Figure 30.
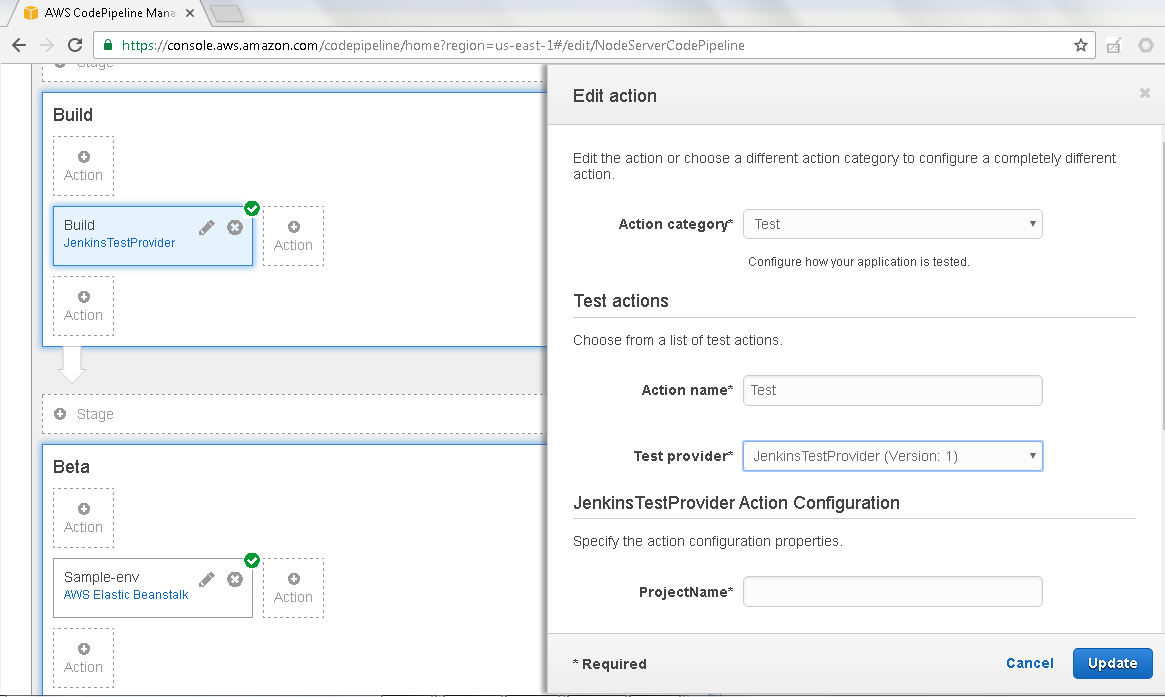
Figure 30. Configuring Test action
In Input artifacts specify Input artifact #1 as the same as the Output artifact #1, which is NodeServerApp, as shown in Figure 31. Also specify an Output artifact #1 (NodeServerJenkins) in Output artifacts. The Output artifact name is arbitrary, other than that the Output artifact name must be the same as the Input artifact to the Beta action, which we have yet to configure. Click on Update.
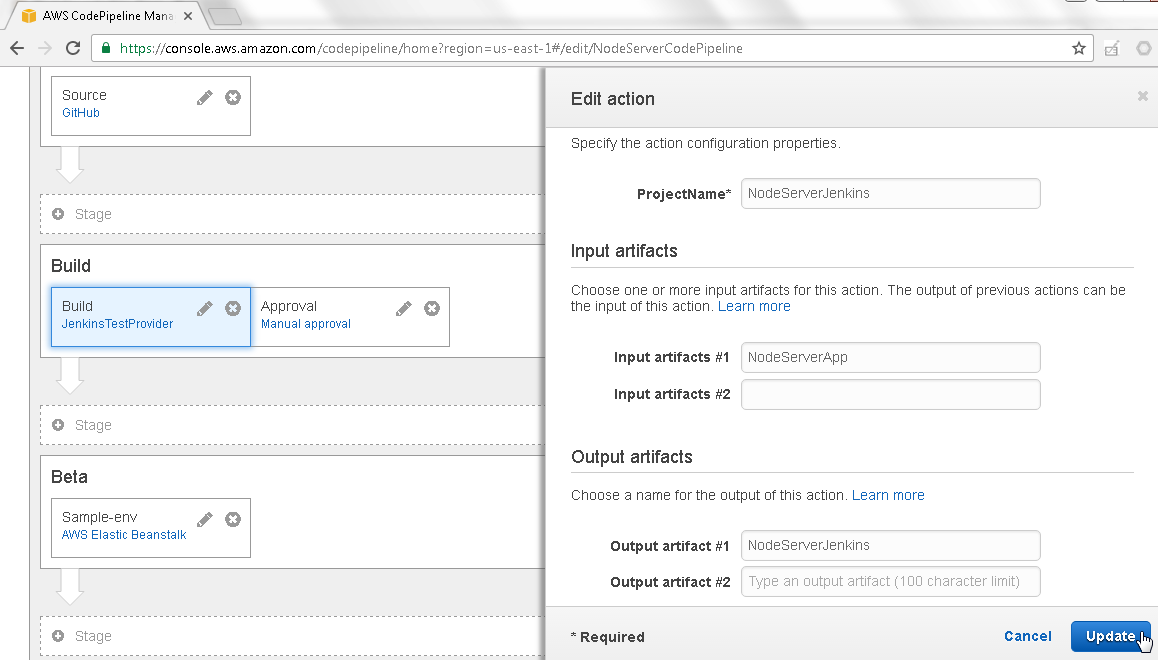
Figure 31. Edit action>Update
The Build action also gets updated as shown in Figure 32.
Figure 32. Build action updated
Next, update the Beta action; for which, click on the edit icon as shown in Figure 33.
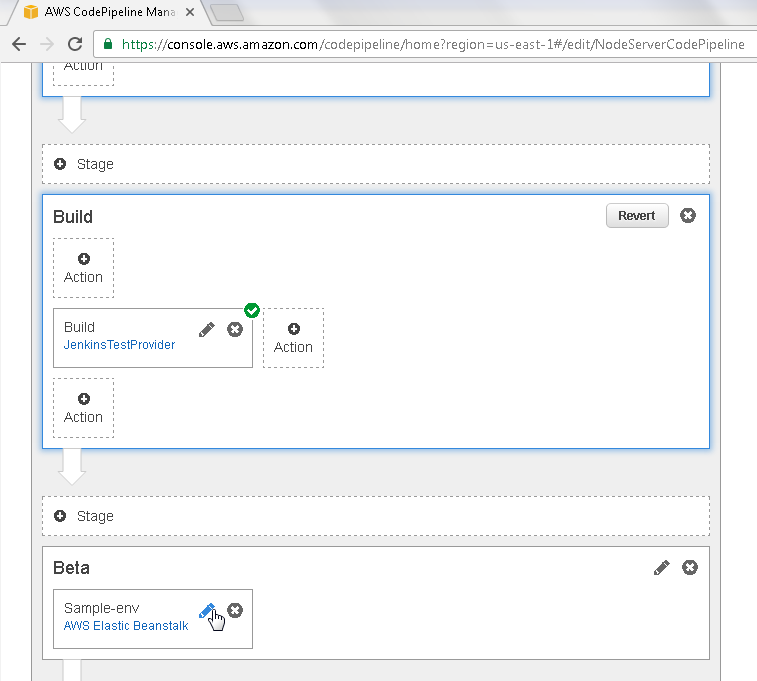
Figure 33. Beta>Edit
In Edit action specify the Input artifact #1 as the Output artifact # 1 name in the Build phase, which is NodeServerJenkins. Output artifact from one phase must be input artifact to the subsequent phase. Click on Update as shown in Figure 34.
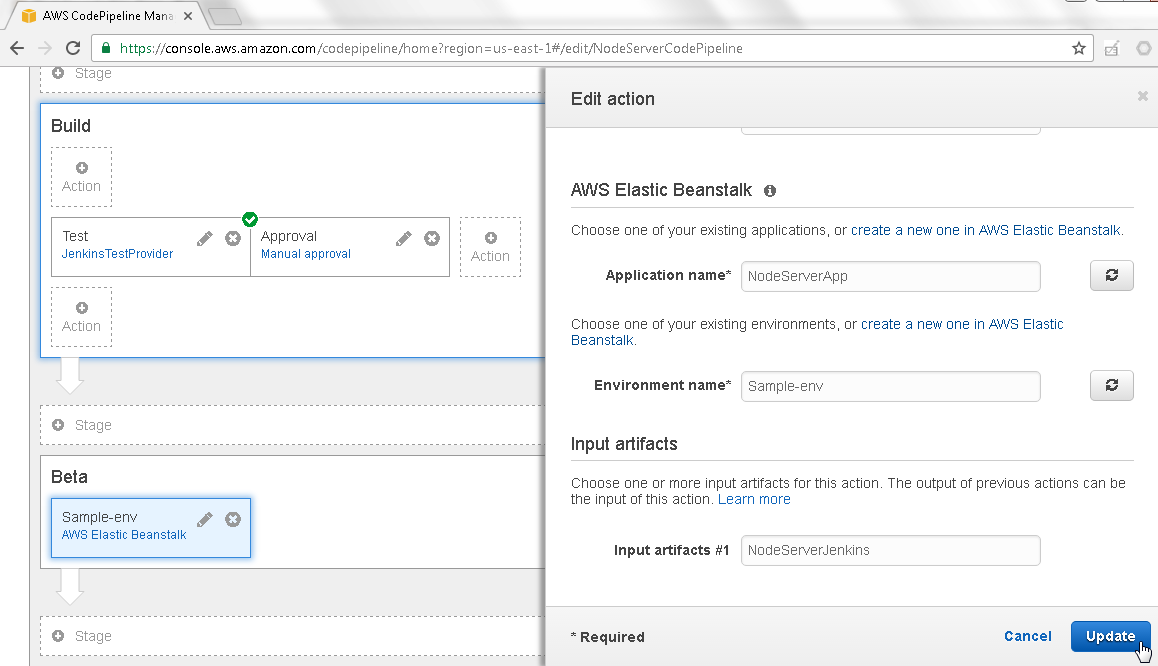
Figure 34. Edit action>Update
The Beta phase also gets updated as shown in Figure 35.
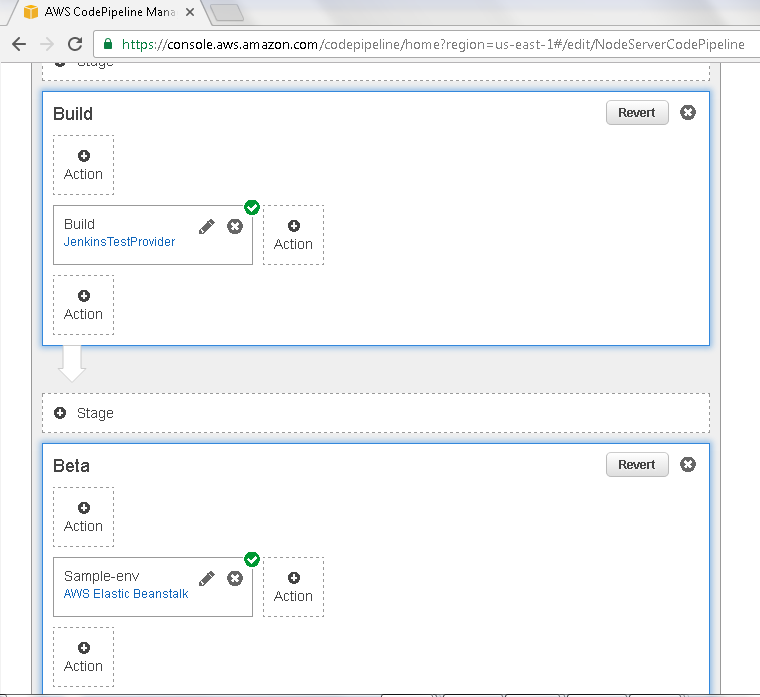
Figure 35. Beta phase updated
Click on Save pipeline changes as shown in Figure 36.
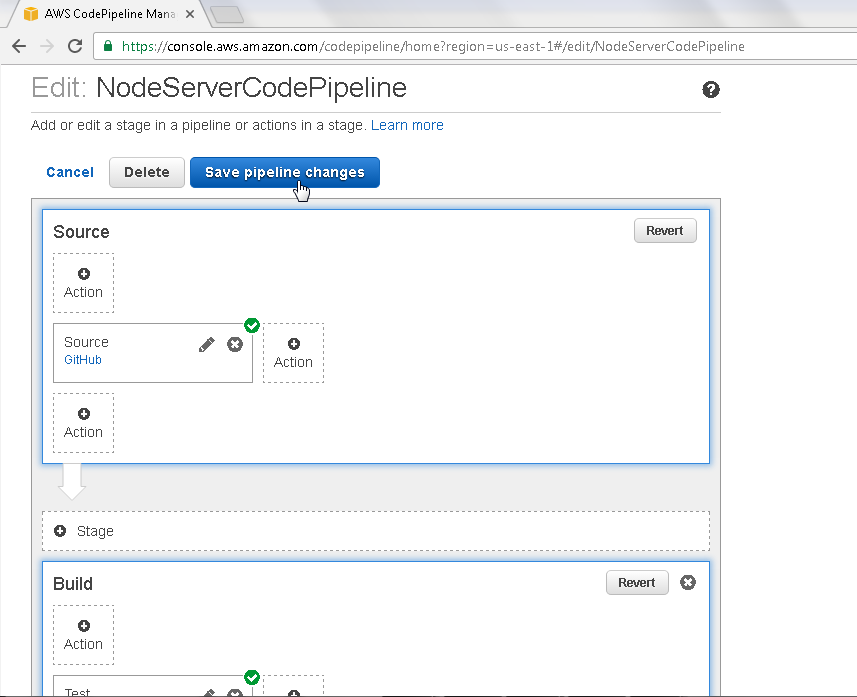
Figure 36. Save pipeline changes
In confirmation dialog click on Save and continue as shown in Figure 37.
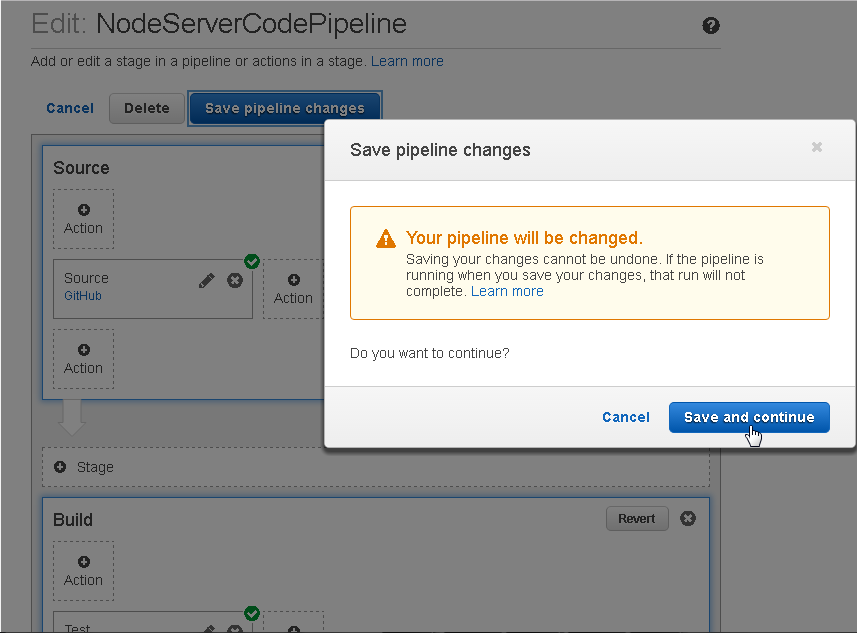
Figure 37. Save and continue
The Pipeline update message gets displayed. The new updates have not yet run in the CodePipeline. Click on Release change as shown in Figure 38 to release the update to the CodePipeline. One or more CodePipeline stages may have run previously and may indicate a “Succeeded” or some other message. The previous state of the CodePipeline is not used when a new update is released to the CodePipeline.
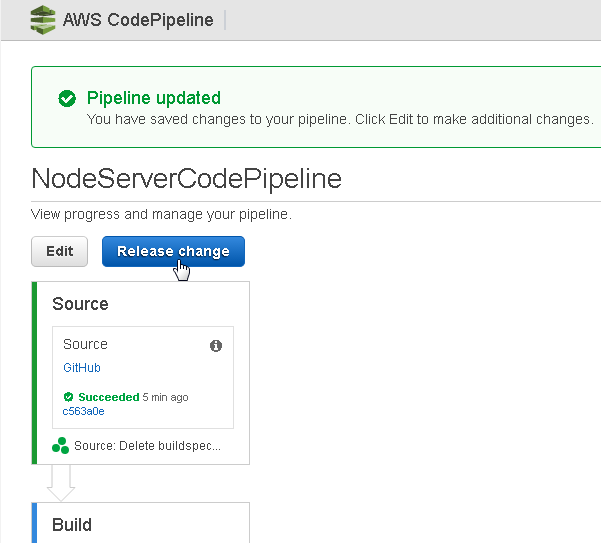
Figure 38. Release change
Click on Release in the confirmation prompt as shown in Figure 39.

Figure 39. Release change>Release
The Source stage starts again if it had run previously, as indicated by the In Progress message in Figure 40. Subsequent stages, such as Build and Beta, have not run yet even though they could indicate a state such as “Succeeded” from a previous run of the CodePipeline.
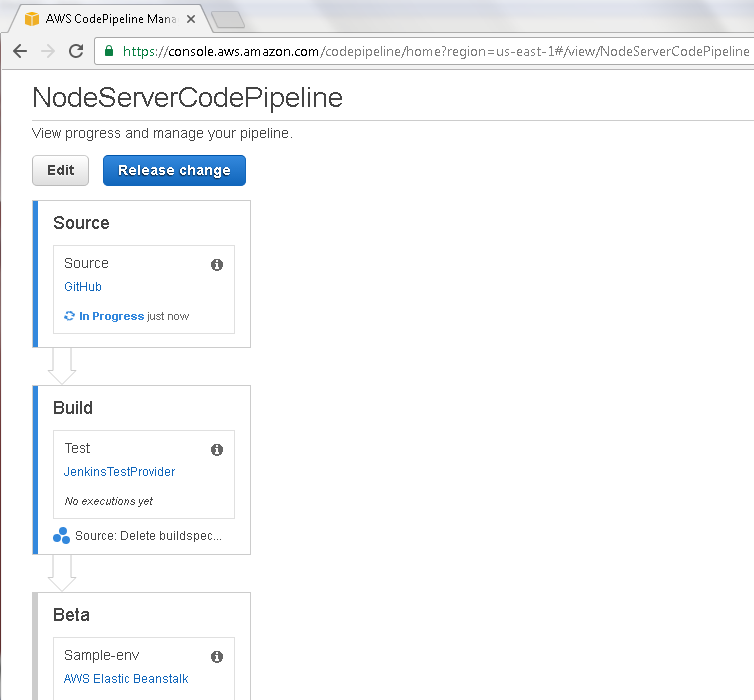
Figure 40. Running Source stage again
Running the CodePipeline
A CodePipeline does not have to be started explicitly. A CodePipeline starts automatically after any of the following:
- A new CodePipeline has been created.
- A CodePipeline update/s have been released to the pipeline with Release Change
- After a successful run of the CodePipeline if GitHub is updated
After the Source phase completes with “Succeeded” the Build phase starts as indicated by the “In Progress” message in Figure 41.
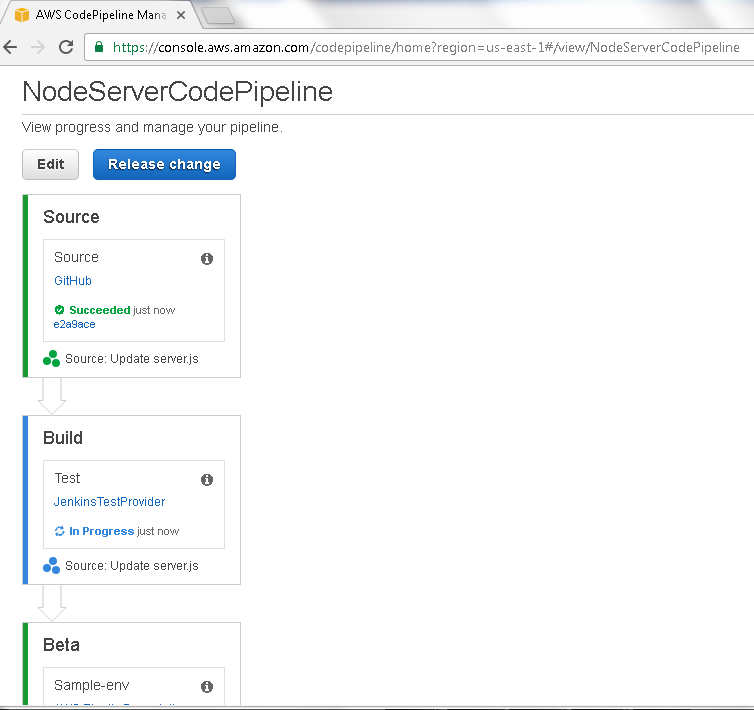
Figure 41. Build stage In Progress
The JenkinsTestProvider gets invoked to test and build the CodePipeline code. While a Build is running, or after it has completed, click on theJenkinsTestProvider link as shown in Figure 42 to find the status of the Jenkins project used to test and build.
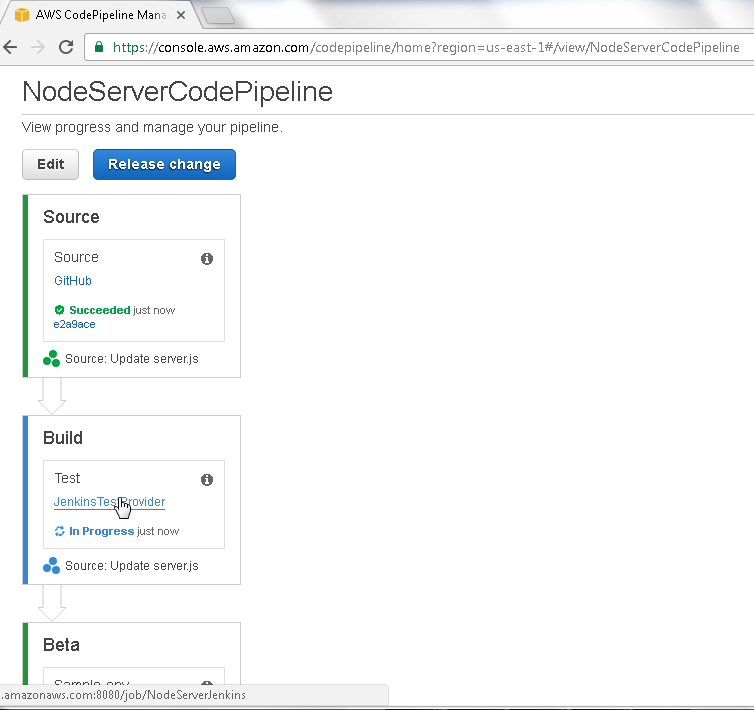
Figure 42. Build>JenkinsTestProvider link
As the Jenkins project build history indicates, a built has completed successfully as shown in Figure 43.

Figure 43. Jenkins project build history
The Workspace for the completed project lists the Dockerfile and server.js as shown in Figure 44.
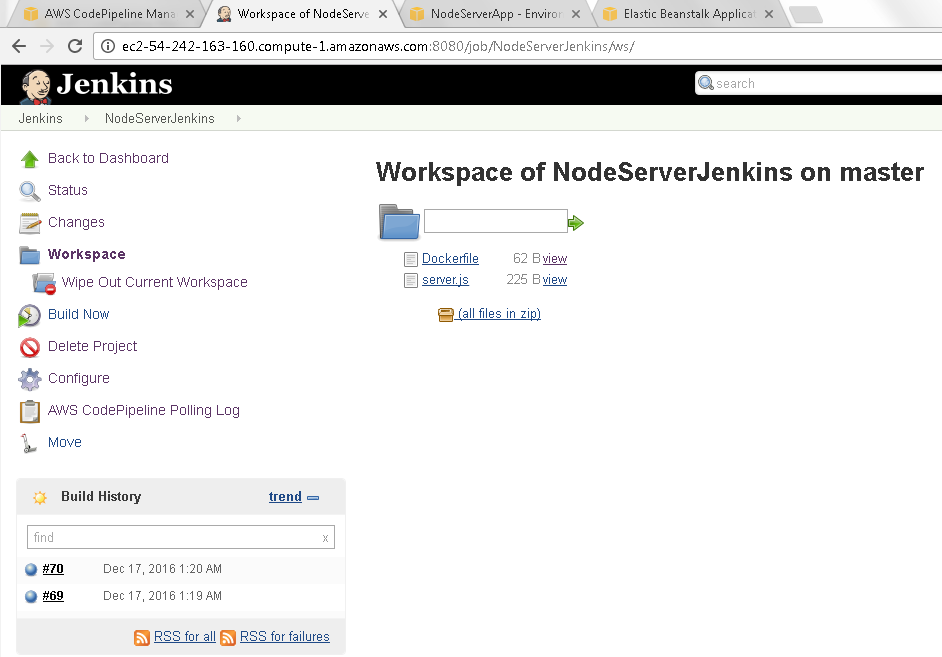
Figure 44. Workspace files
A Jenkins Project that completes successfully has the green (bluish actually) icon for the project in the Jenkins Dashboard as shown in Figure 45.
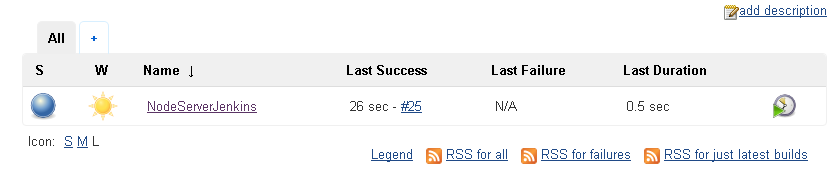
Figure 45. Jenkins Project completed successfully
A Jenkins project build that fails has a red icon for the project in the Dashboard as shown in Figure 46.

Figure 46. Failed Jenkins Project
As the JenkinsTestProvider completed successfully the console output may be displayed from the build history as shown in Figure 47.

Figure 47. Console Output
The Console Output gets displayed as shown in Figure 48.
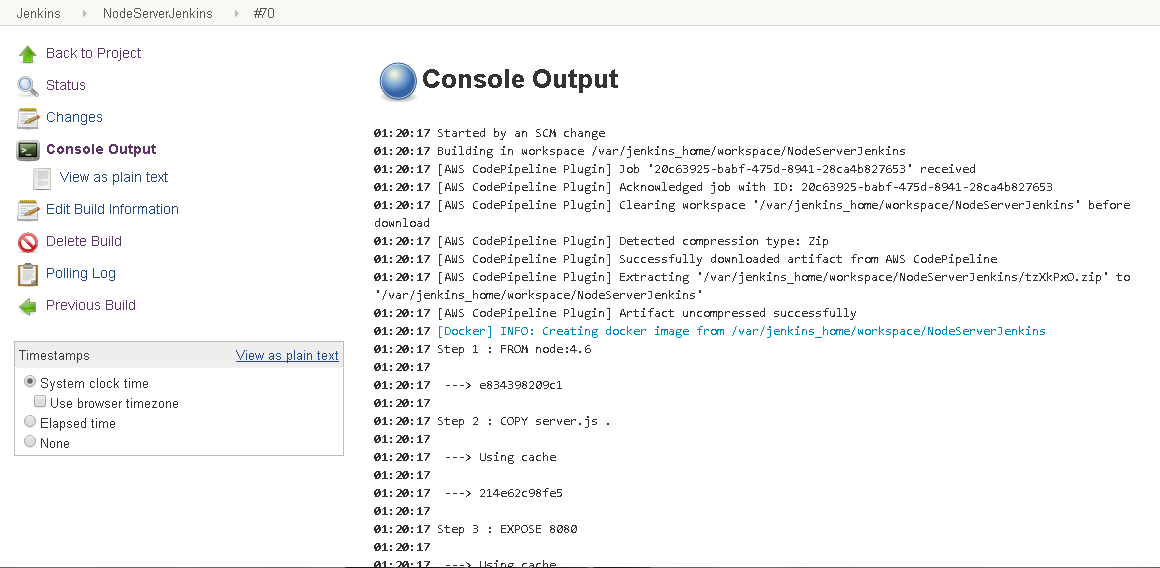
Figure 48. Console Output
As the Console Output indicates, the build finished with “SUCCESS” as shown in Figure 49.
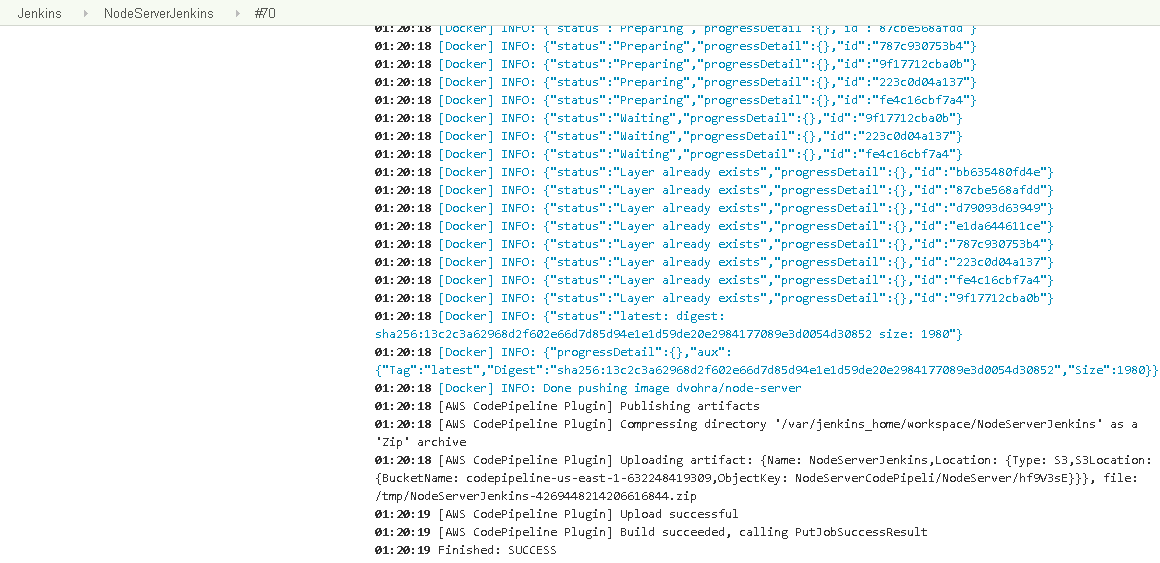
Figure 49. Build Finished with SUCCESS
A more detailed console output is listed:
01:20:17 Started by an SCM change

01:20:17 Building in workspace /var/jenkins_home/workspace/NodeServerJenkins

01:20:17 [AWS CodePipeline Plugin] Job '20c63925-babf-475d-8941-28ca4b827653' received

01:20:17 [AWS CodePipeline Plugin] Acknowledged job with ID: 20c63925-babf-475d-8941-28ca4b827653

01:20:17 [AWS CodePipeline Plugin] Clearing workspace '/var/jenkins_home/workspace/NodeServerJenkins' before download

01:20:17 [AWS CodePipeline Plugin] Detected compression type: Zip

01:20:17 [AWS CodePipeline Plugin] Successfully downloaded artifact from AWS CodePipeline

01:20:17 [AWS CodePipeline Plugin] Extracting
    '/var/jenkins_home/workspace/NodeServerJenkins/tzXkPxO.zip' to '/var/jenkins_home/workspace/NodeServerJenkins'

01:20:17 [AWS CodePipeline Plugin] Artifact uncompressed successfully

01:20:17 [Docker] INFO: Creating docker image from /var/jenkins_home/workspace/NodeServerJenkins

01:20:17 Step 1 : FROM node:4.6

01:20:17

01:20:17  ---> e834398209c1

01:20:17

01:20:17 Step 2 : COPY server.js .

01:20:17

01:20:17  ---> Using cache

01:20:17

01:20:17  ---> 214e62c98fe5

01:20:17

01:20:17 Step 3 : EXPOSE 8080

01:20:17

01:20:17  ---> Using cache

01:20:17

01:20:17  ---> ce9b88e90098

01:20:17

01:20:17 Step 4 : CMD node server.js

01:20:17

01:20:17  ---> Using cache

01:20:17

01:20:17  ---> a6ba69beddd2

01:20:17

01:20:17 Successfully built a6ba69beddd2

01:20:17

01:20:17 [Docker] INFO: Sucessfully created image dvohra/node-server

01:20:17 [Docker] INFO: created container id
    a4e716dea9849e15d48afc236912ff244a168e71bb8dad6b511a26d6f546985d (from image dvohra/node-server)

01:20:17 [Docker] INFO: Pushing image dvohra/node-server

01:20:18 [Docker] INFO: {"status":"The push refers to a repository [docker.io/dvohra/node-server]"}

01:20:18 [Docker] INFO: {"status":"Preparing","progressDetail":{},"id":"bb635480fd4e"}

01:20:18 [Docker] INFO: {"status":"Preparing","progressDetail":{},"id":"e1da644611ce"}

01:20:18 [Docker] INFO: {"status":"Preparing","progressDetail":{},"id":"d79093d63949"}

01:20:18 [Docker] INFO: {"status":"Preparing","progressDetail":{},"id":"87cbe568afdd"}

01:20:18 [Docker] INFO: {"status":"Preparing","progressDetail":{},"id":"787c930753b4"}

01:20:18 [Docker] INFO: {"status":"Preparing","progressDetail":{},"id":"9f17712cba0b"}

01:20:18 [Docker] INFO: {"status":"Preparing","progressDetail":{},"id":"223c0d04a137"}

01:20:18 [Docker] INFO: {"status":"Preparing","progressDetail":{},"id":"fe4c16cbf7a4"}

01:20:18 [Docker] INFO: {"status":"Waiting","progressDetail":{},"id":"9f17712cba0b"}

01:20:18 [Docker] INFO: {"status":"Waiting","progressDetail":{},"id":"223c0d04a137"}

01:20:18 [Docker] INFO: {"status":"Waiting","progressDetail":{},"id":"fe4c16cbf7a4"}

01:20:18 [Docker] INFO: {"status":"Layer already exists","progressDetail":{},"id":"bb635480fd4e"}

01:20:18 [Docker] INFO: {"status":"Layer already exists","progressDetail":{},"id":"87cbe568afdd"}

01:20:18 [Docker] INFO: {"status":"Layer already exists","progressDetail":{},"id":"d79093d63949"}

01:20:18 [Docker] INFO: {"status":"Layer already exists","progressDetail":{},"id":"e1da644611ce"}

01:20:18 [Docker] INFO: {"status":"Layer already exists","progressDetail":{},"id":"787c930753b4"}

01:20:18 [Docker] INFO: {"status":"Layer already exists","progressDetail":{},"id":"223c0d04a137"}

01:20:18 [Docker] INFO: {"status":"Layer already exists","progressDetail":{},"id":"fe4c16cbf7a4"}

01:20:18 [Docker] INFO: {"status":"Layer already exists","progressDetail":{},"id":"9f17712cba0b"}

01:20:18 [Docker] INFO: {"status":"latest: digest:
    sha256:13c2c3a62968d2f602e66d7d85d94e1e1d59de20e2984177089e3d0054d30852 size: 1980"}

01:20:18 [Docker] INFO: {"progressDetail":{},"aux":{"Tag":"latest","Digest":
    "sha256:13c2c3a62968d2f602e66d7d85d94e1e1d59de20e2984177089e3d0054d30852","Size":1980}}

01:20:18 [Docker] INFO: Done pushing image dvohra/node-server

01:20:18 [AWS CodePipeline Plugin] Publishing artifacts

01:20:18 [AWS CodePipeline Plugin] Compressing directory '/var/jenkins_home/workspace/NodeServerJenkins' as a 'Zip' archive

01:20:18 [AWS CodePipeline Plugin] Uploading artifact: {Name: NodeServerJenkins,Location:
    {Type: S3,S3Location: {BucketName: codepipeline-us-east-1-632248419309,ObjectKey: NodeServerCodePipeli/NodeServer/hf9V3sE}}},
    file: /tmp/NodeServerJenkins-4269448214206616844.zip

01:20:19 [AWS CodePipeline Plugin] Upload successful

01:20:19 [AWS CodePipeline Plugin] Build succeeded, calling PutJobSuccessResult

01:20:19 Finished: SUCCESS
After the Build phase has Succeeded the Beta deployment phase starts as shown in Figure 50.
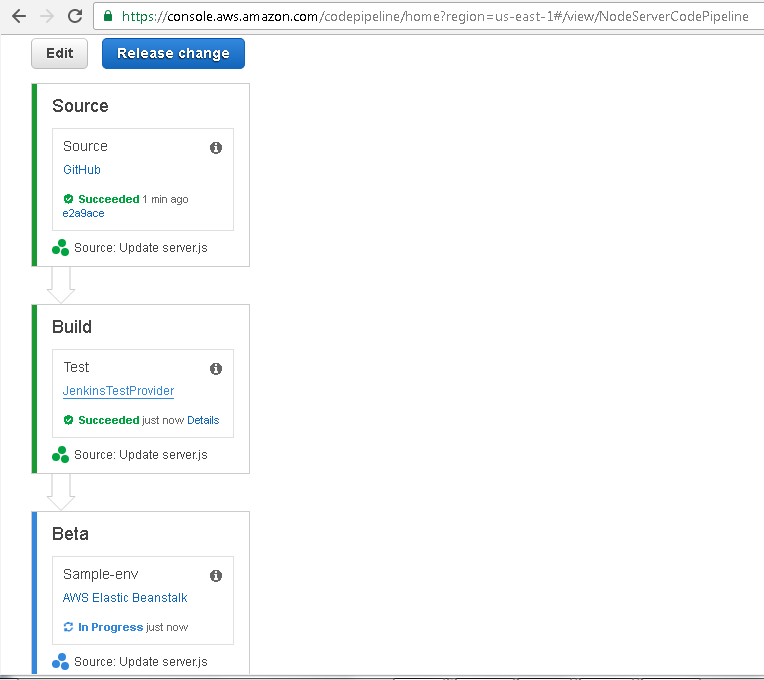
Figure 50. Beta phase In Progress
After the Beta deployment phase also completes successfully, all phases in the CodePipeline are listed as “Succeeded” as shown in Figure 51.
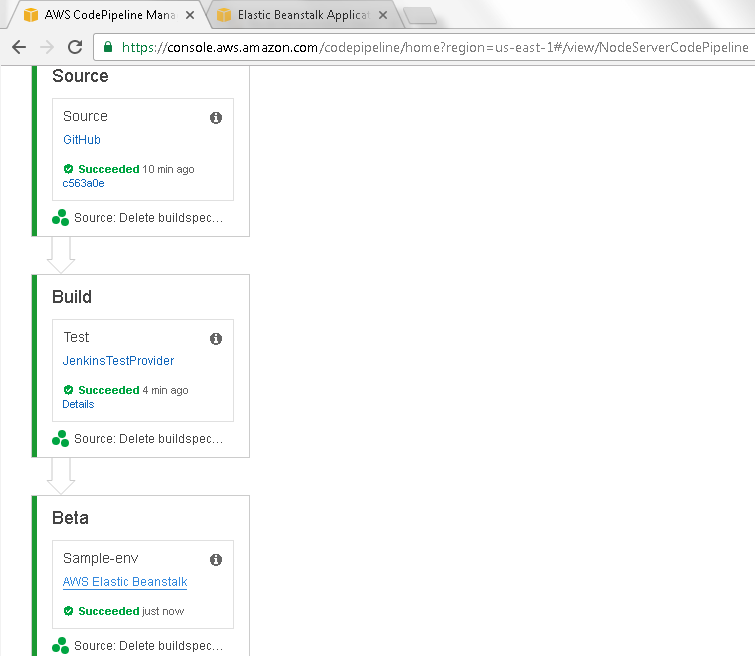
Figure 51. All phases of CodePipeline succeeded
The Elastic Beanstalk NodeServerApp environment indicates that a CodePipeline application has been deployed successfully as shown in Figure 52.
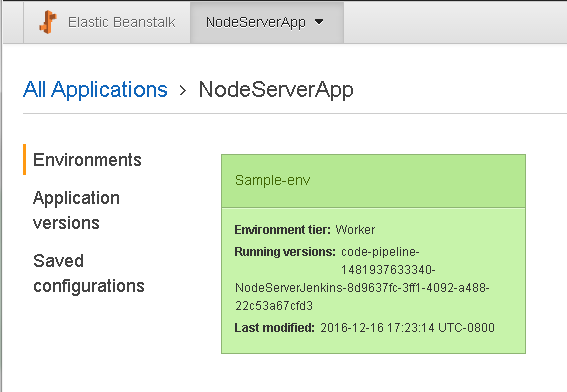
Figure 52. Elastic Beanstalk NodeServerApp>Sample-env
The Elastic Beanstalk environment lists the events, including “New application version was deployed to running EC2 instances” as shown in Figure 53.
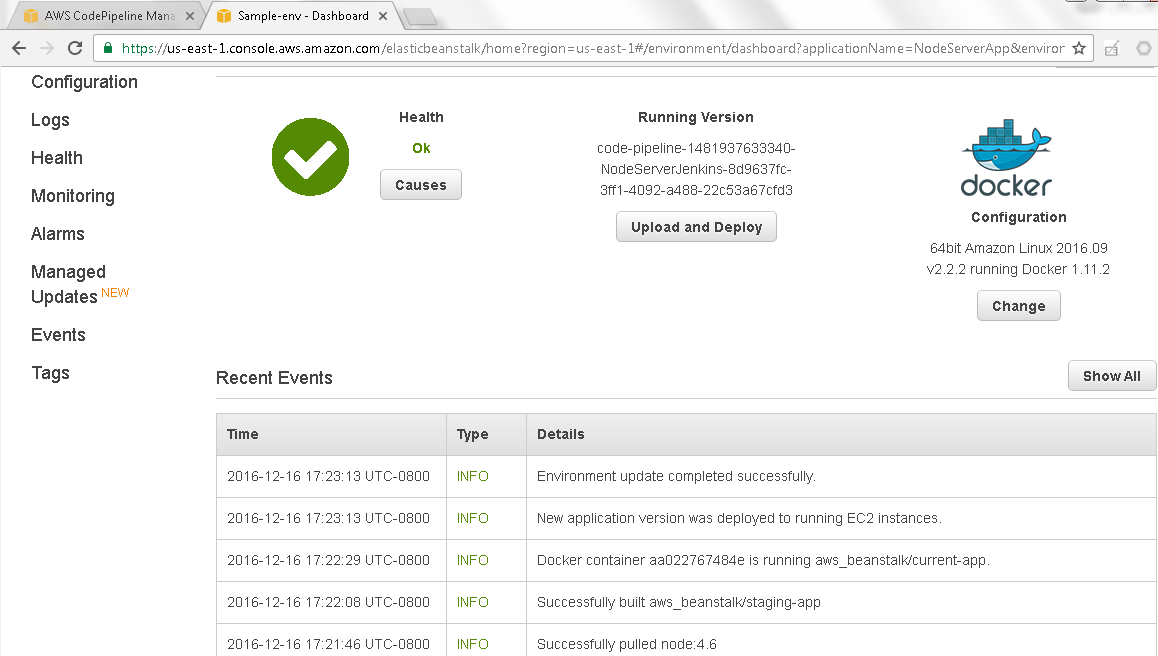
Figure 53. Recent Events
To find detail about the Beta deployment phase click on the link AWS Elastic Beanstalk as shown in Figure 54.
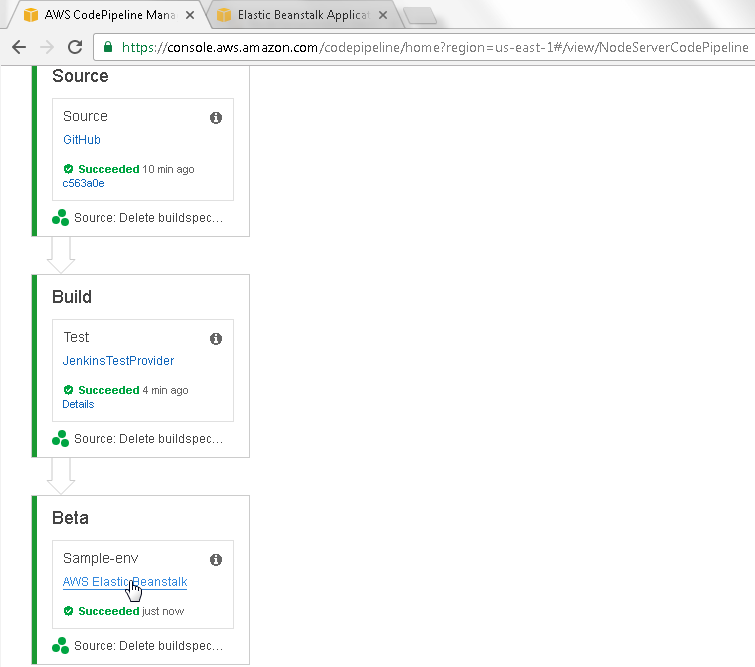
Figure 54. Beta>AWS ElasticBeanstalk link
The AWS Elastic Beanstalk application detail gets displayed as shown in Figure 55.
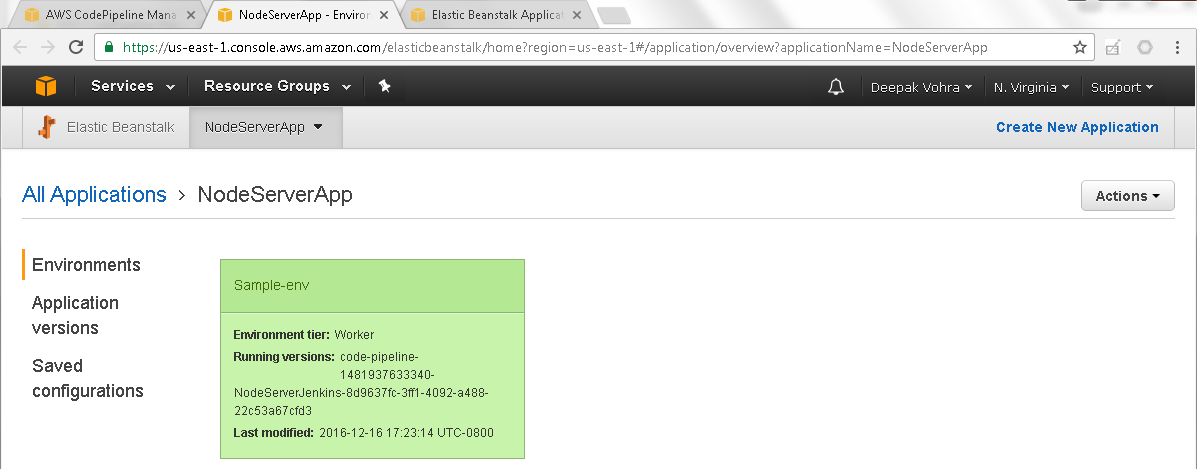
Figure 55. All Applications>NodeServerApp
A Docker image gets uploaded to Docker Hub as shown in Figure 56 during the test and build phase run in Jenkins.
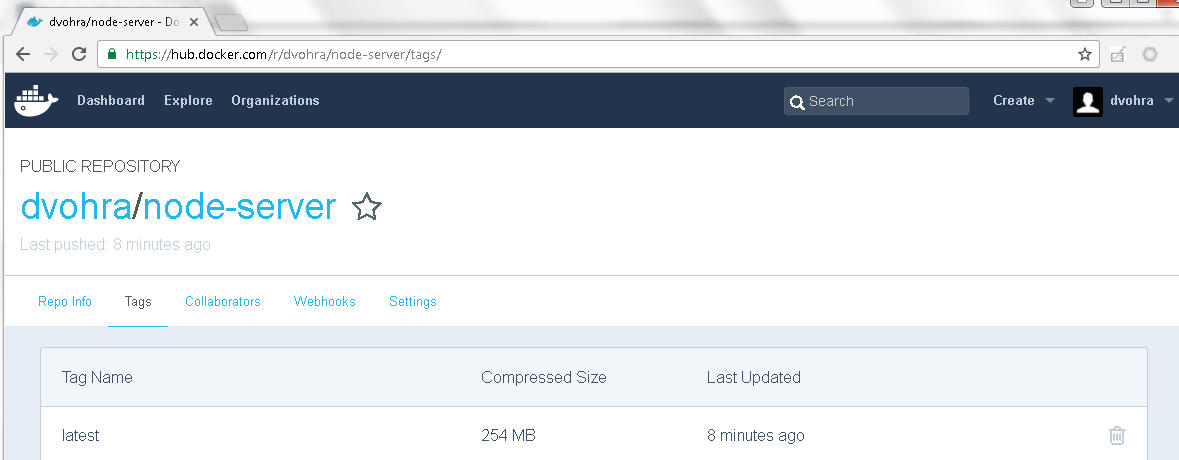
Figure 56. Docker Image uploaded to Docker Hub
The CodePipeline continues to run as the Jenkins project configuration was set to poll the Source Code Management periodically. If GitHub code is updated the complete CodePipeline runs again.
Converting Between a Continuous Deployment CodePipeline and a Continuous Delivery CodePipeline
The difference between continuous deployment and continuous delivery is that while continuous deployment deploys continuously to production, continuous delivery stages an application for deployment to production. At the end of a continuous delivery CodePipeline, the application is production ready but not yet deployed to production. CodePipeline provides certain features to convert between a continuous delivery and continuous deployment pipeline:
-Add an action that requires user input to continue
-Enable or Disable transition between stages of a CodePipeline
First, we shall discuss adding an action in the Build stage that requires a user’s approval to continue. To add an Action to the Build stage click on the edit icon for the Build stage as shown in Figure 57.
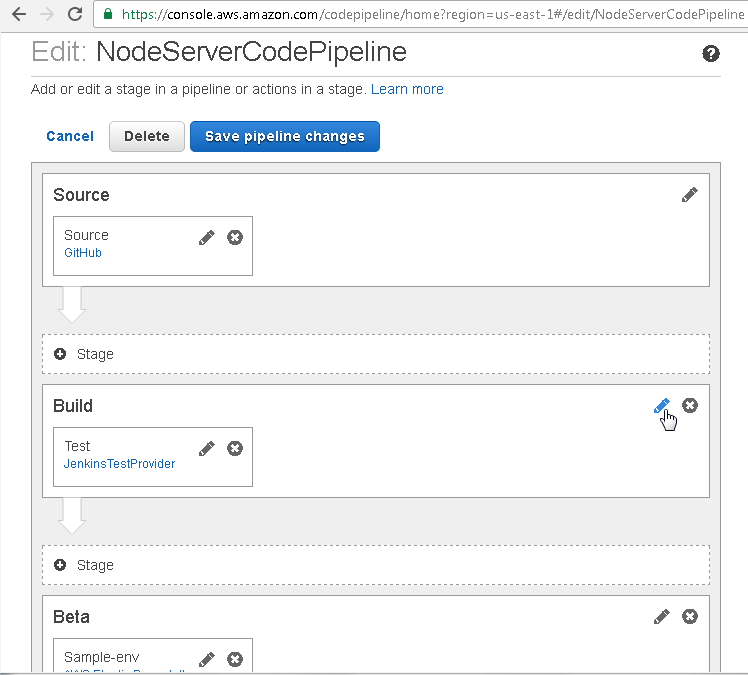
Figure 57. Build>Edit
In the Add action selection, select Action category as Approval as shown in Figure 58.
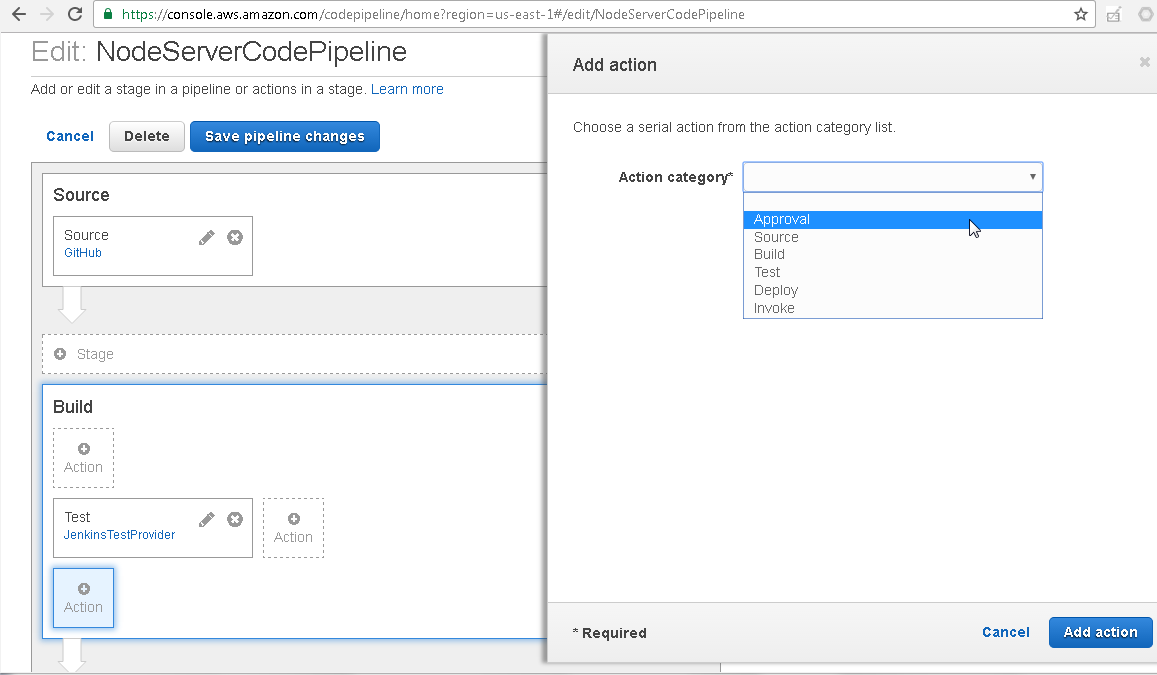
Figure 58. Action category>Approval
Specify an Action name (Approval) and select Action type as Manual approval as shown in Figure 59.
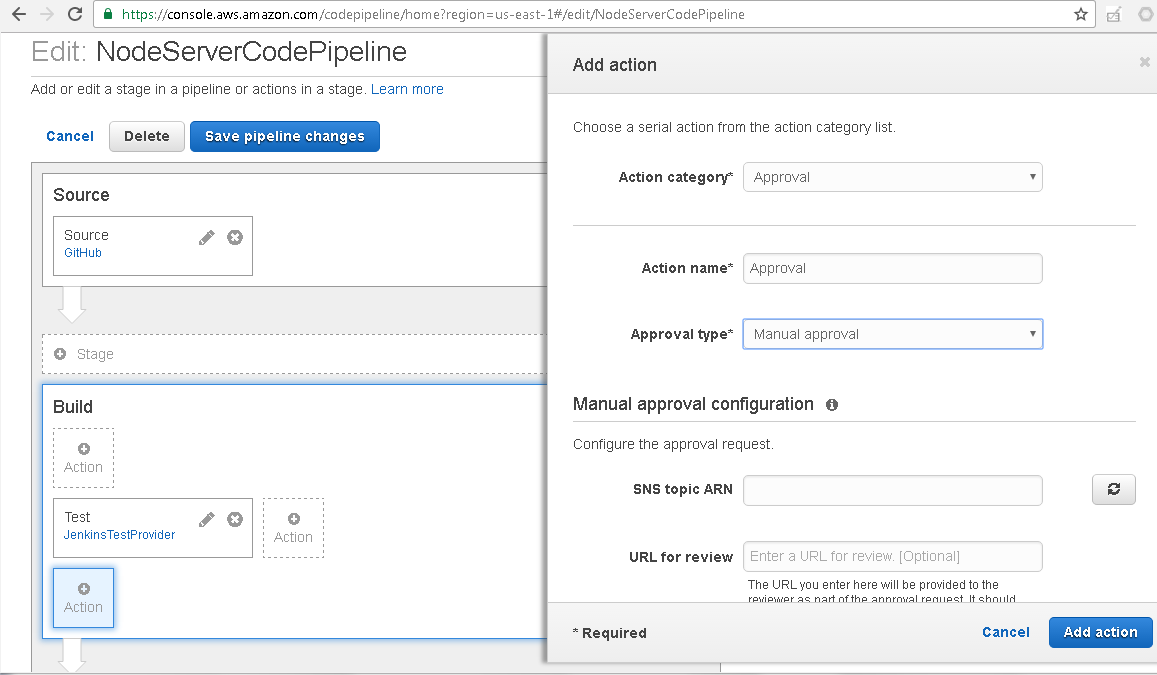
Figure 59. Adding action of type Approval
Click on Add action as shown in Figure 60.
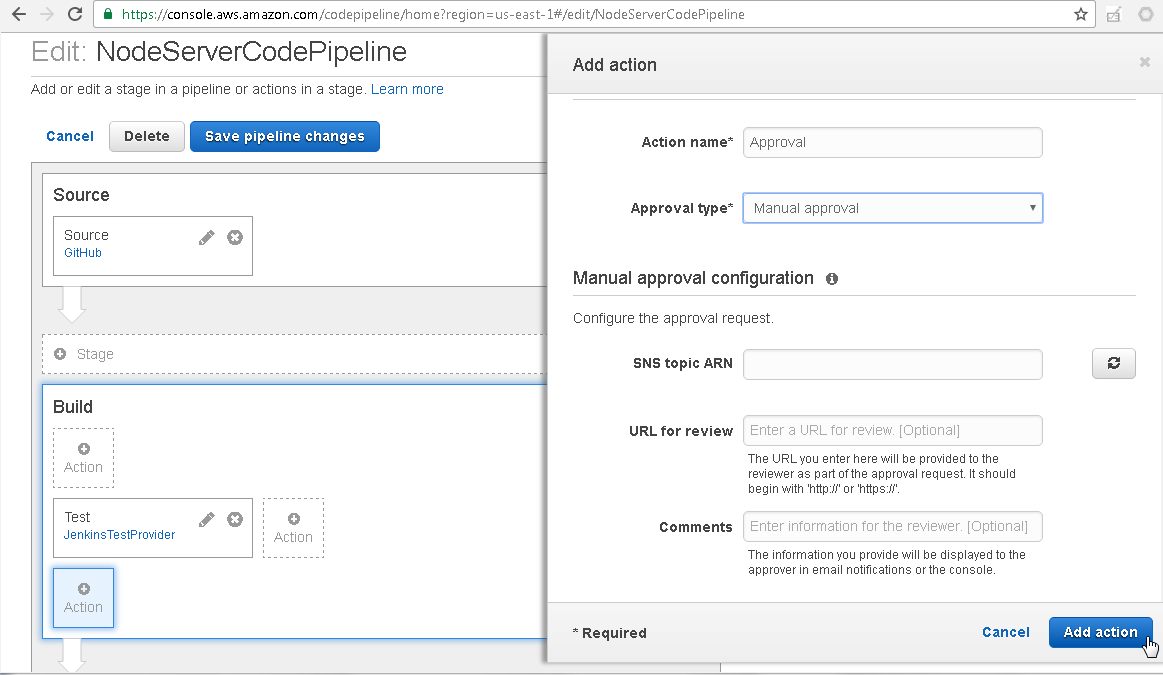
Figure 60. Add action
Click on Save pipeline changes as shown in Figure 61.

Figure 61. Save pipeline changes
In the confirmation dialog click on Save and continue as shown in Figure 62.
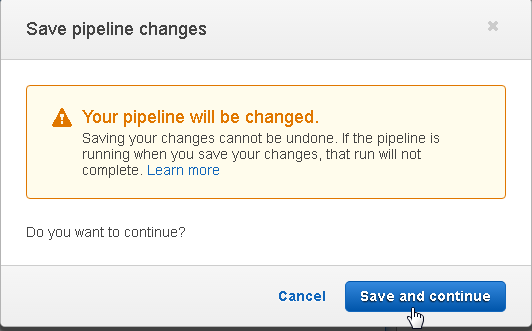
Figure 62. Save pipeline changes
A Pipeline updated message gets output. Click on Release change as shown in Figure 63 to release the update to the CodePipeline.
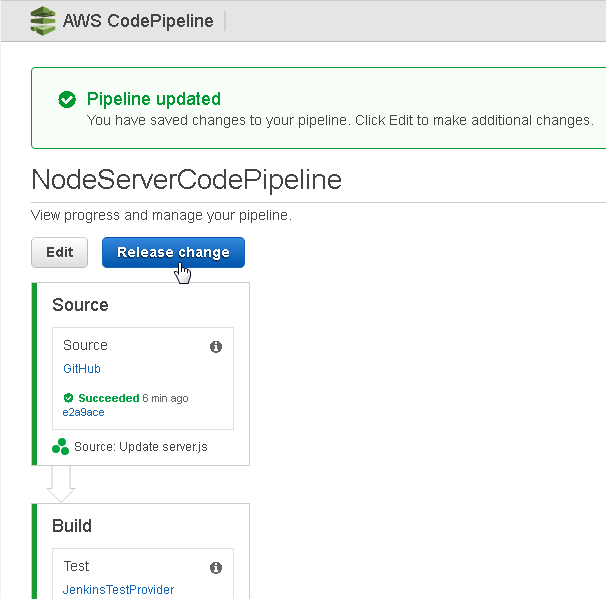
Figure 63. Release change
In the confirmation dialog click on Release as shown in Figure 64.
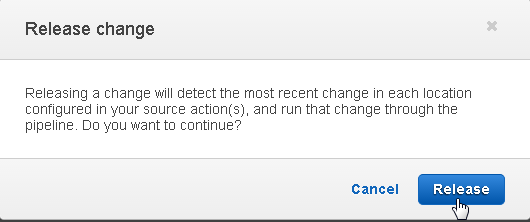
Figure 64. Release change>Release
A new Action called Approval gets added to the Build stage subsequent to the Test Action. The Approval Action has not been run yet. The complete CodePipeline has to run again after an update has been made to any of the stages. The Source stage Action, also called Source, gets started, as indicated by In Progress in Figure 65. The Test Action in the Build stage could indicate a status such as Succeeded or Failed, but it does not apply to the new run of the CodePipeline, which has started after the update.
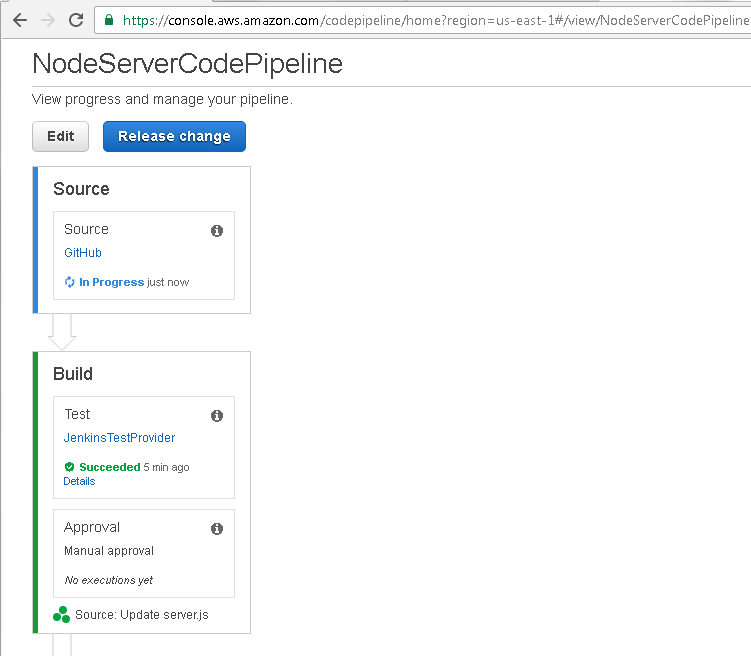
Figure 65. CodePipeline restarted
If the Approval Action were added before the first run of the CodePipeline, the Build and Beta Stages would not list a status as shown in Figure 66 because they have not been run yet even once.

Figure 66. Build and Beta Stages do not list a status
After the Source Action in the Source stage has completed successfully, as indcated by the Succeeded message, the Test Action in the Build stage starts, as indicated by the In Progress message in Figure 67.
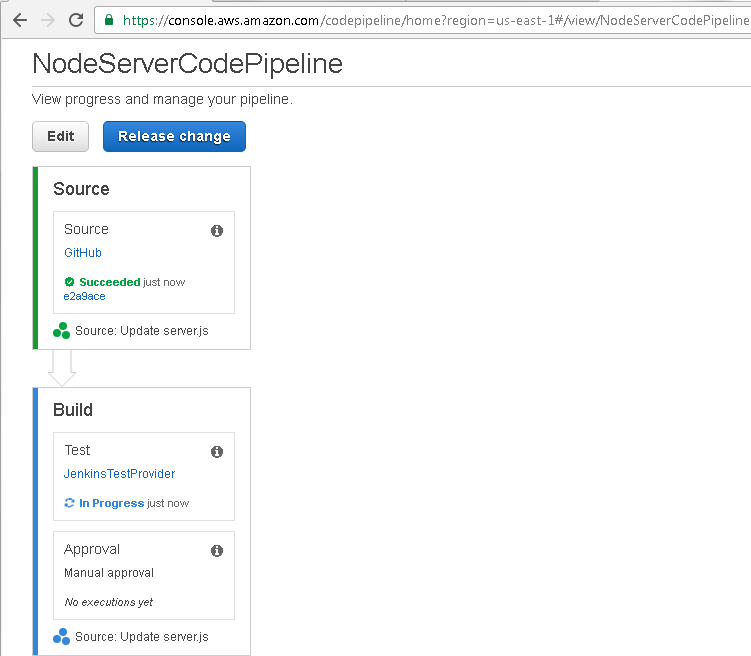
Figure 67. Build stage In Progress
After the Test Action has completed successfully, as indicated by the Succeeded message in Figure 68, the Approval Action starts. The Approval Action requires user input, for which a Review button and a message “Waiting for approval” gets displayed. In effect, a continuous deployment CodePipeline has been converted to a continuous delivery pipeline.
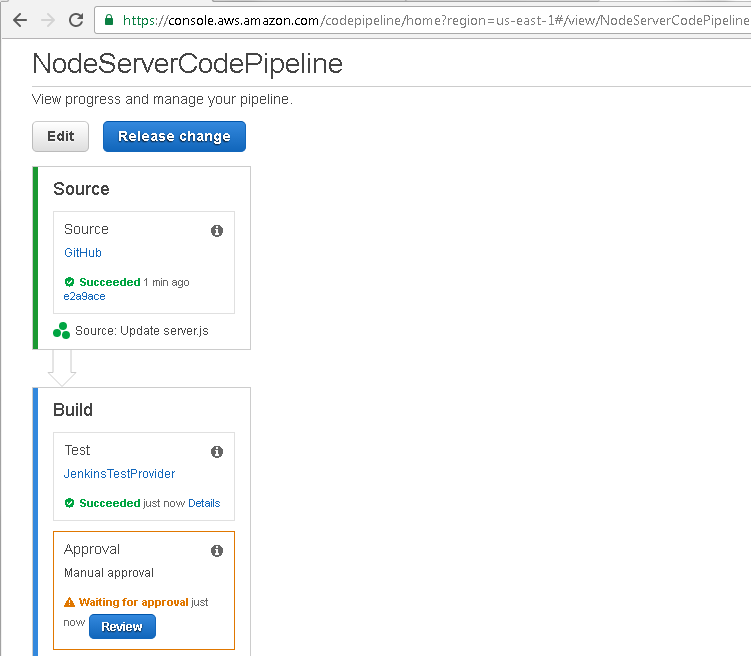
Figure 68. Build>Approval>Review
Click on Review as shown in Figure 69.

Figure 69. Review
In Approve or reject the revision, click on Approve as shown in Figure 70 to continue running the CodePipeline to the subsequent Action or Stage, or click on Reject to not continue running the CodePipeline. Optionally a Comment may be added. Add a comment and click on Approve.

Figure 70. Approve or reject the revision
The Approval Action also gets completed successfully, as indicated by the Succeeded message in Figure 71.
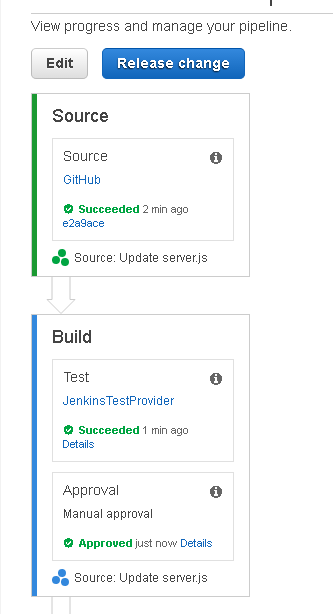
Figure 71. Approval Approved
The Beta deployment Stage gets started, as indicated by the In Progress message in Figure 72.
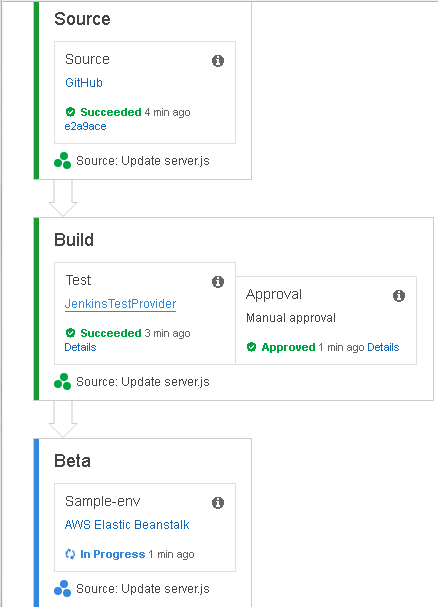
Figure 72. Beta phase started
When the Beta deployment Action Sample-env also completes successfully the Beta Stage has also completed successfully as shown in Figure 73.
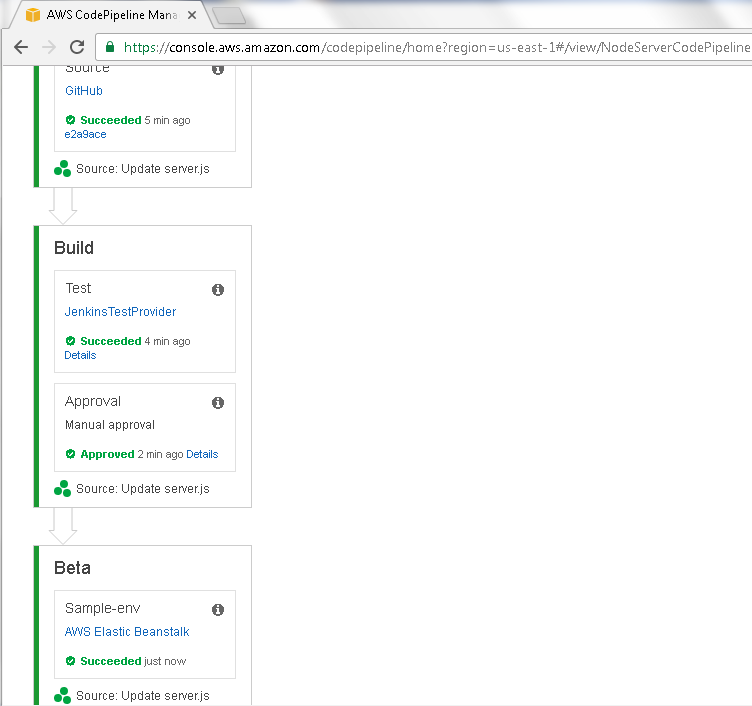
Figure 73. Beta completed
Next, we shall discuss another feature to convert between a continuous deployment and a continuous delivery CodePipeline. The transition from every Stage to the subsequent Stage has an arrow. A symbol in the arrow is grayed out by default to indicate that transition is not to be disabled. To disable a transition click on the arrow. As an example, to disable the transition from the Build to the Beta Stage click on the arrow between the two Stages as shown in Figure 74.
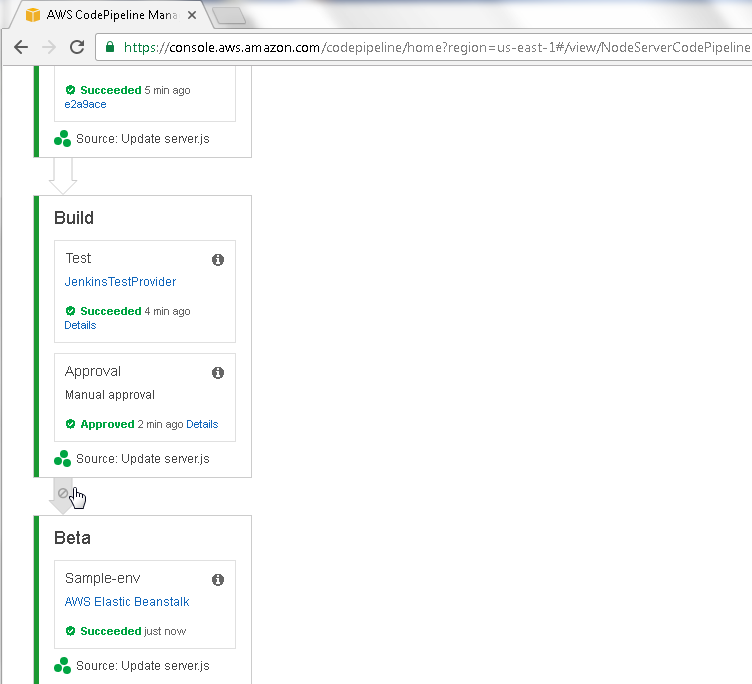
Figure 74. Build->Beta Arrow
A Disable transition message dialog gets displayed as shown in Figure 75.
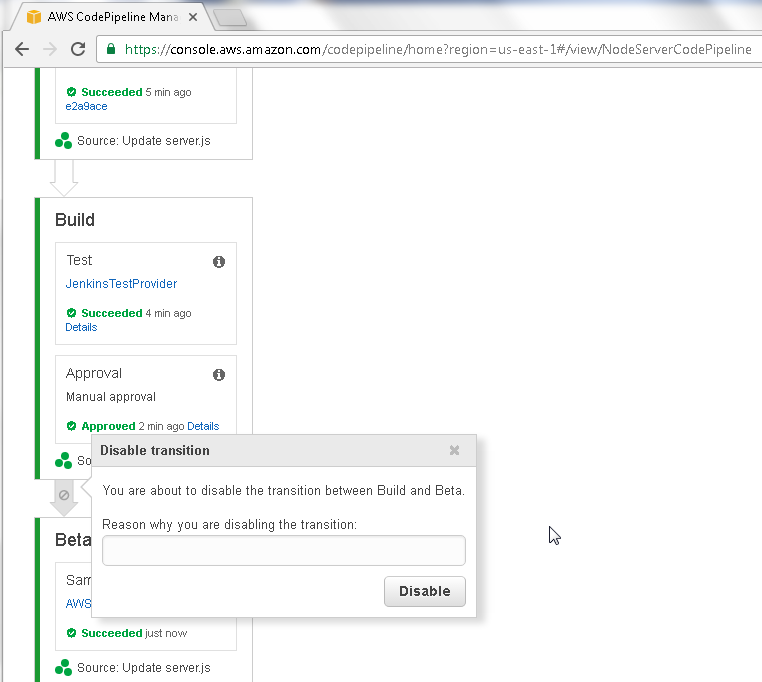
Figure 75. Disable transition
Optionally, specify a Reason for disabling transition and click on Disable as shown in Figure 76.
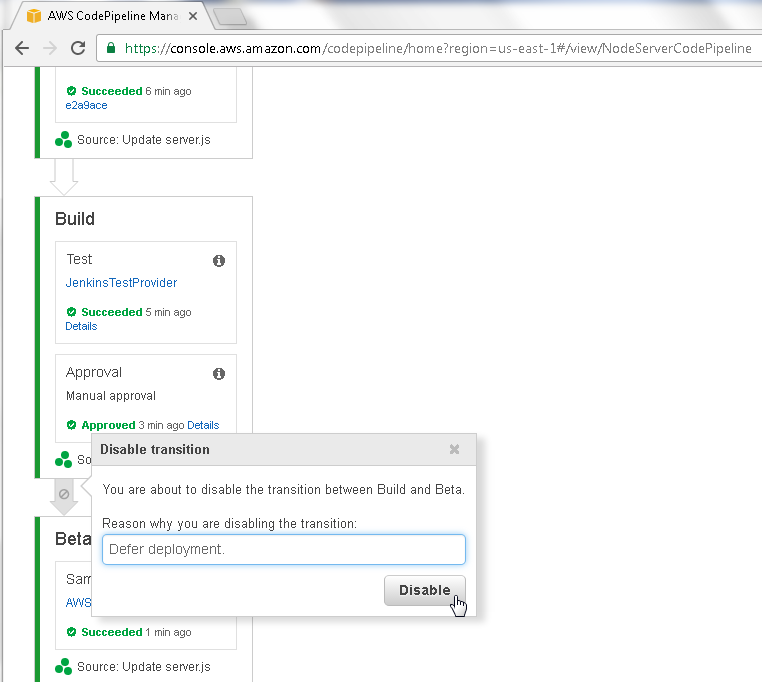
Figure 76. Disable transition>Disable
The transition from the Build to the Beta Stage gets disabled, as indicated by the symbol in the arrow becoming enabled as shown in Figure 77. The Beta Stage Action Sample-env is listed as Succeeded from a previous run. When the CodePipeline is run the CodePipeline does not transition from the Build Stage to the Beta Stage till the transition is enabled by user.
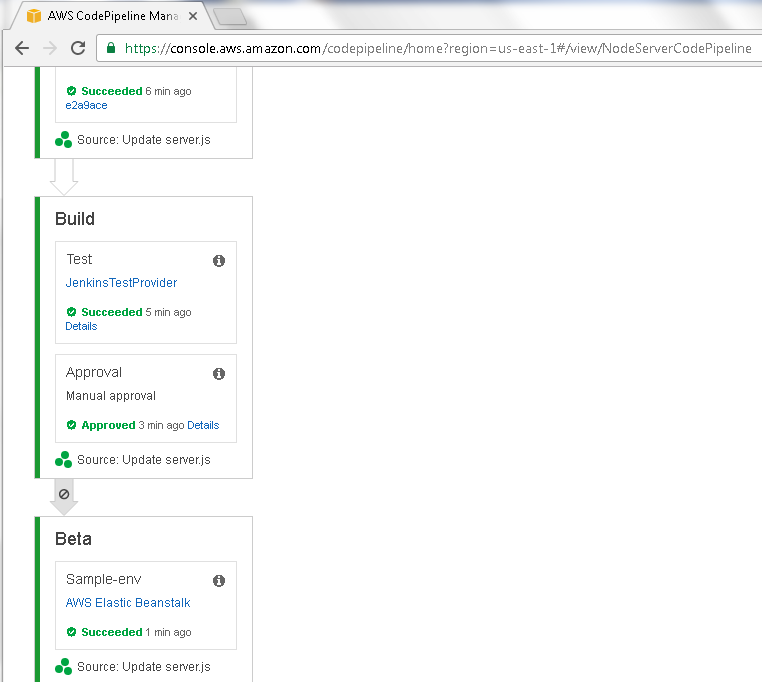
Figure 77. Arrow enabled
Next, we shall demonstrate how the CodePipeline does not transition from Build to Beta. But first, remove the Approval Action, as we have already demonstrated using the Approval Action. Click on the ‘x’ for the Approval Action as shown in Figure 78.
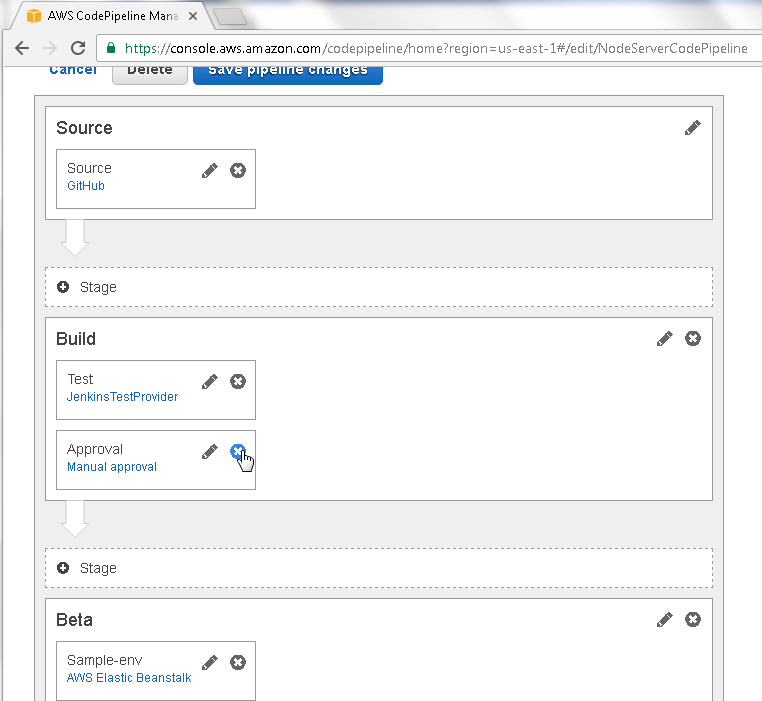
Figure 78. Deleting Approval
In the Delete confirmation dialog click on Delete as shown in Figure 79.
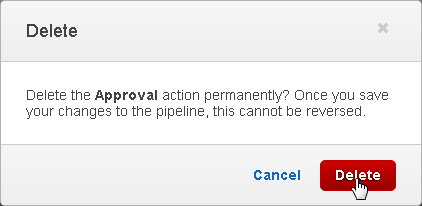
Figure 79. Delete
The Approval Action gets deleted. To apply the updates, which include disabling the transition from the Build to Beta Stage and removing the Approval Action, click on the Save pipeline changes button as shown in Figure 80.
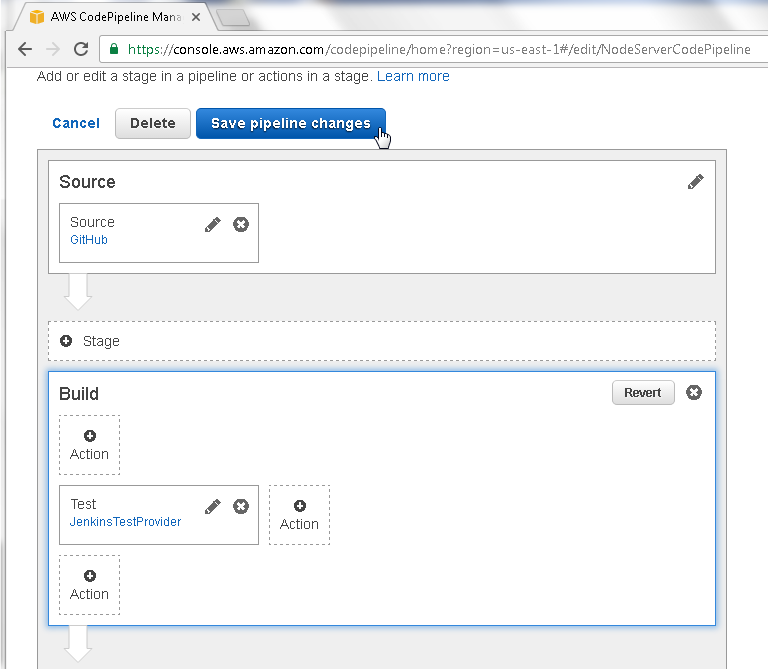
Figure 80. Save pipeline changes
In the confirmation dialog click on Save, and continue as shown in Figure 81.
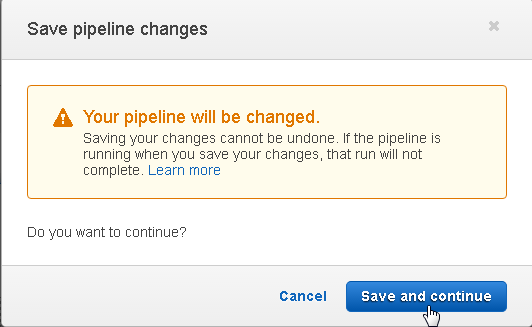
Figure 81. Save pipeline changes
The CodePipeline gets updated. To run the CodePipeline again with the updates applied click on Release change as shown in Figure 82.
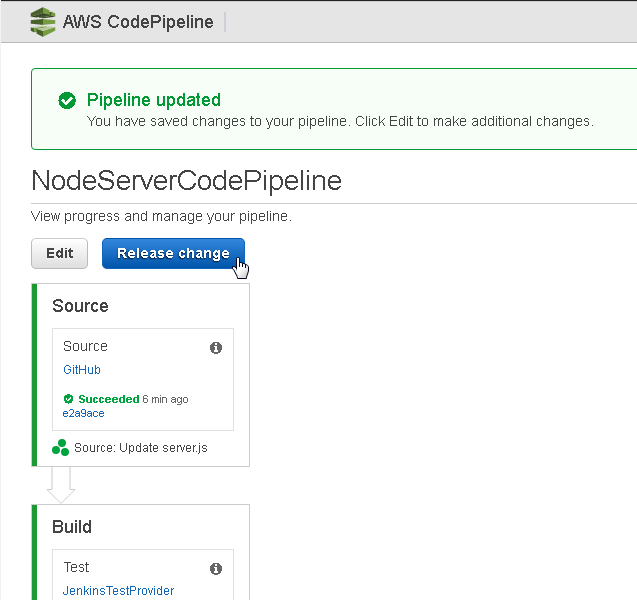
Figure 82. Release change
Click on Release in the confirmation dialog as shown in Figure 83.
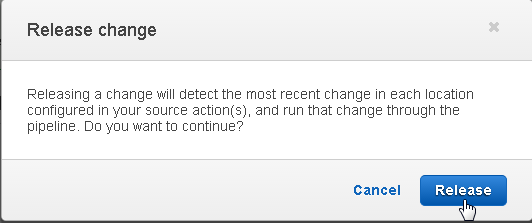
Figure 83. Release change>Release
The Source Stage Action, also called Source, gets started, as indicated by the In Progress message in Figure 84.
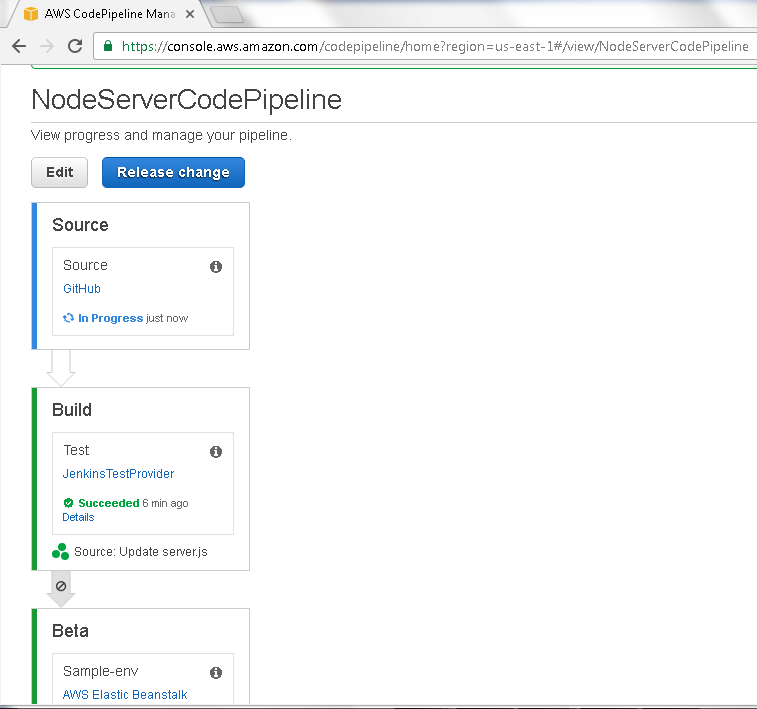
Figure 84. Source In Progress
After the Source Stage completes successfully the Build Stage starts, as indicated by the In Progress message in Figure 85.
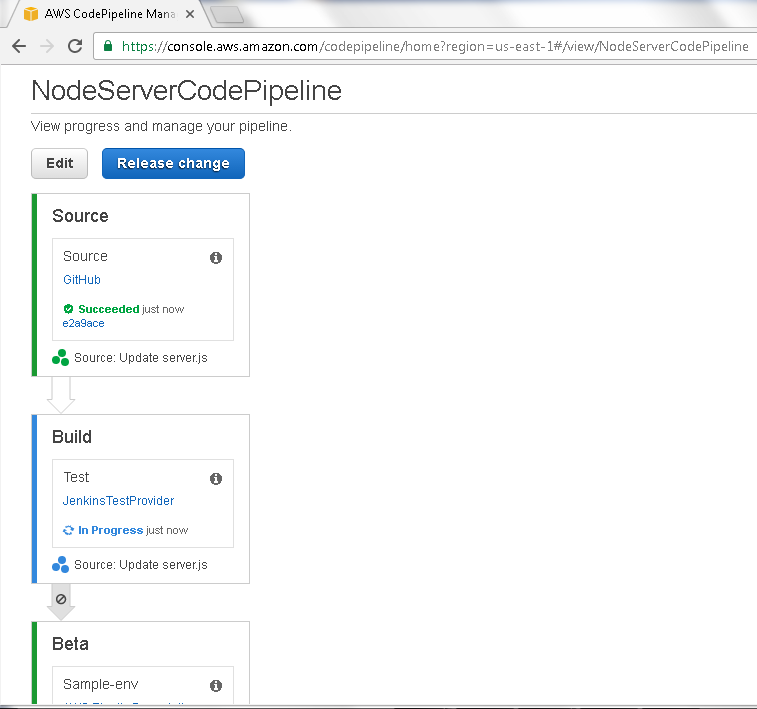
Figure 85. Build In Progress
The Build Stage Action called JenkinsTestProvider also completes successfully and the Jenkins test provider detail may be found from the JenkinsTestProvider link, as we discussed earlier, and as shown in Figure 86.

Figure 86. Build>JenkinsTestProvider link
The NodeServerJenkins project build has completed successfully as shown in Figure 87.
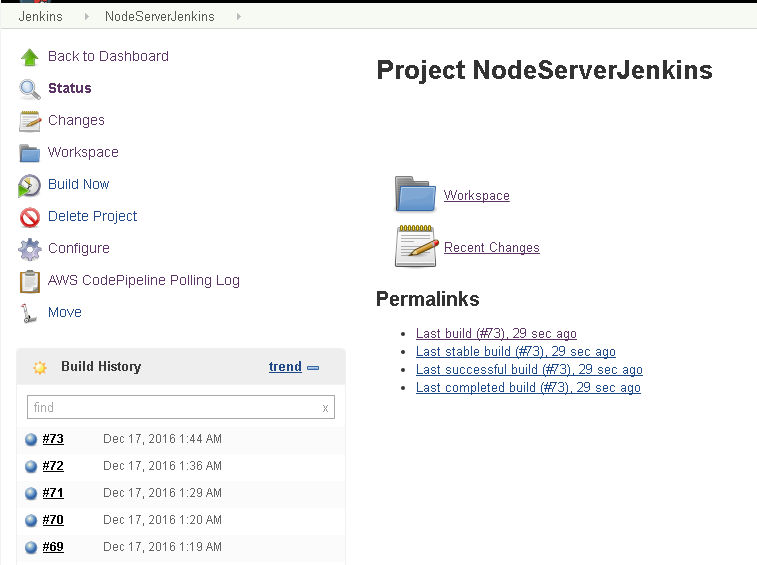
Figure 87. NodeServerJenkins project build completed successfully
The Beta Stage does not start automatically after the Build Stage has completed; in effect, making the CodePipeline a continuous delivery pipeline as shown in Figure 88. The Succeeded message in the Beta Stage is from a previous run, which is also apparent from the Beta Stage having completed “4 min ago”, while the Build Stage has completed only “just now”.
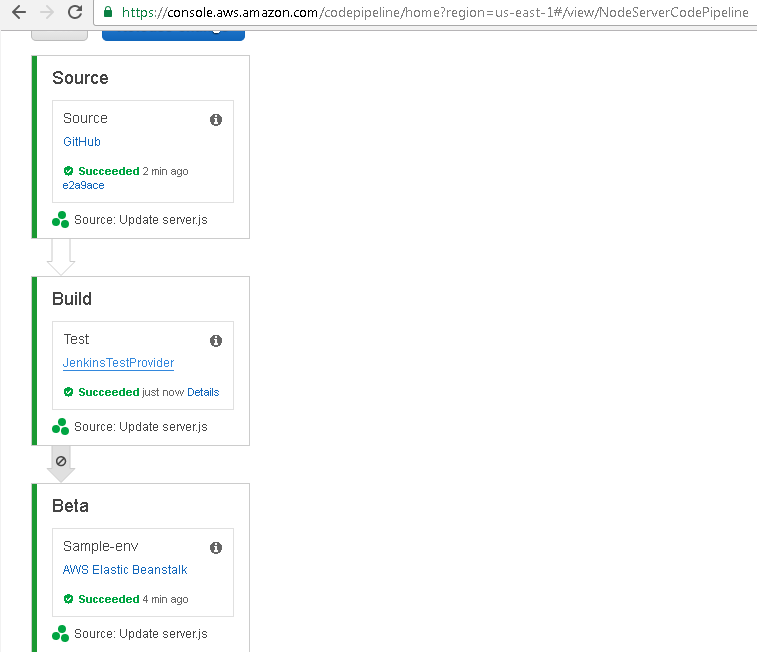
Figure 88. Build Completed but Beta not started
For the CodePipeline to run to completion click on the arrow between the Build and the Beta Stages as shown in Figure 89.
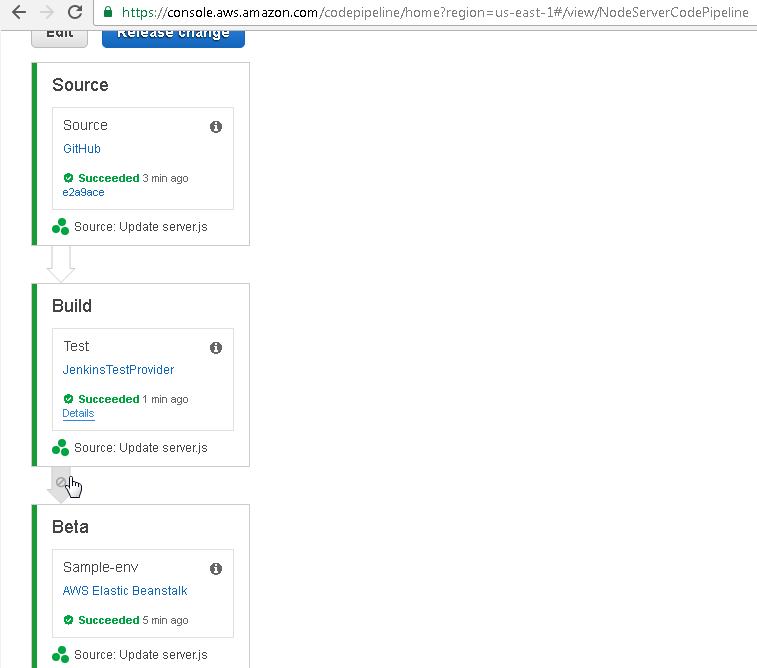
Figure 89. Arrow between Build and Beta
In the Enable transition Stage click on Enable as shown in Figure 90.
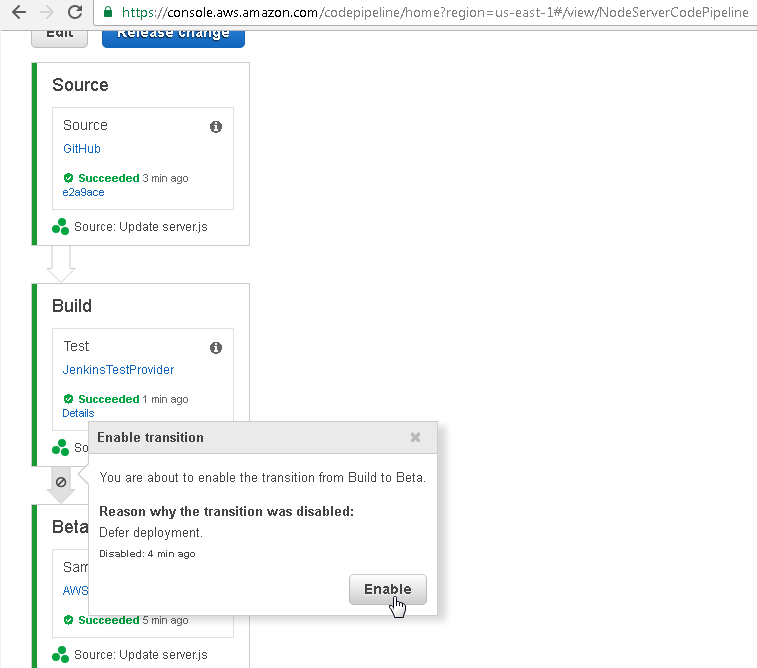
Figure 90. Enable transition>Enable
The Sample-env Action in the Beta deployment Stage gets started, as indicated by the In Progress message in Figure 91.
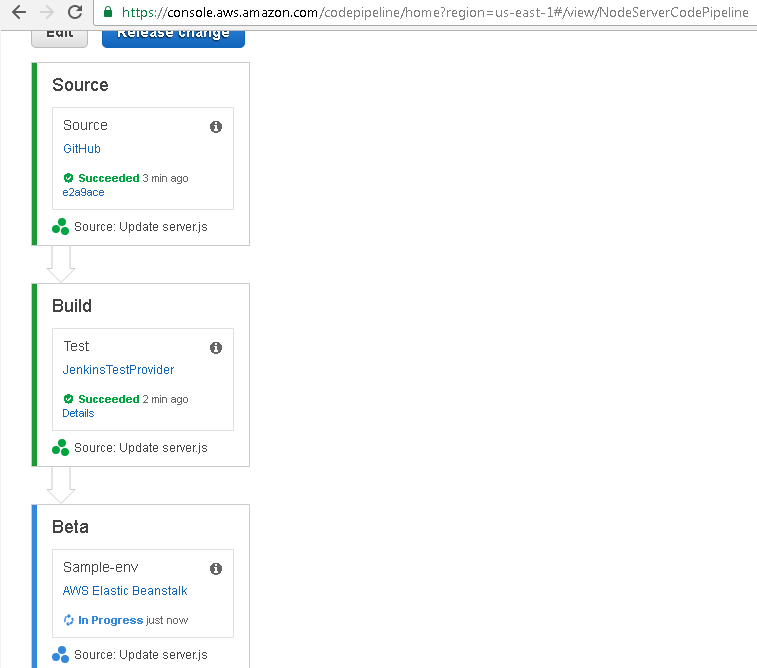
Figure 91. Beta In Progress
When the Sample-env Action has completed successfully the CodePipeline run is also completed successfully as shown in Figure 92.
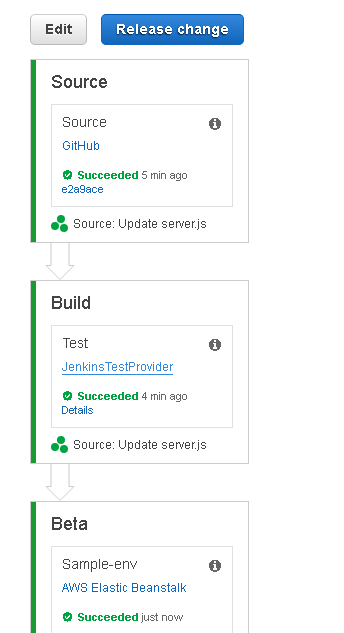
Figure 92. CodePipeline Completed Successfully
Deleting the CodePipeline
To delete the CodePipeline click on Edit as shown in Figure 93.
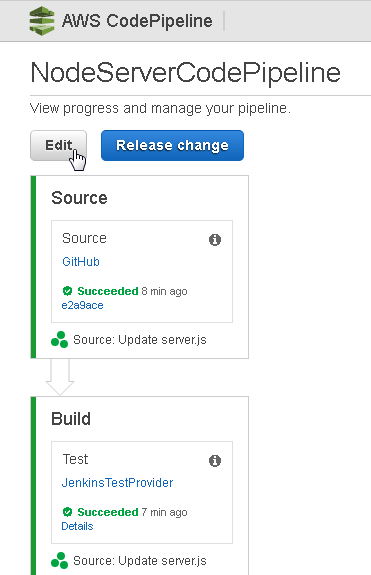
Figure 93. Edit
Click on Delete as shown in Figure 94.
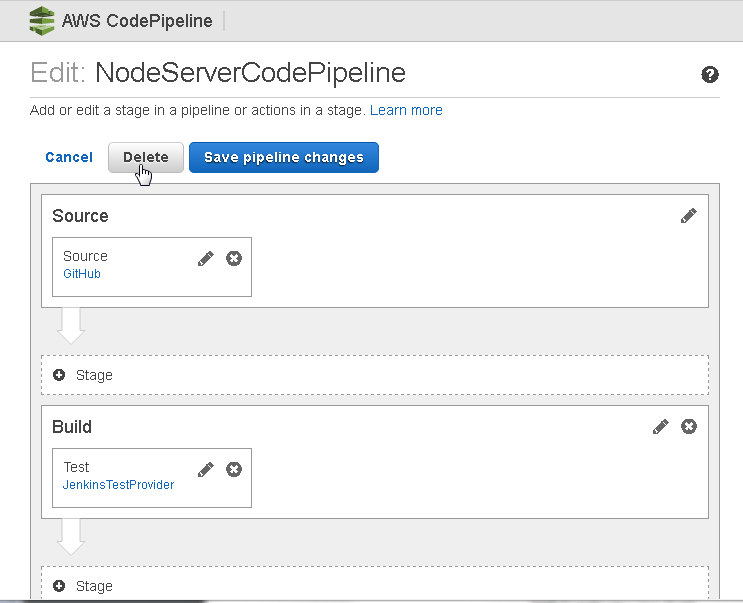
Figure 94. Edit>Delete
In the Delete dialog add the pipeline name in the field and click on Delete as shown in Figure 95.
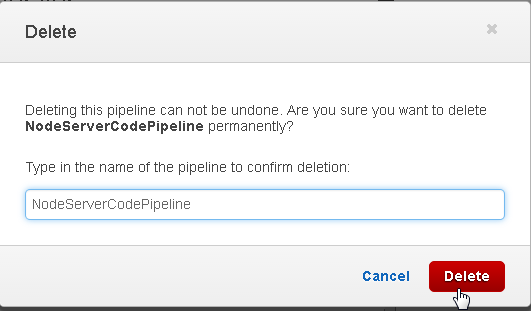
Figure 95. Delete
A Cancel dialog prompts with the provision to either Cancel or Continue as shown in Figure 96. Click on Continue to delete the CodePipeline.
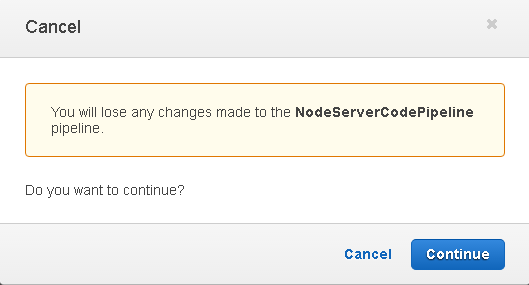
Figure 96. Cancel>Continue
Deleting the Beanstalk Application
To delete the NodeServerApp Beanstalk application select Actions>Delete application as shown in Figure 97.
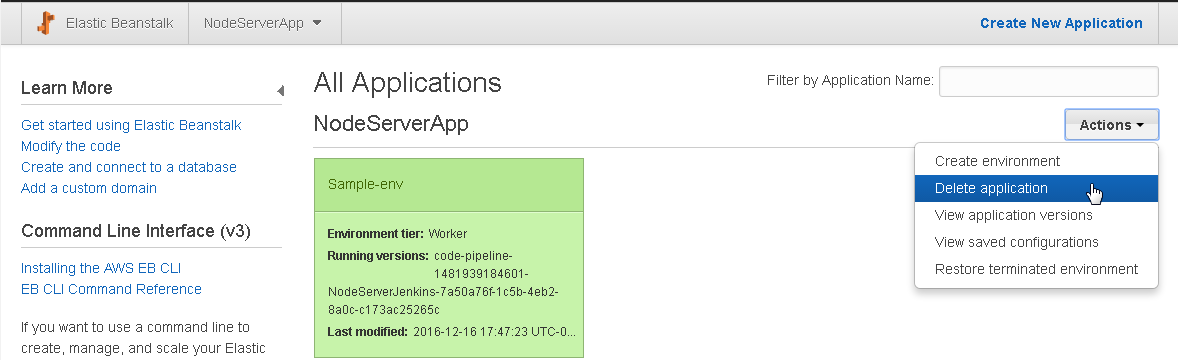
Figure 97. NodeServerApp>Actions>Delete application
Click on Delete in the confirmation dialog as shown in Figure 98.
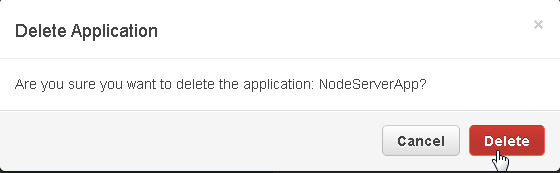
Figure 98. Delete Application>Delete
Deleting the Jenkins Project
To delete the Jenkins project click on Delete Project as shown in Figure 99.
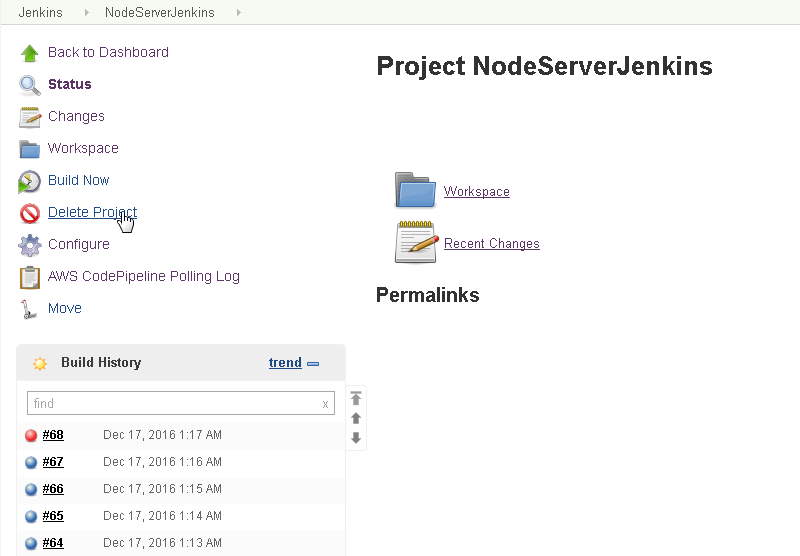
Figure 99. Jenkins>Delete Project
Conclusion
In two articles we discussed developing an AWS CodePipeline consisting of a Source, Build and Beta deploy phases or actions. Two Jenkins plugins are made use of, the AWS CodePipeline Plugin and the Docker build step Plugin. The Source is integrated with source code for a Docker image on GitHub. The Build phase is integrated with a Jenkins project. And the built source code is deployed to an Elastic Beanstalk application environment based on the Docker platform. We also demonstrated switching between a Continuous Delivery and a Continuous Deployment CodePipeline.
Continuous Integration, Continuous Testing, Continuous Delivery and Continuous Deployment are DevOps principles. DevOps benefits include continuous software integration, testing, delivery and deployment, a reduction in deployment lead-time, faster delivery of features, stable application environment, improved collaboration, and less complexity.
Start the discussion at forums.toadworld.com