Introduction
In an earlier article we introduced creating an AWS CodePipeline to continuously integrate GitHub code for a Docker image and subsequently continuously deploy a Docker platform application to an Elastic Beanstalk environment.
Problem
The GitHub code was not tested and not built in a build tool such as CodeBuild or Jenkins. The GitHub code was deployed directly to an Elastic Beanstalk application. The code does get built into a Docker image prior to deployment but code is not tested. If the code on the GitHub repo deployed using a No Build CodePipeline is without any error, no issue should result; however, if the code is continuously being developed by multiple developers and merged on GitHub branches and has not been tested, using a No Build CodePipeline is not recommended.
Solution
Using an AWS CodePipeline is still the solution for integrating GitHub code into a CodePipeline and deploying a Docker image to Elastic Beanstalk, but with one difference. Include a Jenkins Test and Build stage in the CodePipeline subsequent to integrating the GitHub repo code. As shown in Figure 1, after GitHub code has been integrated as the CodePipeline source a Jenkins test and build project is used to test and build the code. And only after the code has been tested and built in Jenkins is a Docker platform application deployed to Elastic Beanstalk.

In two articles we shall use a Jenkins project (Pipeline) to test and build Docker image code. The following sequence is used to deploy a Docker platform application.
- Create a GitHub repo for Docker image code
- Create an Elastic Beanstalk environment for the application to deploy
- Create a Jenkins project to test and build code
- Create a CodePipeline with source code integrated from GitHub and sent to Jenkins for test and build.
- Jenkins tests and builds the source code using Docker Step Plugin.
- Jenkins uploads build artifacts back to the CodePipeline
- CodePipeline deploys the built Docker image to Elastic Beanstalk environment
This article has the following sections.
Creating an IAM Role for Jenkins Integration
- Launching an Amazon EC2 Instance for Jenkins
- Installing Jenkins Server
- Installing and Configuring Jenkins Plugins
- Creating a GitHub Repository
- Creating an Elastic Beanstalk Application
- Creating a Jenkins Pipeline
Creating an IAM Role for Jenkins Integration
We shall be using a CodePipeline to integrate GitHub code and send the code to Jenkins for test and build and deploy the Docker image returned from Jenkins to deploy an Elastic Beanstalk application. For Jenkins to be able to interact with CodePipeline we need to add the AWSCodePipelineCustomActionAccess managed policy to the EC2 instance configuration on which the Jenkins server is running. Next, we shall create a role for Jenkins to be able to access CodePipeline. Select IAM service and select the Roles selection in the navigation. Click on Create New Role as shown in Figure 1.
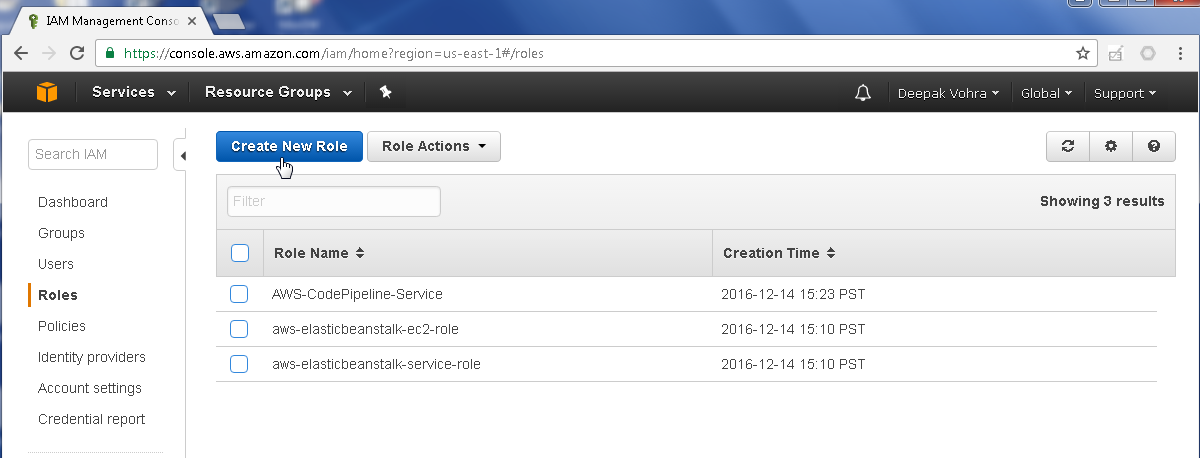
Figure 1. Create New Role
Specify Role Name (JenkinsAccess for example) as shown in Figure 2 and click on Next step.
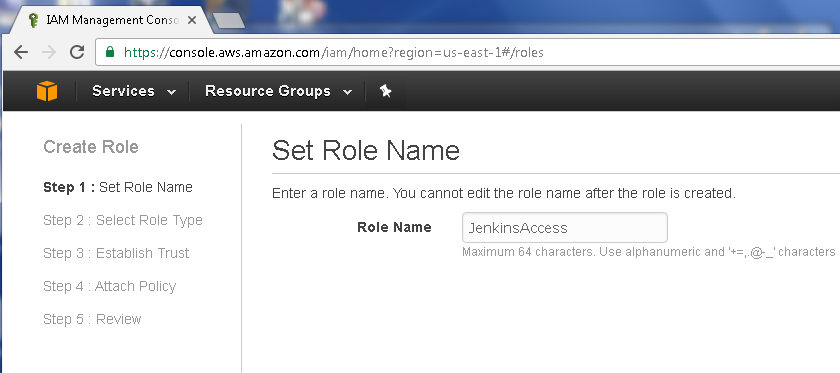
Figure 2. Set Role Name
In Select Role Type, select the Amazon EC2 service role with the Select button as shown in Figure 3.
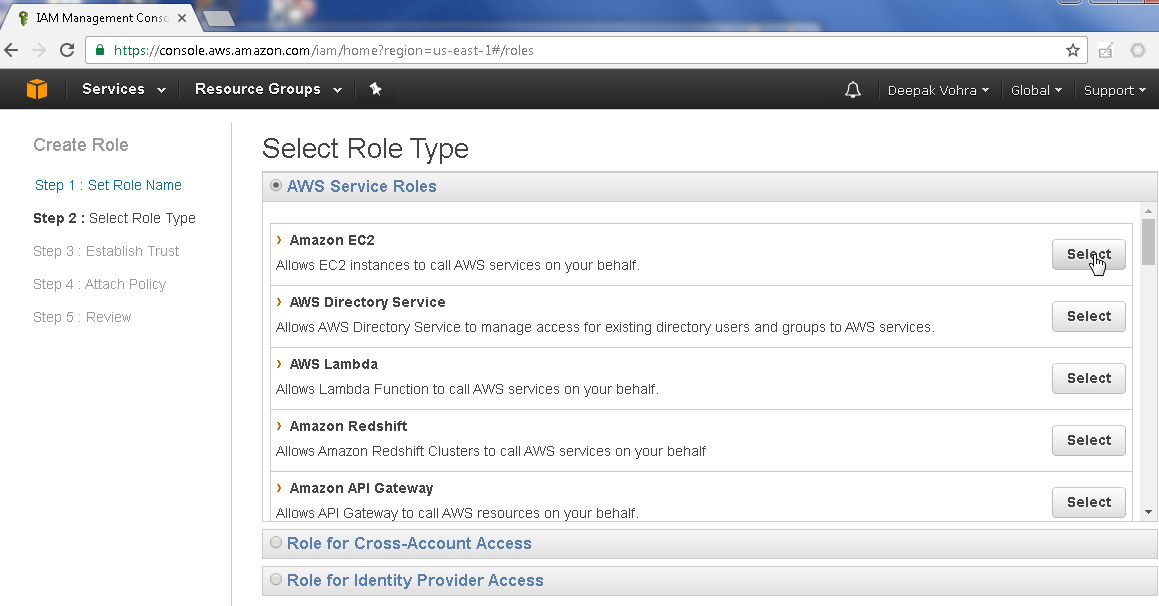
Figure 3. Select Role Type>AWS Service Roles>Amazon EC2
The AWSCodePipelineCustomActionAccess policy may be added when creating the role or after creating the role. To add later, select the default settings and click on Next Step as shown in Figure 4.
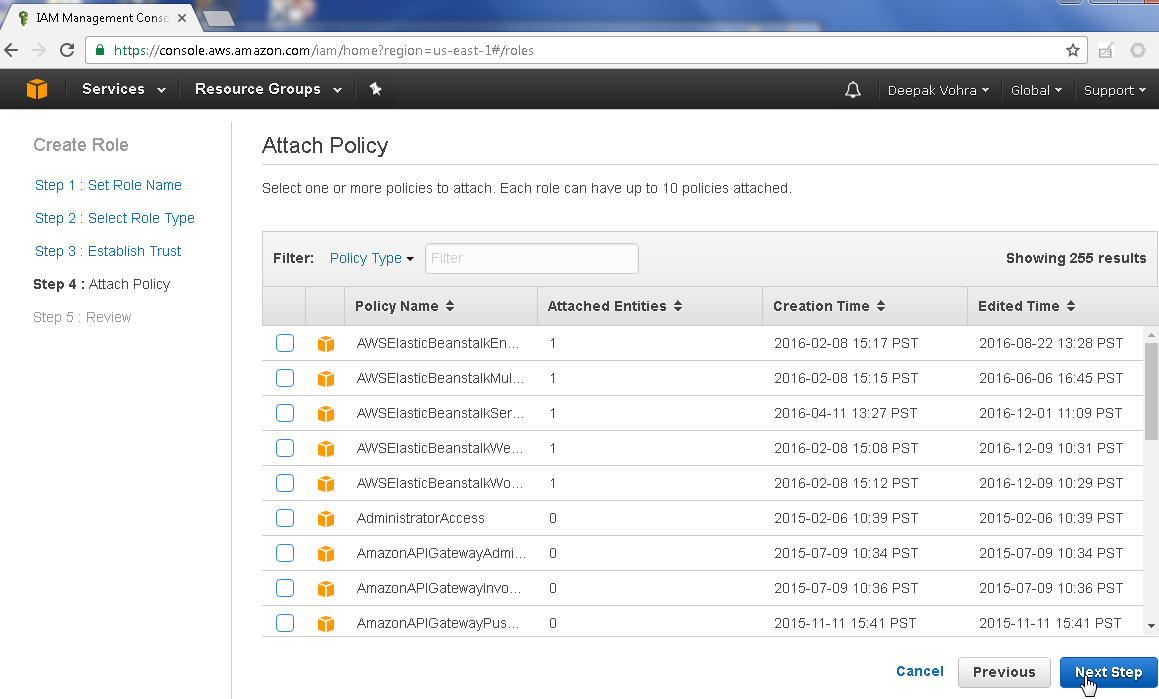
Figure 4. Attach Policy>Next Step
Click on Create Role as shown in Figure 5.
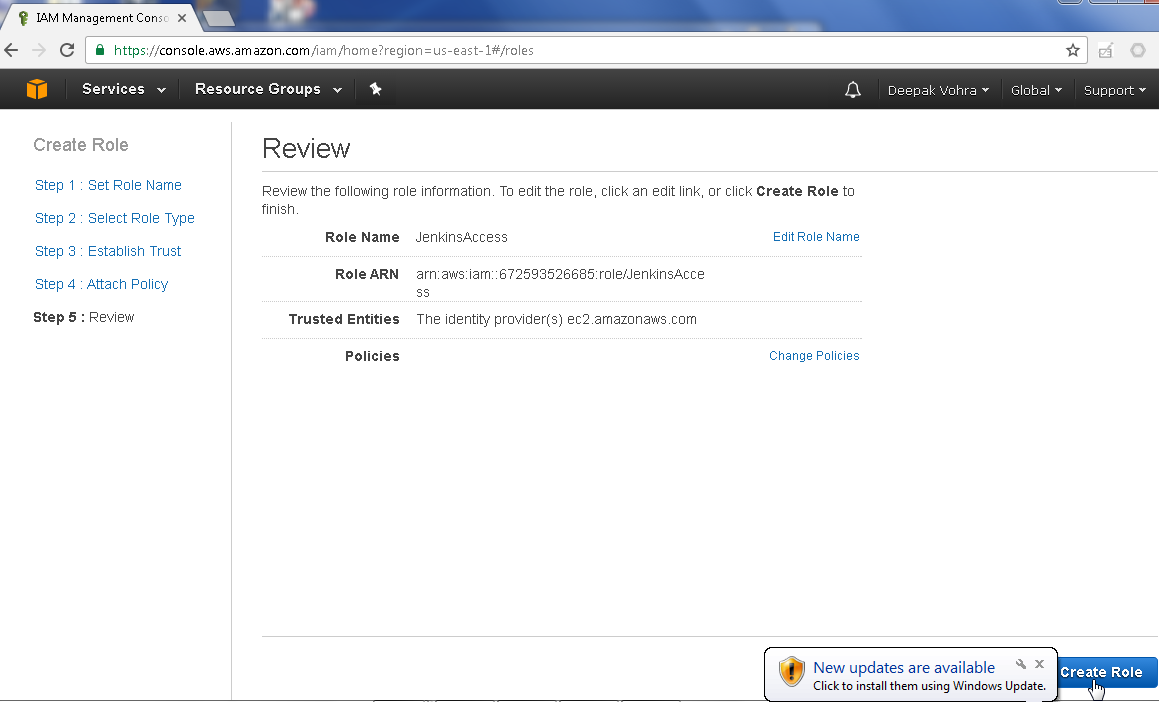
Figure 5. Create Role
The new role JenkinsAccess gets added. To modify the Permissions for the role click on the JenkinsAccess role link as shown in Figure 6.
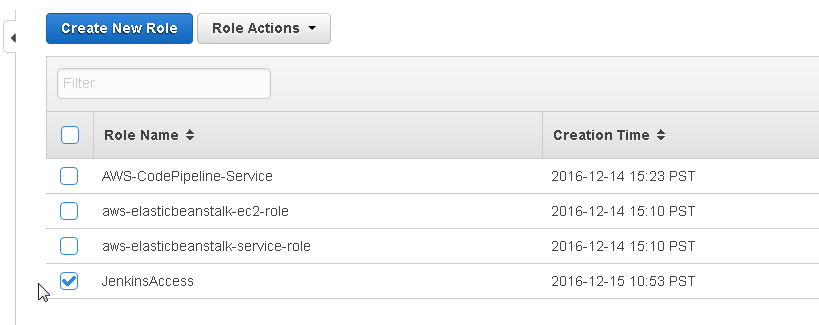
Figure 6. JenkinsAccess Role
Select the Permissions tab if not already selected. Click on Attach Policy as shown in Figure 7.
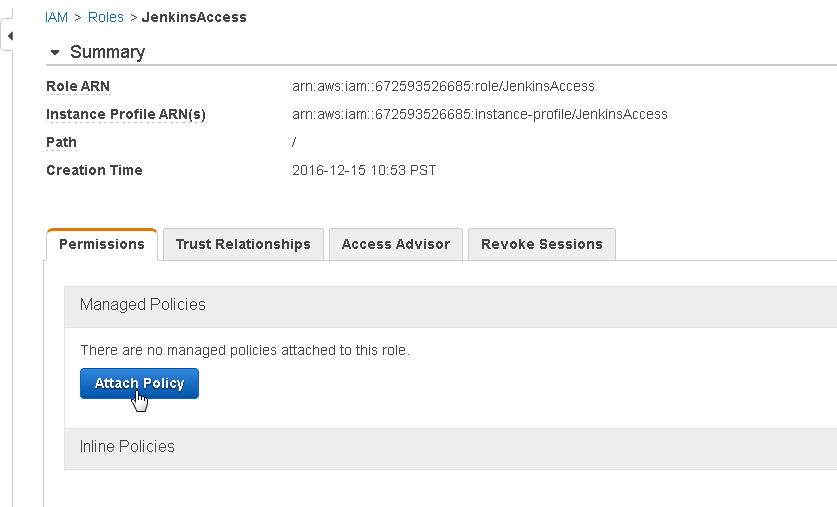
Figure 7. Permissions>Attach Policy
Using the Filter, select the AWSCodePipelineCustomActionAccess managed policy as shown in Figure 8. Click on Attach Policy.
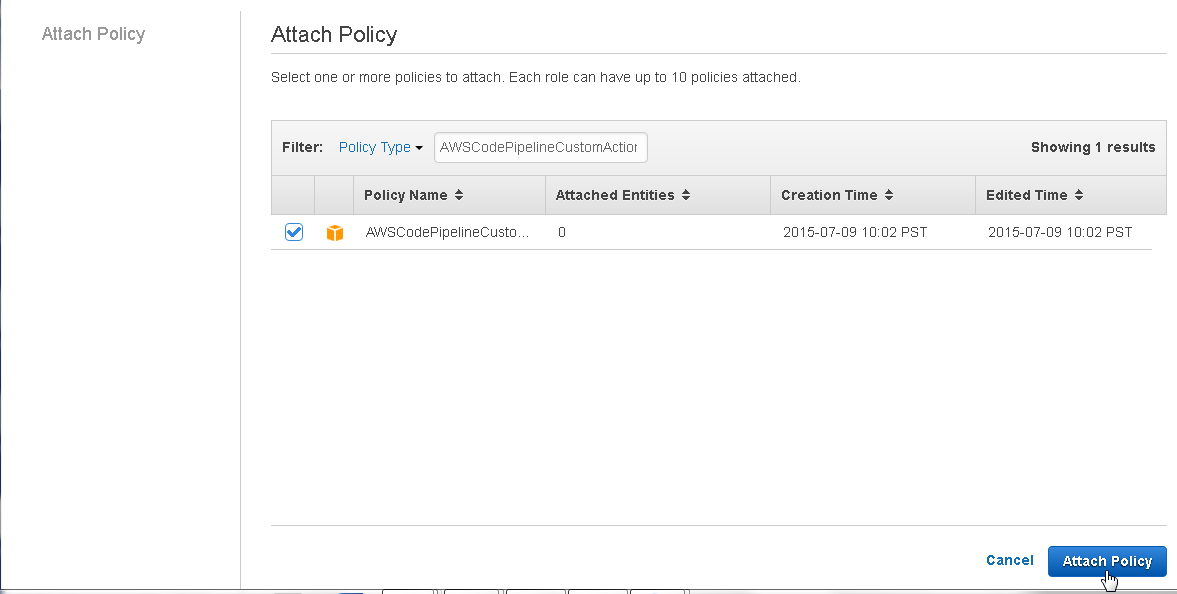
Figure 8. Attach Policy
The AWSCodePipelineCustomActionAccess managed policy gets added to the JenkinsAccess role as shown in Figure 9.
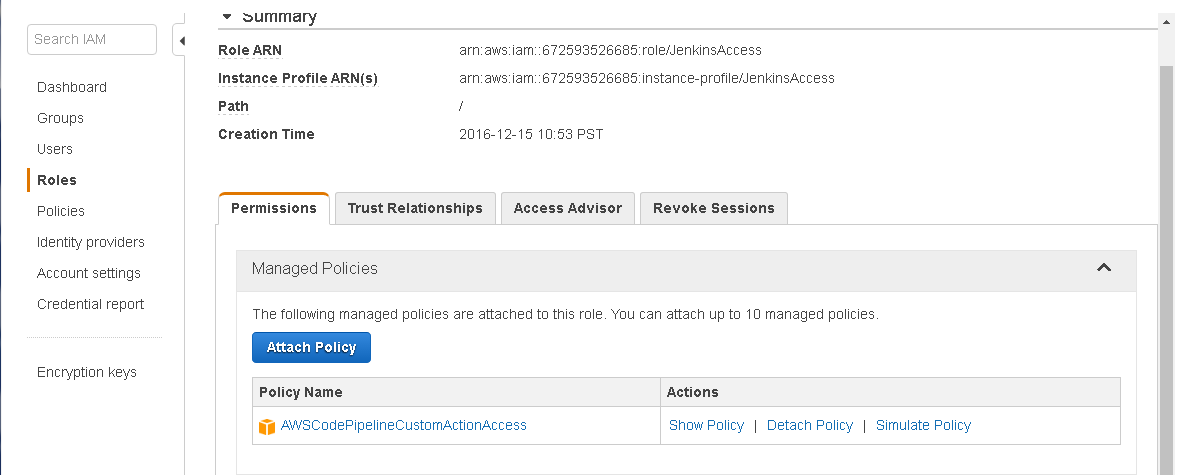
Figure 9. AWSCodePipelineCustomActionAccess Policy added to JenkinsAccess Role
Launching an Amazon EC2 Instance for Jenkins
Create an EC2 instance of type CoreOS. When configuring the instance details select the IAM role JenkinsAccess as shown in Figure 10.
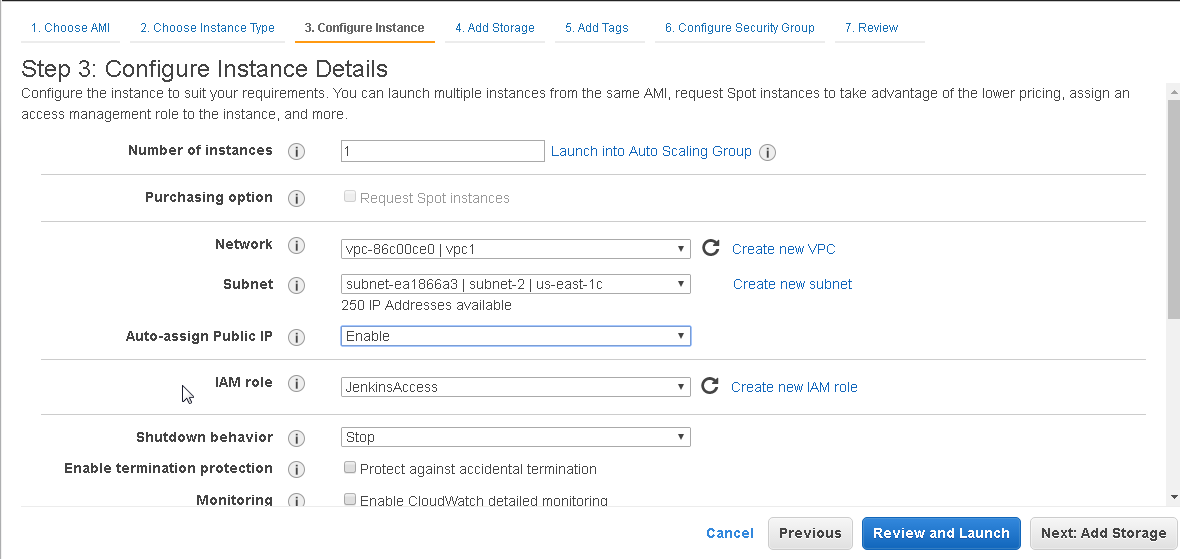
Figure 10. Selecting IAM Role
The EC2 instance on which Jenkins server is to be run gets started with the IAM role JenkinsAccess as shown in Figure 11.
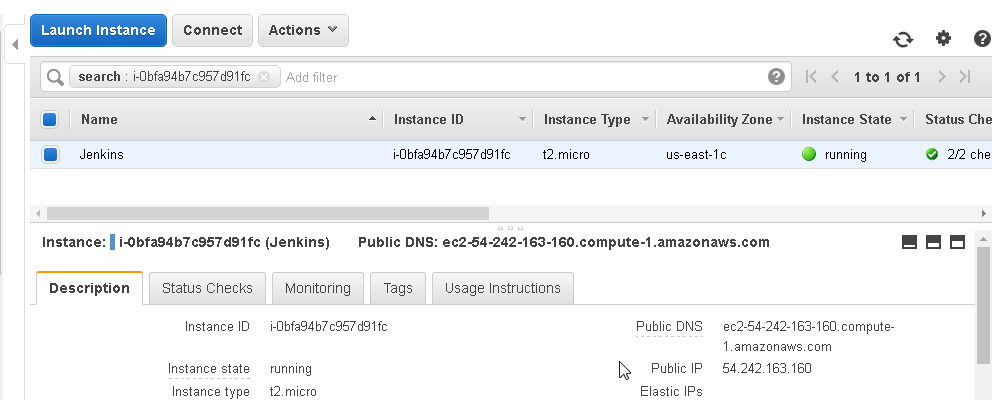
Figure 11. EC2 Instance started
Installing Jenkins Server
In this section we shall install Jenkins on a CoreOS instance configured for Jenkins access to CodePipeline. We shall use a Docker image “jenkins” to install Jenkins. Obtain the Public IP address from the EC2 Console as shown in Figure 11 and SSH login to the CoreOS instance started for Jenkins.
ssh –i “jenkins.pem” core@54.242.163.160
Create and set permissions for a directory to be used by Jenkins.
sudo mkdir /var/jenkins
sudo chmod 777 /var/jenkins
Add user “jenkins” to the “docker” group.
sudo useradd –G docker jenkins
Alternatively append user “jenkins” to the “docker” group.
sudo usermod –aG docker jenkins
Running both commands in sequence to add user “jenkins” to group “docker” does not generate an output as shown in Figure 12.
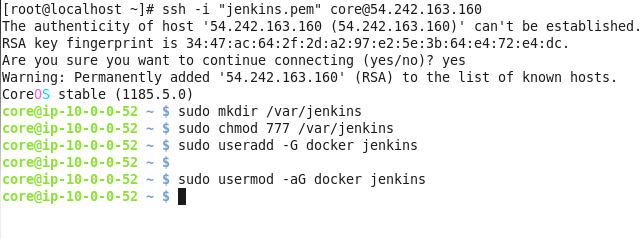
Figure 12. Adding “jenkins” User to “docker” Group
And using the vi editor create a file called /etc/systemd/system/docker-tcp.socket to make Docker available on a TCP socket on port 2375.
sudo vi /etc/systemd/system/docker-tcp.socket
Copy and paste the following listing to the docker-tcp.socket file and save the file with :wq.
 [Unit]
Description=Docker Socket for the API
[Socket]
ListenStream=2375
BindIPv6Only=both
Service=docker.service
[Install]
WantedBy=sockets.target
The docker-tcp.socket file is shown in the vi editor in Figure 13.
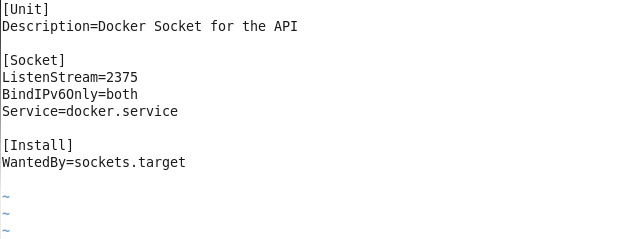
Figure 13. The docker-tcp.socket file
Enable the docker-tcp.socket file, stop Docker, start Docker TCP Socket and start Docker.
systemctl enable docker-tcp.socket
systemctl stop docker
systemctl start docker-tcp.socket
systemctl start docker
The output from the preceding commands is shown in Figure 14.
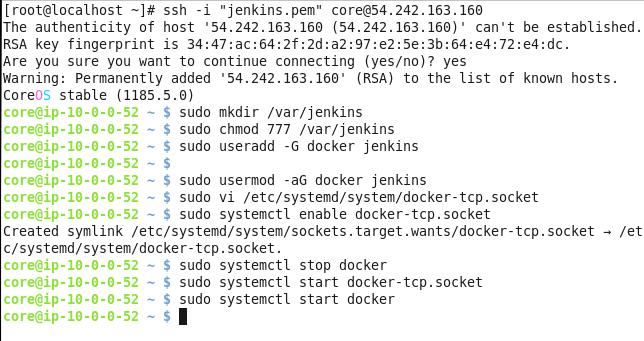
Figure 14. Starting Docker TCP Socket
After configuring tcp access on port 2375, the following command should be able to access Docker.
docker –H tcp://127:0.0.1:2375 ps
Any running containers should get listed. As no Docker containers are running none get listed as shown in Figure 15.

Figure 15. Listing running Docker Containers
Next, install Jenkins from Docker image “jenkins” using the docker run command. The following command creates a Docker container called “jenkins” and publishes the container’s ports 8080 and 50000 to corresponding ports on the host.
docker run --name jenkins -p 8080:8080 -p 50000:50000 jenkins
Docker image “jenkins” gets downloaded as shown in Figure 16.
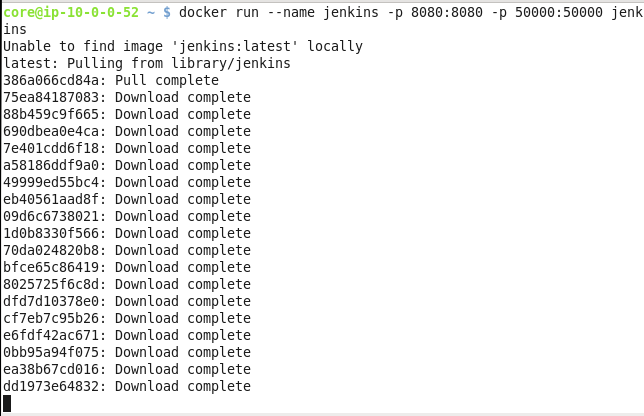
Figure 16. Downloading “jenkins” Docker Image
Jenkins server gets started as shown by the command output in Figure 17.
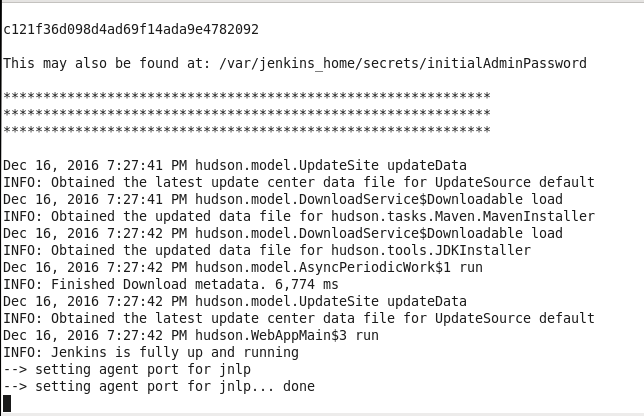
Figure 17. Jenkins server started
Copy the password, which is output, as shown in Figure 18, to access the Jenkins server from an http url.

Figure 18. Copying the Jenkins Password
SSH login to the EC2 instance running the Jenkins server from a different command shell. Run the following command in which the Public IP address of the EC2 instance is used to access Docker and list the running Docker containers.
docker –H tcp:// 54.242.163.160:2375 ps
The “jenkins” Docker container should get listed as shown in Figure 19.

Figure 19. Listing “jenkins” Docker Container
To access the Jenkins dashboard obtain the Public DNS for the EC2 instance running Jenkins server as shown in Figure 20 and invoke the http://<publicdns>:8080 url in a browser.
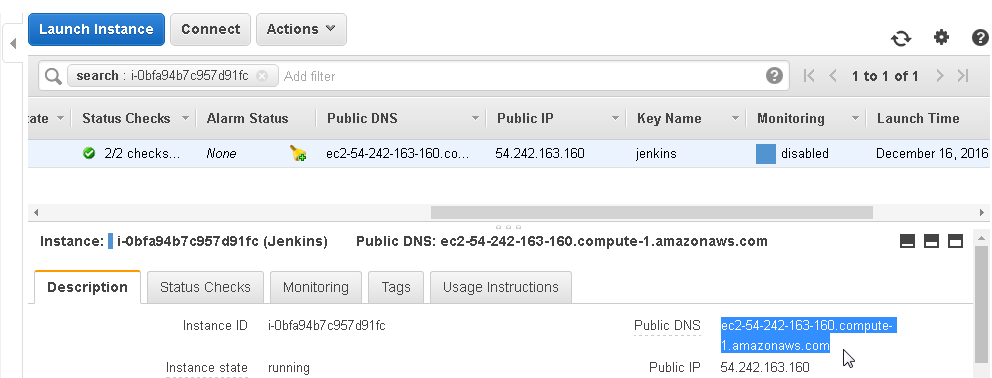
Figure 20. Obtaining Public DNS
Installing and Configuring Jenkins Plugins
We need to install the following Jenkins plugins.
- AWS CodePipeline Plugin – The plugin is used to connect to AWS CodePipeline from Jenkins
- Docker build step plugin – The plugin is used to run docker commands
Click on Manage Jenkins to install the two plugins as shown in Figure 21.
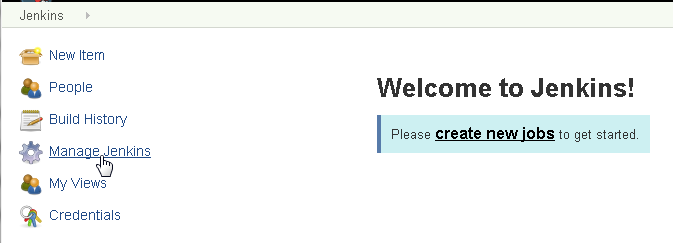
Figure 21. Manage Jenkins
Select the AWS CodePipeline Plugin and click on Install without restart as shown in Figure 22.
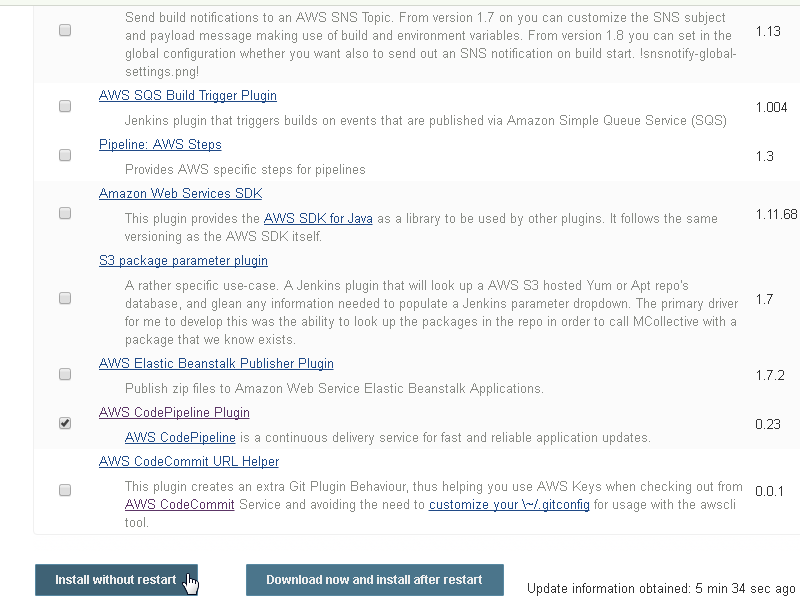
Figure 22. AWS CodePipeline Plugin>Install without restart
The AWS CodePipeline Plugin starts to get installed as shown in Figure 23.
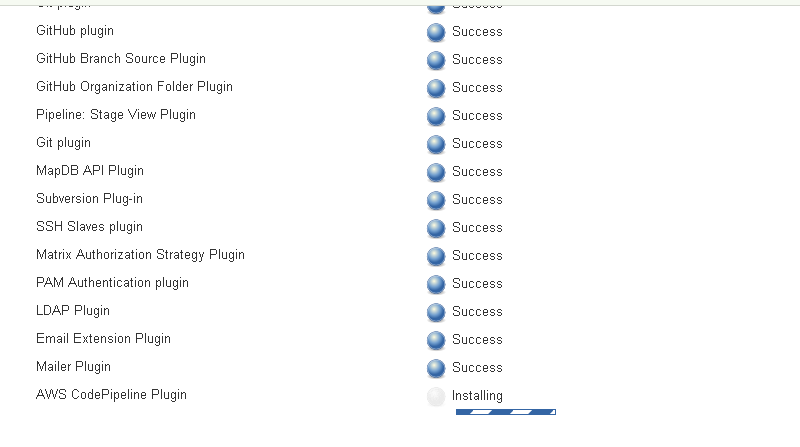
Figure 23. Installing AWS CodePipeline Plugin
The AWS CodePipeline plugin gets installed as shown in Figure 24.
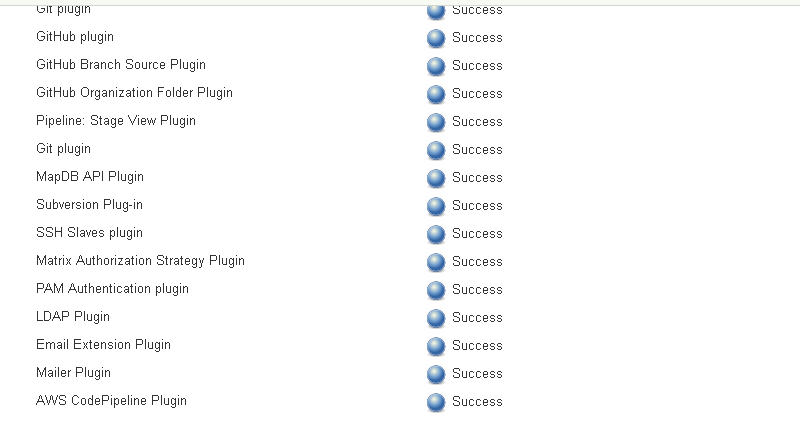
Figure 24. AWS CodePipeline Plugin Installed
Next select the Docker build step plugin and click on Install without restart as shown in Figure 25.
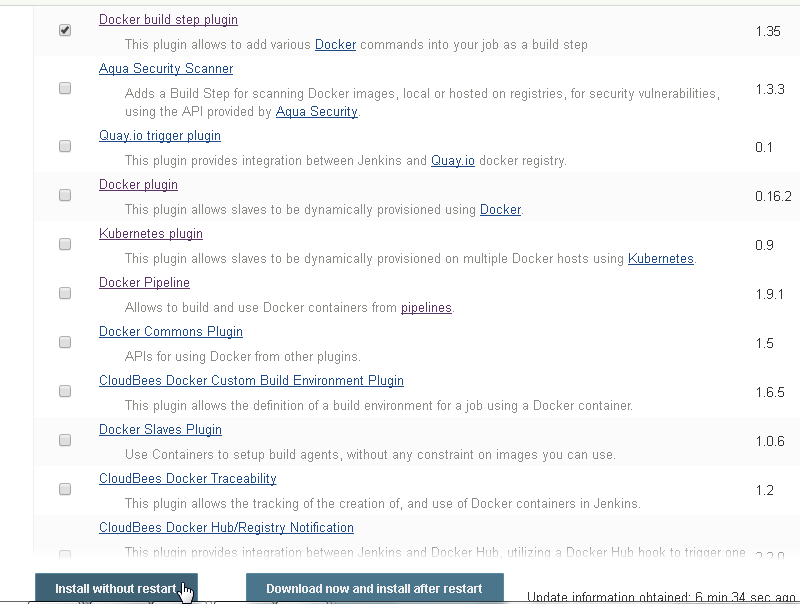
Figure 25. Docker build step plugin>Install without restart
The Docker build step plugin and dependency plugins start to get installed as shown in Figure 26.
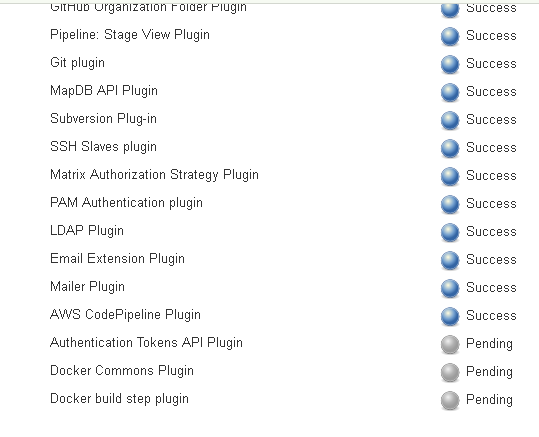
Figure 26. Installing Docker build step plugin
The Docker build step plugin gets installed as shown in Figure 27.
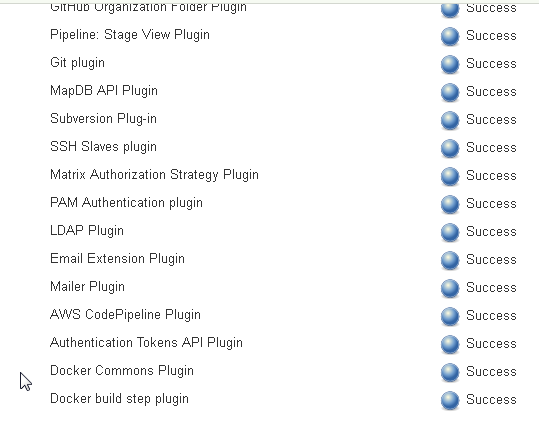
Figure 27. Docker build step plugin Installed
Next, configure the Docker build step plugin to use the Docker installed on the CoreOS host. Select Manage Jenkins and subsequently select Configure System as shown in Figure 28.
Figure 28. Manage Jenkins>Configure System
Scroll for the Docker Builder section and in the Docker URL field specify the url http://54.242.163.160.2375 and click on Test Connection as shown in Figure 29. A message “Connected to http://54.242.163.160.2375” should get displayed.

Figure 29. Docker Builder Plugin>Test Connection
Creating a GitHub Repository
Create a GitHub repo for source code for a Docker image source code. The repo dvohra/docker-node-server was created in an earlier article and has the Dockerfile and the resource file server.js as shown in Figure 30.
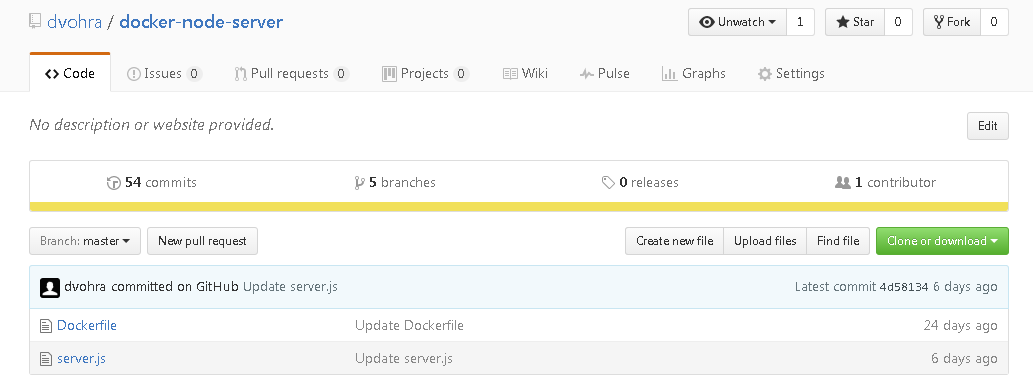
Figure 30. Git Repo for Docker image Source code
The Dockerfile shown in Figure 31 is based on the node:4.4 Docker image, exposes port 8080 and runs the command nodeserver.js.
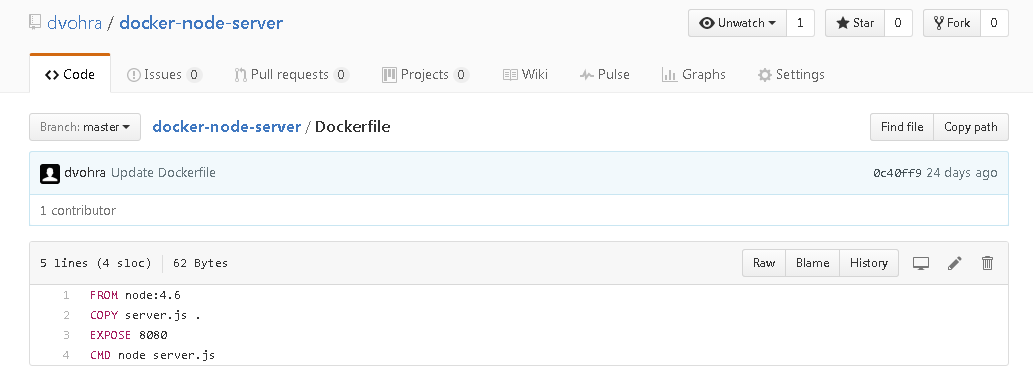
Figure 31. Dockerfile
The server.js file shown in Figure 32 creates a Node server.
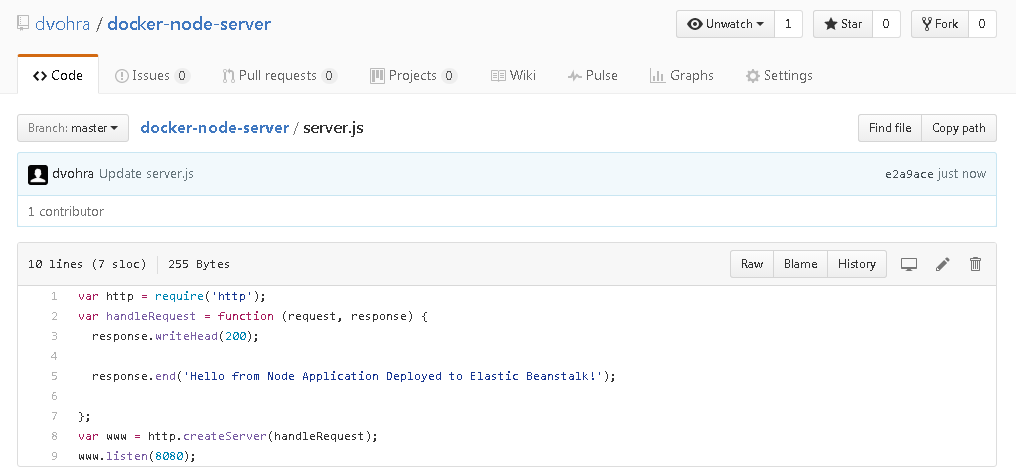
Figure 32. server.js file
Creating an Elastic Beanstalk Application
In this section we shall create an Elastic Beanstalk application. In the Elastic Beanstalk console click on Create New Application as shown in Figure 33.
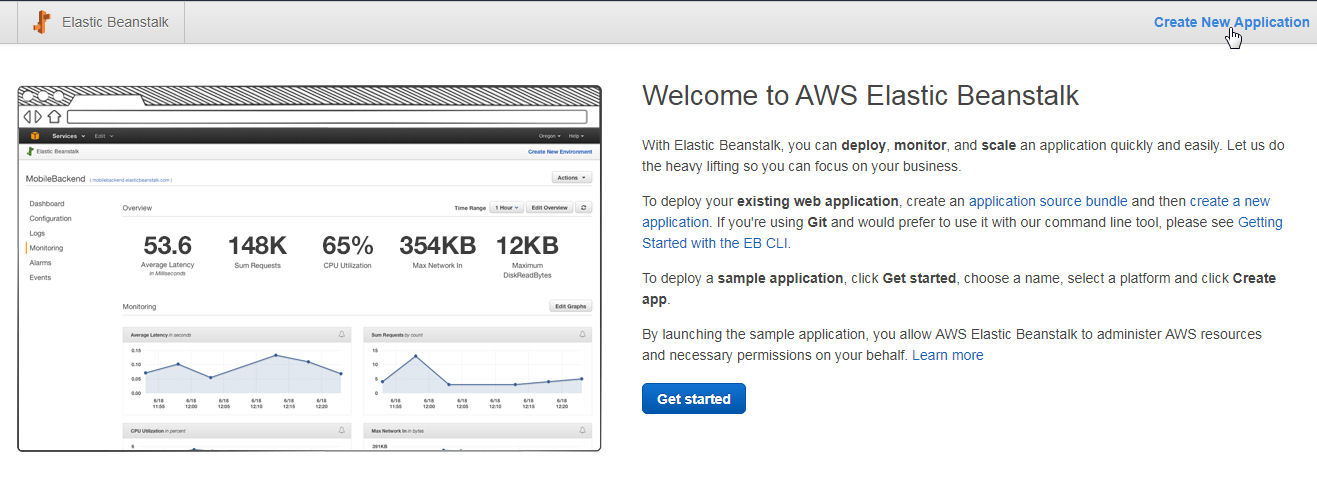
Figure 33. Create New Application
In Create New Application window specify Application Name (NodeServerApp). Click on Create as shown in Figure 34.
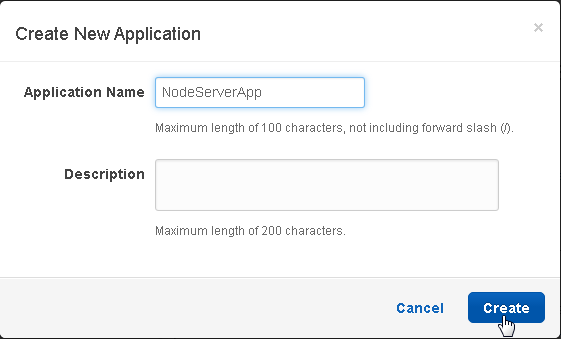
Figure 34. Create New Application>Create
The NodeServerApp gets created. Create an environment with Actions>Create environment as shown in Figure 35.

Figure 35. Actions>Create environment
In Choose an environment tier, select Worker environment and click on Select as shown in Figure 36.
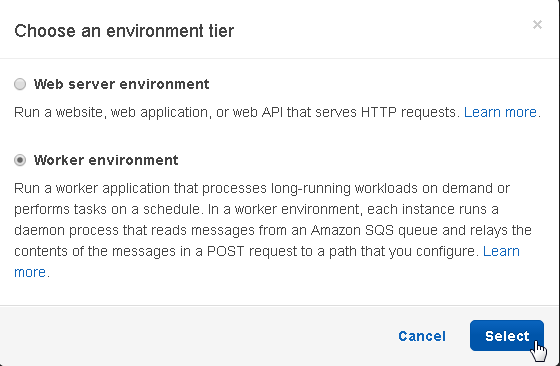
Figure 36. Choose an environment tier
In Create a new environment, select Platform as Docker and select Application code as Sample application as shown in Figure 37. No application code is to be uploaded, as only an application environment is being created. Click on Create environment.
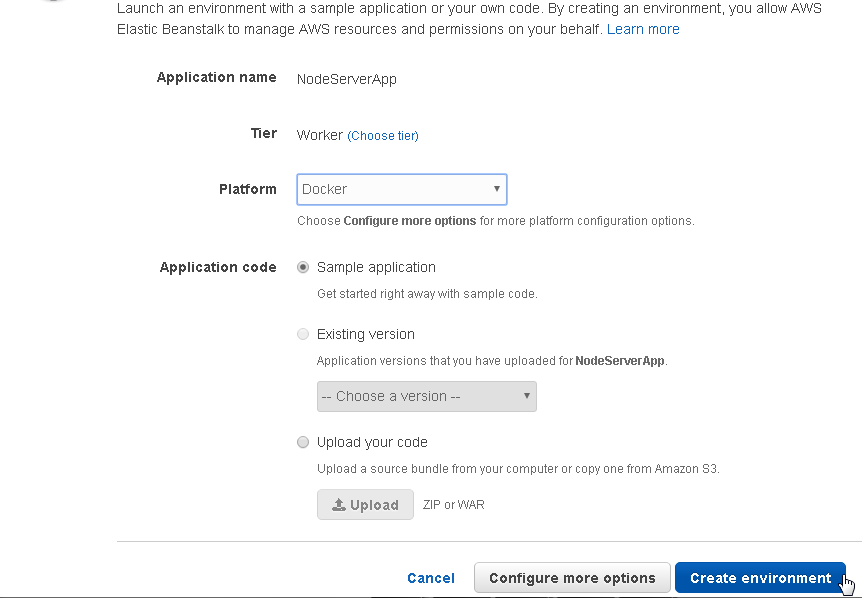
Figure 37. Create environment
A sample environment Sample-env starts to get created as shown in Figure 38.
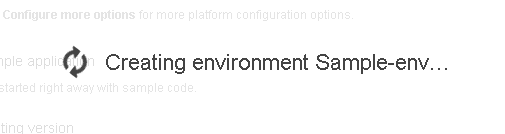
Figure 38. Creating environment Sample-env
An EC2 instance for the Sample-env gets provisioned and the environment gets launched as shown in the console output in Figure 39.
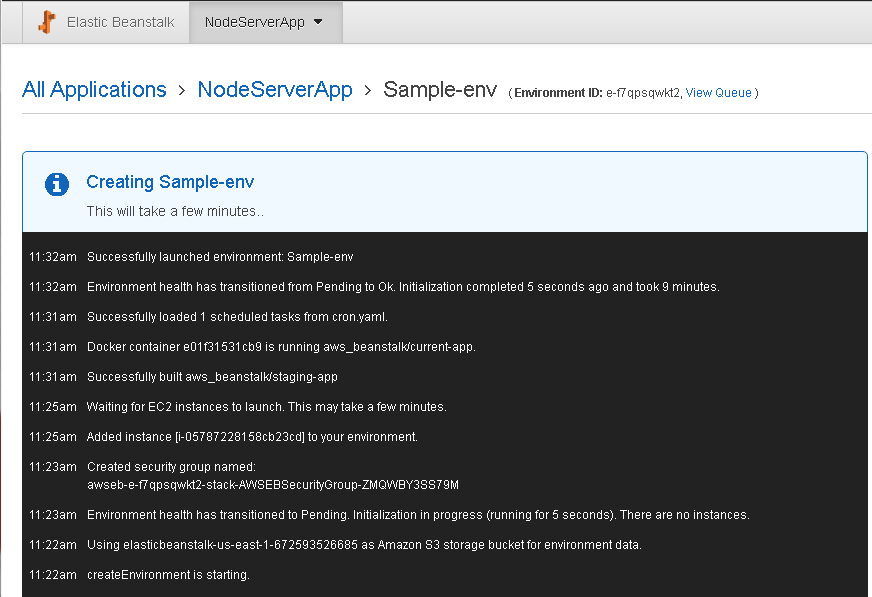
Figure 39. Sample-env Created
The Sample-env environment is shown in the Dashboard in Figure 40.
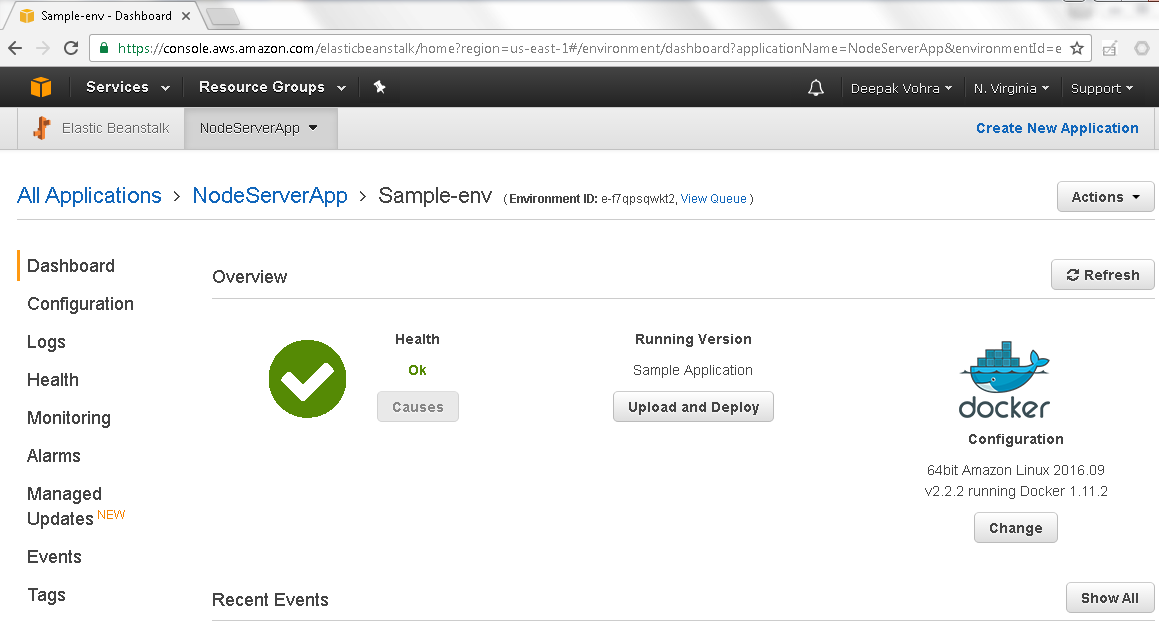
Figure 40. Dashboard>Sample-env
The recent events in the environment launch get listed as shown in Figure 41. As indicated, a Docker container has been provisioned for the application environment and the environment Sample-env has been launched.

Figure 41. Recent Events>Sample-env launched
The Elastic Beanstalk application lists the Sample-env as shown in Figure 42.
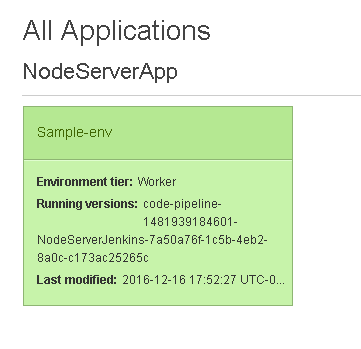
Figure 42. NodeServerApp>Sample-env
Creating a Jenkins Project
Next, create a new Jenkins project. Click on "create new jobs" in the dashboard as shown in Figure 43.
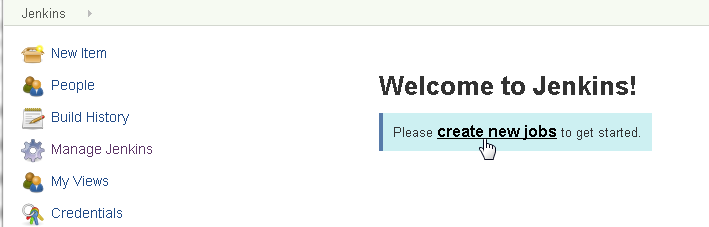
Figure 43. Create new jobs
Specify an item name (NodeServerJenkins) and select the “Freestyle project” as shown in Figure 44 and click on OK.

Figure 44. Creating a Jenkins Freestyle project
In project configuration, the General tab is selected for a new project by default as shown in Figure 45.
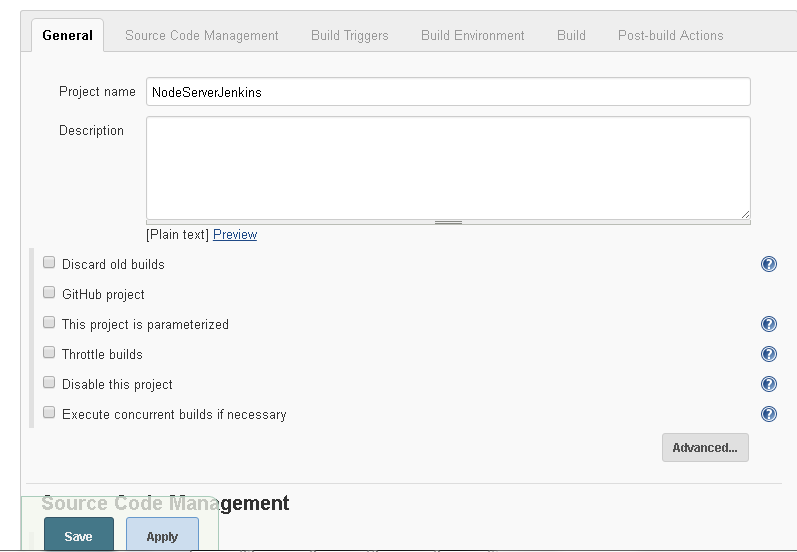
Figure 45. Project Configuration>Jenkins
Select the "Discard old builds" and select Strategy as Log Rotation as shown in Figure 46. Select Days to keep builds as 1 and Max # of builds to keep as 5.
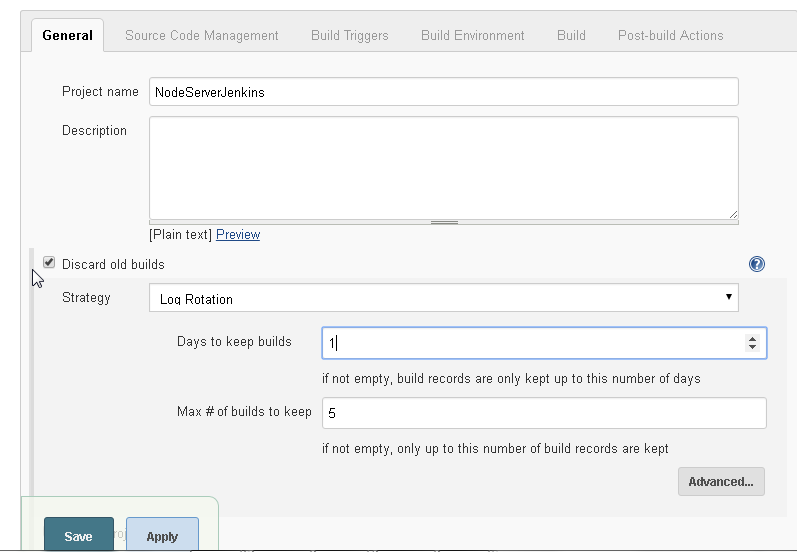
Figure 46. Setting Build Strategy
Select the Source Code Management tab next. Select AWS CodePipeline as Source Code Management as shown in Figure 47.
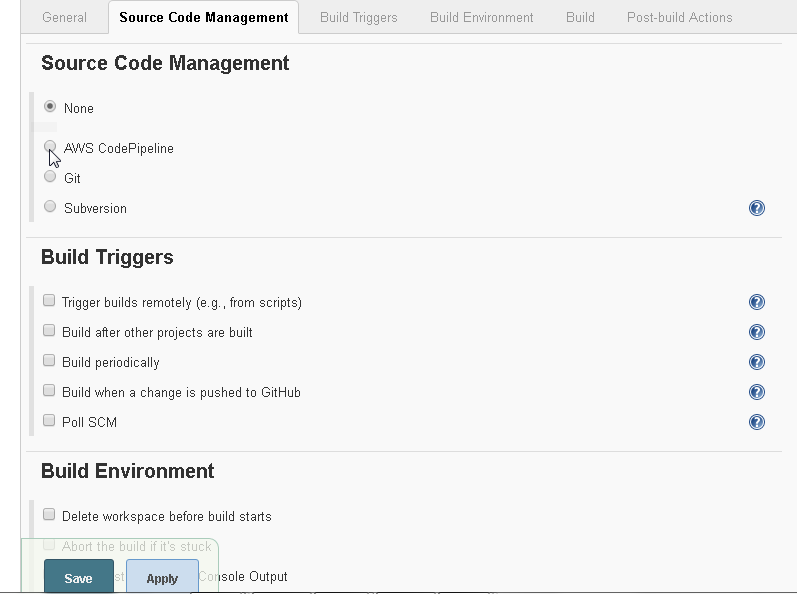
Figure 47. Source Code Management>AWS Code Pipeline
The detail fields for the AWS Code Pipeline get displayed as shown in Figure 48. Specify AWS Region as US EAST 1 and specify Proxy Port as 0. Specify the AWS Access Key and AWS Secret Key as obtained from the AWS user account.
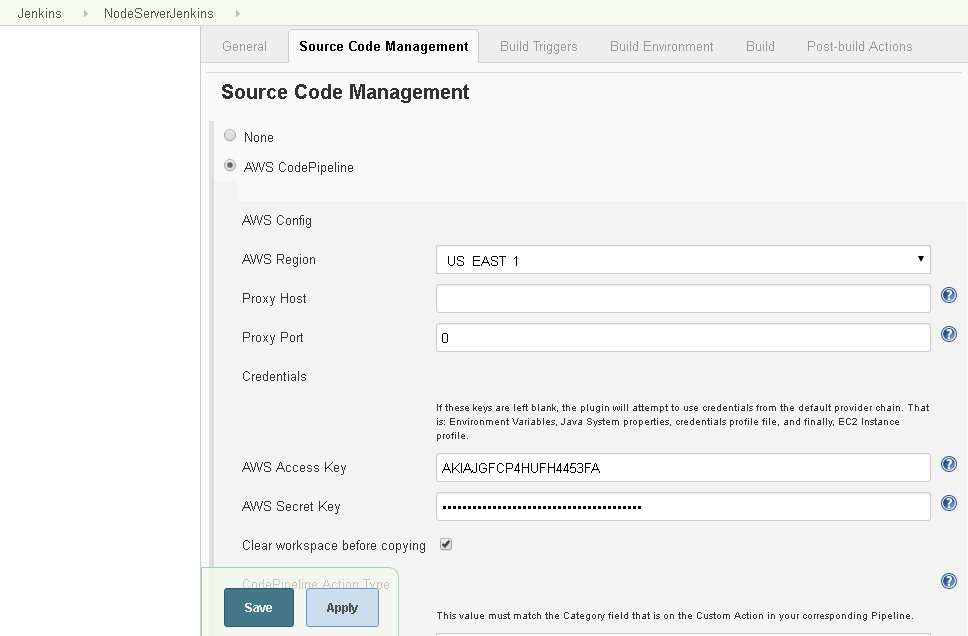
Figure 48. Specifying detail of AWS CodePipeline
Select Clear workspace before copying. In CodePipeline Action Type, select Category as Test. The category should be the same as the Custom Action in the Pipeline that makes use of the Jenkins project. We have yet to create a CodePipeline, but copy and keep the Custom Action value “Test” for subsequent use. In the Provider field specify JenkinsTestProvider and specify Version as 1, which is the same the Version field in the Custom Action in the CodePipeline. The Credentials and CodePipeline ActionType settings are shown in Figure 49.
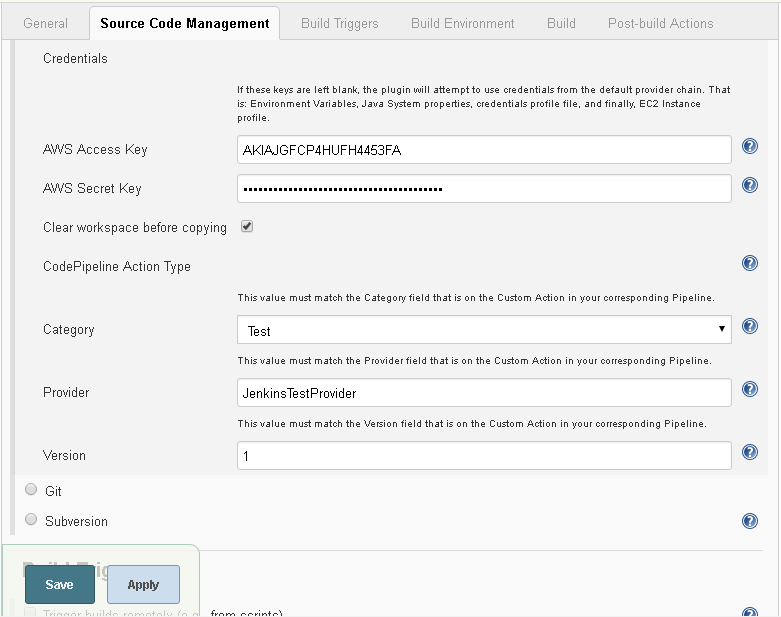
Figure 49. Credentials and CodePipeline Action Type
Select the Build Triggers tab next. Select Poll SCM (SCM is for Source Code Management) and specify a Schedule, the format for which may be obtained from the Help icon “?”. Specify a Schedule of H/15**** to poll SCM every 15 minutes as shown in Figure 50.
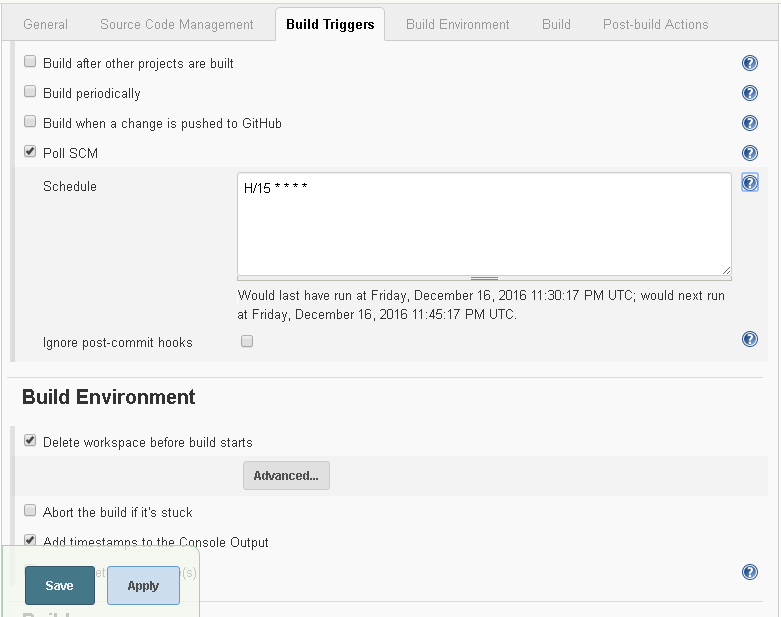
Figure 50. Setting Poll SCM interval
In Build Environment select Add timestamps to the Console Output as shown in Figure 51. Next, add the Docker build steps to run. Click on the Add build step drop-down list and select Execute Docker command.
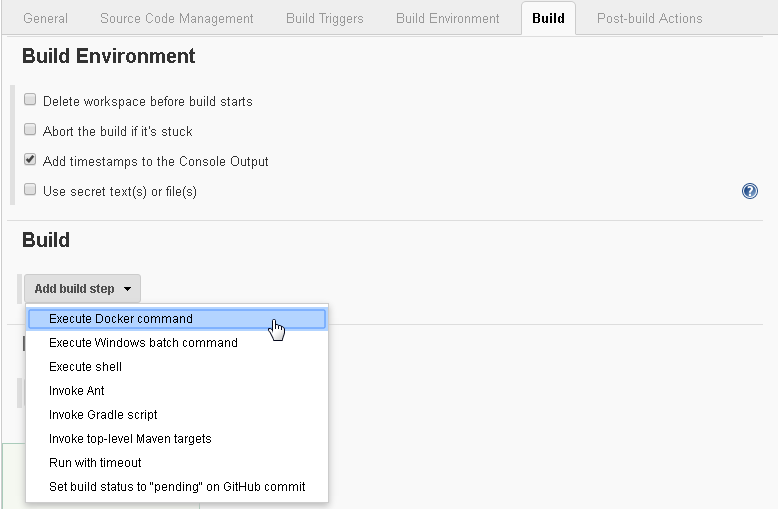
Figure 51. Setting Build Environment and Build
Select Docker command as Create/build image as shown in Figure 52. Keep the default Build context folder$WORKSPACE and specify Tag of the resulting docker image as dvohra/node-server.
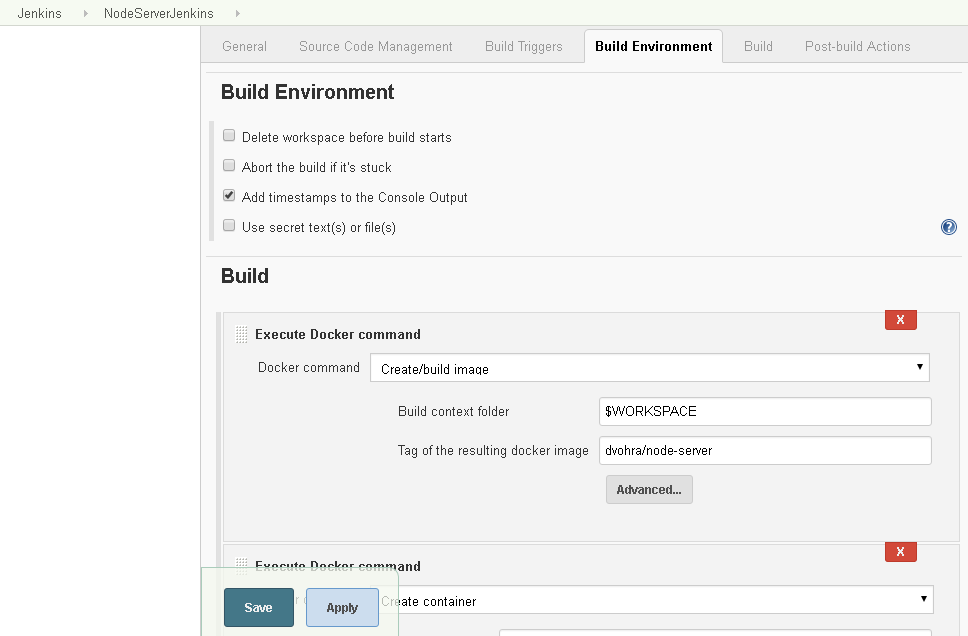
Figure 52. Setting Build Docker Command
Next, add another build step for which click on the Add build step drop-down list again and select the Execute Docker command. Select Docker command Create container as shown in Figure 53. Select Image name as the same as the value in the field Tag of the resulting docker image in the Create/build image step as shown in Figure 52 as dvohra/node-server. Specify the Docker command to run to test the Docker image as follows.
docker run -d -p 8080:8080 dvohra/node-server.
Specify Hostname as the Public DNS name of the EC2 instance on which Jenkins is running. Specify Container name as the $BUILD_NUMBER variable. The container name must not be a fixed name, as multiple runs for testing and debugging would cause overlap in container name and result in an error.
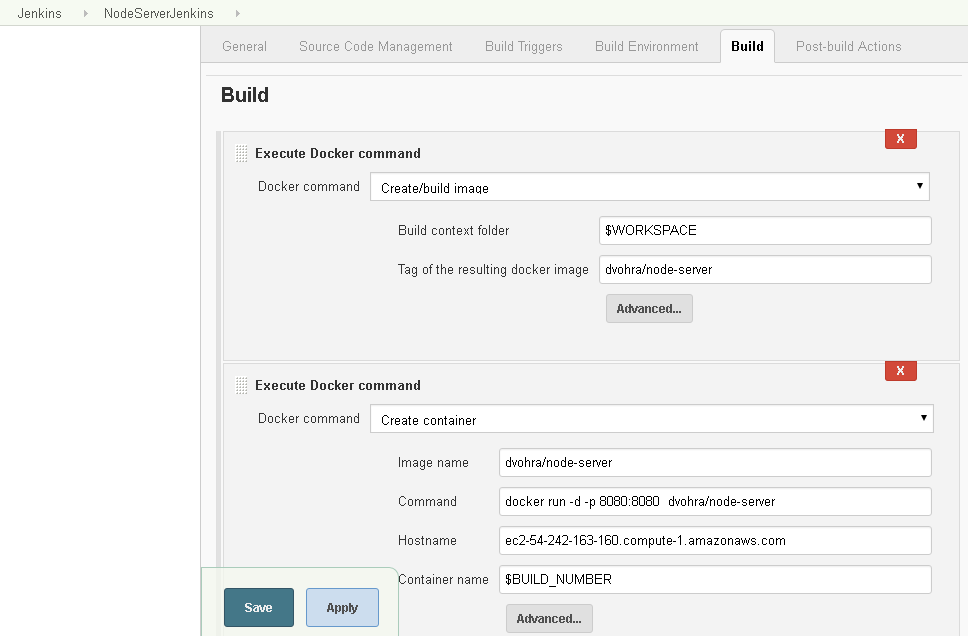
Figure 53. Adding another Docker Build Step
To add a third build step click on the Add build step drop-down list and select the Execute Docker command. Select the Docker command Push image as shown in Figure 55. Specify Name of image to push as dvohra/node-server. Specify the Docker registry URL as http://index.docker.io/v1/ for Docker Hub. Before we are able to complete the Push image build step we need to configure the registry credentials.
To add the Registry credentials click on Add for the Register credentials field and select Jenkins. In Jenkins Credentials Provider: Jenkins >Add Credentials select Domain as Global credentials and Kind as Username with password as shown in Figure 54. Select Scope as Global. Specify Username and Password for the Docker Hub account, which would be different for different users or user groups. Click on Add.
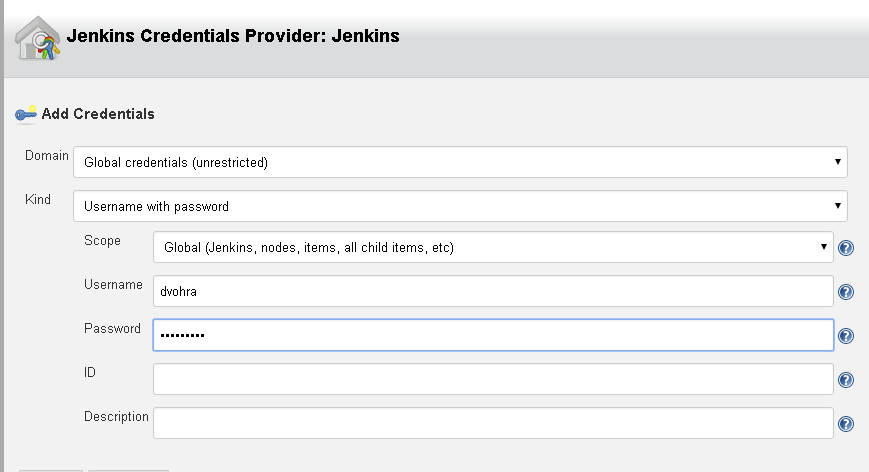
Figure 54. Jenkins Credentials Provider: Jenkins
Subsequently, select the Registry credential added. The Docker command to push Docker image to Docker Hub gets configured as shown in Figure 55.
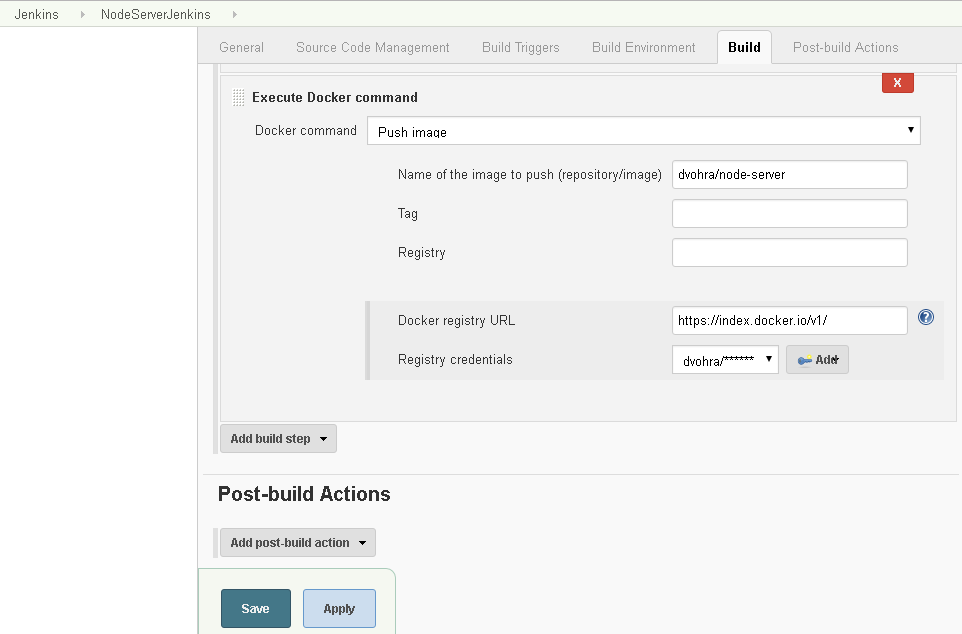
Figure 55. Configuring Push Image build step
In Post-build Actions click on Add post build action and select AWS CodePipeline Publisher as shown in Figure 56.
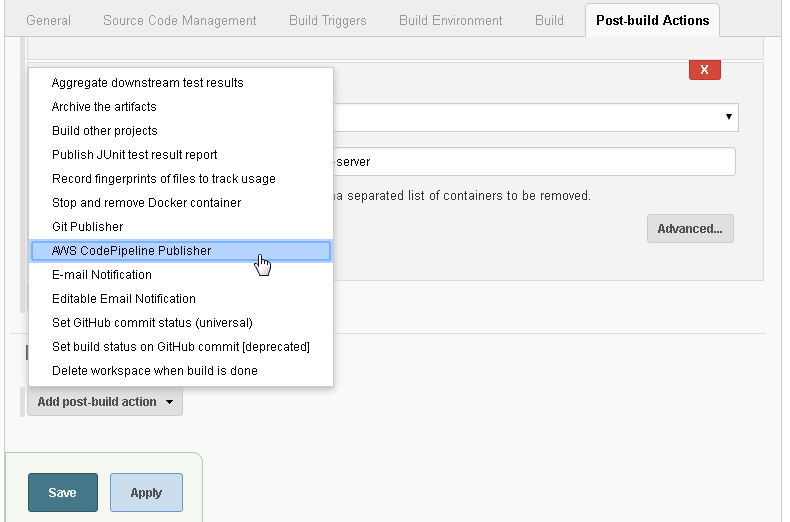
Figure 56. Post-build Actions>AWS CodePipeline Publisher
We have not yet completed the post-build action configuration. Click on Save periodically to save the project configuration as shown in Figure 57. Click on Add for Output Locations.
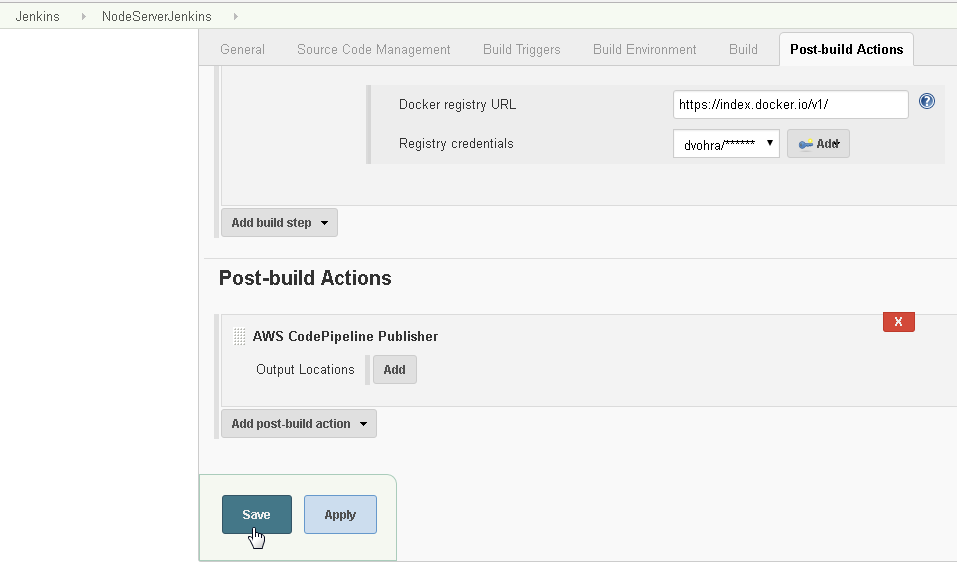
Figure 57. Saving Post-Build Action Configuration
In Output Locations keep the Location field empty as shown in Figure 58. Click on Save to save the project configuration.
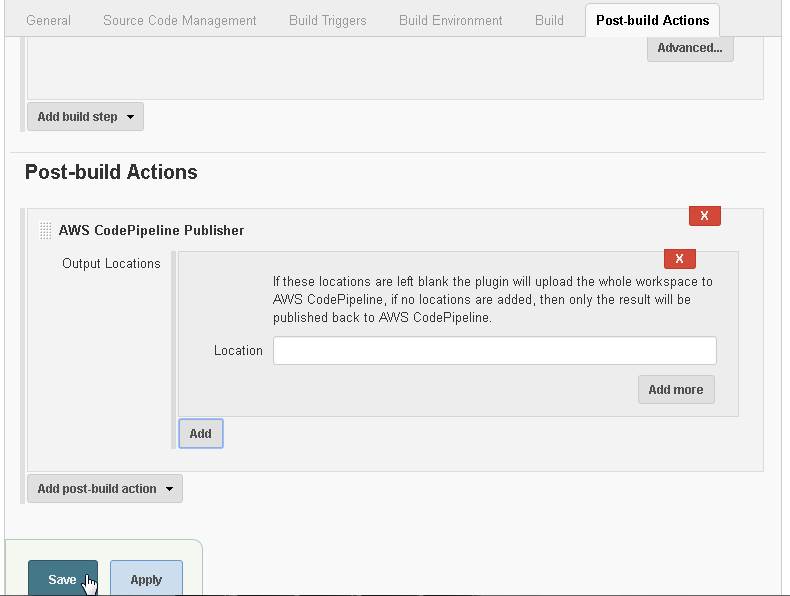
Figure 58. Configuring Output Locations for AWS CodePipeline Publisher
A Jenkins project gets created as shown in Figure 59.
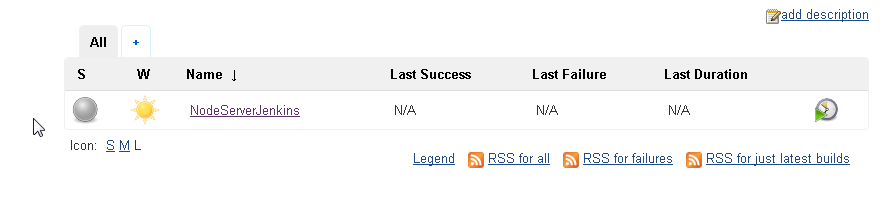
Figure 59. Jenkins project NodeServerJenkins
Conclusion
In this article we discussed why using a Jenkins Pipeline is necessary to test a code build before deploying an application to Elastic Beanstalk with AWS CodePipeline. We created an IAM role for Jenkins, launched an EC2 instance for Jenkins, installed the Jenkins server, installed and configured the Jenkins plugins, created a GitHub repo for the source code of a Docker image, created an Elastic Beanstalk application and created a Jenkins project. In the second of this two-article series we shall create an AWS CodePipeline and run the CodePipeline.
Start the discussion at forums.toadworld.com