Introduction
Oracle Container Database (CDB) and Pluggable Databases (PDBs) provide modularization to Oracle Database 12c, as discussed in the article Modularization by using Oracle Database Containers and PDBs on Docker Engine. Docker Engine provides a lightweight platform for running applications in Docker containers. Multiple Docker containers run on the underlying OS kernel isolated from each other, with each Docker container having its own filesystem and networking.
In this tutorial we shall take the earlier tutorial further by accessing the Oracle Database 12c CDB and PDBs running on Docker using Toad for Oracle, which provides a graphical user interface (GUI) for connecting to Oracle Database and for running SQL scripts, among other features. One difference from the earlier tutorial is that we shall use Docker Swarm mode for creating a Docker service for Oracle Database instead of using the docker run command. Docker Swarm mode offers some advantages:
– Docker service tasks (with each task running a Docker container) run on a distributed cluster.
– Docker service is scalable.
– Mounts may be mounted in Docker containers to access volumes and directories on the host.
– Resources (CPU and memory) may be configured, including setting resource reserves and limits.
– Rolling Updates may be applied to a running service without interruption in service.
– Scheduling, networking, load balancing, logging, and monitoring may be configured.
This tutorial has the following sections.
- Creating or Downloading the Docker Image
- Setting Docker Swarm Mode
- Creating a Docker Service for Oracle Database
- Creating a Connection to an Oracle Database PDB in Toad for Oracle
- Enabling Auto Commit
- Finding Session Privileges in Oracle Database PDB
- Creating a Connection to an Oracle Database CDB in Toad for Oracle
- Finding Session Privileges in Oracle Database CDB
- Listing PDBs
- Setting Container to PDB
- Listing Data Files for PDB
- Listing Temp Files for PDB
- Creating a Database Table
- Querying the Database Table
- Disconnecting Toad for Oracle Connection to Oracle Database
Setting the Environment
First, you need to download and install the following software.
Oracle Instant Client for Microsoft Windows (x64)
Download and install Toad for Oracle. Download the Oracle Instant Client for Microsoft Windows (x64) and extract the zip file to a directory. Any of the versions for 12c (12.2.0.1.0, 12.1.0.2.0, or 12.1.0.1.0) may be downloaded. Add the directory C:instantclient_12_1 (the directory in which the Oracle Instance Client zip is extracted with sub-directories VC10, VC11, VC12) at the beginning of the PATH environment variable. The only other prerequisite is an AWS account, which may be created at https://aws.amazon.com/resources/create-account/.
Create an AWS EC2 instance with AMI Container Linux by CoreOS (Stable) for the Swarm manager node. A Docker Swarm consists of at least one Swarm manager and one or more Swarm worker nodes. We shall create a Docker Swarm with one Swarm manager; a Swarm manager is also a worker node by default. Because the Docker image for Oracle Database 12c is several GB additional storage (~200GB) must be added, as shown in Figure 1, when creating the EC2 instance.

Figure 1. Adding Additional Storage
The EC2 instance for Docker Swarm manager is shown in Figure 2. To access the EC2 instance, obtain the Public IP Address from the AWS EC2 management console as shown in Figure 2.
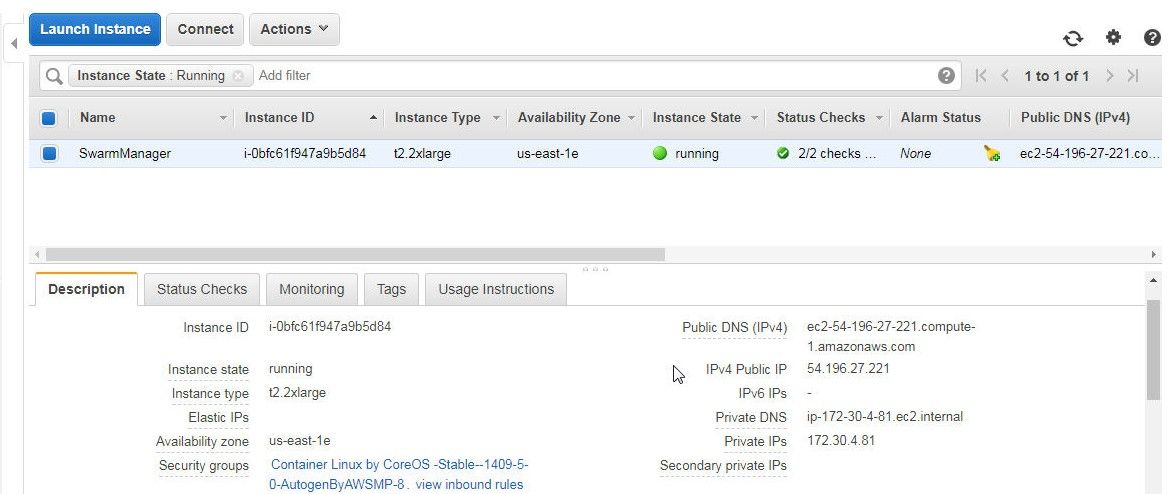
Figure 2. Obtaining the Public IP Address for the CoreOS EC2 Instance
SSH Login into the CoreOS instance using the Public IP Address and the Public key used to create the CoreOS instance.
ssh -i "coreos.pem" core@54.196.27.221
Output the Docker version with the following command.
docker version
To be able to use Docker Swarm mode the Docker version must be at least 1.12, as shown in Figure 3.
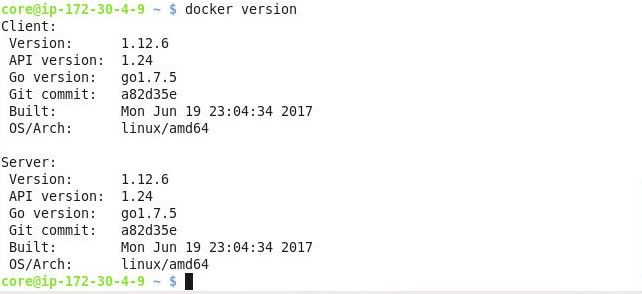
Figure 3. Docker Version must be at least 1.12
Creating or Downloading the Docker Image
As discussed in the tutorial Modularization by using Oracle Database Containers and PDBs on Docker Engine the Docker image must be created or built locally by downloading the source code for the image and using the Oracle Database 12c binaries. The Docker image created should not be uploaded to a public Docker image repo but may be uploaded to a private repo. We shall be using the same Docker image used in the earlier tutorial, and the image repo (local or on the web) would be different for different users. Login to the Docker Hub and provide the username and password when prompted.
docker login
The user login gets completed, as shown in Figure 4.

Figure 4. Logging into Docker Hub
Pull the Docker image (the image name would be different for different users or user groups).
docker pull dvohra/oracle-db:12.2.0.1-ee
The Docker image gets pulled, as shown in Figure 5.
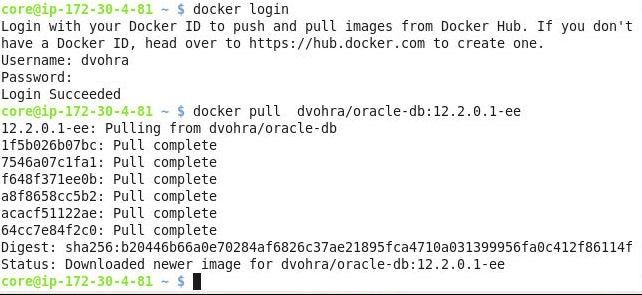
Figure 5. Pulling Docker Image
List the Docker images.
docker images
The Docker image gets listed, as shown in Figure 6.

Figure 6. Listing Docker Images
Setting Docker Swarm Mode
The Docker Swarm mode is Docker-native starting with version 1.12, but must be enabled. To initialize the Docker Swarm, obtain the Private IP of the Swarm manager node from the EC2 management console, as shown in Figure 7.
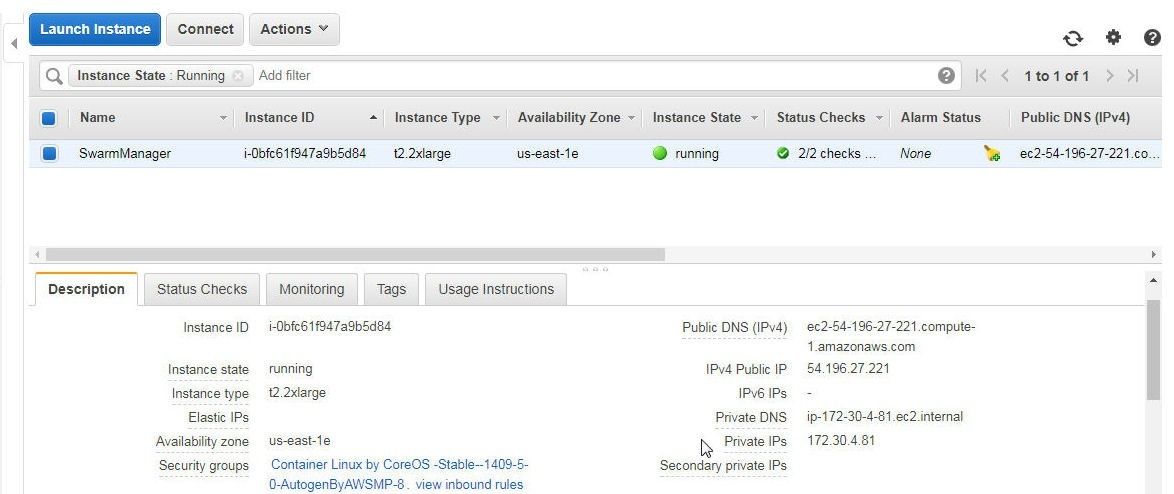
Figure 7. Private IP of Swarm Manager
Initialize the Docker Swarm using the Private IP of the EC2 instance on which the Swarm manager node is to be created.
docker swarm init --advertise-addr 172.30.4.81
As the output in Figure 8 indicates, the Swarm gets initialized and the current node becomes the manager.
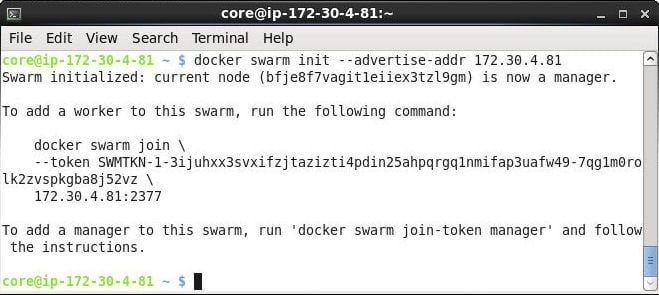
Figure 8. Initializing the Swarm Mode
List the Swarm nodes.
docker node ls
The Swarm manager node should get listed as shown in Figure 9.

Figure 9. Listing the Swarm Manager Node
Creating a Docker Service for Oracle Database
In this section we shall create a Docker service using the Docker image for Oracle Database 12c. Provide the parameters discussed in Table 1 to the docker service create command.
Table 1. Parameters to the docker service create Command
|
Parameter |
Description |
Value |
|
–replicas |
Sets the number of tasks or replicas |
1 |
|
-p |
Exposes port 1521 on the host |
1521:1521 |
|
-p |
Exposes port 5500 on the host for Enterprise Manager Database Console |
5500:5500 |
|
–env |
Sets Oracle SID |
ORACLE_SID=ORCLCDB |
|
–env |
Sets Oracle database pluggable database name |
ORACLE_PDB=ORCLPDB1 |
|
–env |
Sets Oracle password |
ORACLE_PWD=oracle |
|
–name |
Sets Service name |
orclcdb |
Run the following command from the CoreOS EC2 instance.
docker service create
  --replicas 1
  -p 1521:1521 -p 5500:5500
  --env ORACLE_SID=ORCLCDB
  --env ORACLE_PDB=ORCLPDB1
  --env ORACLE_PWD=oracle
  --name orclcdb
  dvohra/oracle-db:12.2.0.1-ee
A Docker service gets created and a string gets output as shown in Figure 10. List the Docker services.
docker service ls
The orclcdb service gets listed, as shown in Figure 10.
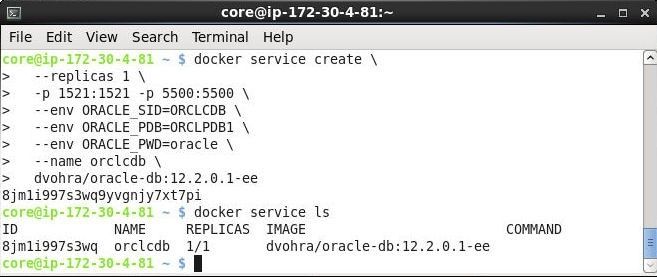
Figure 10. Creating and Listing Docker Service for Oracle Database 12c
To list the tasks (replicas) in a Docker service the command syntax is as follows.
docker service ps <SERVICE>
List the tasks in the Docker service orclcdb.
docker service ps orclcdb
A single Docker service task gets listed, as shown in Figure 11.
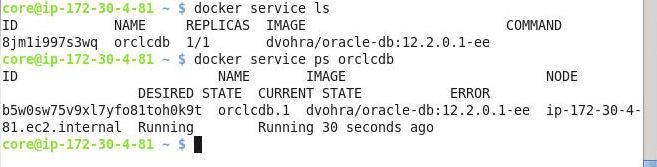
Figure 11. Listing the Docker Service Tasks
Creating a Connection to an Oracle Database PDB in Toad for Oracle
In this section we shall create a connection to an Oracle Database 12c PDB from Toad for Oracle. Start Toad for Oracle and the New Connection wizard should get started automatically. If Toad for Oracle has already been started and the New Connection (or Login) wizard is not open, create a New Connection by selecting Session>New Connection as shown in Figure 12.

Figure 12. Session>New Connection
In the Toad for Oracle Login wizard, click on Add Login Record as shown in Figure 13.
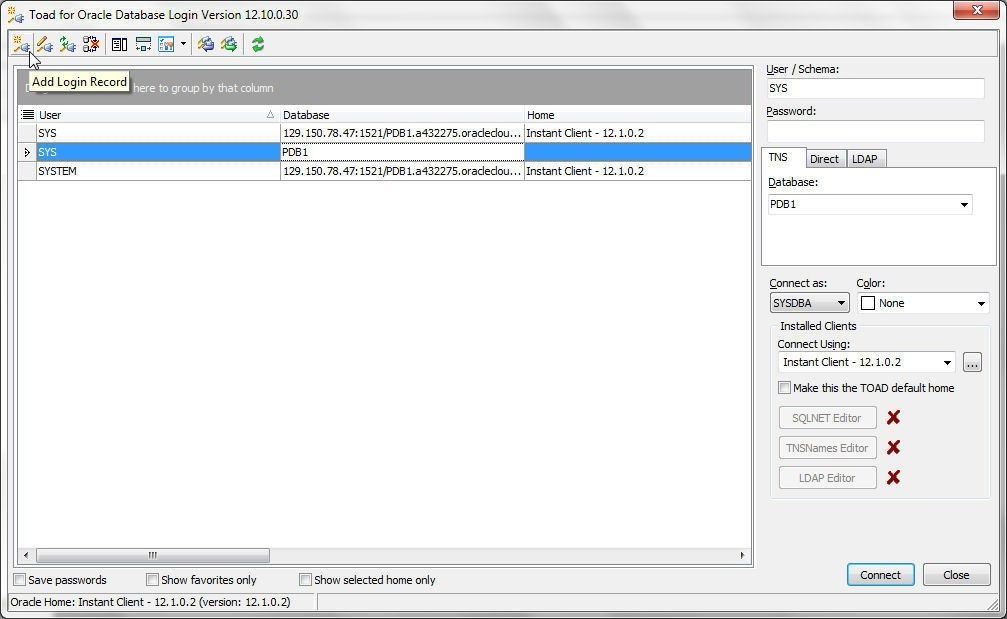
Figure 13. Toad for Oracle Login>Add Login Record
The Add Login Record wizard gets started, as shown in Figure 14. A new connection may be created by using any of the three options: TNS, Direct, or LDAP. We shall use the Direct option.
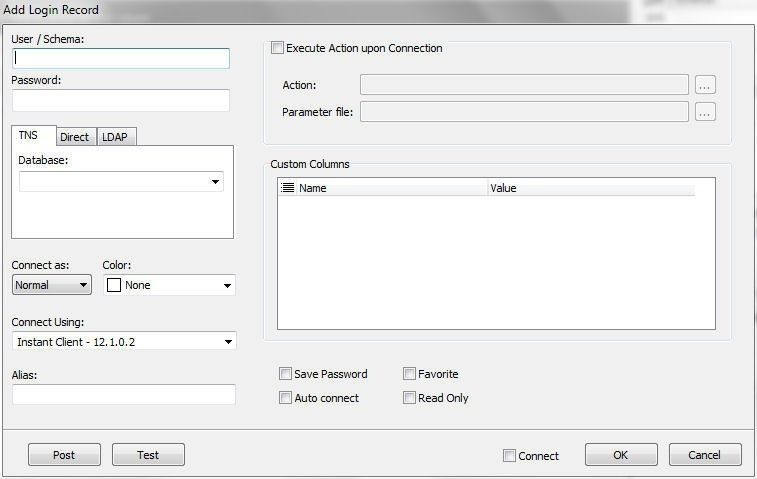
Figure 14. Add Login Record Wizard
We shall need to provide the Host for the Oracle Database 12c running on Docker Engine on a CoreOS instance. The Host is the Public DNS of the CoreOS EC2 instance on which the Swarm manager node is created. Obtain the Public DNS from the EC2 management console, as shown in Figure 15.
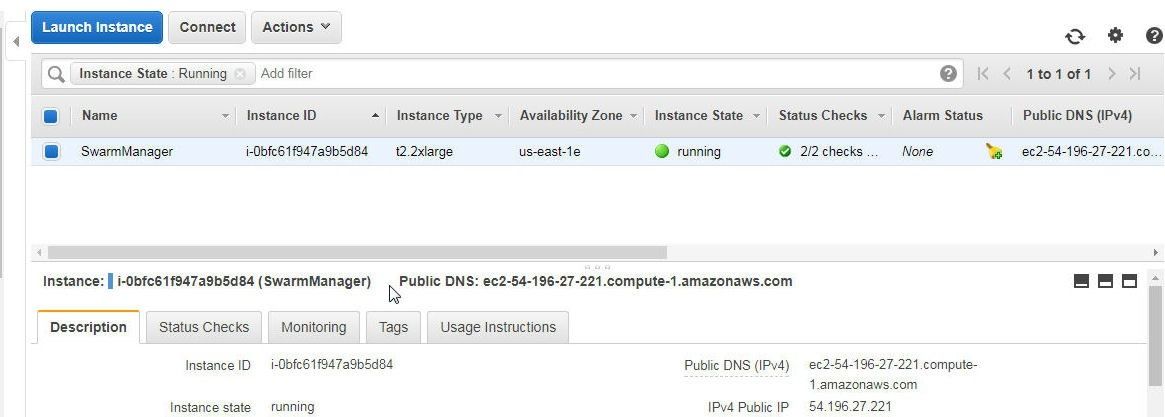
Figure 15. Public DNS
In the Add Login Record specify the connection parameters listed in Table 2.
Table 2. Connection Parameters for a PDB
|
Parameter |
Value |
|
User/Schema |
pdbadmin |
|
Password |
oracle |
|
Host |
Public DNS of CoreOS Instance from Figure 15 |
|
Port |
1521 |
|
Service Name |
ORCLPDB1 |
|
Connect Using |
Instant Client 12.1.0.2 |
The Add Login Record is shown in Figure 16. Click on Test to test the connection.

Figure 16. Configuring and Testing Connection
If a connection gets established the message Success gets displayed, as shown in Figure 17. Click on OK.
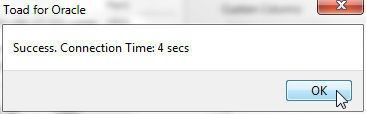
Figure 17. Success Message
Select the Connect checkbox to connect automatically when the connection configuration is completed. Click on OK as shown in Figure 18.
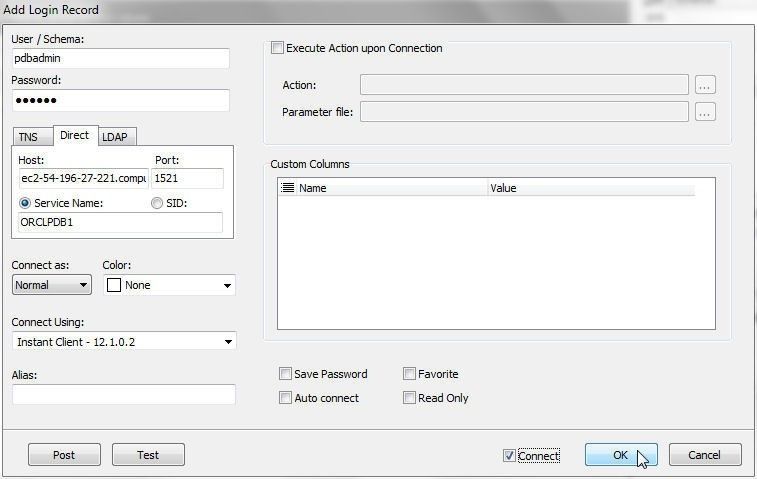
Figure 18. Creating a New Connection
A new connection gets added to Toad for Oracle, as shown in Figure 19.
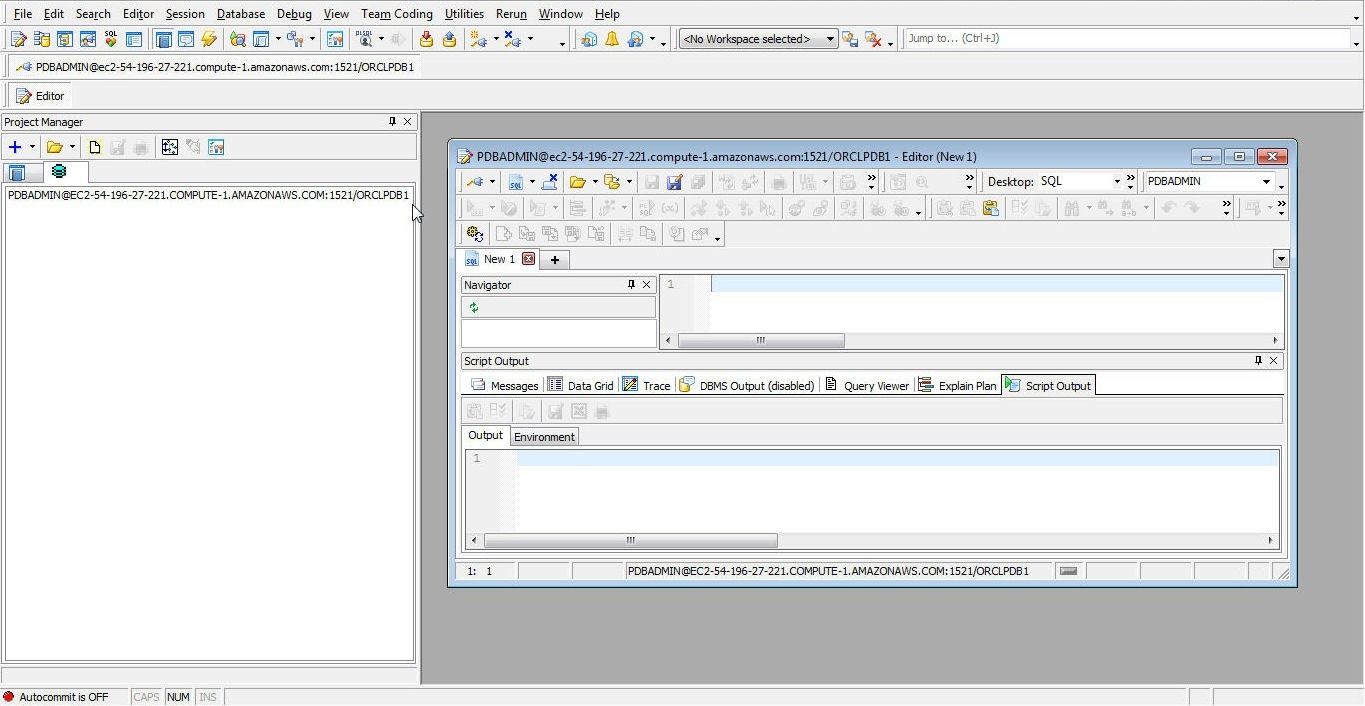
Figure 19. Connection added to Toad for Oracle
The new connection also gets added to the Toad for Oracle Database Login, as shown in Figure 20.
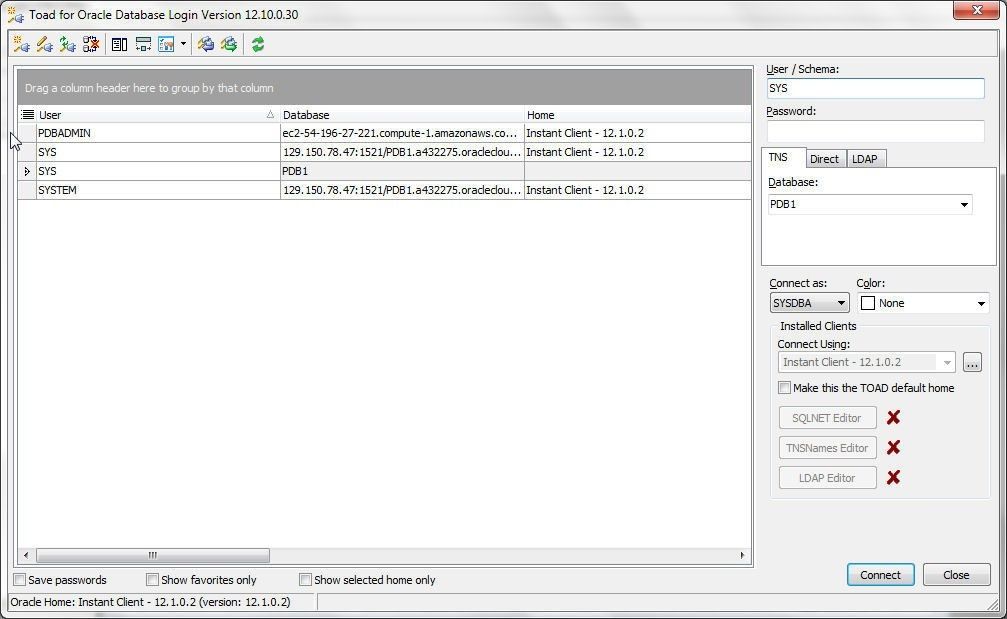
Figure 20. New Login Record for PDB
Enabling Auto Commit
As the Autocommit is Off message in the lower section of the Toad for Oracle console indicates, the Auto Commit is Off by default. To set Auto Commit to ON click View>Toad Options, as shown in Figure 21.
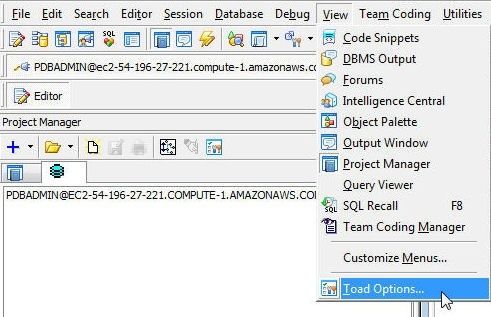
Figure 21. View>Toad Options
In Options select Oracle>Transactions as shown in Figure 22. The Commit after every statement checkbox is not selected, as shown in Figure 22.
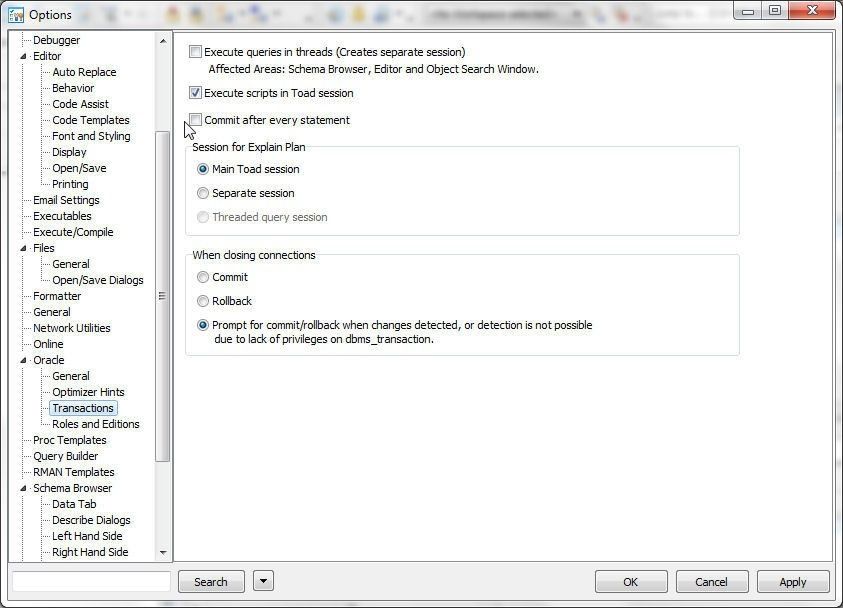
Figure 22. Oracle>Transactions
After selecting Commit after every statement click on OK as shown in Figure 23.
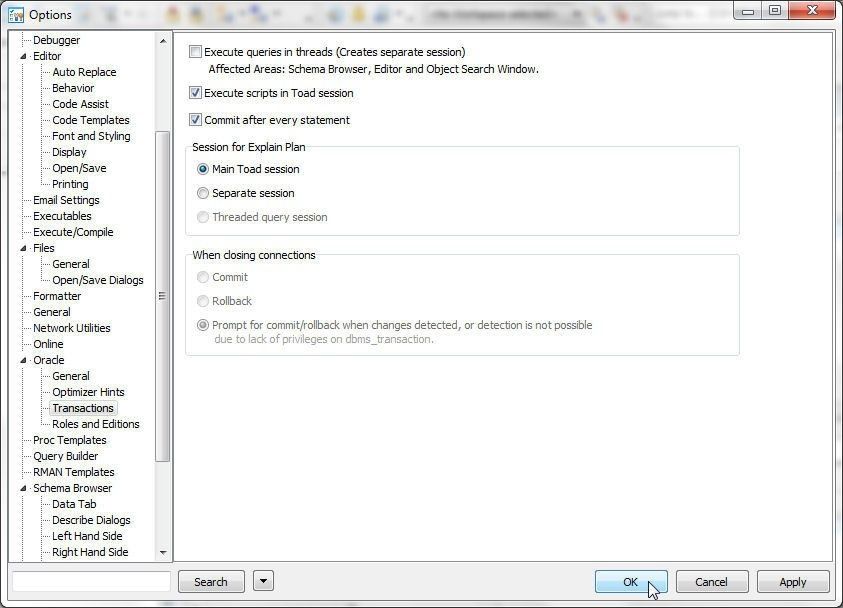
Figure 23. Commit after every statement selected
The Autocommit is ON message should get displayed, as shown in Figure 24.
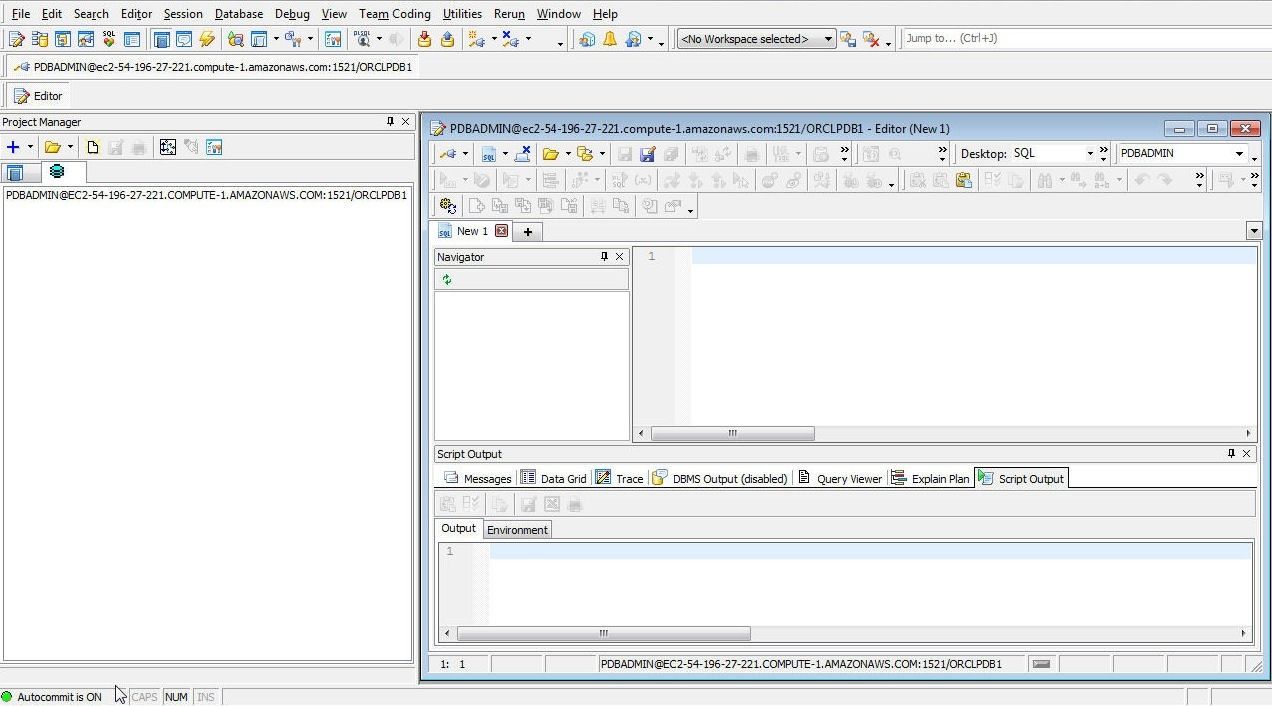
Figure 24. Autocommit is ON
Finding Session Privileges in Oracle Database PDB
A PDB has limited session privileges. To find the session privileges for the PDB to which a connection is created, run the following SQL statement in a SQL Editor.
SELECT * FROM SESSION_PRIVS;
As shown in Figure 25, only three privileges get listed: SET CONTAINER, CREATE PLUGGABLE DATABASE, and CREATE SESSION.
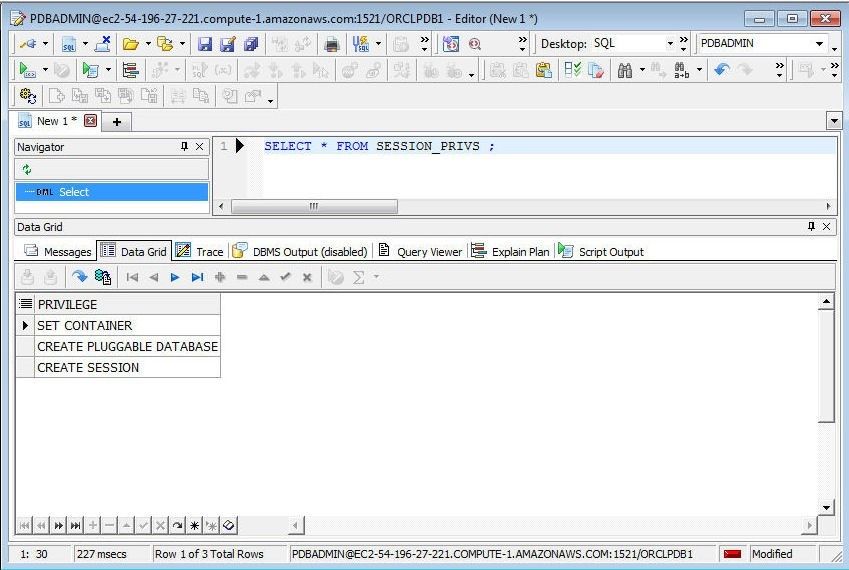
Figure 25. Listing Session Privileges for PDB
Without the CREATE TABLE session privilege a table cannot be created in the PDB using the session connection. Run a SQL script to create a database table, as shown in Figure 26.
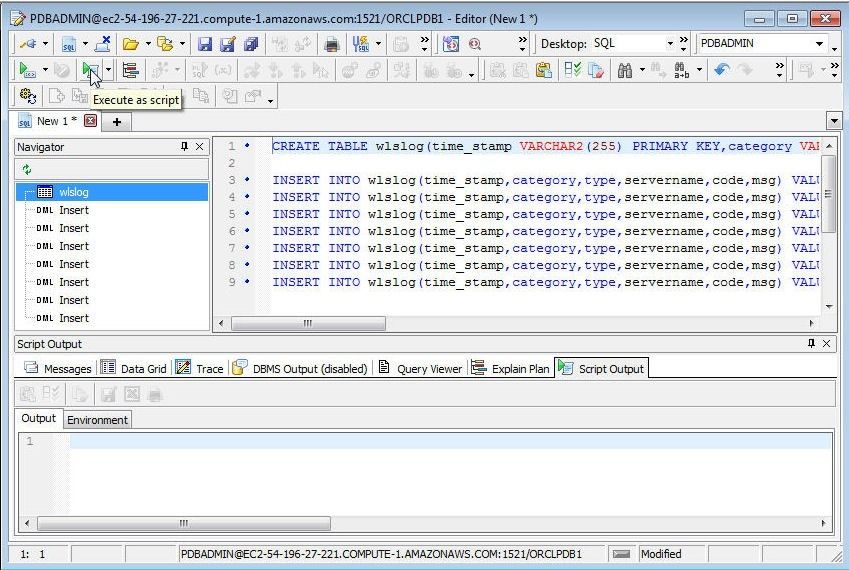
Figure 26. Running a SQL Script to create a Database Table in PDB
A message indicates “Insufficient privileges”, as shown in Figure 27.
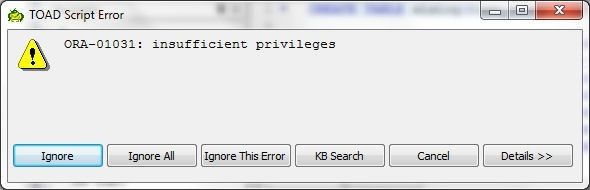
Figure 27. Insufficient Privileges
To be able to create a database table we need to create a connection with the CDB in Oracle Database 12c, which is discussed next.
Creating a Connection to an Oracle Database CDB in Toad for Oracle
To create a new connection select Session>New Connection, as discussed earlier and shown in Figure 12. Alternatively, right-click in the Project Manager and select New connection as shown in Figure 28.
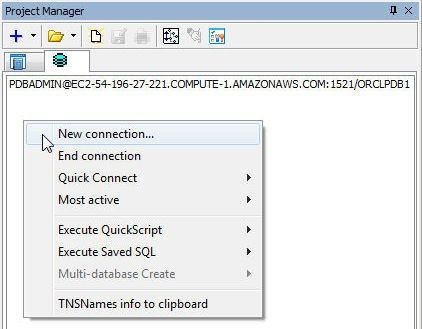
Figure 28. New connection
Click on Add Login Record as shown in Figure 29.
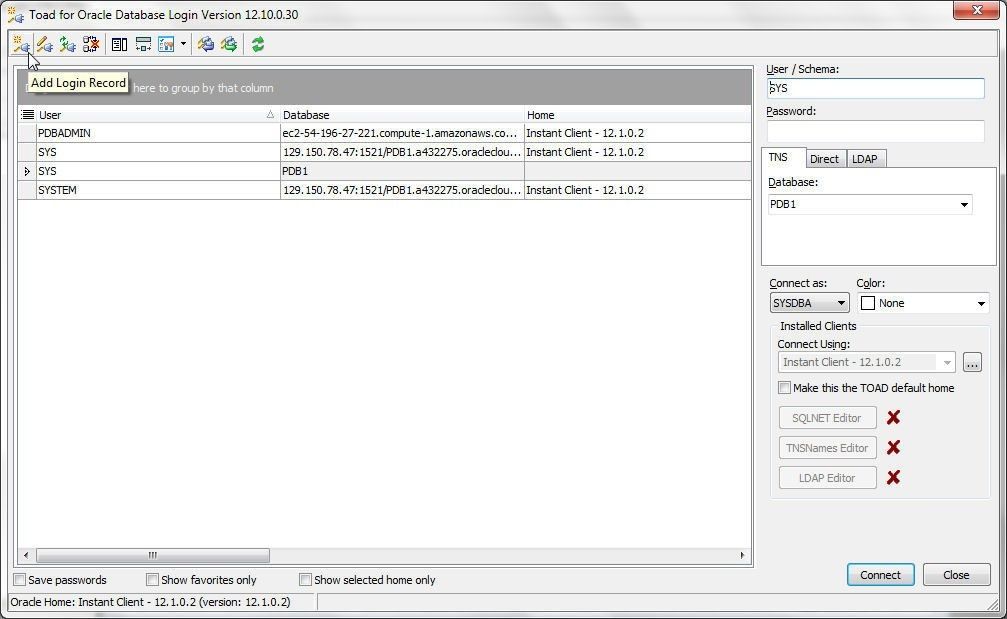
Figure 29. Toad for Oracle Login>Add Login Record
Some of the connection parameters for connecting to a CDB are different than connecting to a PDB and are shown in Table 3.
Table 3. Connection Parameters for a CDB
|
Parameter |
Value |
|
User/Schema |
SYS |
|
Password |
oracle |
|
Host |
Public DNS of CoreOS Instance from Figure 15 |
|
Port |
1521 |
|
Service Name |
ORCLCDB |
|
Connect As |
SYSDBA |
|
Connect Using |
Instant Client 12.1.0.2 |
Click on Test to test the connection as shown in Figure 30.
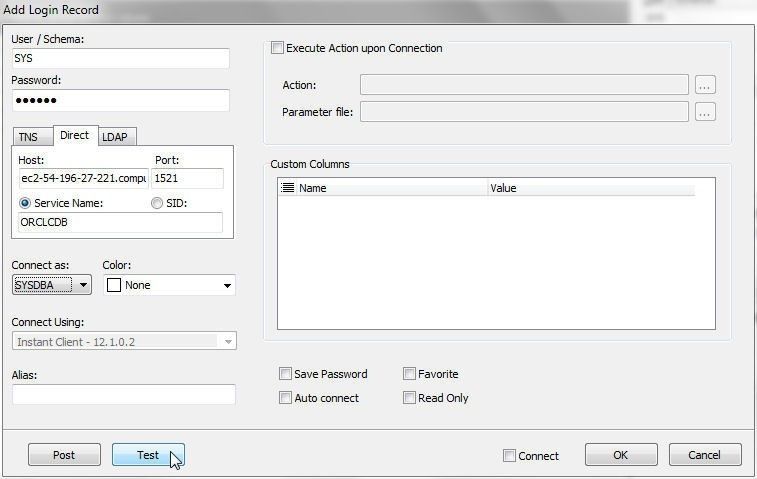
Figure 30. Configuring and Testing a Connection to a CDB
If the connection is successful click on OK as shown in Figure 31.
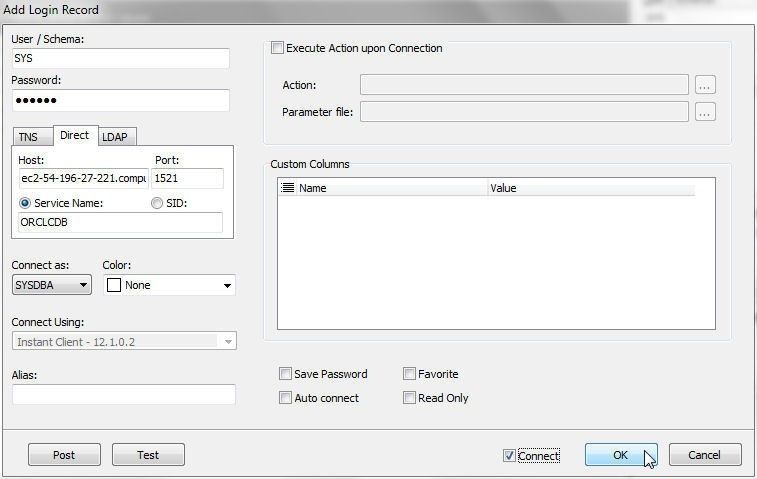
Figure 31. Creating a New Connection to CDB
A new connection to a CDB gets added to the Toad for Oracle, as shown in Figure 32.

Figure 32. New Connection to CDB
A new login record for the CDB gets added, as shown in Figure 33.
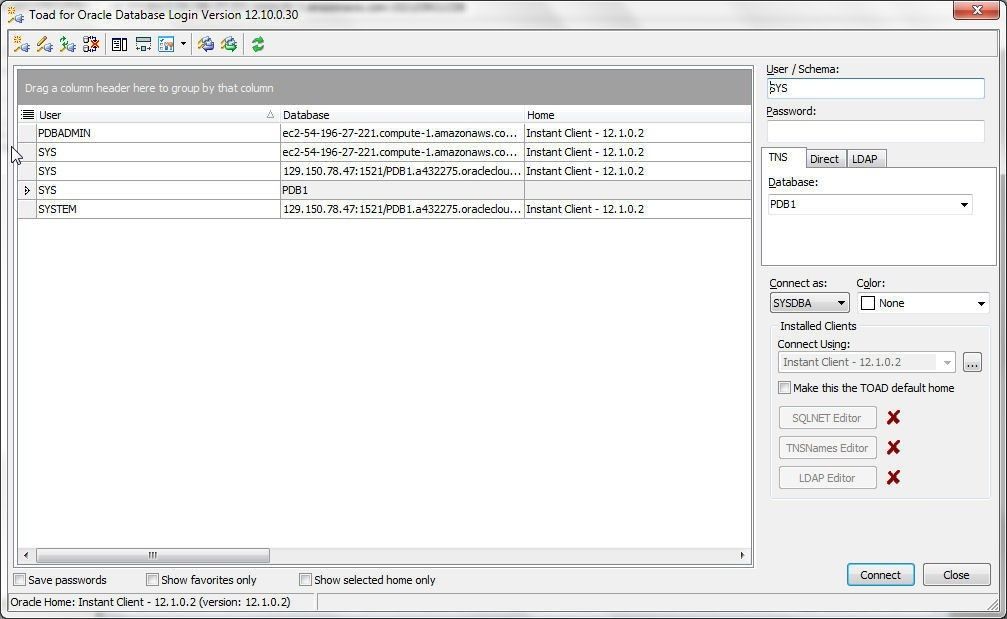
Figure 33. Login Record for CDB
Finding Session Privileges in Oracle Database CDB
To find the session privileges run the following SQL statement in a SQL Editor for the connection to the CDB.
SELECT * FROM SESSION_PRIVS;
The output may be listed in a Grid, as shown in Figure 34.
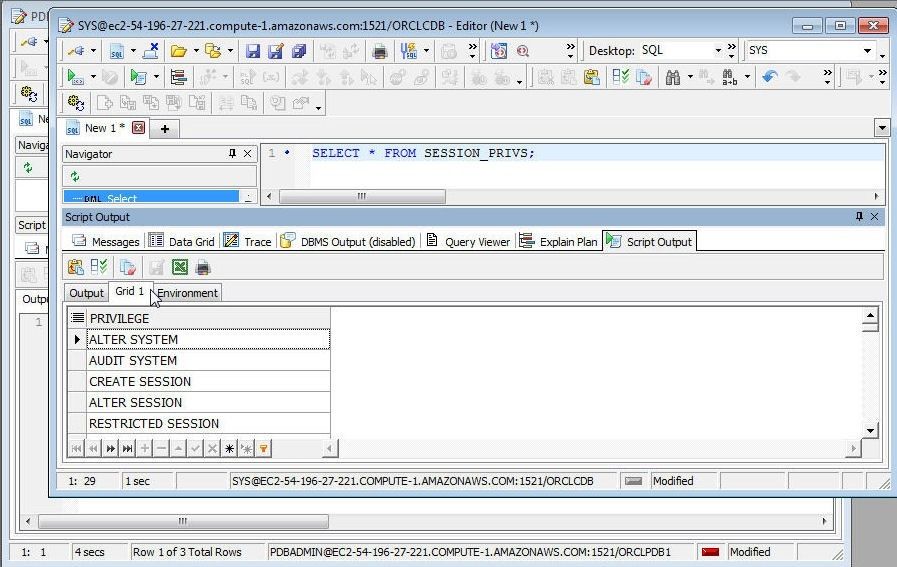
Figure 34. Session Privileges for CDB
The CREATE TABLE session privilege also gets listed, as shown in Figure 35.
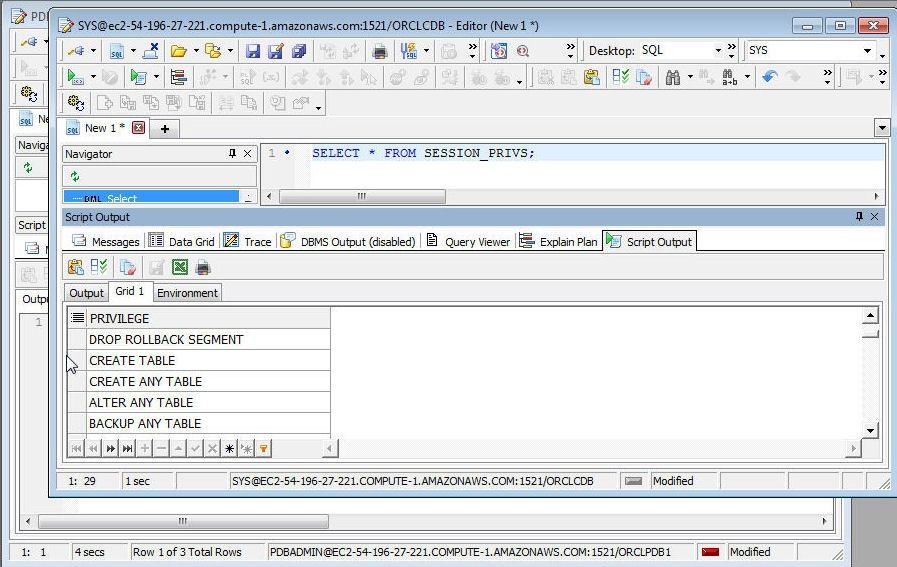
Figure 35. CREATE TABLE Session Privilege
Listing PDBs
Select the PDB’s name, and open mode with the following command.
select name, open_mode from v$pdbs;
TheORCLPDB1 PDB gets listed, as shown in Figure 36.
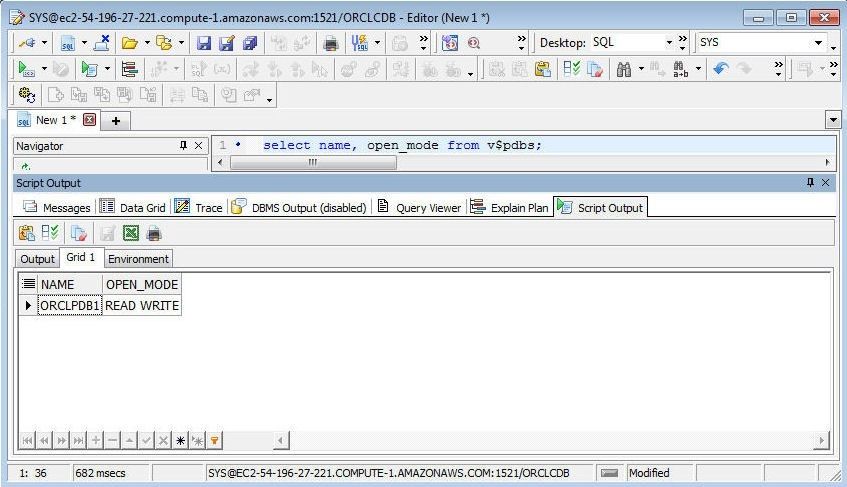
Figure 36. Listing the ORCLPDB1 PDB
Select and list the connection id, DB ID, and PDB name.
select con_id, dbid, name from v$pdbs;
The connection id and DB ID for the ORCLPDB1 database get listed, as shown in Figure 37.
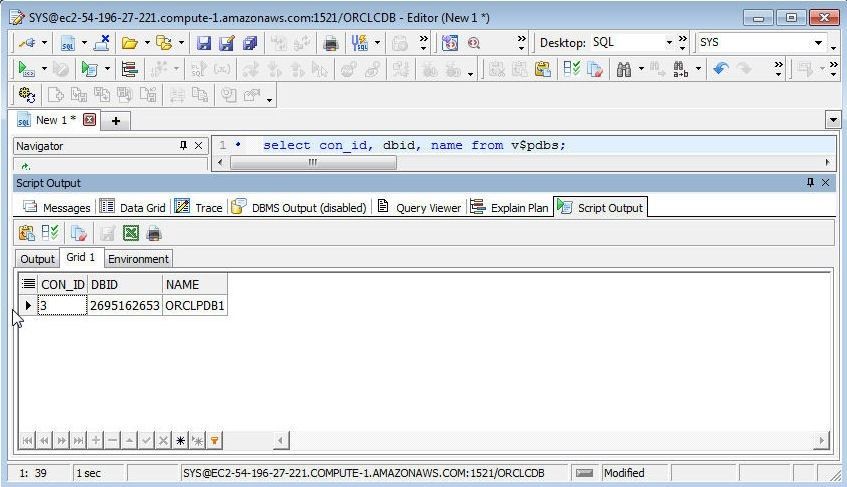
Figure 37. Listing CON_ID and DBID for ORCLPDB1
Setting Container to PDB
To be able to create a database table in the PDB ORCLPDB1 we need to set the container to ORCLPDB1 with the following ALTER SESSION statement.
alter session set container = ORCLPDB1;
Click on Execute as script as shown in Figure 38.
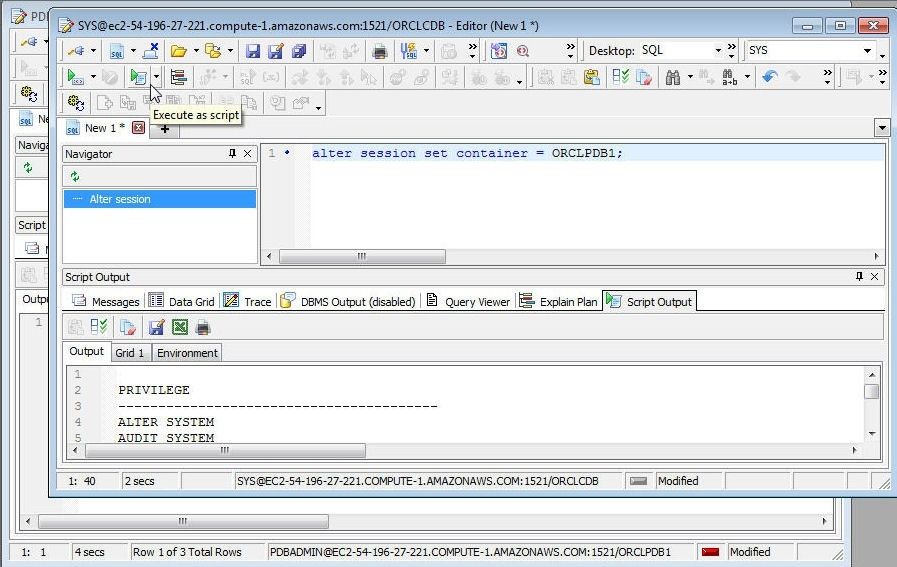
Figure 38. Running SQL Statement to set Container as ORCLPDB1
The Session gets altered, as shown in Figure 39.

Figure 39. Setting Container to ORCLPDB1
Listing Data Files for PDB
To list the data files run the following SQL statement.
select name from v$datafile;
The data files in the ORCLPDB1 database get listed, as shown in Figure 40.
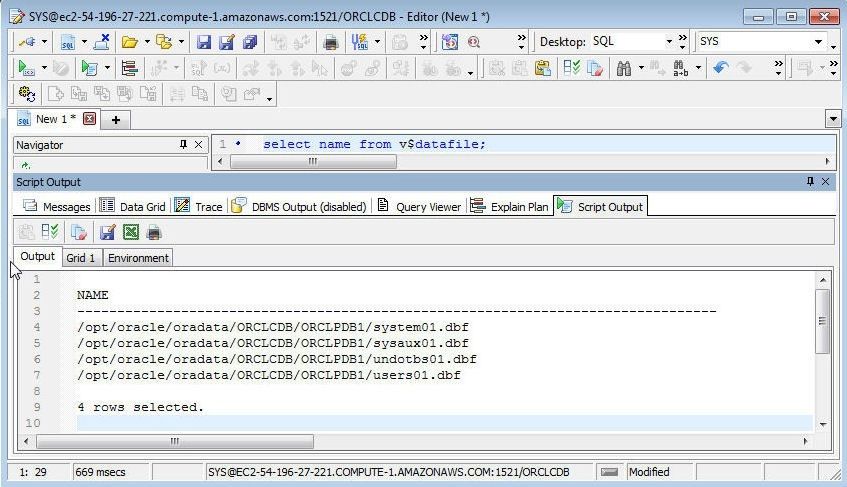
Figure 40. Listing Data files on ORCLPDB1
The System Variables and User Variables may be listed in the Environment tab, as shown in Figure 41.
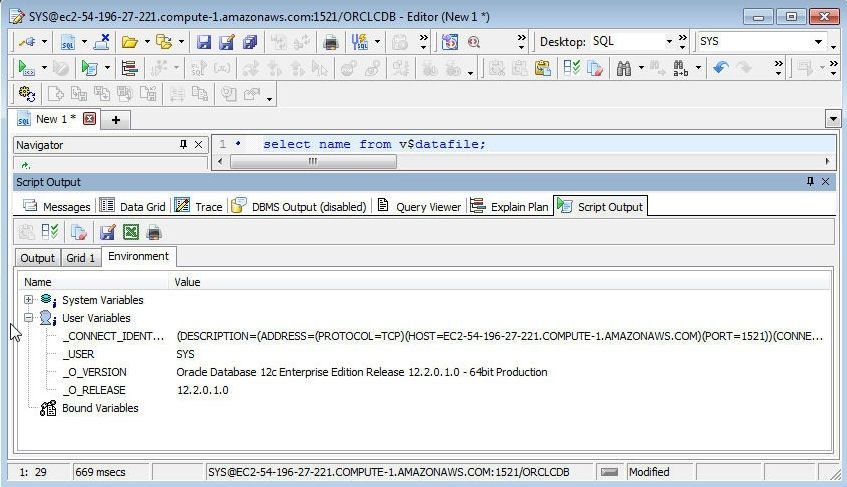
Figure 41. System and User Environment Variables
Listing Temp Files for PDB
To list the temp files run the following SQL statement.
select con_id,name from v$tempfile;
The temp file for the ORCLPDB1 database gets listed as shown in Figure 42.

Figure 42. Listing Temp Files
Creating a Database Table
To create a database table in ORCLPDB1, which has been set as the current container, copy the following SQL statement to a SQL Editor for the connection to the ORCLCDB.
CREATE TABLE wlslog(time_stamp VARCHAR2(255) PRIMARY KEY,category VARCHAR2(255),type VARCHAR2(255),
    servername VARCHAR2(255), code VARCHAR2(255),msg VARCHAR2(255));
INSERT INTO wlslog(time_stamp,category,type,servername,code,msg) VALUES('Apr-8-2014-7:06:16-PM-PDT',
    'Notice','WebLogicServer','AdminServer','BEA-000365','Server state changed to STANDBY');
INSERT INTO wlslog(time_stamp,category,type,servername,code,msg) VALUES('Apr-8-2014-7:06:17-PM-PDT',
    'Notice','WebLogicServer','AdminServer','BEA-000365','Server state changed to STARTING');
INSERT INTO wlslog(time_stamp,category,type,servername,code,msg) VALUES('Apr-8-2014-7:06:18-PM-PDT',
    'Notice','WebLogicServer','AdminServer','BEA-000365','Server state changed to ADMIN');
INSERT INTO wlslog(time_stamp,category,type,servername,code,msg) VALUES('Apr-8-2014-7:06:19-PM-PDT',
    'Notice','WebLogicServer','AdminServer','BEA-000365','Server state changed to RESUMING');
INSERT INTO wlslog(time_stamp,category,type,servername,code,msg) VALUES('Apr-8-2014-7:06:20-PM-PDT',
    'Notice','WebLogicServer','AdminServer','BEA-000361','Started WebLogic AdminServer');
INSERT INTO wlslog(time_stamp,category,type,servername,code,msg) VALUES('Apr-8-2014-7:06:21-PM-PDT',
    'Notice','WebLogicServer','AdminServer','BEA-000365','Server state changed to RUNNING');
INSERT INTO wlslog(time_stamp,category,type,servername,code,msg) VALUES('Apr-8-2014-7:06:22-PM-PDT',
    'Notice','WebLogicServer','AdminServer','BEA-000360','Server started in RUNNING mode');
Click on Execute as script as shown in Figure 43.
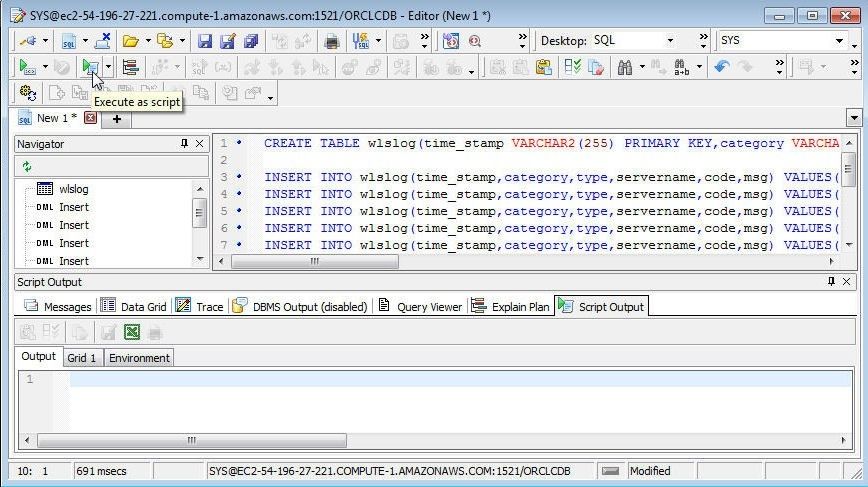
Figure 43. Running SQL Script to create a Database Table in PDB ORCLPDB1
A database table gets created and data gets added, as shown by the output in Figure 44.
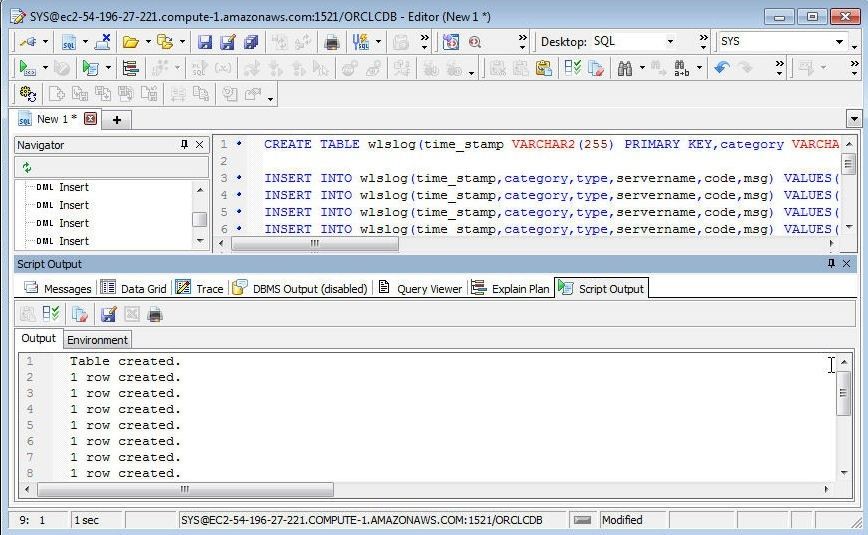
Figure 44. Database Table created
Querying the Database Table
To query the database table created, copy the following SQL statement to an SQL Editor.
SELECT time_stamp || ' ' || category || ' ' || type || ' ' || servername || ' ' ||code || ' ' || msg from wlslog;
Click on Execute as script and a result set gets displayed, as shown in Figure 45.
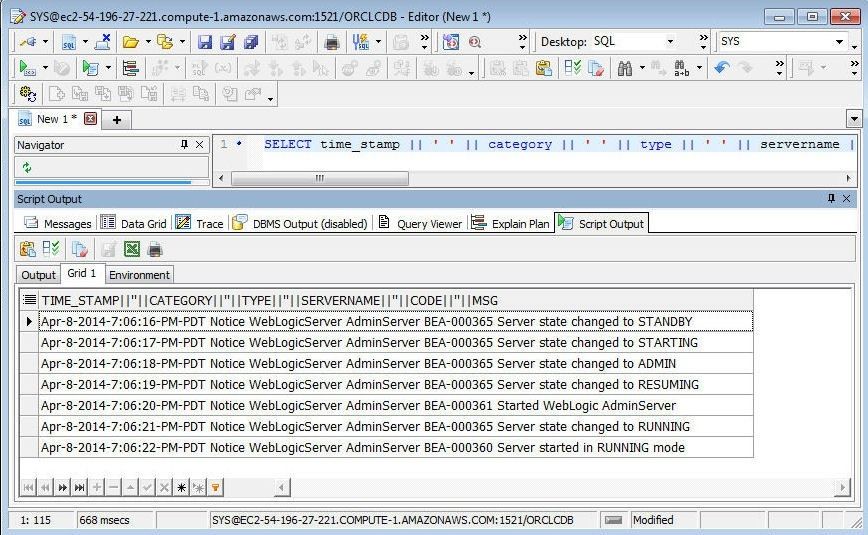
Figure 45. SQL Result Set
Disconnecting Toad for Oracle Connection to Oracle Database
To disconnect from Oracle Database 12c ORCLCDB, select the connection to the CDB, right-click in the Project Manager, and select End Connection, as shown in Figure 46.
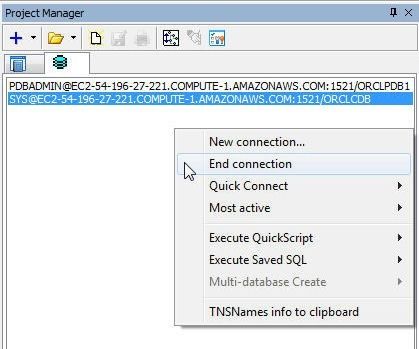
Figure 46. End connection
In the Confirm dialog click on Yes as shown in Figure 47.
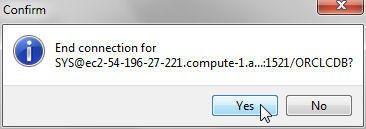
Figure 47. Confirming disconnecting
The CDB connection gets removed from Toad for Oracle, as shown in Figure 48. To remove the other connection for ORCLPDB1 select the connection, right-click and select End connection.
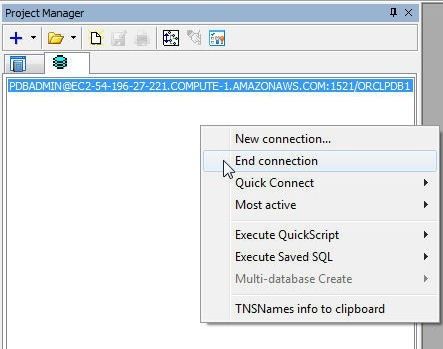
Figure 48. Connection to CDB Removed
Click on Yes in the Confirm. The other connection also gets removed. The message “Oracle has terminated the session or the connection is dropped” gets displayed, as shown in Figure 49.
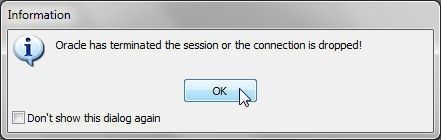
Figure 49. Session to Oracle Database terminated
Conclusion
In this tutorial we discussed using Oracle Database 12c CDB and PDB from Toad for Oracle. The modularity provided by a Docker image for creating Oracle database 12c CDB and PDBs is combined with the simplified database development and management provided by Toad for Oracle.
Start the discussion at forums.toadworld.com