In Version 12.1 Toad for Oracle added source control integration for Git, a popular distributed version control provider. Git is free software, distributed under the GNU general public license. Toad integrates with Git by providing standard check-in-in/check-out functionality to a locally stored Git repository.
This document includes a brief discussion of Distributed Version Control Systems, Git installation instructions, instructions on creating a Git Repository, and how to configure and use Git in Toad.
What is a Distributed Version Control System?
Git is a highly popular distributed version control system. There are some significant differences in the work flow of a distributed version control system (DVCS), compared to a conventional centralized version control system, such as Subversion (SVN) or Team Foundation Server. If you are new to using a decentralized version control system, it is important to understand these differences.
Centralized Systems
In a centralized system, the repository is a centrally located master copy, usually hosted on a server. Clients check out the master copy of an object to a local working folder to make changes. The object is locked for edits by other users. Once the modifications are complete, the changes are checked in to the central repository, and the object is unlocked. The workflow looks something like this:
- Retrieve the object from repository to local working folder.
- Lock object.
- Modify local copy.
- Check in local changes to repository
- Unlock object.
Distributed Systems
In a distributed system, such as Git, the system does not impose a central repository copy. Each user has a local version of the repository. Changes are committed to the local copy. There is no concept of locking an object. Local changes are shared with other developers by ‘pushing’ changes to a hosted remote repository, typically a hosted service such as GitHub. Remote changes are synchronized with the local repository by ‘pulling’ remote changes from the centralized repository. It is important to remember that in Git, the centralized repository in is arbitrary. A developer can clone a copy of any repository, and push/pull changes to the local repository. The distributed work flow might look something like this:
- Clone/Init – create or get a local copy of repository.
- Pull – Fetch merges/changes from remote repository.
- Edit – local copy of objects
- Stage – Add local changes to staging area. In Git perform ‘Add’ command.
- Commit local changes.
- Push – Push local changes/merges to remote repository.
The work flow differences between these two models have significant implications for Toad. Because there is no system defined master copy, Toad checks in / out objects from the local repository, as specified by the user. There may be changes made by other users that Toad is not aware of. Updates and merges with a remote repository are handled outside of Toad. Toad also commits local changes immediately, which is similar to the work flow for other source control providers in Toad.
The most important thing to remember is that Toad checks in/out files from the local repository. Changes are posted back to the local repository immediately. Updates to any centralized repository are handled outside of Toad.
Prerequisites
- Install the Git Window Client
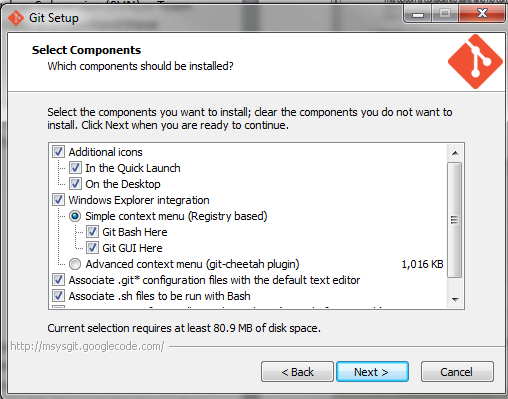
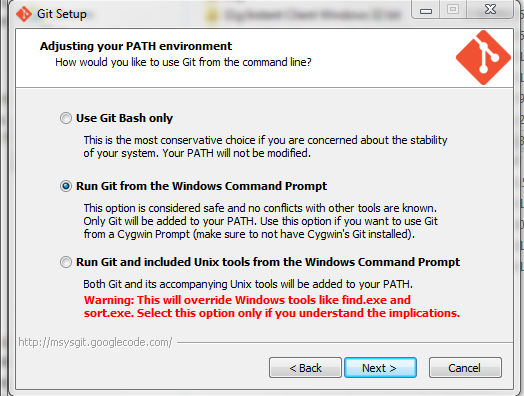
If it is not already installed, install Git Windows Client. You can download a windows install client fromhttps://gitforwindows.org/. Run the installer. Please note the options in the following screens. Make sure to enable the ‘Run from Windows Command Prompt’ option.
- Set Up an empty Git Repository
If you have an existing Git repository you may use it with Toad. In a typical environment, a client ‘clones’ and existing Git repository. For the purposes of this walkthrough, we will create a new empty Git repository to use with Toad. You can do this from the windows command line, or using the Git windows client. We will use the command line. Git is case sensitive. All commands are in lower case. Also note that Git converts the Windows back slash ‘\’ to forward slash ‘/’.
- Open the windows command prompt from the Windows start menu.
- From the command prompt create a new directory by typing the following command:
mkdir c:\Work\GitMaster
- Navigate to the directory you just created:
cd \Work\GitMaster
- Create the new Git Repository by typing:
git init
Window displays ‘Initialized empty git repository in c:/Work/GitMaster/.git’ message
- Populate Git Repository
Before using the repository we need to add some objects to control. Toad treats subdirectories under the Git main directory as modules or projects. Each project you use in Toad has a corresponding directory in the Git repository. For example, to have a TKD_SCHOOL project, create a directory with that name in the Git master directory. In order to see the directory in Toad and Git, and initial file must be added to Git.
- Create an empty TKD_SCHOOL directory in the GitMaster directory
mkdir TKD_SCHOOL
- Edit or add a file to this directory, let’s say Initfile.txt. We created one using notepad.exe TKD_SCHOOL\initfile.txt, but you can use any method you prefer.
- Add the file to git. This is a two-step process.
‘git add’ adds changes for staging. From the GitMaster directory type:
git add TKD_SCHOOL/InitFile.txt
- ‘git commit’ commits staged changes to the local repository. Type:
git commit –m “Initial commit to create directory” TKD_SCHOOL/InitFile.txt
- Create an empty TKD_SCHOOL directory in the GitMaster directory
The Git repository is ready, with one sub-folder. You can add multiple sub-folders if you wish, by repeating the steps above.
Using Toad Source Control with Git
Configure Client Settings
To set up Toad Source Control to work with the Git client perform the following steps:
- Open Toad Options – Source Control. Select ‘Git’ from the Default VCS dropdown.
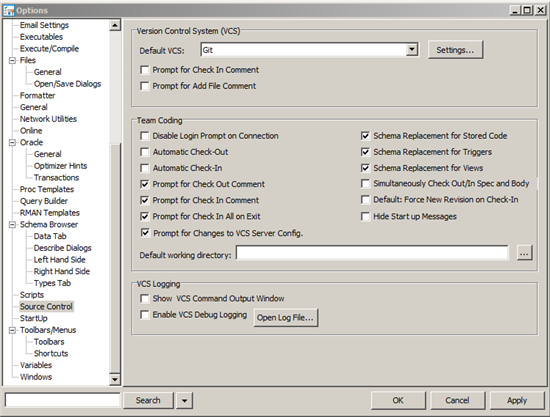
- Open ‘Settings…’ to configure the Git client. The following settings are available.

- Git Client: Windows should point to the default Git client. Typically, no change is required from the default. If you wish to point to a different Git executable you may enter the full path to the client executable.
- Automatically Login to Default Git Repository: Check this option if you wish to login to the default repository without opening the login window.
- Allow Toad Login to Update Repository User and Email: If this option is checked, Toad will update the Git user and email configuration settings for the repository. These are used to track the author of changes and commits.
- Commit Comments: Git requires comments for commit. The Default Comment value will be used for commits, if no comment is set by the user.
Log in to Git from Toad Source Control
To use Toad source control with Git, log in to source control.
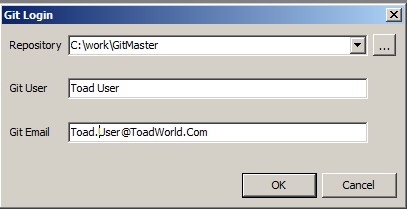
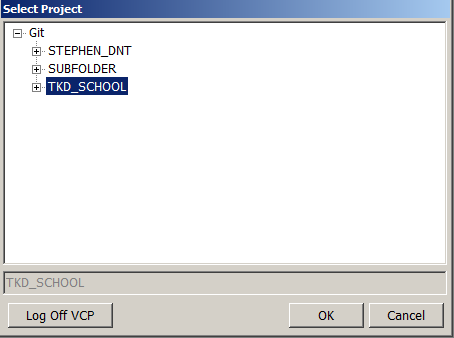
- From the Toad main menu select Utilities – Team Coding – Select VCS Project. The Git login window will open. Enter the information for repository, Git User and Git email. Click Ok.
- The source control select project dialog opens. You can now select the Git Sub Directory TKD_SCHOOL from the list of modules.
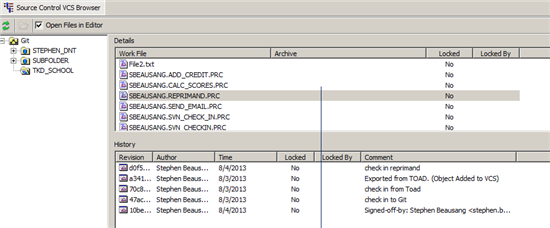
- Open the source control VCS Browser. You can browse Git controlled objects, open files in the editor, check in, check out or add files to the local Git repository.
Start the discussion at forums.toadworld.com