Introduction
When first looking at TDT, it can be a very intimidating product. Of course, the same can be said of SQL*Plus. Both are very powerful but both require a level of understanding about what is going on behind the scenes in order to get the most out of it. For SQL*Plus, you need to have a firm foundational grasp on SQL.For TDT, we don't limit you to a specific language or environment (we provide examples in PowerShell, VBA, and Oracle). Any programming environment which can instantiate COM will suffice. That being said, I believe the best and most efficient way to maximize the effectiveness of TDT is to use PowerShell. In the PowerShell examples provided with TDT, every aspect of the product is exposed. As a result, the examples provided are very robust and complex, and may be more than what you will require when using TDT in your own environment. For this blog, I will attempt to simplify TDT use in PowerShell using the process of building a robust script in a step by step fashion.
Since we're dealing with PowerShell, it's highly recommended that you download the latest version of PowerShell from Microsoft. For the examples to follow, you can use the simple PowerShell command prompt or the PowerShell ISE. Both will yield the same results.
Basic Example
With any COM object, there are a couple of things that are required no matter who the provider is or what the program is designed to do:
- Turn it on
- Turn it off
After that, how you interact with the program is 100% dependent on what the program exposes and your ability to take advantage of what is exposed. For TDT, all of the calls that are available are located in the help under API Reference Documentation but the overall idea is:
- Turn it on
- Set some parameters on the module of your choice
- Execute the module
- Turn it off
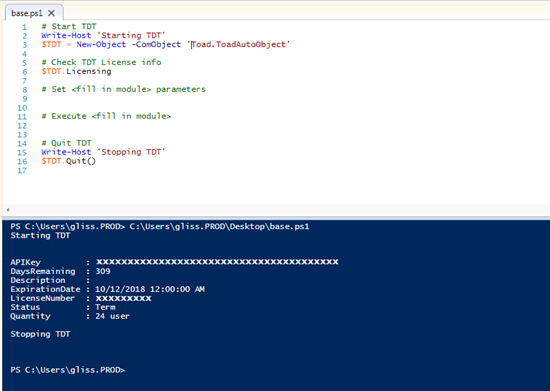
So let's start off by writing a basic PowerShell script to "turn it on" and "turn it off". For this example, I'm going to add an additional call to show the licensing information and have placeholders for where setting parameters and module execution would go.
# Start TDT
Write-Host 'Starting TDT'
$TDT = New-Object -ComObject 'Toad.ToadAutoObject'
# Check TDT License info
$TDT.Licensing
# Setparameters
# Execute
# Quit TDT
Write-Host 'Stopping TDT'
$TDT.Quit()
So lets begin by looking at the "Turn It on" line. $TDT is a variable that will be used by PowerShell to reference the instance of TDT that will be used in the script. The next part is New-Object. This is a standard PowerShell command to create an instance of a .NET framework or COM object. For TDT, we need a COM object so the next part of the line tells PowerShell what kind of object to create by using the -COMObject parameter. The next part of the line tells PowerShell what COMObject to create. When TDT is installed, it is registered as “Toad.ToadAutoObject” so that is how we reference it. So when you put it all together, that line simply creates a new variable called $TDT which contains a reference to a COM object called Toad.ToadAutoObject.
Lets skip to the end and look at the "Turn it off" line – $TDT.Quit(). This line looks very simple because it is. It uses the variable $TDT that we created in the first line and tells it to quit. The Quit call is documented in the API reference documentation as well.
Based on what we have, before we quit, we can do some things with the instance of TDT that we've created and stored in the $TDT variable. As I said earlier, I want to make a call to licensing and ensure that I have a valid license. To do this, look into the API reference documentation to the Licensing interface and discover that I can do this by making a call to $TDT.Licensing. When that call is made, the licensing info is output to the console.
You can see the full execution of this example in the PowerShell ISE screen capture. This is probably as simple as you can get for creating and using any COM object but it lays the foundation for building bigger and better scripts.
Code Analysis Example
Code Analysis is one of the easiest modules to understand so I thought I'd start with this one and provide a very basic example on how to:
- Start TDT
- Make a DB connection
- Set some CA parameters
- Execute CA
- Quit TDT
# Start TDT
Write-Host 'Starting TDT'
$TDT = New-Object -ComObject 'Toad.ToadAutoObject'

# Set DB Login info
Write-Host 'Setting DB Login Info'
$SourceConnection = "gliss/gliss@linuxxe"

# Set CA parameters
Write-Host 'Setting CA Parameters'
$TDT.CodeAnalysis.Connection = $TDT.Connections.NewConnection($SourceConnection)
$TDT.CodeAnalysis.ReportName = "CA Report"
$TDT.CodeAnalysis.OutputFolder = "C:\demoworkspace\output"
$TDT.CodeAnalysis.ReportFormats.IncludeHTML = $TRUE

# Set DB Object Info to Analyze
Write-Host 'Setting DB Object Info to Analyze'
$DBObject = $TDT.CodeAnalysis.DBObjects.Add()
$DBObject.ObjectName = 'FTEST'
$DBObject.ObjectOwner = 'GLISS'
$DBObject.ObjectType = 'FUNCTION'

# Execute Code Analysis
Write-Host 'Executing Code Analysis...'
$TDT.CodeAnalysis.Execute()

# Quit TDT
Write-Host 'Stopping TDT'
$TDT.Quit()
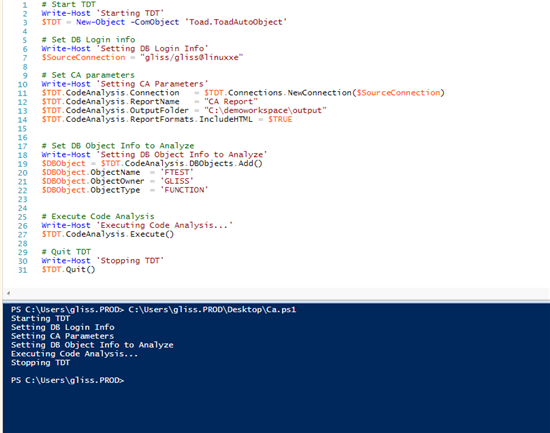
Again, I'll break down the example line by line. Starting and stopping TDT are exactly the same. Since they're the only two "required" items, they will be the same for all scripts. The first line that is different is where the DB connection information is set. In the example shown, I'm using a TNS entry for my string with my user name, password, and DB. You could also use a direct connect string. The line creates a PowerShell variable called $SourceConnection and assigns it a value of gliss/gliss@linuxxe (hopefully nobody is going to use this to hack my local XE database). There are many ways to mask this information as well but that is beyond the scope here.
Now that I have a variable that contains connection information, I can then use it as part of the call into my CodeAnalysis interface in TDT. The next line does exactly that. For my TDT instance, I make a call to the CodeAnalysis interface and the Connection property. According to the documentation, it needs a connection so I make a call to my TDT instance, the Connections interface, the NewConnection property and pass it the information I want to create a new connection with – namely the information stored in the $SourceConnection variable.
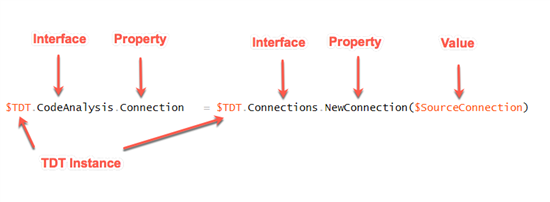
When setting parameters in TDT, the same mechanism is followed. The <TDT Instance>.<Interface>.<Property> = <some value>. The next two lines set these values to simple strings. The first sets the report name. The second sets the output folder. The line after that tells TDT to include HTML reports.
The next section creates a DB Object to analyze. For this a new variable called $DBObject is created and a new CodeAnalysis DB Object is created for it. The next lines simply set the ObjectName, ObjectOwner, and ObjectType. In this case, there is a function called FTEST in the GLISS schema in the DB I connected to in the previous section. This is a very simple way to add a single object but not the only way. Like CA in Toad for Oracle, you can use wildcards and/or add files.
So far, TDT has been started, a DB connection has been made, properties have been set (including adding a DB object). All that is left, according to the plan, is to execute Code Analysis. For this, we simply call the Execute() method on the CodeAnalysis module.. Once executed, 'CA Report.html' is created in the 'c:\demoworkspace\output; folder and TDT then quits.
Final Example
From here, it becomes more of an exercise in PowerShell programming than it does TDT. Every module in TDT follows the same behavior:
- Start TDT
- Set some module parameters
- Execute the module
- Quit TDT
The last example shows how Code Analysis can be used to analyze files on the computer with a lot of added PowerShell "best practices" ideas thrown in.
- Initialize variables
- Start TDT
- Set input and output folders
- Ensure the output folder exists
- Ensure TDT exists
- Set CA parameters
- Walk through input folder and add all functions to the list of items to analyze
- Execute CA
- Look in the output folder for the report
- Launch the HTML report in the default browser
# This demo will look in c:\DemoWorkspace\Source for any files with an .fnc extension
# It requires no connection.  It will iterate through all subfolders and add the files
# to a the list to be analyzed.  Once analyzed, it will output CodeAnalysis.HTML and CodeAnalysis.JSON
# files to the c:\DemoWorkspace\output folder

# In a DevOps environment, the source folder would be populated via Source Control (git, SVN, TFS, ...)
# and the output would be stored as "artifacts" for the build.


#Initialize variables
$TDT = $NULL
$URL = $NULL
try
{
    # Create instance of TDT
                $TDT = New-Object -ComObject Toad.ToadAutoObject
                # Set the source and destination folders
                $SourceFolder = 'c:\DemoWorkspace\source\'
                $OutputFolder = 'c:\DemoWorkspace\output\'
                Write-Host 'Set Source Folder to : ' $SourceFolder
                Write-Host 'Set Output Folder to : ' $OutputFolder
                # Ensure the output folder exists
                If(!(test-path $OutputFolder))
                {
                                New-Item -ItemType Directory -Force -Path $OutputFolder
                }

                if ($TDT)
                {
                                Write-Host 'TDT successfully loaded'
                                # Set report name
                                $TDT.CodeAnalysis.ReportName    = "CodeAnalysis"
                                # Set output formats
                                $TDT.CodeAnalysis.ReportFormats.IncludeHTML = $TRUE;
                                $TDT.CodeAnalysis.ReportFormats.IncludeJSON = $TRUE;
                                # Set ruleset to Top 20 (0 is the default)
                                $TDT.CodeAnalysis.RuleSet       = 0
                                # Set the output folder
                                $TDT.CodeAnalysis.OutputFolder  = $OutputFolder
                                # Iterate through working source folders
                                Get-ChildItem $SourceFolder -Filter *.fnc -Recurse | % {
                                                $TDT.CodeAnalysis.Files.Add($_.FullName)
                                }
                                Write-Host 'Added Files'
                                # Execute CA
                                $TDT.CodeAnalysis.Execute()
                                Write-Host 'Successfully Executed CA'
       # Close the instance of TDT
                                $TDT.Quit()
                                # Find HTML Output Filename
                                Get-ChildItem $OutputFolder -Filter *.html  | % {
                                   $URL = $_.FullName
                                }
                                # If HTML file is found, launch it in default browser
                                if ($URL)
                                {
                                   Write-Host 'CA Report location: ' $URL
          # Open HTML output of CA
                      Start-Process -FilePath $URL
                                }
                }
                else
                {
                                Write-Host 'Toad Failed'
                }
}
catch
{
                # Close the instance of TDT
                $TDT.Quit()
                Write-Error $_.Exception.Message -ErrorAction: Stop
}
Conclusion
Using TDT with PowerShell can be as easy or as complex as you want to make it. With some imagination and a little study time, you'll soon discover that TDT, although very powerful, is very easy to use. The power is there, in your hands to programmatically access all of the features that TDT has to offer.
Start the discussion at forums.toadworld.com