We can easily create a data model of an existing database schema using the Toad Data Modeler Reverse Engineering wizard and then using the Convert Model Wizard to convert that model to another database platform.
For this demonstration I have a schema called quest in an Oracle 11g R2 database; below we can see its data model.
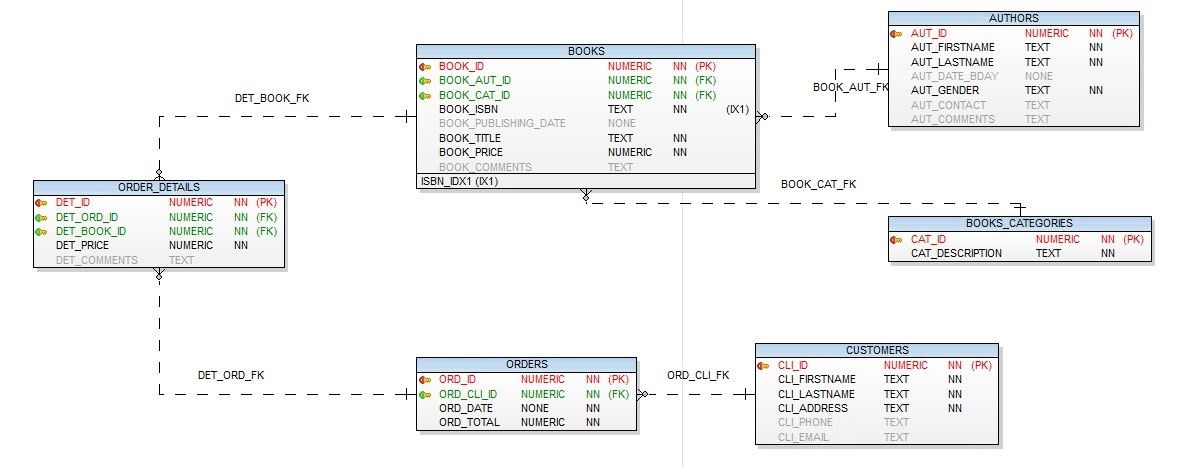
Figure 1. Data model for our example schema
Reverse Engineering Wizard
Before using the wizard that will allow us to create the data model of the existing database, it’s very important to know which database systems are supported by the Reverse Engineering tool.
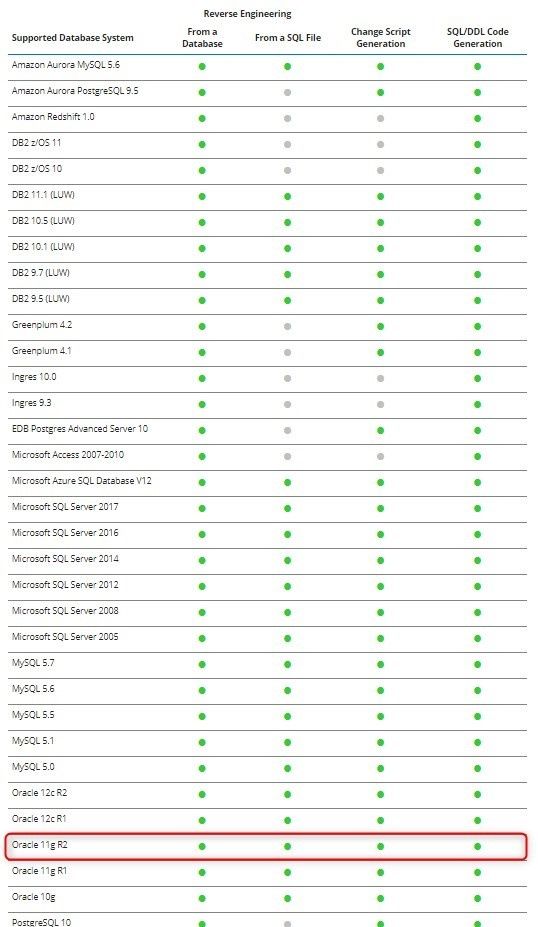
Figure 2. Reverse Engineering supported database systems
Inthis chart from the Toad Data Modeler User Guide, you can see all the databases that are supported by the tool.
Open Toad Data Modeler and select File Menu > Reverse Engineering >Reverse Engineering Wizard. (You can download a trial of Toad Data Modeler here.)
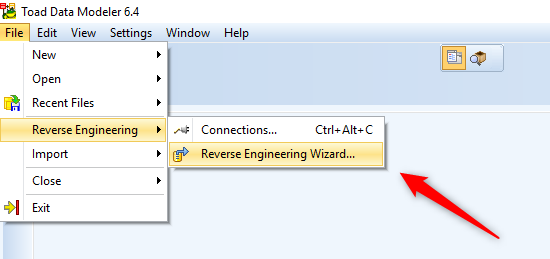
Figure 3. Selecting Reverse Engineering Wizard
The Reverse Engineering Wizard window opens.
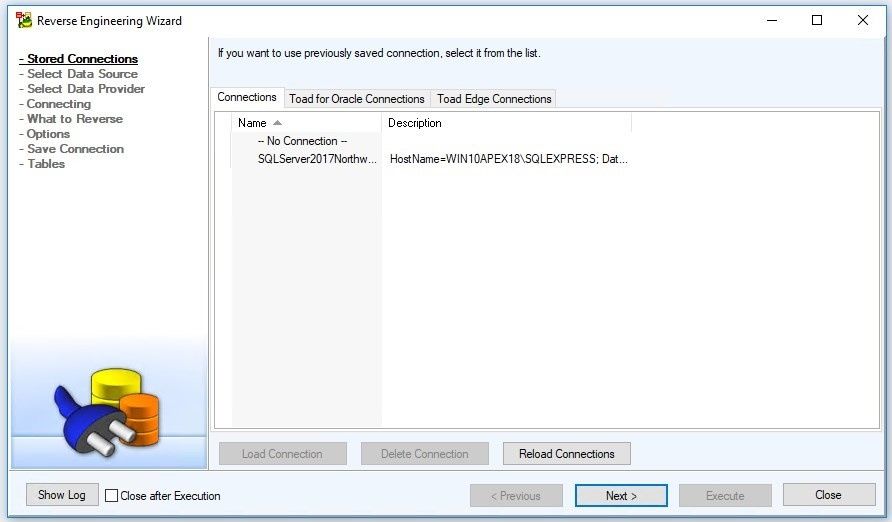
Figure 4. Reverse Engineering Wizard – Connections
We click on the Next button.
Now, we need to select the Data Source. From the root node of the Database RE tree, we select the desired type of database RE; in this case, we select Oracle 11g Release 2.
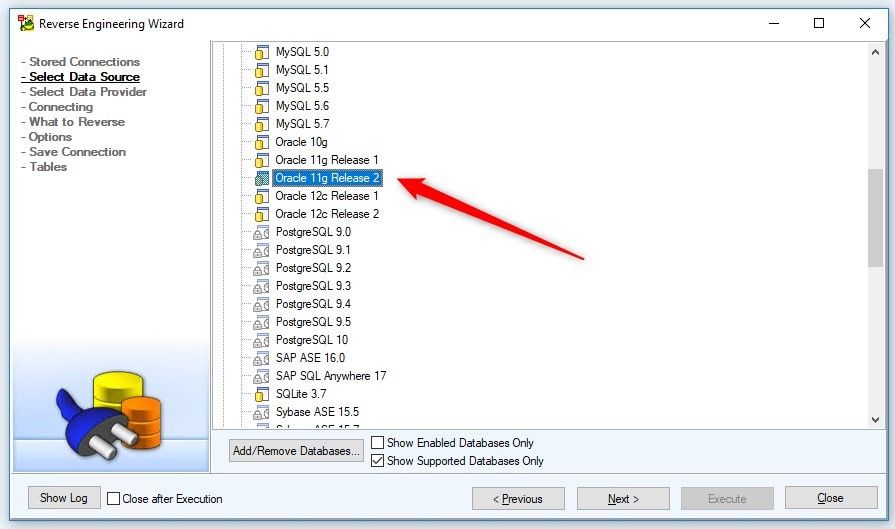
Figure 5. Selecting the Data Source
We click on the Next button.
Select the Data Provider:
- Native Client Connection. The provider does not require installation of any additional software on the client.
- ODBC Connection via ODBC Database Connection via ODBC (Open Database Connectivity) Driver. ODBC Driver is not part of Toad Data Modeler. In most cases, it is distributed directly with the database.
- ADO Connection via ADO Database Connection, via ADO (ActiveX Data Objects), with OLE DB Drivers. OLE DB Drivers are not part of Toad Data Modeler. In most cases, they are distributed directly with the database.
- TCP/IP Connection via TCP/IP. This connection type allows us to connect to our database without client. To make the connection successfully, we need to know the TCP/IP server name and port.
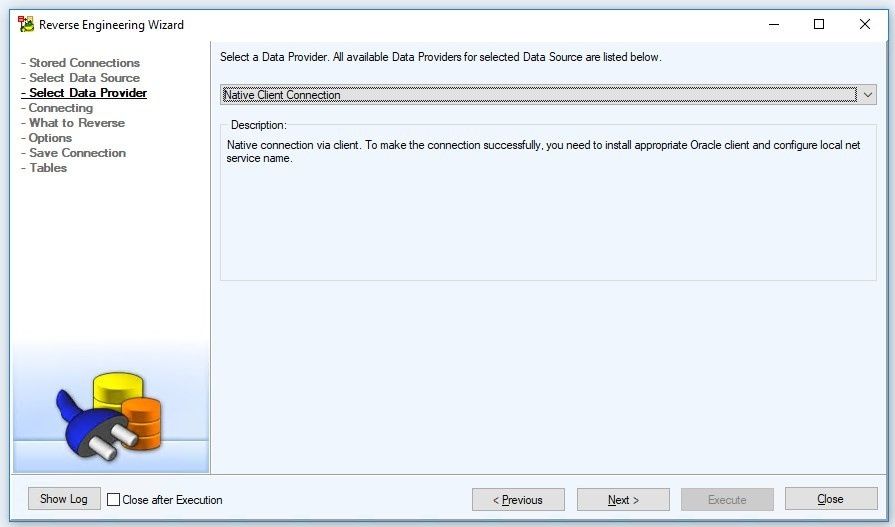
Figure 6. Selecting the Data Provider
Click on the Next button.
Select the Home and the Net Service Name. In addition, enter the user and password of the schema.
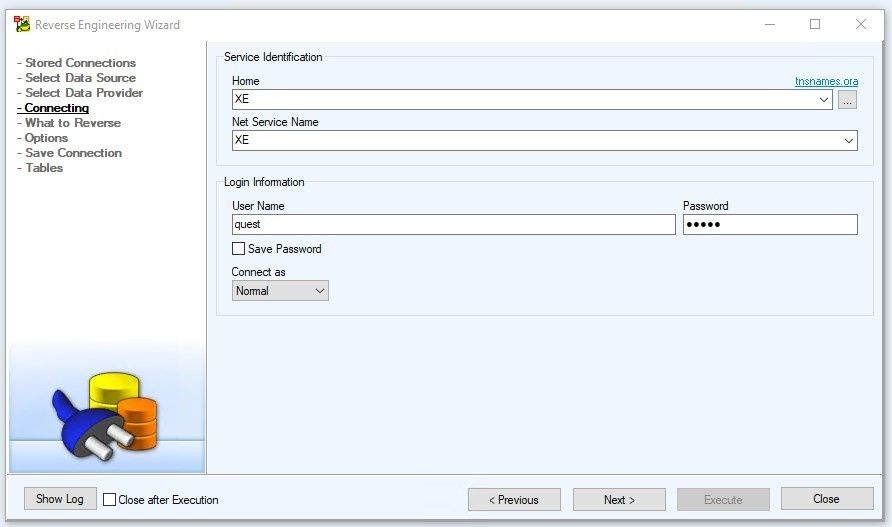
Figure 7. Specifying the Service Identification and Login Information
We click on the Next button.
In this window, we select what we want the Reverse Engineering to perform. We can use the Auto Check button to automatically select parent objects when any of their dependent objects are selected.
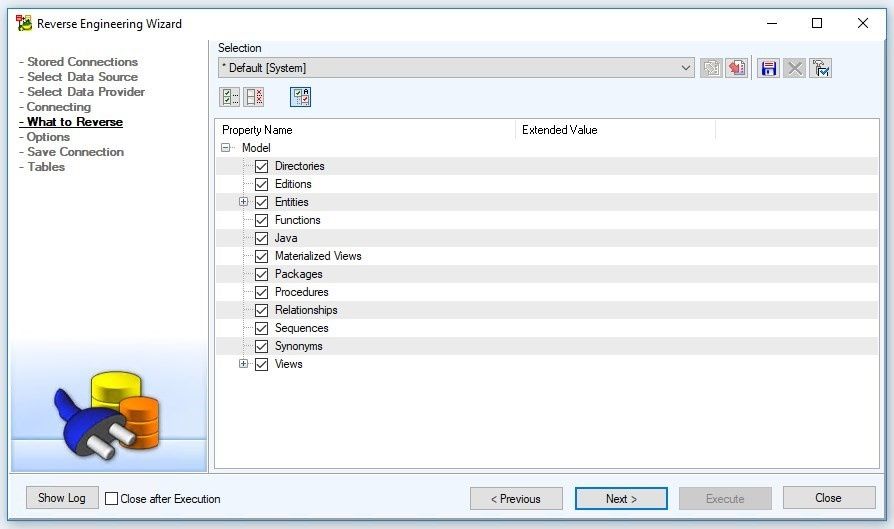
Figure 8. Selecting what to reverse
We click on the Next button.
In this window we configure settings used for Reverse Engineering.
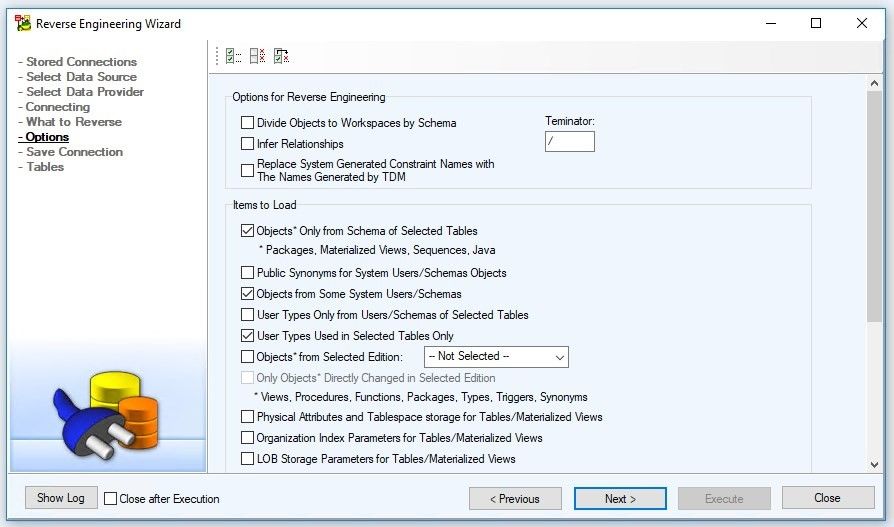
Figure 9. Configuring the settings for reverse engineering
We click on the Next button.
In Save Connection, we can save the connection or move on with the wizard.
In this case, we are going to save the connection. To do that, we click on the Save button and then click on the OK button.

Figure 10. Saving the connection
We click on the Next button.
We select all objects. It’s important to mention that depending on what the database schema has, the tabs: Tables, Views, Procedures, Functions, etc., will be either displayed or not.
Once all the objects that we want to show in the data model have been selected, we click on the Execute button.
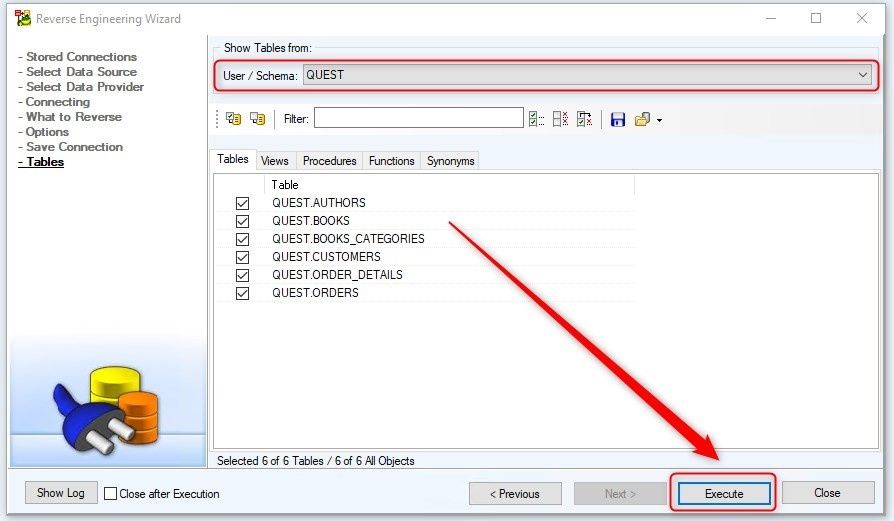
Figure 11. Selecting Tables
When the process of creating the model is finished, we can close the informative popup and then close the wizard window.
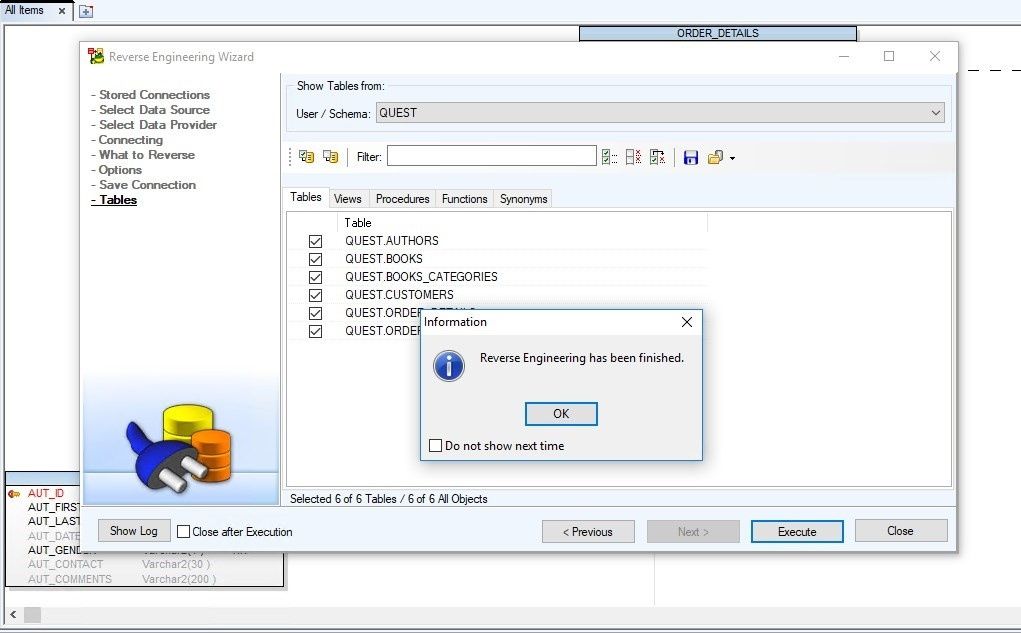
Figure 12. Notification message: Reverse Engineering is finished. Click OK.
If we want to see the data model entities larger, we can use the zoom tool in the icon bar or simply place the mouse over each entity so we can see the maximized object in the Collapsible Pane on the bottom area of the window.
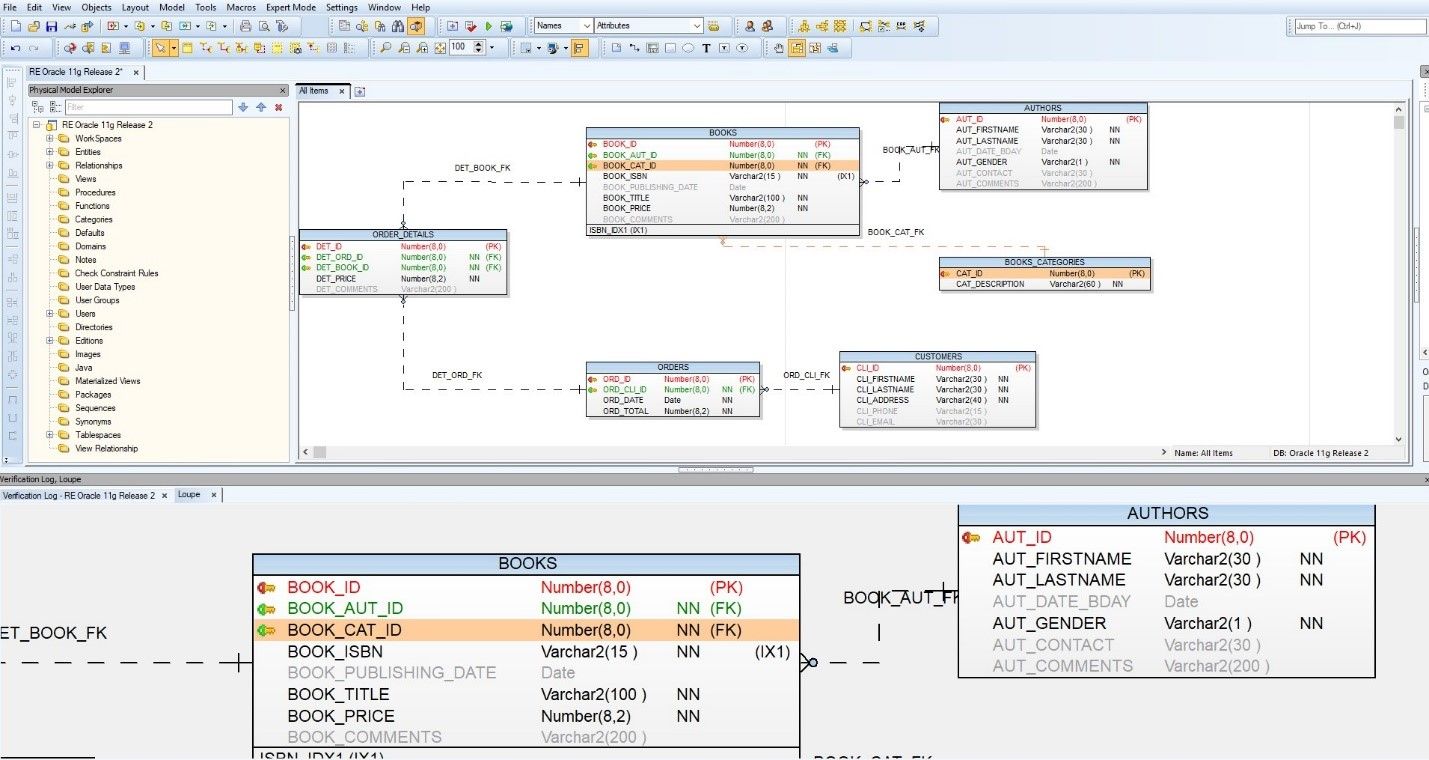
Figure 13. Zooming in on data model entities
In this very simple way we have generated a data model with the Toad Data Modeler of an existing schema in an Oracle 11g R2 database.
Model Conversion Wizard: from Oracle 11gR2 to MS SQL Server 2017
The Model Conversion wizard allows us to convert:
- Convert a model from one platform to another (for example: Oracle 11g R2 model to SQL Server 2017 model)
- Convert a model from one version to another (Oracle 11g R2 model to Oracle 12c model)
- Physical model to Logical model
- Logical model to Physical model
In this section we are going to convert the previously generated basic model to MS SQL Server 2017 database platform.
We Select Model Menu > Convert Model > Run…
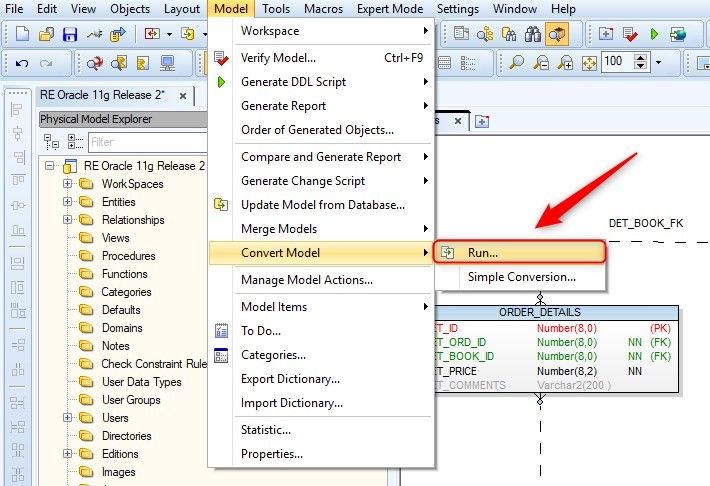
Figure 14. Choosing to run Convert Model Wizard
The Model Conversion wizard opens.
First, we need to define the Target of the database. Select Microsoft SQL Server 2017
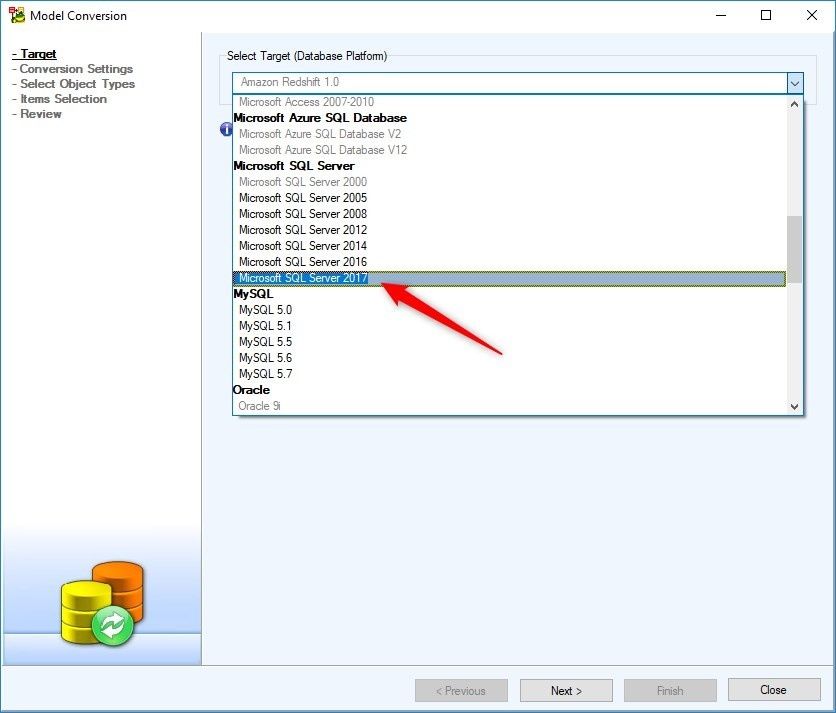
Figure 15. The Model Conversion Wizard. Selecting the target database platform
We click on the Next button.
In Conversion Settings window, we accept the default values.
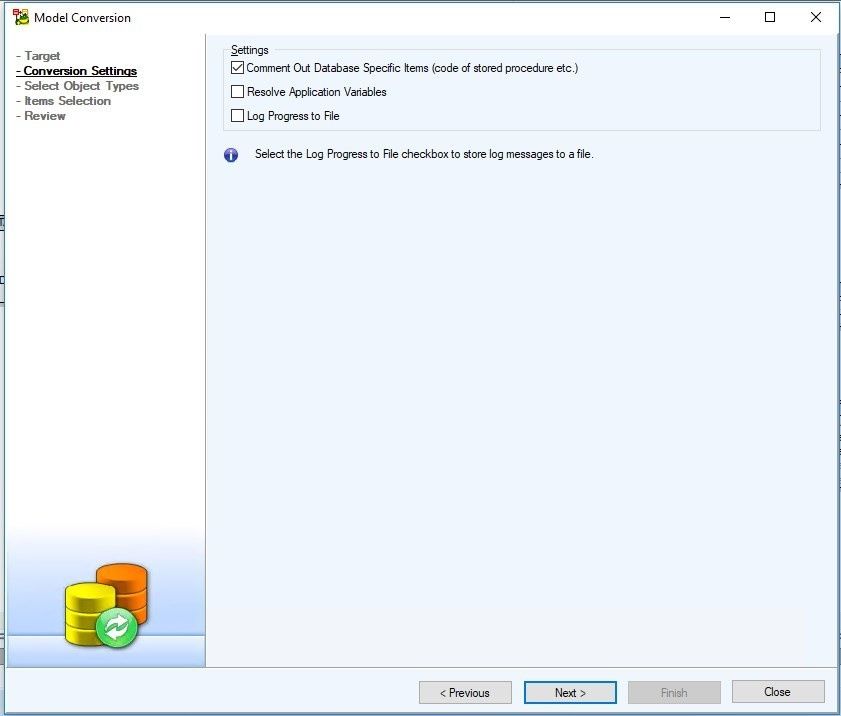
Figure 16. Conversion Settings window
Note: Converting between different platforms means that some items that contain SQL code may not be converted correctly (e.g. After Scripts, Before Scripts, Procedures… ). In this case, it is recommended to check the Comment Out Database Specific Items checkbox. This way, SQL code that cannot be successfully converted will be commented out. We can review these parts of code later and fix them on our own.
We click on the Next button.
In this step of the wizard, we choose what object types will be converted. We can access full list of Objects and Properties by clicking on Detailed Settings.
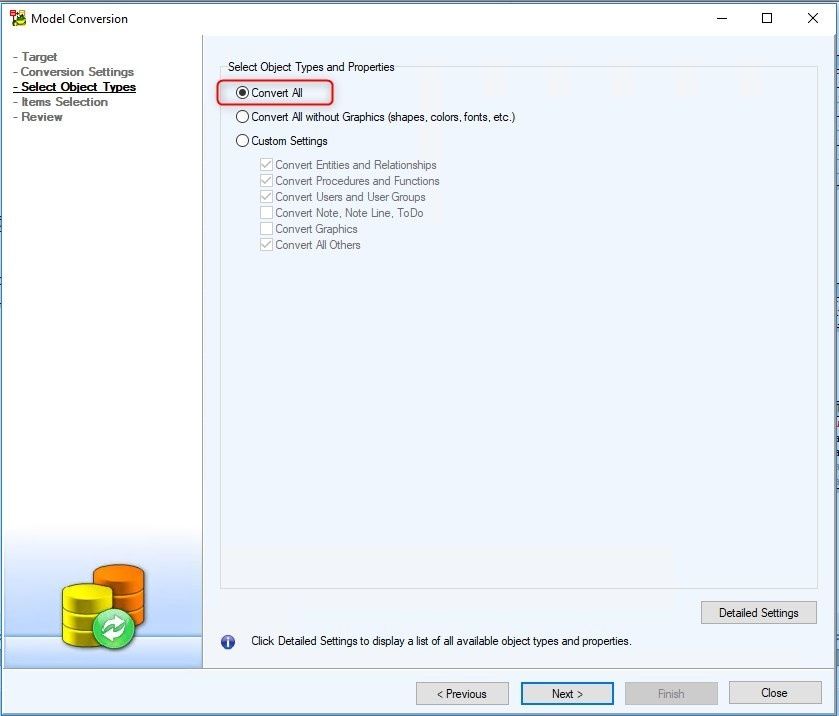
Figure 17. Choosing object types to be converted
We click on the Next button.
In the Items Selection window, we select all the objects that we want to convert to another model.
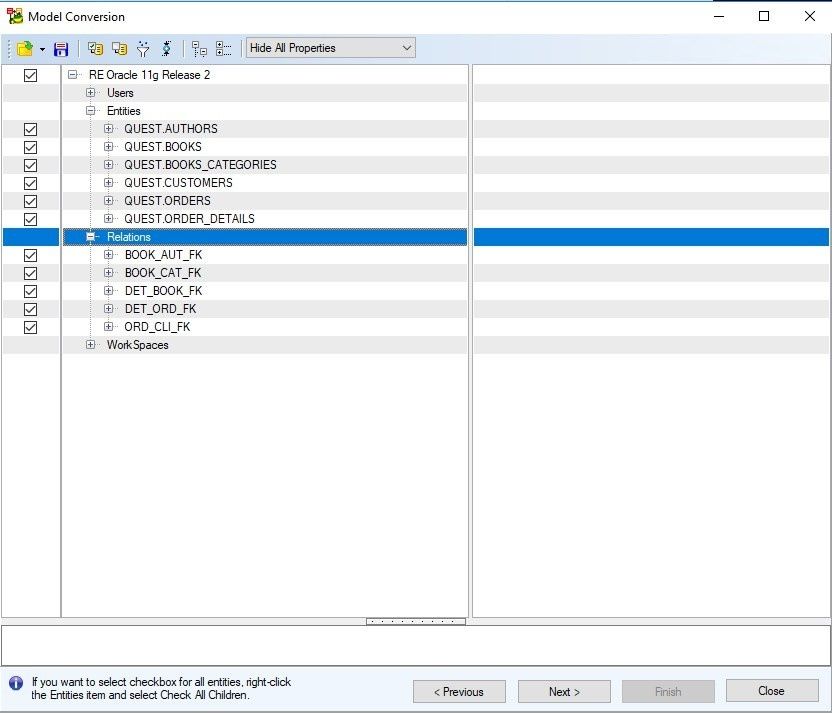
Figure 18. Selecting objects to convert
Finally, we come to the Review window, which shows us some statistics about how many and what kinds of objects will be converted.
We change the name for the new data model to "Convert Oracle 11g R2 to SQL Server 2017" and once we're done reviewing, we click on the Finish button.
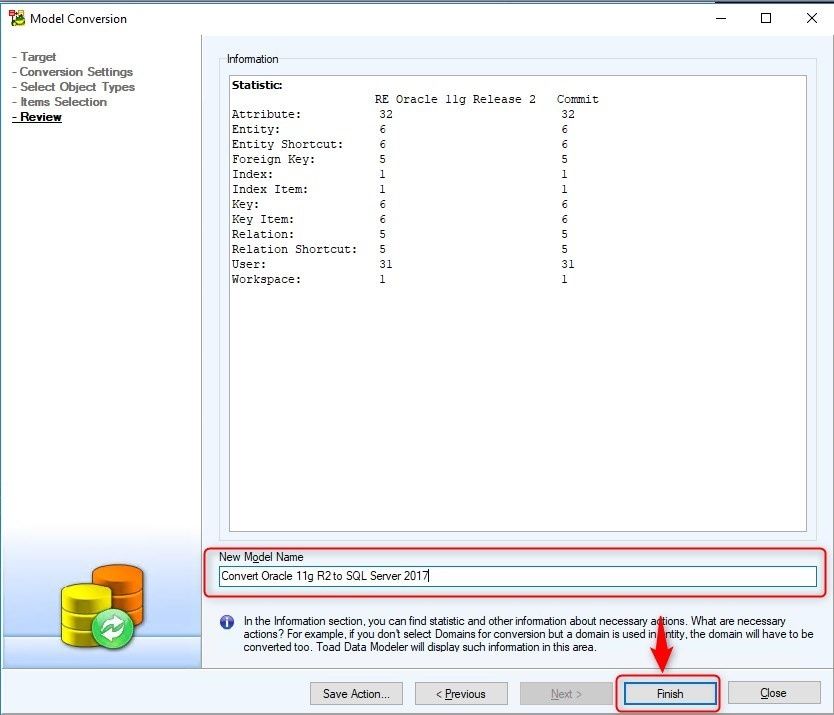
Figure 19. Review Window. Specify the new model name and click Finish.
The conversion process occurs and our model is now converted to MS SQL Server 2017 database platform.
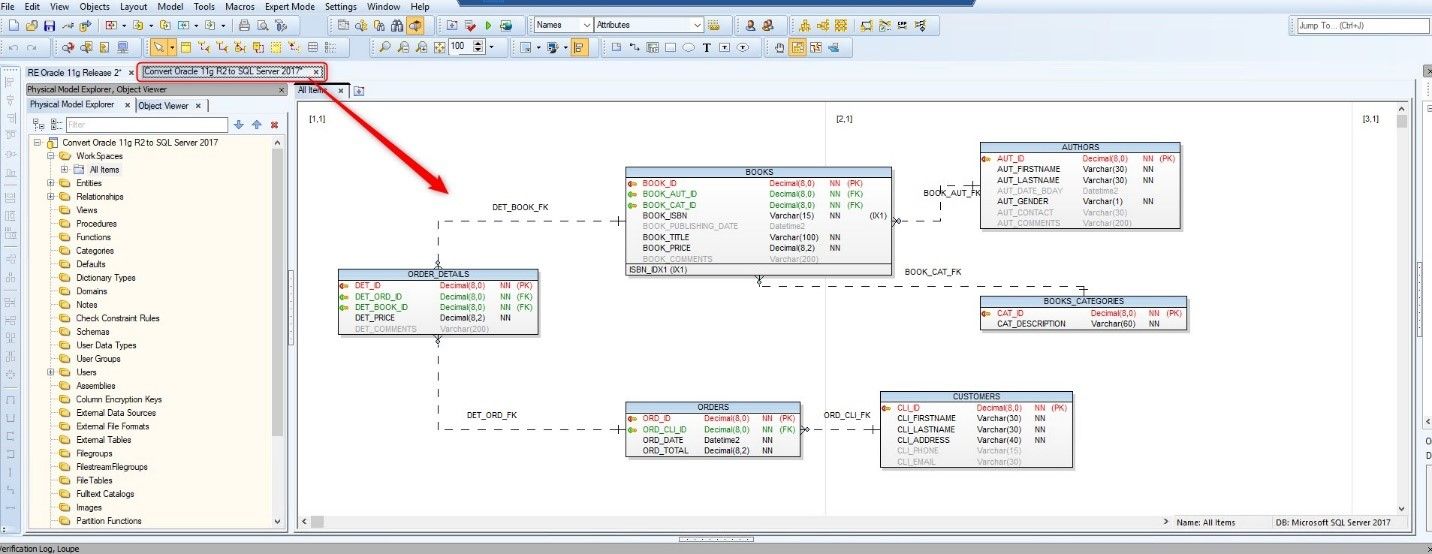
Figure 20. Showing the new data model generated for MS SQL Server 2017 database
Generate Script
To generate the Data Model Script, we can click on the "Generate DDL Script" icon or click from the Model menu > Generate DDL Script > Run…
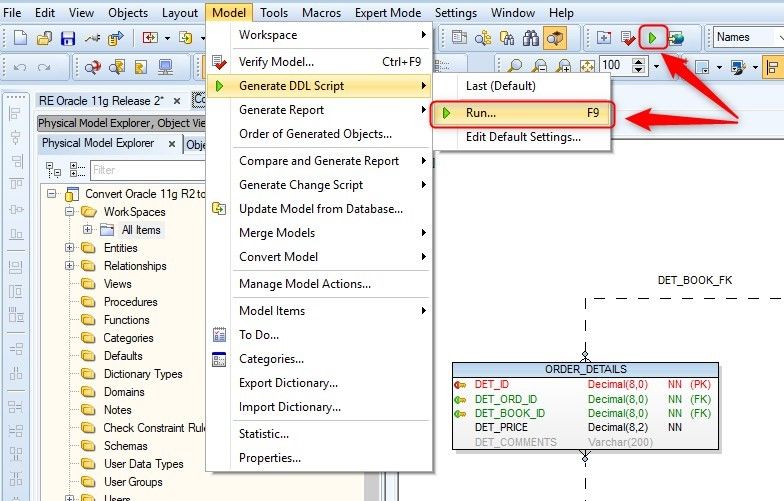
Figure 21. Opening the DDL Script Generation Wizard
The "DDL Script Generation of …" wizard opens. Then we can see four configuration tabs:
- What to Generate: This essential part of script generation, we need to select items which should be generated.
- Detail Settings: Specific and database related settings can be found on this tab. Usually it is not necessary to change them in any way.
- Referential Integrity: Referential integrity further specifies which relations are generated.
- Select List: If we want to generate only a set of specific model objects, we can do exactly that on this tab.
What to Generate Tab
Location of SQL File: in this box we select the location where the generated script will be saved.
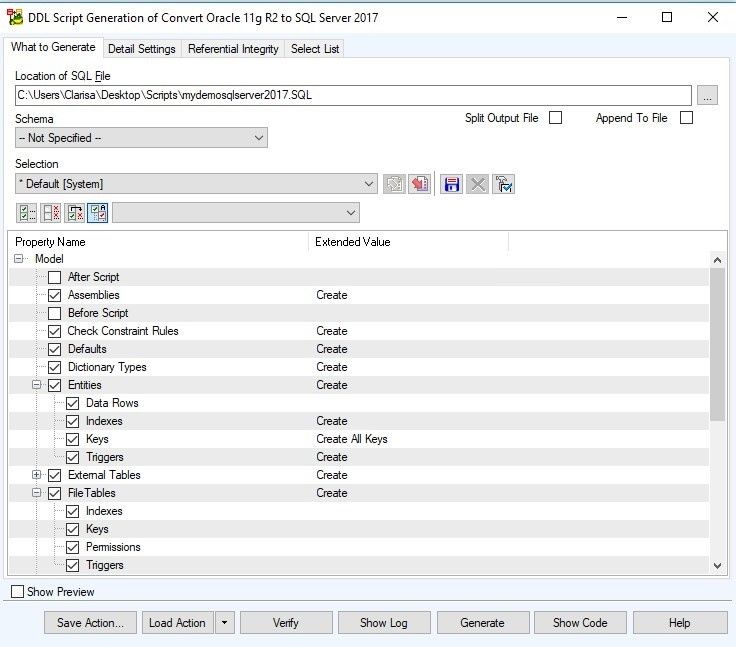
Figure 22. The What to Generate tab of the DDL Script Generation Wizard
Detail Settings
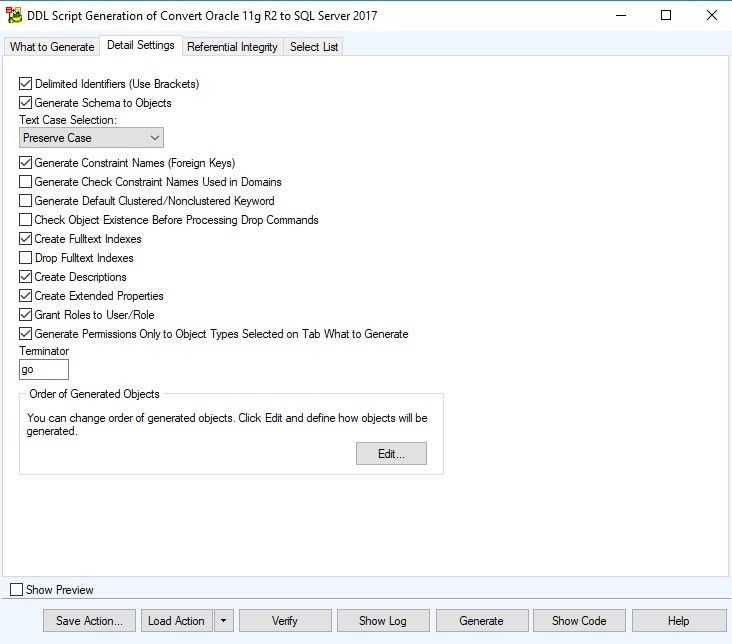
Figure 23. The Detail Settings tab of the DDL Script Generation Wizard
Referential Integrity
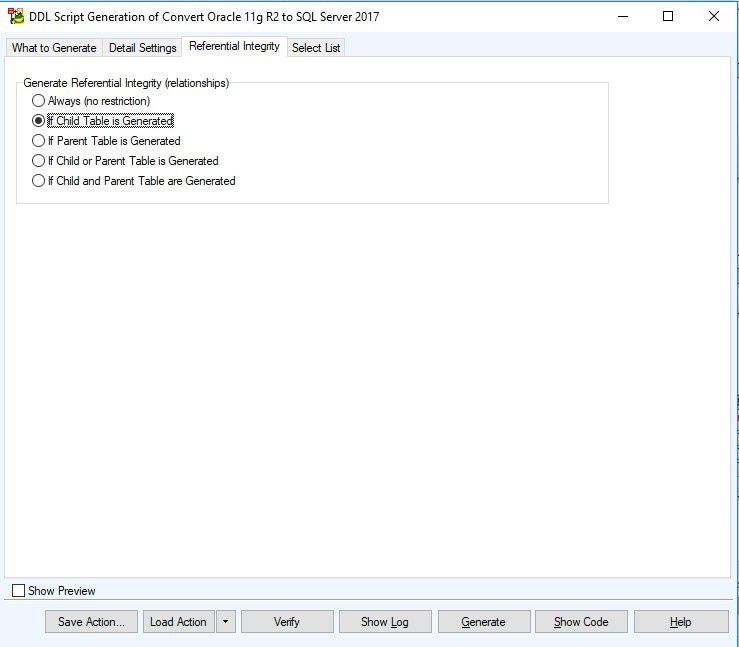
Figure 24. The Referential Integrity tab of the DDL Script Generation Wizard
Select List
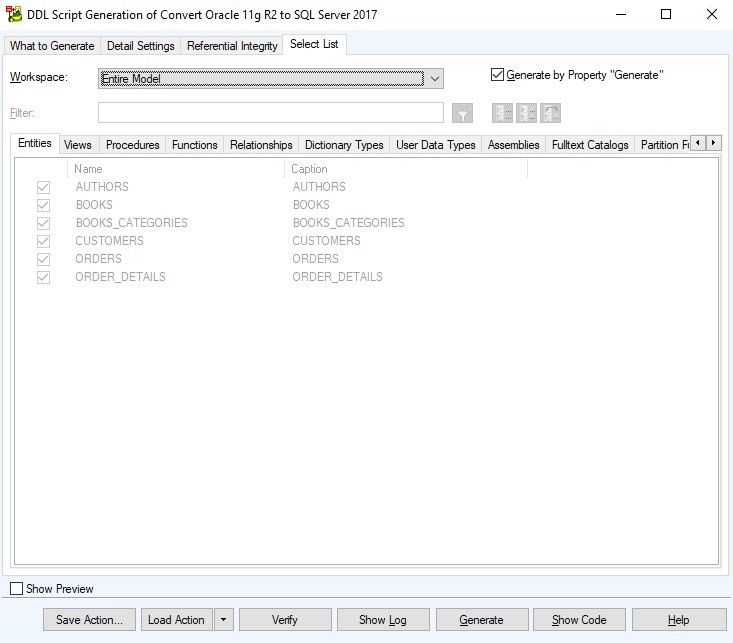
Figure 25. The Select List tab of the DDL Script Generation Wizard
Before generating the Script, we can perform a verification. To do this, we click on the Verify button.
The tool helps us find errors (red icon), warnings (yellow icon) and also show us hints (blue icon) in the lower pane called Verification Log.
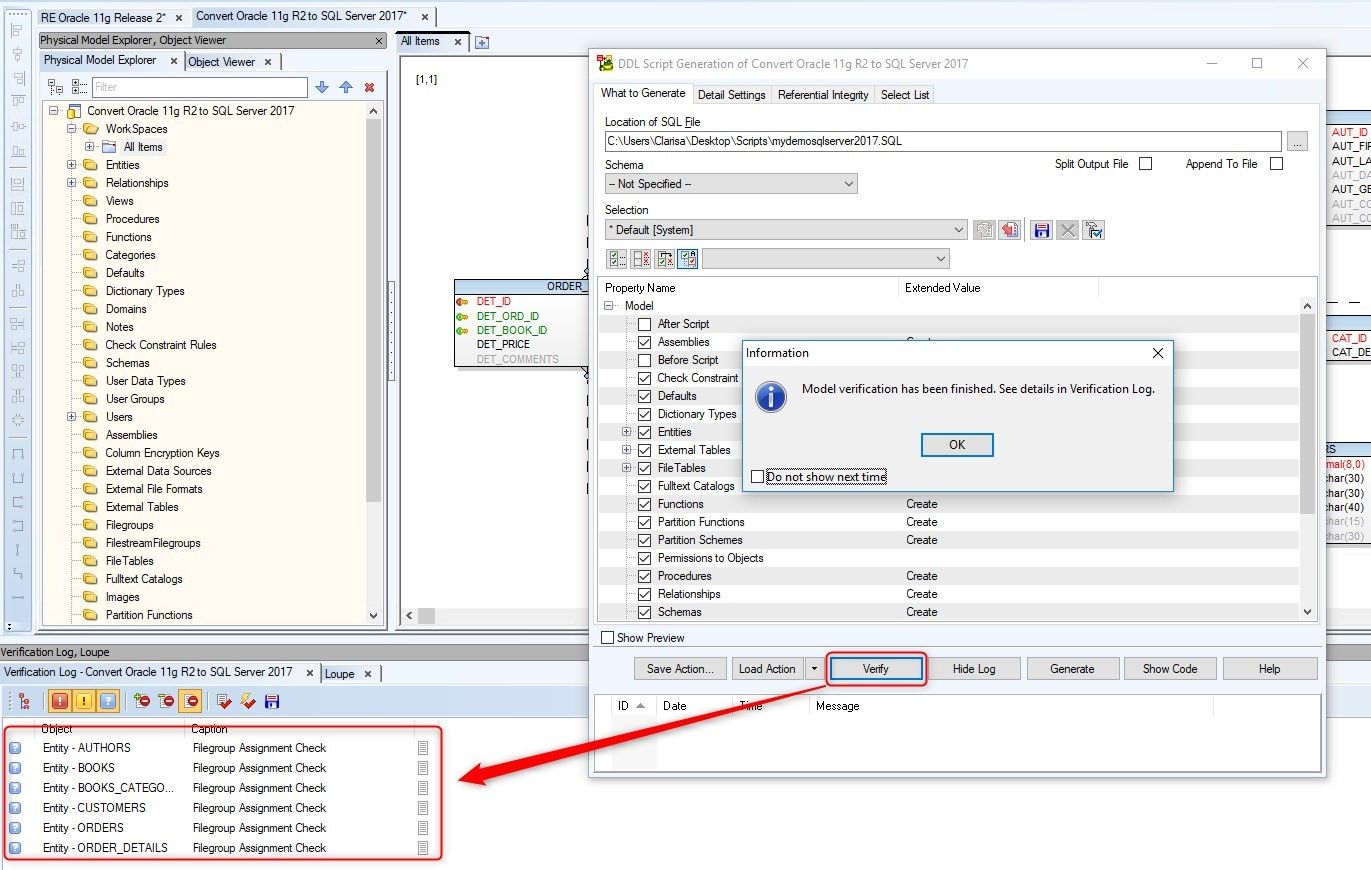
Figure 26. Verifying the model before generating the script
To learn more about the errors, warnings, or hints, we place the mouse over the row and it shows us tips to solve the problem. In this case, it shows us that the Authors entity has not been assigned a Filegroup.
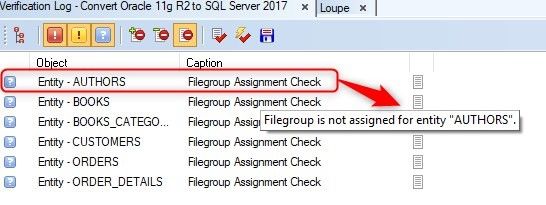
Figure 27. Verification log provides error information
For this demonstration, we have created a database called quest and it only has the PRIMARY filegroup.
We double click on first row, Entity – AUTHORS, and in the popup window we assign the Filegroup to the entity. If it is not shown in the select list, we can create a filegroup called PRIMARY by clicking on the button with the ellipsis.
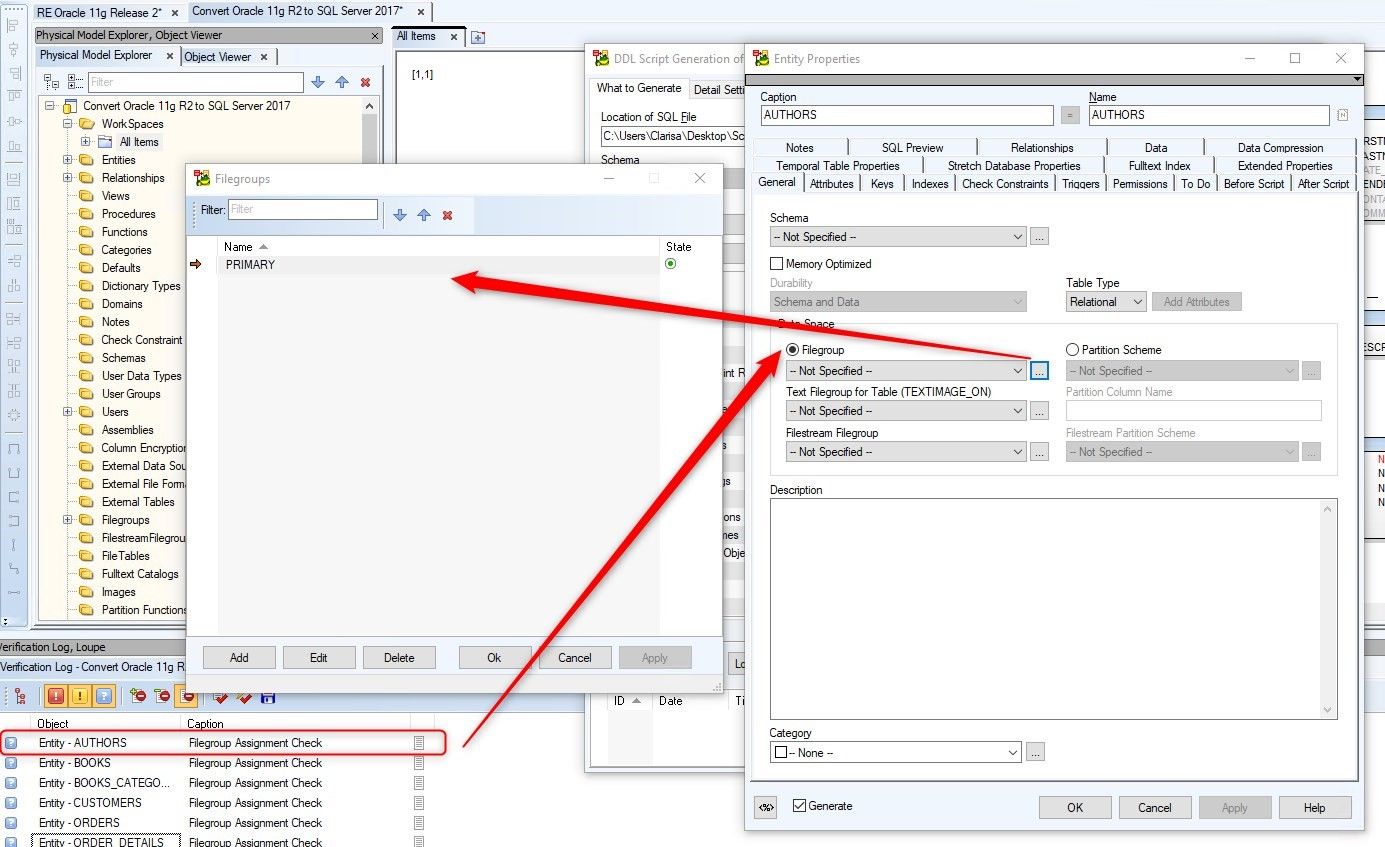
Figure 28. Learning how to implement the hints suggested by Toad Data Modeler – Assigning a Filegroup to an entity.
Now we assign the newly created Filegroup to the AUTHORS entity and click on the Apply button. We can see that the Hints disappear from the list of the Verification log.
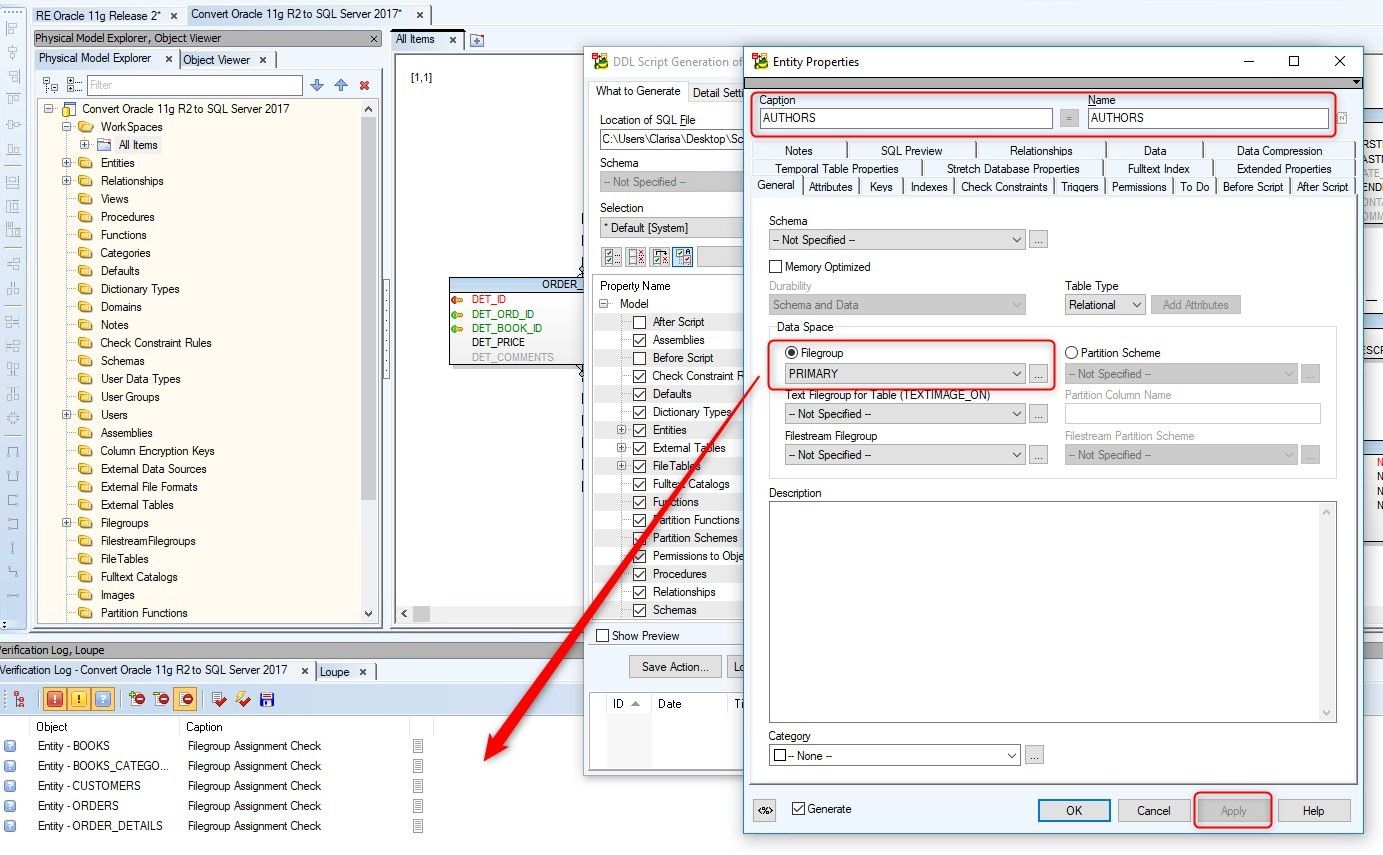
Figure 29. Applying the hint suggested by Toad Data Modeler to the AUTHORS entity
We do the same for each of the remaining entities.
Once the errors and warnings have been solved and the hints given by the tool have been applied, we can generate the Script by clicking on the Generate button.
Note: We can ignore the warnings or hints but I advise you to resolve the errors before generating the script.
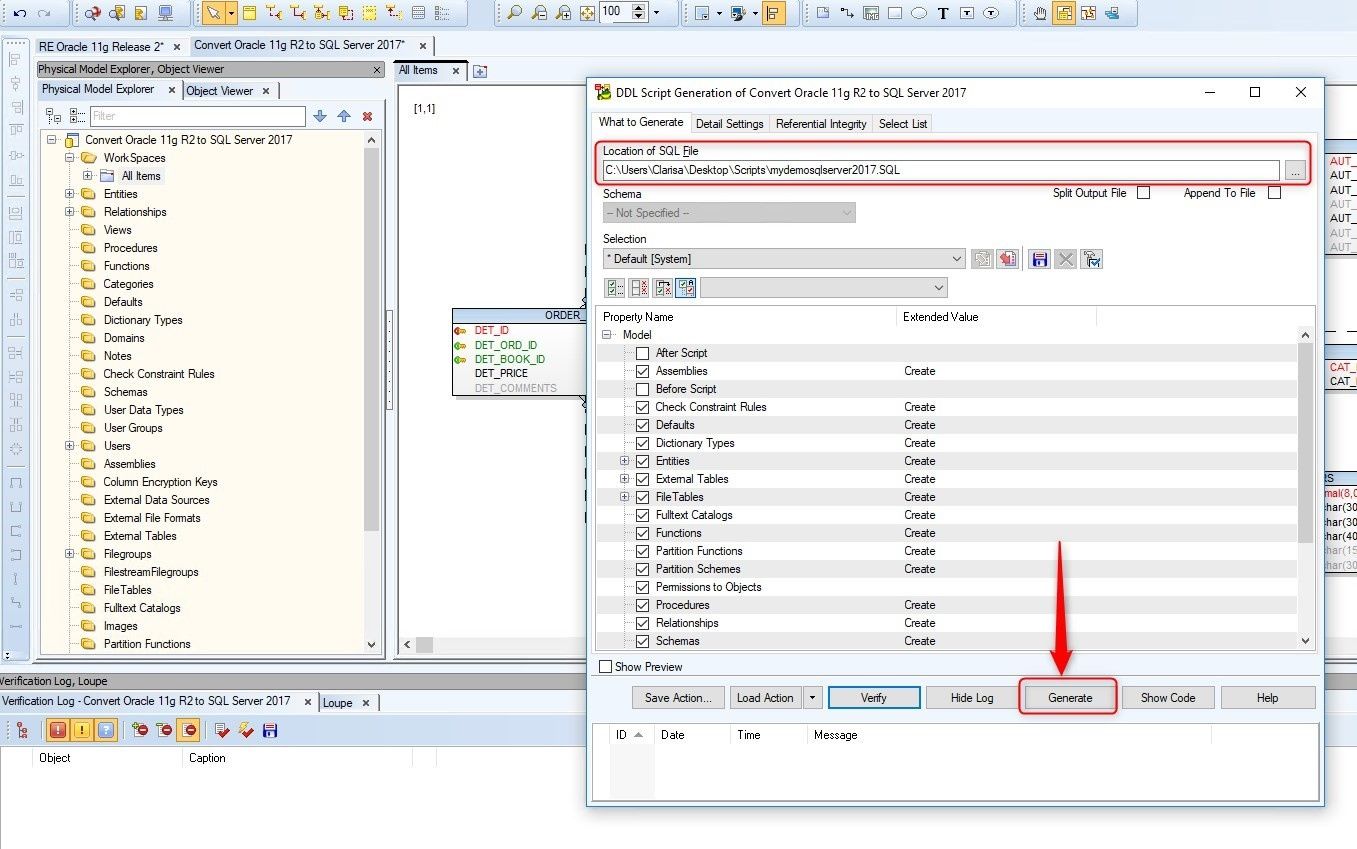
Figure 30. Clicking on the Generate button
At the end of the Script generation process, we can see the code by clicking on the Show Code button.
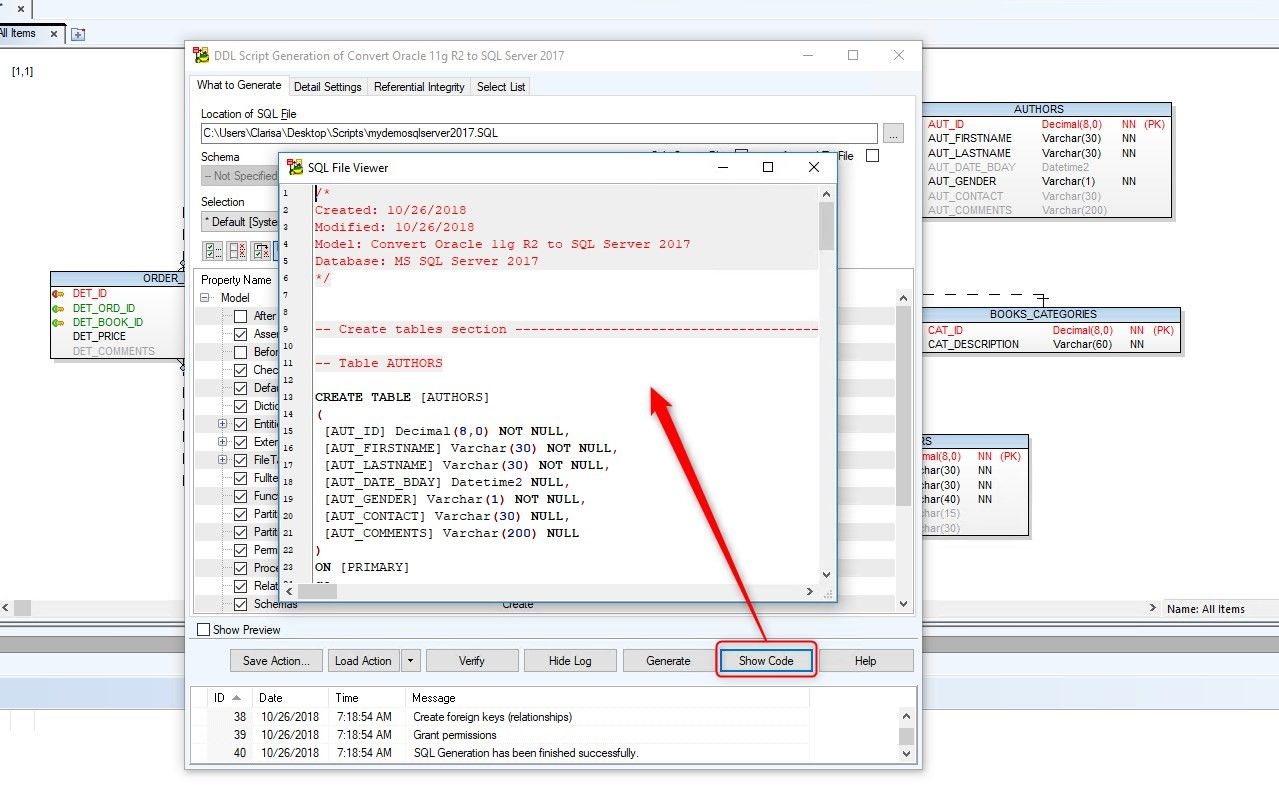
Figure 31. Clicking on the Show Code button brings up SQL File Viewer window
Now we use Toad Data Point to execute the SQL Server database script.
We connect and open the newly generated script.
When the quest database is selected, we can see that the database does not have tables created yet. We click on the Execute Scripts icon.
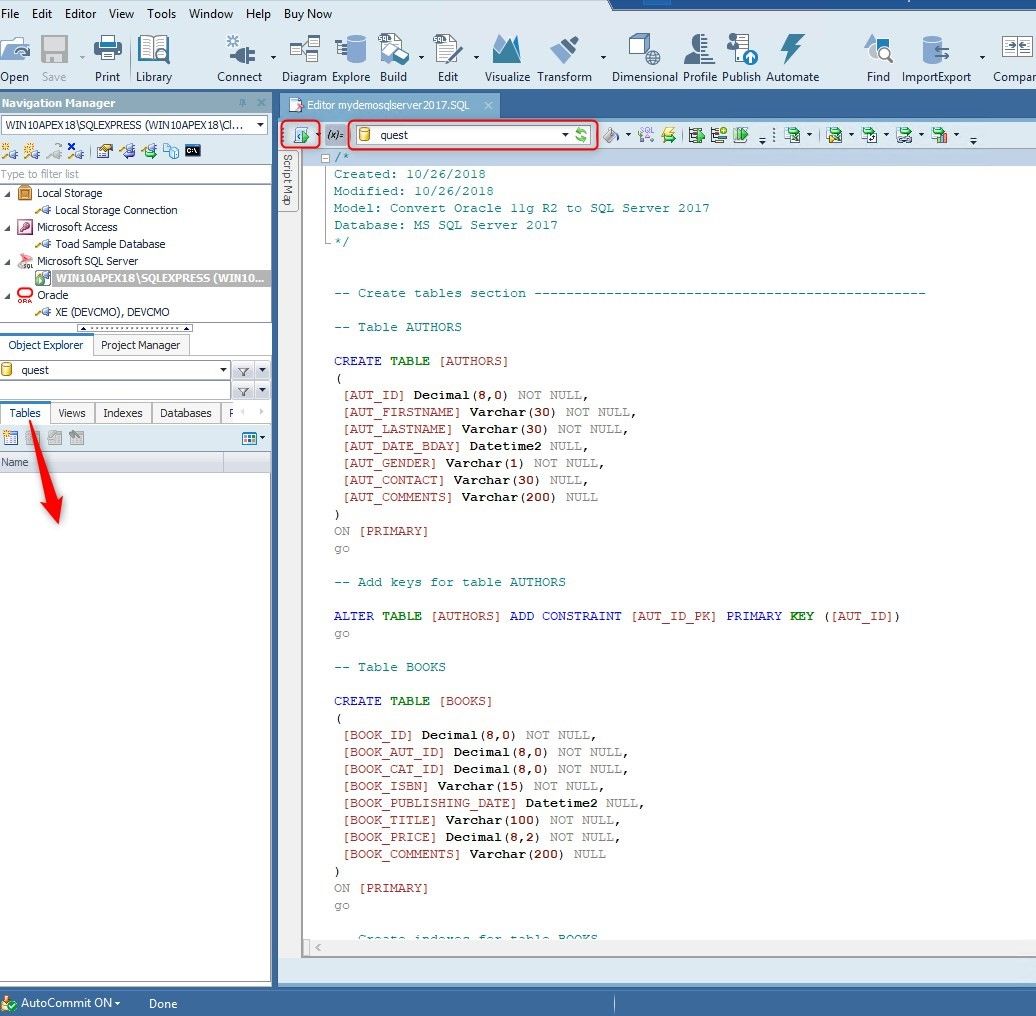
Figure 32. Clicking on the Execute Scripts icon.
Once the script is executed, we can see the tables created in the quest database.
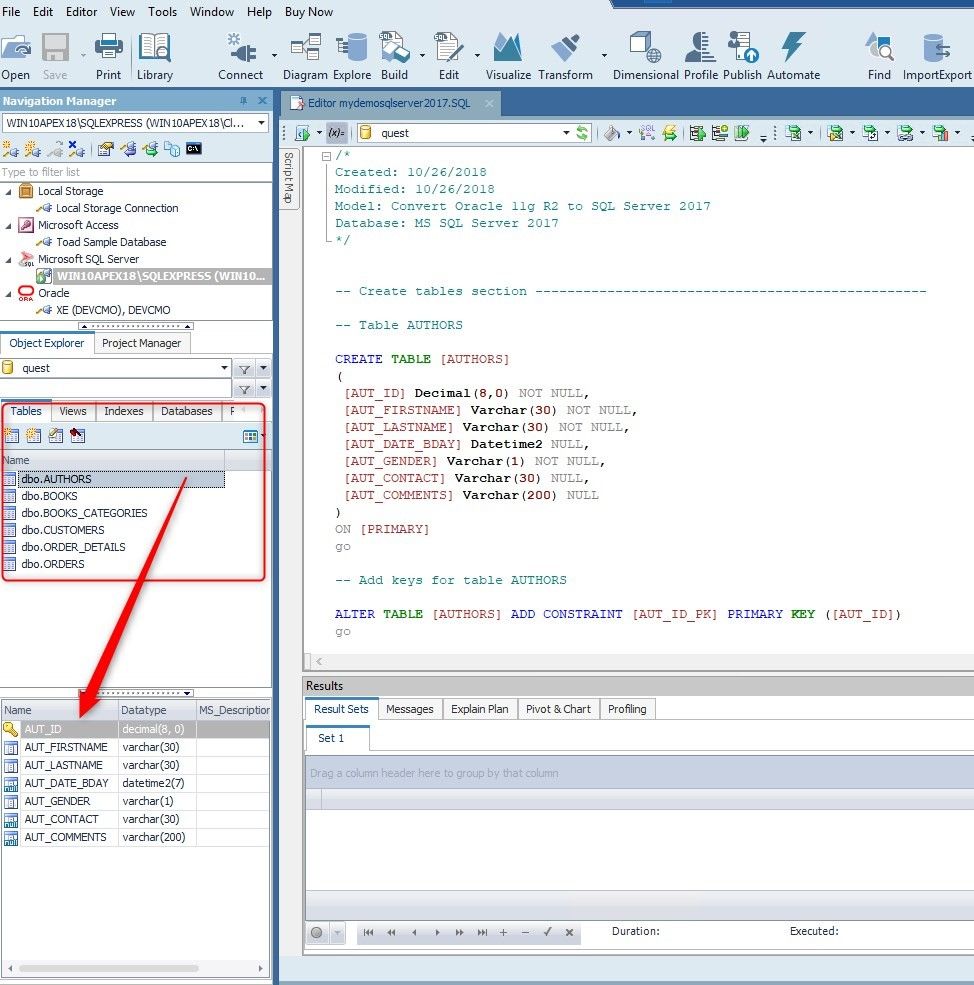
Figure 33. Tables have been created.
Model Conversion Wizard: from Oracle 11gR2 to SQLite 3.7
SQLite is an in-process library that implements a self-contained, serverless, zero-configuration, transactional SQL database engine. The code for SQLite is in the public domain and thus is free for use for any purpose, commercial or private.
Now let's convert the data model from Oracle 11g R2 to SQLite.
We follow the same steps described above for the Model Conversion Wizard; click on Model menu > Convert Model > Run…
We select the Target of the database: SQLite 3.7. In the name of the model enter: "Convert Oracle 11gR2 to SQLite".
Generate Script
We open the wizard to generate the script and before generating we verify and solve the problems shown in the verification log.
In this case, we need to order the entities because, for example, the Foreign key in the child entity of the Books entity must be created before the entity Books_Categories.

Figure 34. Learning how to solve warning messages shown in the Verification Log Tab – Error message indicates we must reorder entities.
We reorder the entity Books_Categories up and then click on the Apply button. We check again and we no longer have errors.
Now, we generate the Script for SQLite.
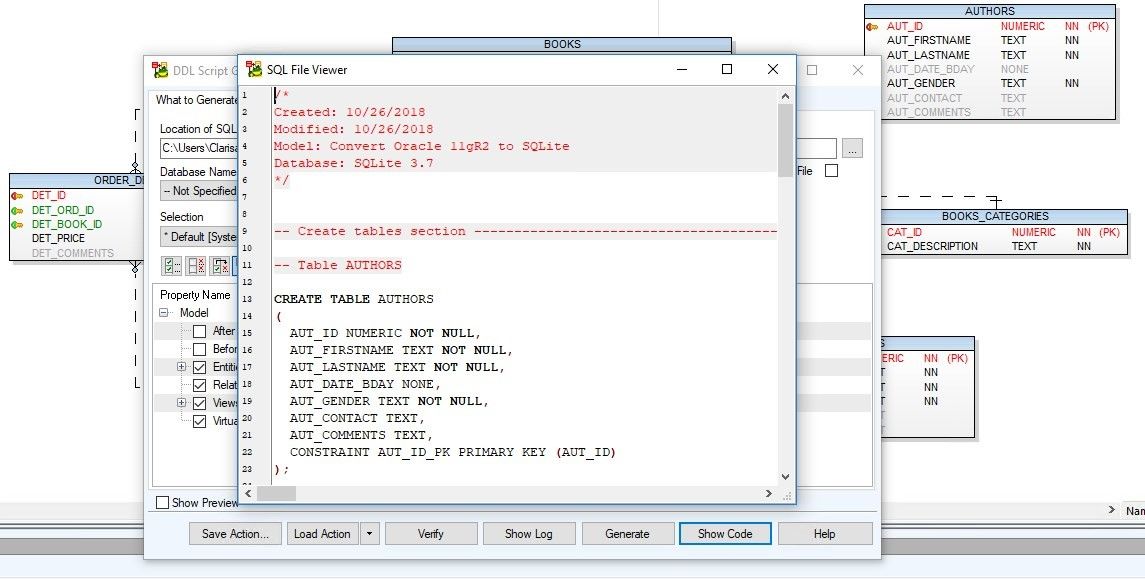
Figure 35. Generating the script for SQLite database
We execute the script inside our DB Browser for SQLite tool.
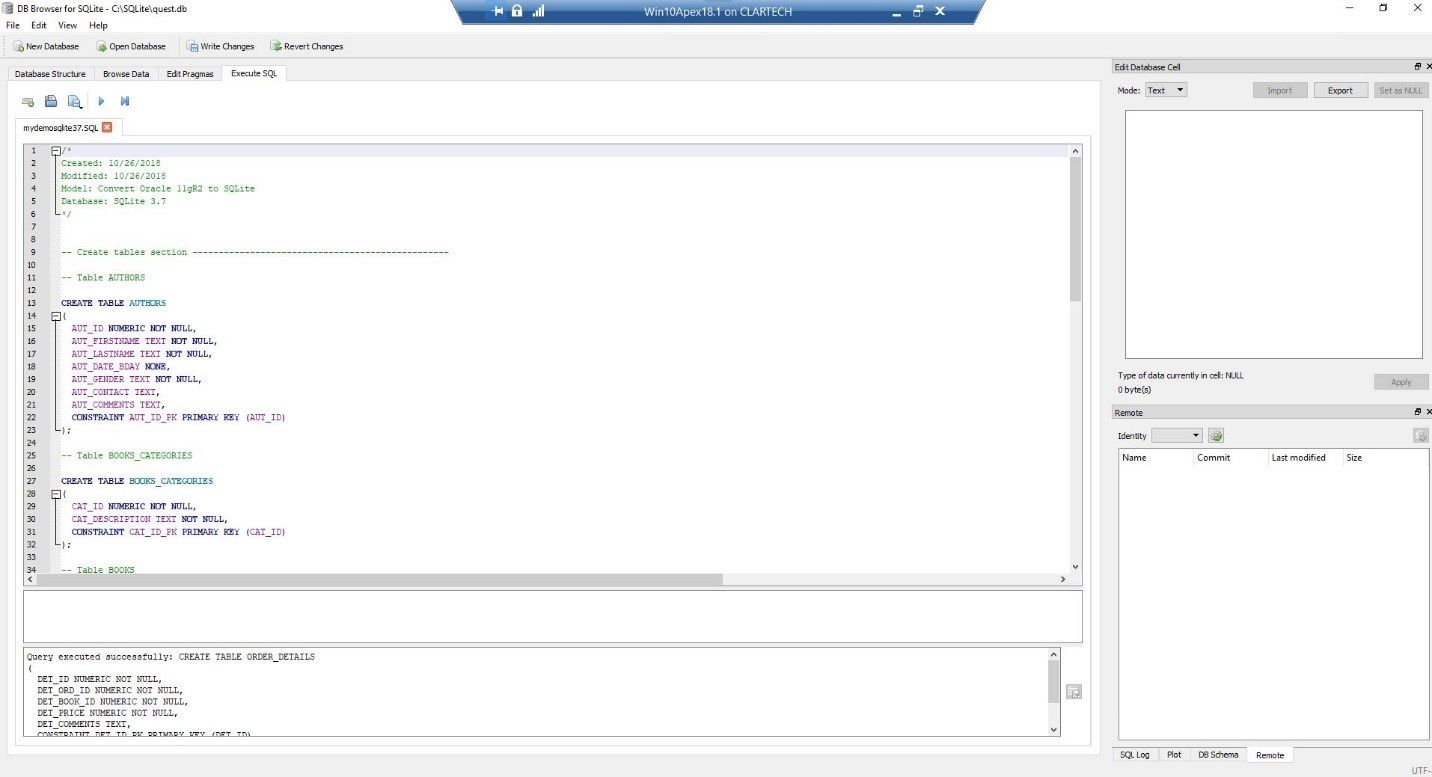
Figure 36. Executing the script
We can see that all the tables have been created in the database quest.db.
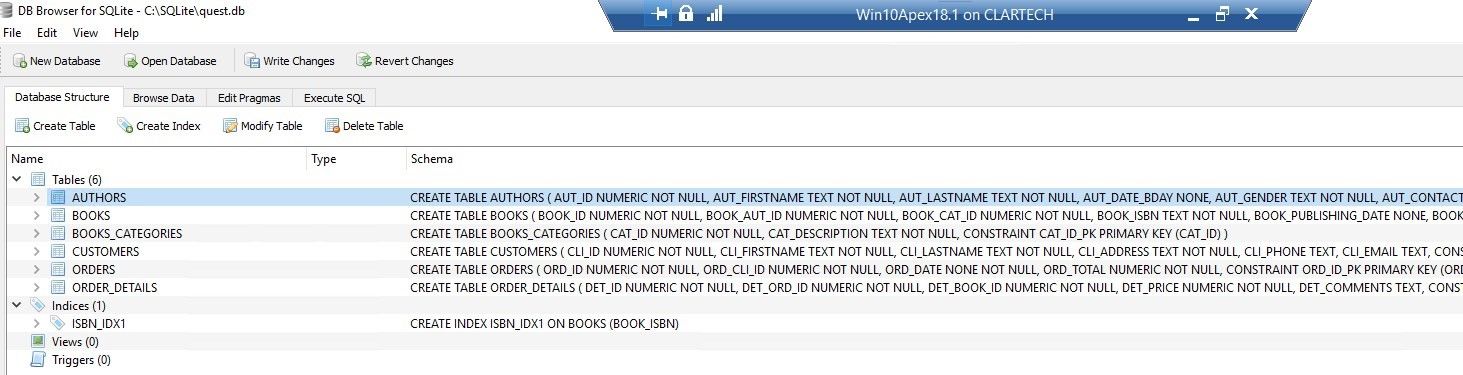
Figure 37. Tables have been created
Conclusion
The Toad Data Modeler can help us greatly reduce the amount of work hours to migrate a data model from one database platform to another platform.
The generation of the script is not totally automatic. When we work with basic models we usually have no problems, but when our data model is more complex we need to work manually with the Toad Data Modeler generated script to avoid errors when we execute the script on the target platform.
Start the discussion at forums.toadworld.com