Oracle Autonomous Database is a self-driving database that requires almost no DBA-initiated management. Automated patching, upgrades and tuning, backups, scaling, and other routine database management tasks while the database is running make the autonomous database self-driving, self-securing, and self-repairing. The autonomous database offers several benefits including high availability, and unmatched performance. The database, recently scoring highest in all Use Cases in a Gartner report, recovers automatically from failure with 99.995% uptime guaranteed. Compute and storage are scaled elastically as needed with no downtime.
Two versions of the database are available, Autonomous Transaction Processing (ATP) and Autonomous Data Warehouse (ADW). Each of these is designed for a different type of workload. ATP is optimized for online transaction processing (OLTP) with low response time, and application development. ADW is optimized for complex data analytics over large volumes of data.
Self-driving and all the other autonomous features only refer to the administration of Oracle Autonomous Database. You still need a client to connect with Oracle Autonomous Database, and Toad for Oracle provides a one-stop integrated development environment to connect with, and use Oracle Autonomous Database.
Quest® Toad® for Oracle may be used with either ATP or ADW. In this article we shall discuss using the Autonomous Transaction Processing service with Toad for Oracle. It involves the following sequential procedure.
- Set the environment, which includes creating an Oracle Cloud Platform account, and installing Toad for Oracle
- Create an Oracle Autonomous Database Instance
- Download and install Connect Credentials
- Create a Connection in Toad for Oracle
- Explore the Oracle Autonomous Database with Toad for Oracle Database Browser

Step 1: Setting the environment
An Oracle Database Cloud Service account is required and an account may be created at Oracle Cloud Free Tier. An Always Free option for ATP and ADW is also available. Download and install Toad for Oracle as explained in How to download Toad for Oracle (for advanced editions) and How to install and activate Toad for Oracle Base Subscription.
Step 2: Creating an autonomous database instance
To create an Oracle Autonomous Database Instance, log in to the Oracle Cloud Services console with the link sent when an Oracle Cloud Services account is created. Click on the button/link Create Instance. In the Create Instance window click on Create button for Autonomous Transaction Processing (Figure 1).
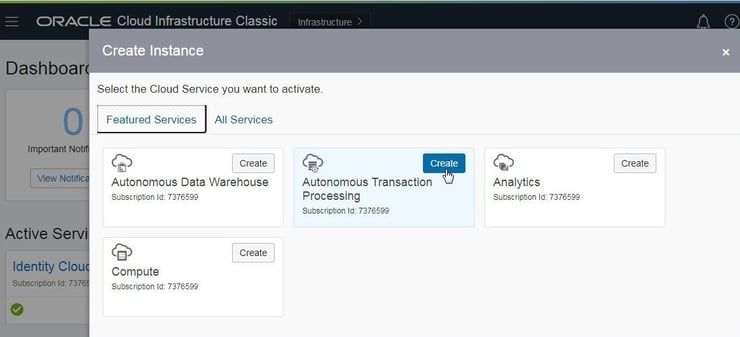
Figure 1. Create Autonomous Transaction Processing
Launch the Create Autonomous Database wizard from the Autonomous Databases table with the Create Autonomous Database button (Figure 2).
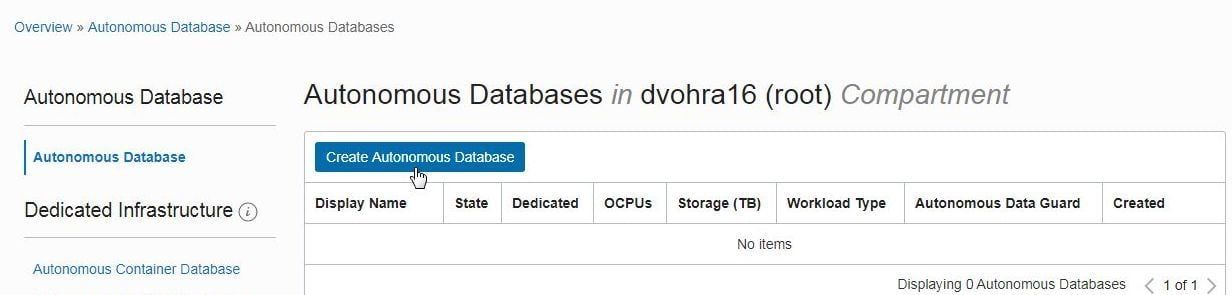
Figure 2. Autonomous Databases>Create Autonomous Database
Provide basic information for creating a new instance, which includes a Compartment, Display Name and Database Name (Figure 3). An Oracle Cloud Infrastructure (OCI) compartment is a container for grouping together and organizing related resources.
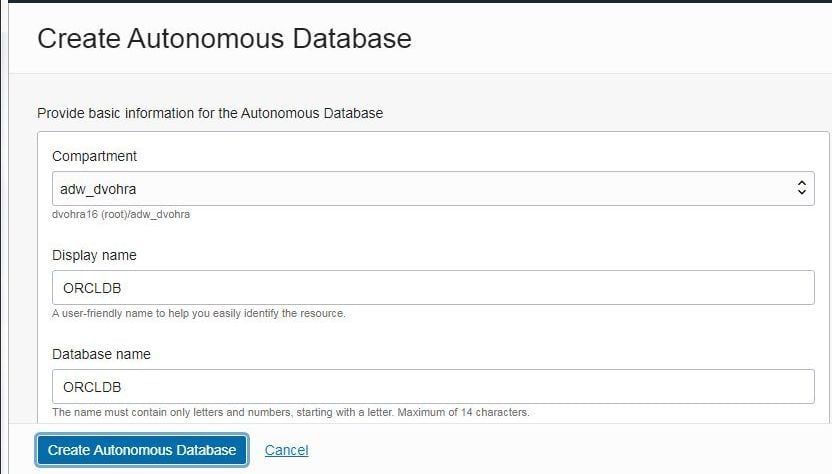
Figure 3. Basic Information for creating a new Oracle Autonomous Database instance
Choose workload type as Transaction Processing. Choose deployment type as Shared Infrastructure (Figure 4.).
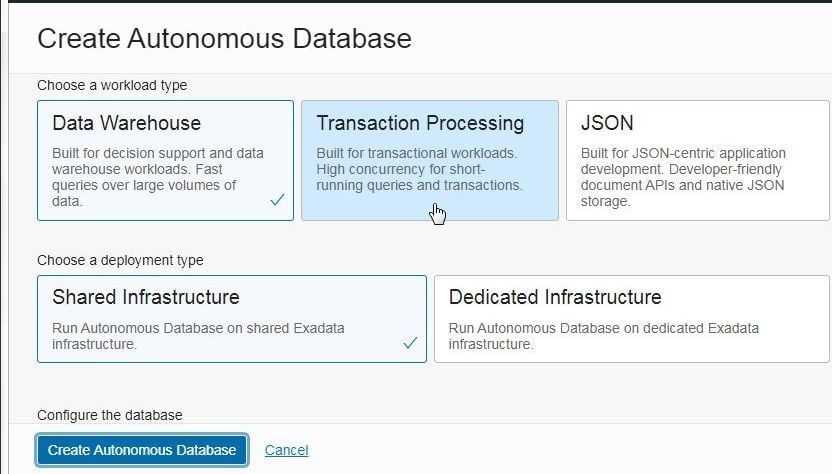
Figure 4. Choosing Workload type and deployment type
Configure the database. The Always Free toggle button (Figure 5) is set to OFF position by default.
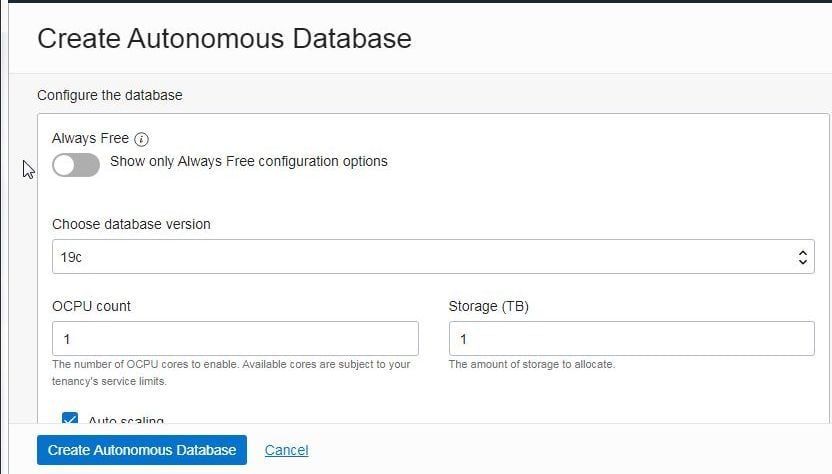
Figure 5. Configure the database>Always Free Toggle OFF
If the Always Free database instance is to be created click on the toggle button (Figure 6). The Always Free Autonomous Database does have some resource restrictions. Select a Oracle Database version, such as the 19c shown in Figure 6. As of December 2020, Oracle Database 21c is available with Always Free Autonomous Database. The Always Free instance is limited to 1 Core CPU and .02 TB storage.
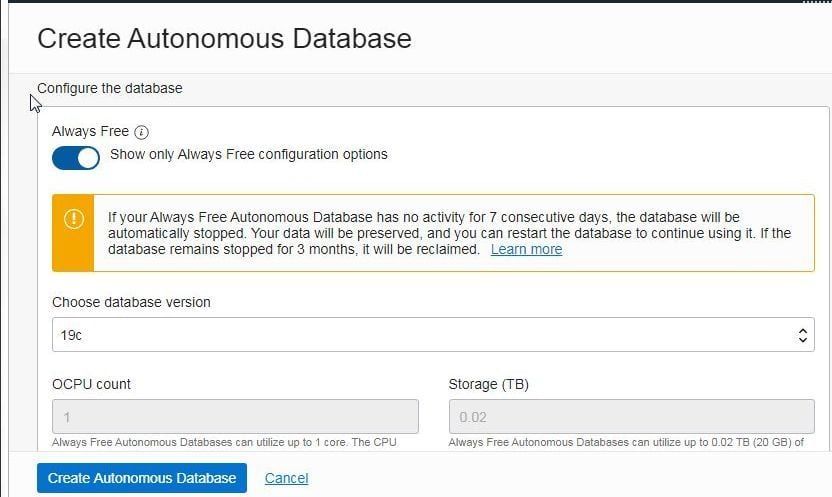
Figure 6. Selecting the Always Free Option
Specify administrator credentials (Figure 7). The Username is ADMIN by default and cannot be changed. Specify a password in the Password field, and confirm password in the Confirm Password field.
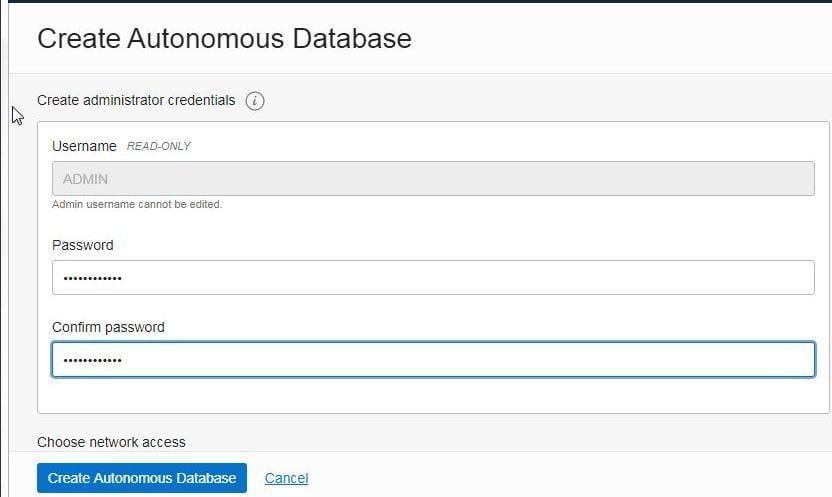
Figure 7. Specifying administrator credentials
Select network access type (Figure 8) as Allow secure access from everywhere.
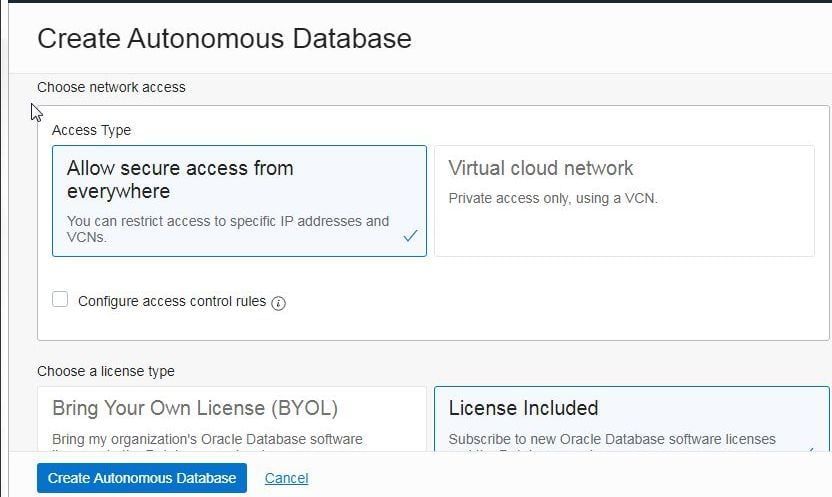
Figure 8. Choosing a Network Access Type
Tags may be set with Show Advanced Options link. Choose License type as License Included. Click on Create Autonomous Database (Figure 9).
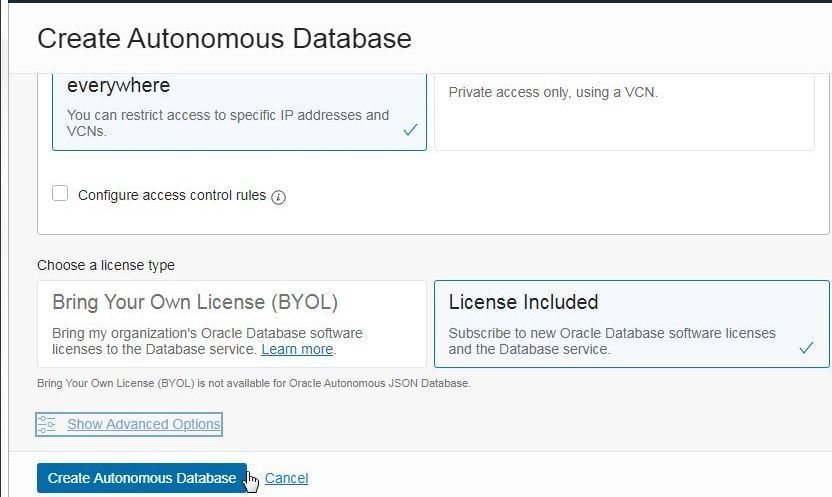
Figure 9. Selecting License type
A new ATP instance gets created as indicated by the AVAILABLE status (Figure 10).
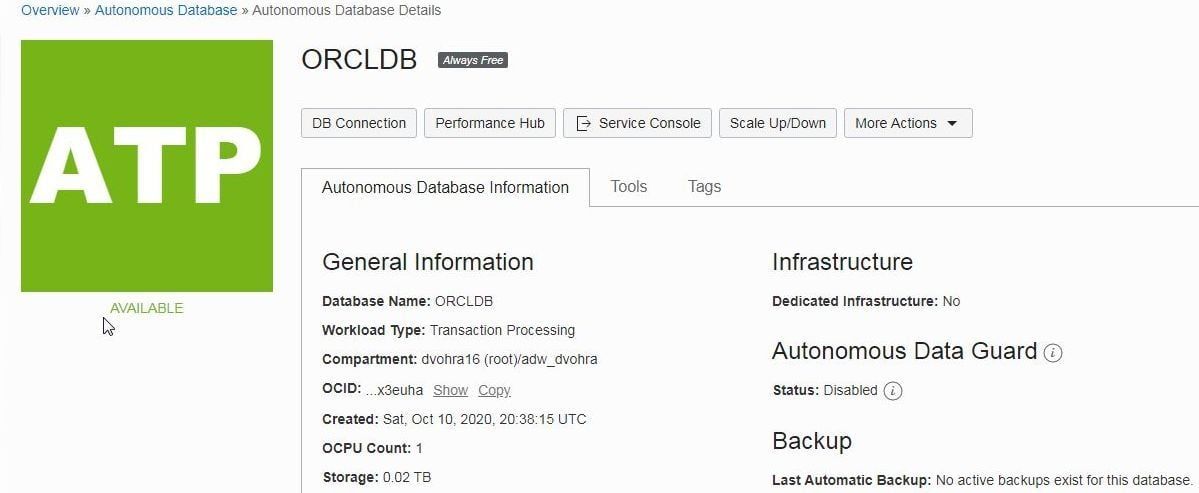
Figure 10. New ATP Instance AVAILABLE
A new database instance gets listed in the AutonomousDatabases table (Figure 11).
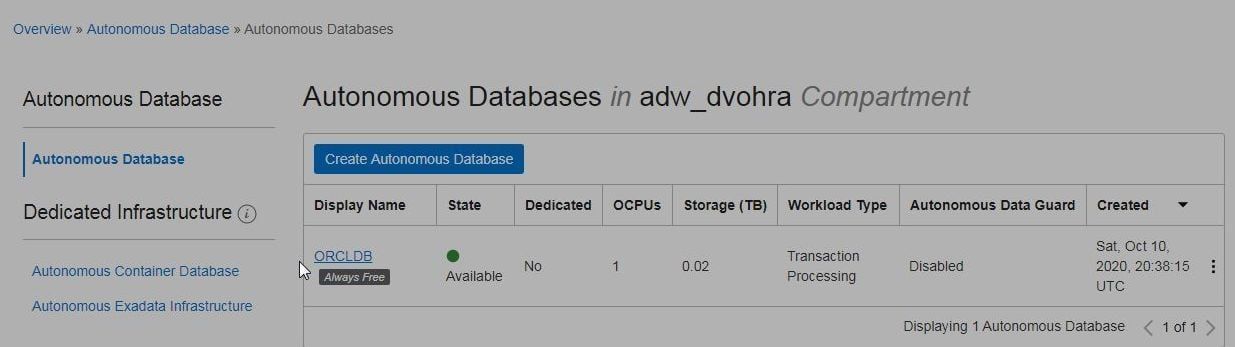
Figure 11. New Autonomous Database Instance
Step 3: Download and install Connect Credentials
Downloading and configuring credentials
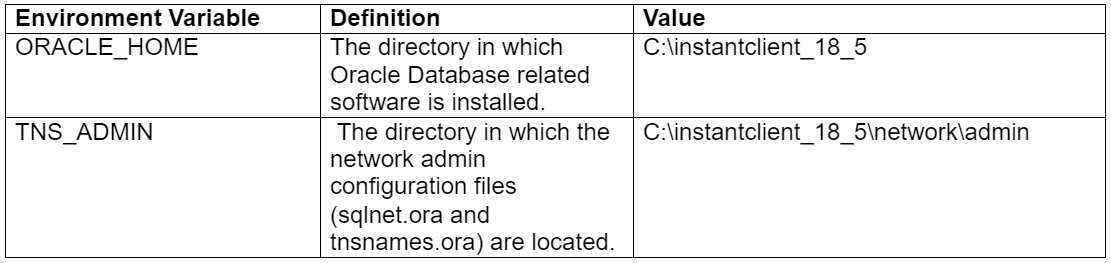
For connecting to Oracle Autonomous Database from a local machine, Oracle Instant Client needs to be installed locally. Download Instant Client version 18.5 (not the latest 19.8). Instant Client for Microsoft Windows (x64) is used in the article. Click on the link for version 18.5 and download and extract the instantclient-basic-windows.x64-18.5.0.0.0dbru.zip file. Create a new directory path C:\instantclient_18_5, and copy the contents of the extracted zip file to the new C:\instantclient_18_5 directory. Sub-directories within the extracted directory path are not to be copied, and only the files and directories from the last folder (C:\instantclient_18_5) in the extracted directory path are to be copied to the new C:\instantclient_18_5 directory. Create sub-directory path C:\instantclient_18_5\network\admin. Set two environment variables on the local Windows machine as discussed in Table 1.
Table 1. Environment Variables
Download and install/configure ATP database credentials. Click on DB Connection button (Figure 12) in the Oracle Autonomous Database Details page.
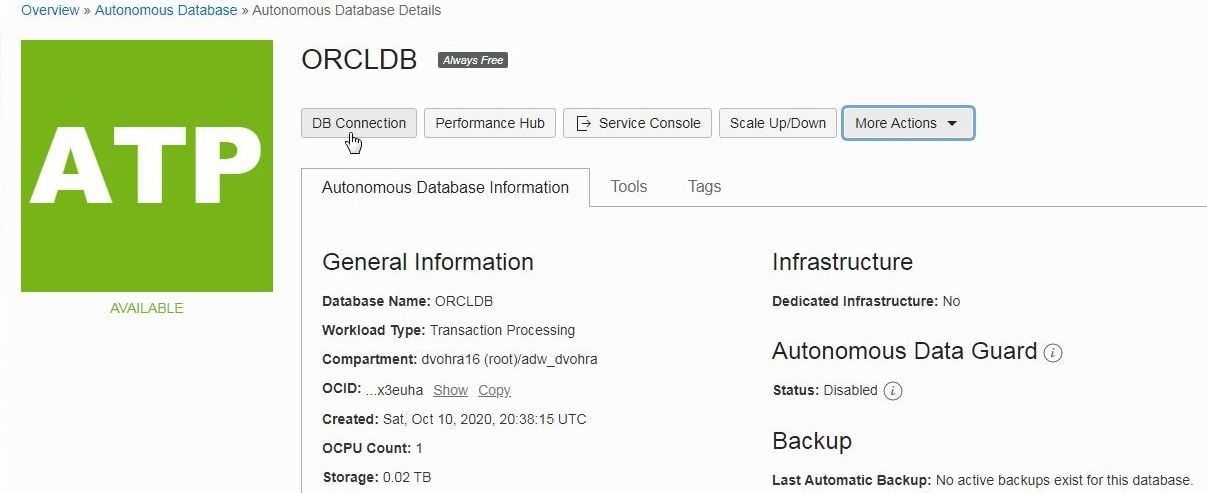
Figure 12. DB Connection
In the DatabaseConnection window click on Download Wallet (Figure 13) in the Download Client Credentials (Wallet) section.
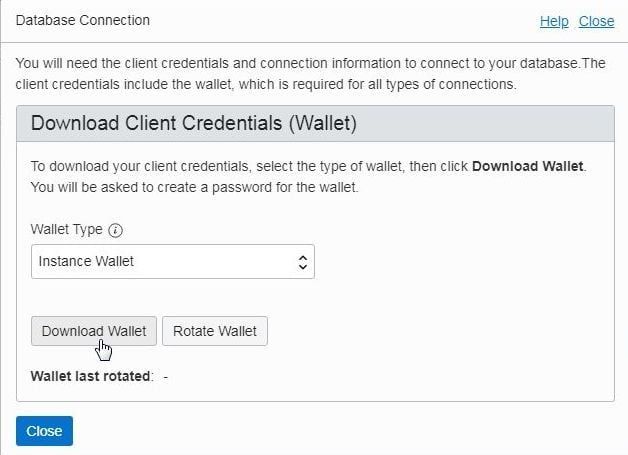
Figure 13. Downloading Client Credentials Wallet
In the Download Wallet window specify a password (Figure 14) that is needed by some clients to connect to the database. Click on Download. Even though Toad for Oracle doesn’t require a password and auto-login is used just with the wallet, a new password needs to be specified to be able to download the wallet zip file.
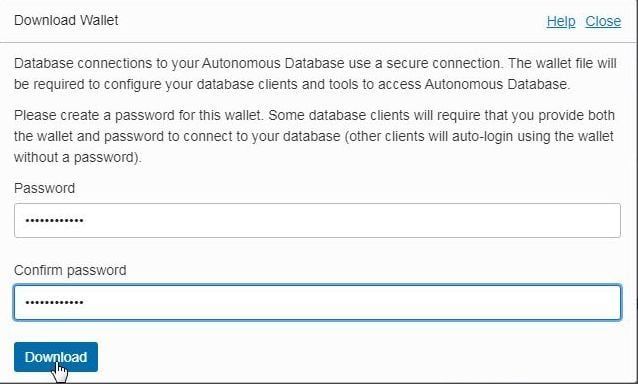
Figure 14. Download Wallet
The client credentials zip file or wallet gets downloaded (Figure 15). Click on the Close button.
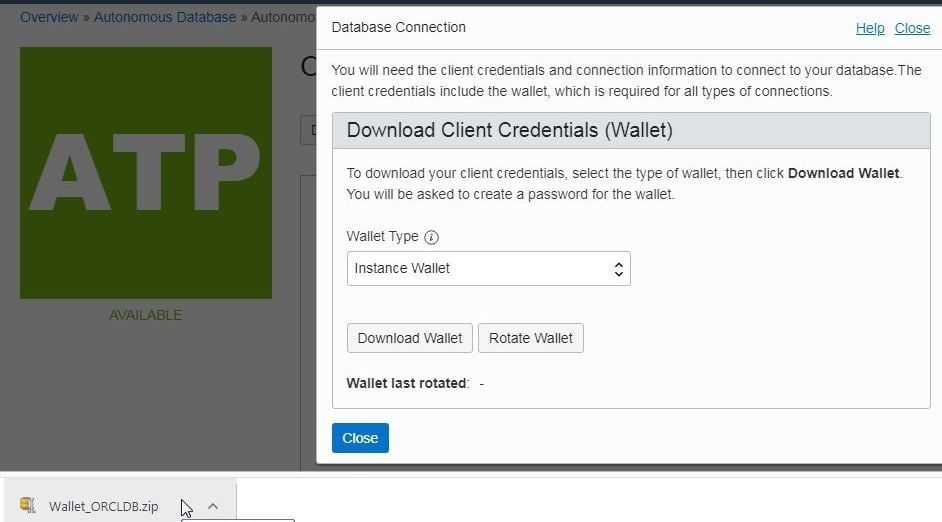
Figure 15. Client credentials zip file or wallet
Extract the files in the wallet zip file such that the tnsnames.ora, sqlnet.ora and other files are in the C:\instantclient_18_5\network\admin directory.
Step 4: Creating a Connection in Toad for Oracle
Before connecting verify the following:
- Toad for Oracle is installed
- Oracle Autonomous Database instance is created
- The Oracle Instant Client 18.5 is installed
- The environment variables ORACLE_HOME and TNS_ADMIN are set
- The Oracle Autonomous Database instance credentials zip file is downloaded and extracted
Launch Toad for Oracle. The Toad for Oracle Database Login window gets displayed (Figure 16).
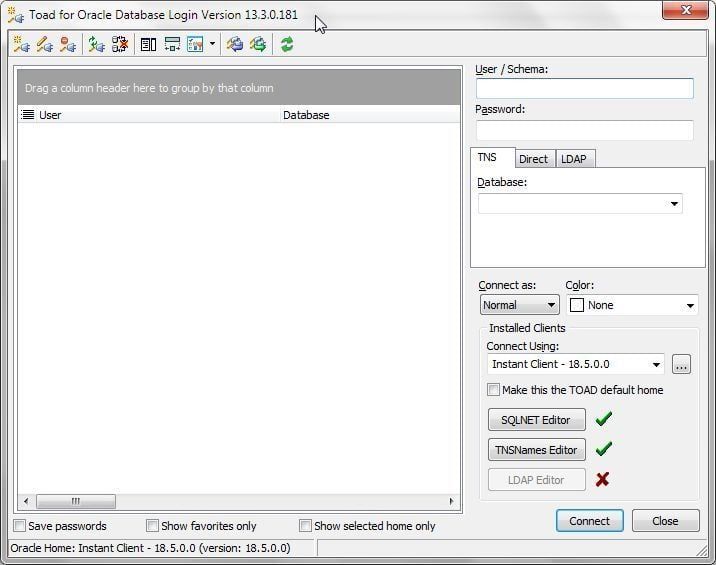
Figure 16. Toad for Oracle Database Login window
With the TNS tab selected specify User/Schema as ADMIN (Figure 17). Specify password for ADMIN. From the Database drop-down select one of the database services; these database services are pre-configured in the tnsnames.ora file that is downloaded in the wallet zip file.
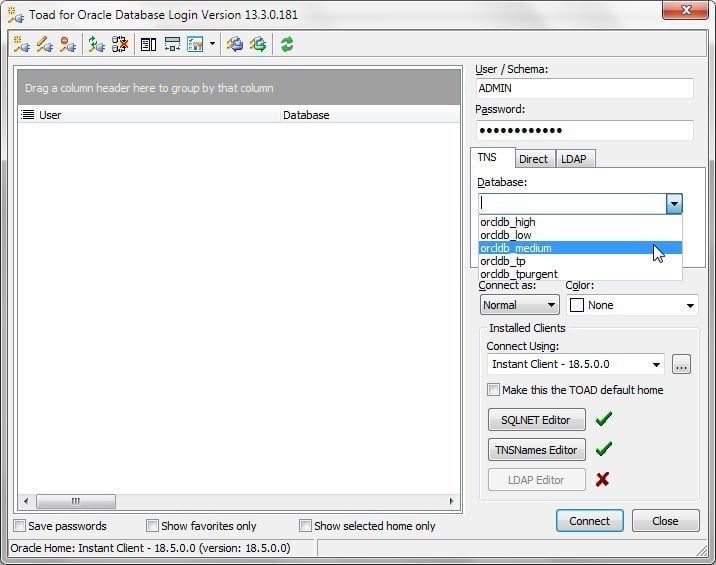
Figure 17. Selecting database service
Select Connect as: asNormal, and select Connect Using as Instant Client – 18.5.0.0, and click on Connect (Figure 18).
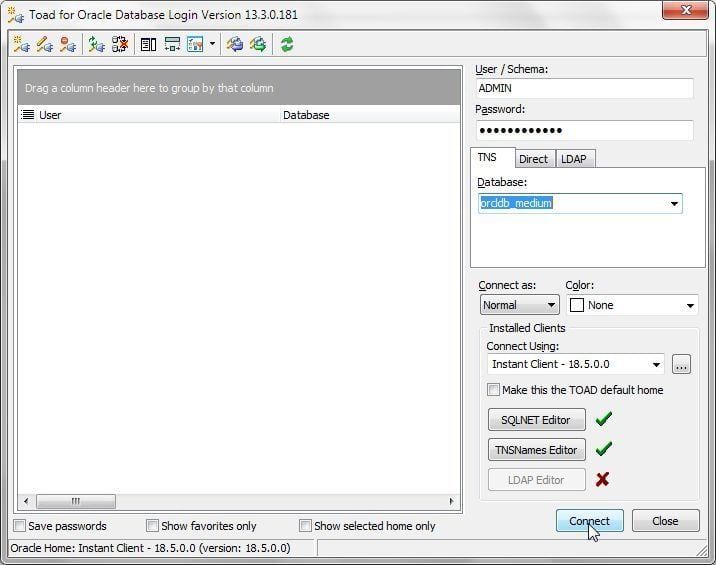
Figure 18. Login>Connect
A new connection gets created (Figure 19) and a SQL worksheet or Editor associated with the connection gets opened.
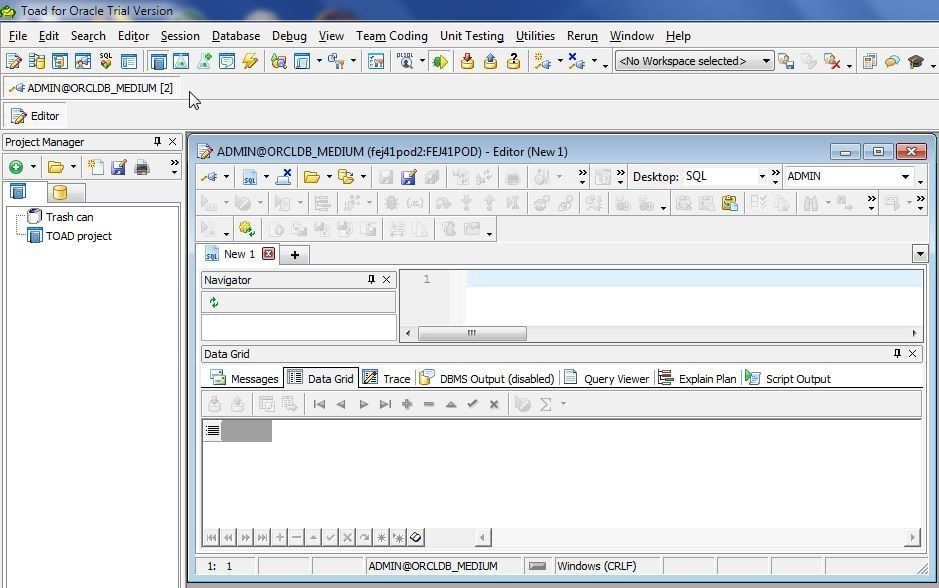
Figure 19. New Connection to Oracle Autonomous Database
Multiple connections may be created simultaneously. To create another connection click on New Connection (Figure 20), which launches a new Login window. 
Figure 20. New Connection
A second connection and associated SQL worksheet, or Editor, are shown in Figure 21.
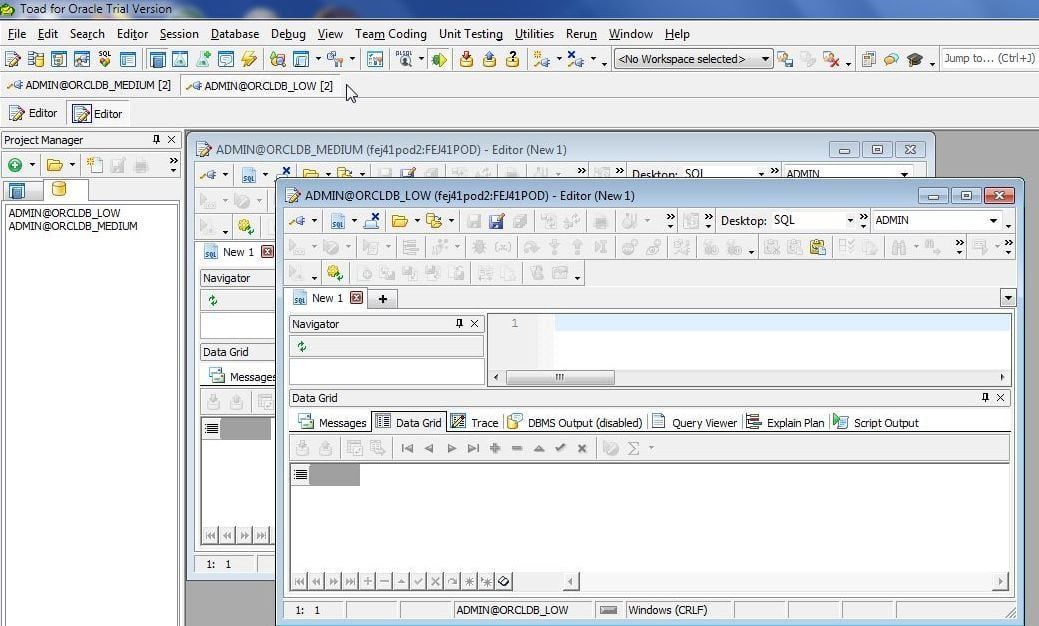
Figure 21. Second Connection
Step 5: Explore the Oracle Autonomous Database with Toad for Oracle Database Browser
Using the Database Browser
Use the Database Browser to browse the Oracle Autonomous Database instance. Click on Database Browser in the toolbar (Figure 22).

Figure 22. Database Browser in the toolbar
The Database Browser gets launched (Figure 23).
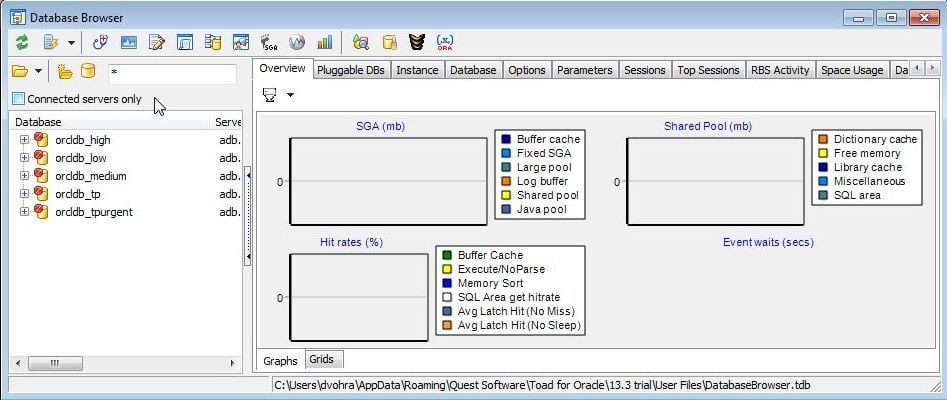
Figure 23. Database Browser
Even though one database instance is created multiple database services get provisioned for different types of use as discussed at Predefined Database Service Names for Autonomous Transaction Processing. All the Database instance service names are listed in the Database Browser.
Double-click on a database instance service (orcldb_high) icon to browse the database. In the LOGIN dialog, specify Username, Password, and click on OK. The Overview tab (Figure 24) displays Graphs sub-tab for the System Global Area (SGA), Shared Pool, Hit rates, and Event waits graphs. Select the Grid sub-tab to display the same information in a grid.

Figure 24. Database Browser>Overview
The Instance tab (Figure25) displays information such as SID, Version, Startup time, Status, Parallel status, number of threads, Archiver status, and instance role.

Figure 25. Instance Detail
The Database tab (Figure 26) displays information about the database such as SID, DBID, Log mode, Controlfile type, and Open reset logs status.
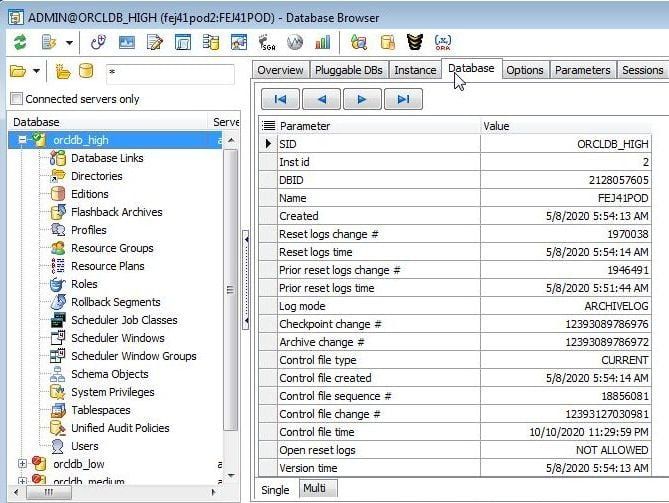
Figure 26. Database detail
The Options tab displays information about Parameters such as ASM Proxy Instance, Advanced Analytics, Advanced Compression, Advanced replication, Automatic Storage Management, Backup Encryption, Basic Compression, Block Change Tracking, Change Data Capture, and Connection pooling, among others. The Parameters tab displays the settings for the instance parameters such as noncedb_compatible, target_pdbs, and cdb_cluster among others. The Sessions tab lists all the sessions, and the Top Sessions tab lists the top sessions. The RBS Activity tab lists information about the rollback segments. The Space Usage tab displays the space usage for each tablespace. The Datafile IO tab displays information about the Datafiles IO for each tablespace including Datafile name, total IO, and total block IO. The Redo Logs tab displays information about the redo logs by date. The Directories lists all the database directories.
Tablespaces node (Figure 27) lists all the tablespaces including their status and size. Other instance nodes for Database Links, Editions, Flashback Archives, Profiles, Resource Groups, Resource Plans, Roles, Rollback Segments, Scheduler Job Classes, Scheduler Windows, Scheduler Window Groups, Schema Objects, System Privileges, Unified Audit Policies, and Users are also provided.
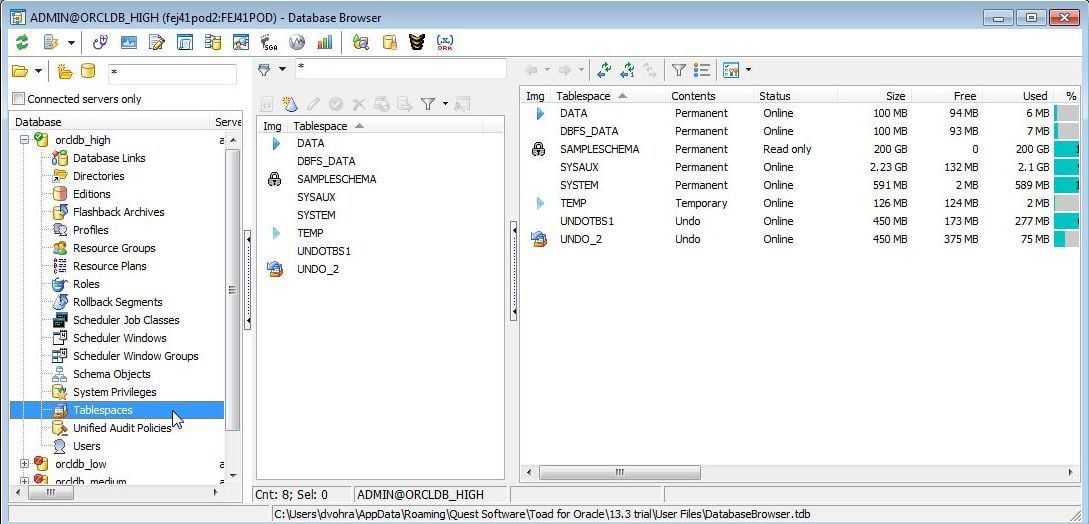
Figure 27. Tablespaces
In a continuation article we shall discuss using Toad for Oracle to create a table in the Oracle Autonomous Database, add data, run an SQL query, export dataset to an Excel file, and create a report among other features.
Summary
Toad for Oracle is ideally suited to be used as a client tool and integrated development environment for Oracle Autonomous Database. I demonstrated the complete procedure using a trial version of Toad for Oracle 14.
Need help managing data? Try Toad for free!Quest Software® is here to help you simplify complexity, reduce cost and risk, and drive performance. Maybe that’s why we’re consistently voted #1 by DBTA readers and have 95%+ customer satisfaction rate.
Toad® database management tools are cross-platform solutions from Quest® that can help new and veteran DBAs, and even “accidental” DBAs manage data in Oracle, SQL Server, DB2, SAP, MySQL, and Postgres environments. |

Related Toad World posts
Blog: The Oracle Autonomous Data Warehouse Cloud Service (ADWC)
Blog: How to Install Oracle Database 18c on Windows
Blog: How to install an Oracle Instant Client for Toad® for Oracle
Useful resources
Toad for Oracle general information
Technical brief: Top Five Reasons to Choose Toad Over SQL Developer
Case study: Opening doors and creating opportunities with data insights
Have questions, comments?
Head over to the Toad for Oracle forum on Toad World®! Chat with Toad developers, and lots of experienced users.
Help your colleagues
If you think your colleagues would benefit from this blog, share it now on social media with the buttons located at the top of this blog post. Thanks!
We are evaluating Toad for use with Oracle cloud Autonomous databases.
After downloading the instance wallet file for one database, I can connect to that database using Toad. I can also have two separate connections in Toad to that same database.
However, when trying to connect to a second database, Toad won't allow me to do that. It throws an error:
ORA-12529: TNS:connect request rejected based on current filtering rules.
Isn't it possible to connect to two different Oracle Cloud Autonomous databases at the same time using Toad?
We followed this article for the config of our ...\network\admin directory: