
This article explains how to use the ALTER TABLE statement to modify the oracle table. We are going to use an array of examples in order to learn how to alter a table in Oracle.

We can perform the following changes in a table schema by using the ALTER TABLE statement.
- Add a column in an existing table.
- Change datatype and length of the table.
- Add constraints in the table.
- Drop the existing table.
- Move table from default tablespace to different tablespace.
For demonstration, I’ve created a pluggable database named EltechDB and a table named tblStudent. The tblStudent contains the data of the students.
The following query creates a table named tblStudent.
CREATE TABLE “TBLSTUDENT”
(
“STUDENTID” NUMBER(*,0) GENERATED ALWAYS AS IDENTITY MINVALUE 1 MAXVALUE 9999999999999999999999999999 INCREMENT BY 1 START WITH 1 CACHE 20 ORDER CYCLE KEEP NOSCALE ,
“STUDENT_FIRSTNAME” VARCHAR2(100 BYTE),
“STUDENT_LASTNAME” VARCHAR2(100 BYTE),
“STUDENT_ADDRESS” VARCHAR2(500 BYTE),
“STUDENT_GRADE” VARCHAR2(1 BYTE)
)
CREATE INDEX “IDX_TBLSTUDENT_FIRSTNAME” ON “SYS”.”TBLSTUDENT” (“STUDENT_FIRSTNAME” DESC);
CREATE UNIQUE INDEX “TBLSTUDENT_PK” ON “SYS”.”TBLSTUDENT” (“STUDENTID”);
Example 1: Add a column in a table
To add a column in a table, we can use the ALTER TABLE ADD COLUMN statement. The syntax to add a column is the following.
ALTER TABLE [table_name] ADD COLUMN [column_name][data_type]
In the syntax,
- Table_name: Specify the table name in which you want to add a column.
- Column_name: Specify the name of the column. The value of the column_name parameter must be specified after ADD COLUMN
- Data_type: Specify the data type of the new column. The datatype must be specified after the column name.
In our example, we are adding a column named student_grade, which stores the grade of students. The query is as following.
ALTER TABLE TBLSTUDENT ADD (STUDENT_GRADE VARCHAR2(1));
Run the following query to view the list of the columns and their datatype.
Select Table_name, column_name, data_type,data_length from all_tab_columns where table_name=’TBLSTUDENT’;
Query output
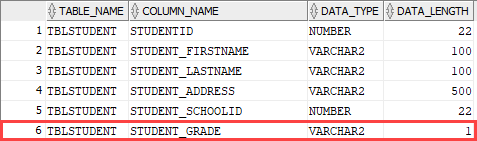
As you can see, the column has been added.
Example 2: Modify a column of a table
In this section, we will learn how to modify the column. We can use the ALTER TABLE MODIFY statement to perform the following tasks.
- Change datatype and change the length of the column.
- Add a column constraint in the table.
- Drop a column.
Change datatype and length
The syntax to change the datatype is following:
ALTER TABLE [table_name] MODIFY([column_name][new_data_type](data_length))
In the syntax,
- Table_Name: Specify the table name that you want to modify.
- Column_name: Specify the column name that you want to modify.
- New_data_type: Specify the new data type.
- Data_length: Specify the length of the datatype.
Example
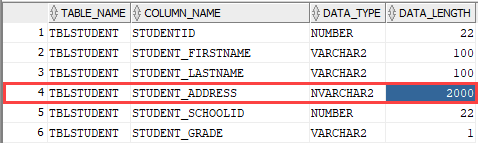
For example, we want to change the datatype of the Student_Address column from VARCHAR2 to NVARCHAR, and the data length of the Student_Address column will be 2000. To change the data type and length, execute the following query:
ALTER TABLE TBLSTUDENT MODIFY (STUDENT_ADDRESS NVARCHAR2(2000) );
Run the following query to verify the changes.
select Table_name, column_name, data_type,data_length from all_tab_columns where table_name=’TBLSTUDENT’;
Query output
Add column constraint
We can add the following constraints using ALTER TABLE MODIFY statement.
- NOT NULL
- DEFAULT
- CHECK
- UNIQUE
The syntax to add a column constraint is the following.
ALTER TABLE table_name MODIFY (column_nameconstraint);
In the syntax,
- table_name: Specify the table name whose column you want to modify.
- column_name: Specify the column name you want to add the constraint.
- Constraint: Specify the constraint.
For example, we want to add a NOT NULL constraint on the Student_Firstname column of the tblStudent table. To do that, run the following query:
ALTER TABLE TBLSTUDENT MODIFY (STUDENT_FIRSTNAMENOT NULL);
We can add the following constraints using the ALTER TABLE ADD CONSTRAINT statement.
- PRIMARY KEY
- FOREIGN KEY
The syntax is following:
ALTER TABLE table_name ADD CONSTRAINT constraint_name (key_column_name)
ENABLE;
In the syntax,
- table_name: Specify the table name.
- key_column_name: Specify the column name which acts as a primary key or a foreign key.
- Constraint: Specify the constraint. The constraint can be a Primary key or foreign key constraint.
For example, we want to make the Student_ID a primary key column of the tblStudent table. To do that, run the following query statement.
ALTER TABLE TBLSTUDENT ADD CONSTRAINT TBLSTUDENT_PK PRIMARY KEY
(
STUDENTID
)
ENABLE;
Drop the column
The process of dropping a column of a large table is time and resource consuming, so we can easily drop the table by using ALTER TABLE SET UNUSED COLUMN statement.
The syntax is following:
ALTER TABLE table_name SET UNUSED COLUMNS column_name;
In the syntax,
- table_name: Specify the table name.
- column_name: Specify the column name that you want to mark as unused.
Suppose we want to mark the student_address column in the tblStudent table as unused. You can run the following SQL query.
ALTER TABLE tblStudent SET UNUSED COLUMNS student_address;
Once the command is executed, the column will be inaccessible. You can view the list of unused columns by querying the DBA_UNUSED_COL_TABS view.
SELECT
*
FROM
DBA_UNUSED_COL_TABS;
Query output

As you can see, the tblStudent has one unused column. Later, you can drop the column by running the following query.
ALTER TABLE tblStudent DROP UNUSED COLUMNS;
We can also use the ALTER TABLE DROP COLUMN statement to drop the column. The syntax is following:
ALTER TABLE table_name DROP COLUMNS column_name;
In the syntax,
- table_name: Specify the table name.
- column_name: Specify the column name that you want to drop.
For example, we want to drop the student_address column from the tblStudent table. To do that, run following query.
ALTER TABLE tblStudent DROP COLUMNS student_Address;
Now, let’s understand how we can change the default tablespace of the table.
Example 3: Change default tablespace
We can use ALTER TABLE MOVE TABLESPACE statement to move the existing table to another tablespace. The syntax is following:
ALTER TABLE table_name MOVE TABLESPACE tablespace_name;
In the syntax,
- table_name: Specify the table name you want to move to the new tablespace.
- tablespace_name: Specify the tablespace name you want to move the table.
I’ve created a new tablespace named tbs1_data_tblStudent in EltechDB. You can create the tablespace by running the following query.
CREATE TABLESPACE tbs1_data_tblStudent DATAFILE ‘tbs1_data_tblStudent_new.dbf’ SIZE 500m;
We are moving the tblStudent table from SYSTEM tablespace to tbs1_data_tblStudent tablespace. We can perform this activity by performing the following steps.
Step 1: Run ALTER TABLE statement to change the tablespace. The query is following:
ALTER TABLE tblStudentMOVE TABLESPACE tbs1_data_tblStudent;
Step 2: When we change the tablespace, the indexes created on the table will be unusable; therefore, we must rebuild those indexes. To do that, run the following query.
ALTER INDEX TBLSTUDENT_PK REBUILD ONLINE;
ALTER INDEX IDX_TBLSTUDENT_FIRSTNAME REBUILD ONLINE;
Once indexes have been rebuilt, execute the following query to verify that the table has been moved to tbs1_data_tblStudent tablespace.
select table_name, tablespace_name,status,min_extents, max_extents from user_tables WHERE TABLE_NAME=’TBLSTUDENT’;
Output

As you can see, the table tblStudent has been moved to tbs1_data_tblStudent tablespace.
Note: The above example is used to move tablespace offline.
Try Toad free for 30 days.Already in a trial? Talk to sales or buy now online. Already a loyal fan of Toad for Oracle? Renew now. |
Summary
In this article, we learned how to alter an existing table using ALTER TABLE statement. We learned the following use cases with examples.
- Add a column in an existing table.
- Change datatype and length, add constraint in a column, and drop the column.
- The step-step-step process to move the table from default tablespace to different tablespace.
Related Links
Blog: How to alter and drop database objects with Quest® Toad® for Oracle Pro DB Admin
Blog: How to Create an Oracle Database Sequence: Explained with Examples
Blog: Supported Oracle 21c new features in Toad© for Oracle 15.1
Blog: DB performance: 6 benefits from maintaining database health and stability
Blog: SQL query optimization: Level up your SQL performance tuning
Have questions, comments?
Head over to the Toad for Oracle forum on Toad World®! Chat with Toad developers, and lots of experienced users.
Help your colleagues
If you think your colleagues would benefit from this blog, share it now on social media with the buttons located at the top of this blog post.
Start the discussion at forums.toadworld.com