In this article series, we are exploring the capabilities of Oracle Enterprise Manager Cloud Control 13c for the private Database-as-a-Service (DBaaS) cloud – including the setup of such a cloud. In the previous parts, we started the setup of the private DBaaS cloud, including the configuration of the self-service portal. The full procedure includes setting up the Enterprise Manager software library, creating the PaaS infrastructure zones, database pools, and quotas for the users, service templates, and optionally chargeback plans to apply to the users for cloud allocation and cloud usage.
We configured the software library, set up the Enterprise Manager self-update system, and downloaded the latest plug-ins from the external Enterprise Manager store. We created a custom cloud role in Enterprise Manager, and a Cloud SSA user named as "SAI_DAS". Next, we created a PaaS Infrastructure Zone named as “Sainath_PaaS_Zone”, a group of hosts that will be used for Database as a Service. Members (hosts) were added to the PaaS infrastructure zone.
A new database pool was then created – a group of database servers where the database software had been preinstalled, with all servers in the pool belonging to the same platform as well as the same database version. Next, we added our Oracle Home targets to the pool, with each Oracle Home target belonging only to a single database pool. The Placement Policy Constraint “Maximum number of Database Instances per host” was set at 10 instances.
After that, we entered the quotas for the role selected. The Quotas page allows the SSA Administrator to configure the total amount of resources which are allocated to the self-service user via the role. Then we selected Data Sources from the left panel, and on the page that appears, clicked on the Data Profiles tab and created a new profile. In the creation wizard that started, we selected the Reference target as the “saiprod” database. This is the production database that will be used as the master source. We chose to include “Data Content” and “Structure and Data” by creating an RMAN backup from the source database. The profile will be used for the Database-as-a-Service functionality.
We then created a new database profile to be used for the snap clone functionality. We clicked on “Create” in the Data Profiles tab and specified the reference target again as the “saiprod” database, and included the “Structure and Data” by including an “RMAN Database Image” for this new profile, instead of an RMAN backup. This profile will be used for the Database-as-a-Service using the snap clone functionality.
The next step was to create service templates for the database cloud, which can then be used by the SSA User to provision databases in the pool. The profiles created in the previous section are like gold copies of an Oracle database, and they are used by service templates. The service template is what is offered to the SSA user and forms the basis of the functionality of the cloud. We created the service templates by selecting Setup | Cloud | Database and then Service Templates in the left pane, followed by clicking on the Create button. We named the service template as “Sainath 11204 Single Instance Database”. Under the Source Identification section, we selected the Create Database as “Using Profile” and then from the list of profiles, we selected the appropriate profile that was created with an RMAN Full backup.
The other options for Create Database, besides “Using Profile”, are “Using existing Database” and “Using Test Master Snapshot”. Test master snapshots are a snapshot of an RMAN image backup from a production database. Test master snapshots are new in Enterprise Manager 13.1, and can be used to create snap clones. However, these require special storage hardware such as EMC storage array, NetApp storage appliance, Sun ZFS storage appliance, or even the Solaris File System (ZFS). Note that the dNFS file system and CloneDB cannot be used for test master snapshots.
Then, we selected Single instance under the Database Definition. In our case, we specified the SID prefix as “sai” (up to six letters are allowed) and the domain name as “sainath.com”. This can be defined as per company standards, or you may allow the SSA user to specify the prefix at request time. You can also select “Enable Standby Database” for this service template, provided you have already set up the infrastructure for this, and have a standby database pool of servers that you can select at this stage.
Under the section “Pools and Zones”, we clicked on Add and selected the previously created “Sainath_PaaS_Zone”. Then, we clicked on “Assign Pool” and selected the Sainath_Database11204_Pool to be assigned to this zone. The self-service databases will be created in this pool.
In the Placement section, there are two possibilities. The provisioning of the database on the host can be selected by the “placement algorithm”, or selected by the user during request. The placement algorithm is controlled by the placement constraints that have been configured in the PaaS infrastructure zone we have selected. The two constraints, Maximum CPU Utilization (%), and Maximum Memory Allocation (%), have been set to 95% in our case.
The placement algorithm is also influenced by the placement policy constraint specified in the database pool; i.e., the maximum number of database instances per host, which has been specified as 10 in our case. The algorithm looks at all these factors and decides which member of the zone should be used for the creation of new services. In our case, there is just one host, but if the algorithm returns false for that host, no new service will be created.
If “selected by the user during request” is used, then the algorithm doesn’t decide on the member, the human user makes that decision. However, the constraints will still apply. If there are multiple hosts in the pool and the human user selects a host that is already over-utilized, the creation of the new service will not work.
The Database details step then appeared. On the Database details page, we selected File System for both the Storage Type and Fast Recovery area (FRA). Put the Fast Recovery Size as 6000 MB. Tick “Enable Archiving”.
It is important to configure the FRA and enable archiving if you want SSA users to schedule database backups and perform restores by themselves. This puts the onus of power right in the hands of the SSA user, and they need to use this power responsibly and wisely for the sake of their own databases.
For the Listener port, we entered the port number that should be associated with the new database. If you are provisioning an 11.2 or later RAC database, you must specify the scan port number. On the same page, you need to enter the passwords you want to use for the administrative users (SYS, SYSTEM and DBSNMP) in a self-service created database. Note that as the SSA Administrator, you are currently creating the service catalog entry for the database, and once the SSA user has created a database using your service catalog, these logins can then be used by you to manage the database. The SSA User will have no access to these passwords. Since this is a demo system, we select “Use the same password”; otherwise, we would use different passwords for a production or test system.
In the “Master Account Privileges” section, name the Master Account role as “saimaster_role”. This role will be granted to the master account that is specified by the SSA user when creating the self-service database. There is a list of privileges that will be granted to the role. You can modify this list depending on your company requirements – for example, if you feel that the SSA master account should not have privileges like “Create any directory”, you can remove that privilege. On the other hand, if you want to add more privileges, you can do so. In our case we have added the “select any table” privilege to the role in addition to the existing privileges. This can be done if the requirement is that the master account role should be able to select any data from any table in the database.
On the Initialization parameters page that appears next, simply select the “Database Sizes” that the service template will support. These are the pre-created sizes we had created in an earlier section in this article series. The limits for each size are also displayed. You can choose to include all of the sizes or only some of them in each template.
This gives the SSA user SAI_DAS an option as to which database size to select. Click on “Set as Default” to make one the database sizes the default, so that it is the first choice for the SSA user when this service template is selected at the time of self-service database creation.
The initialization parameters for the database can also be edited on this page. However, note that the “Database Size” that is selected by the SSA user at request time will override the corresponding initialization parameters such as sga_target, pga_aggregate_target, processes and cpu_count parameters. The Storage GB, as explained before, is not a hard limit on the database but only used for thresholds and alerts.
Click on Next. The Customization page appears (Figure 26).
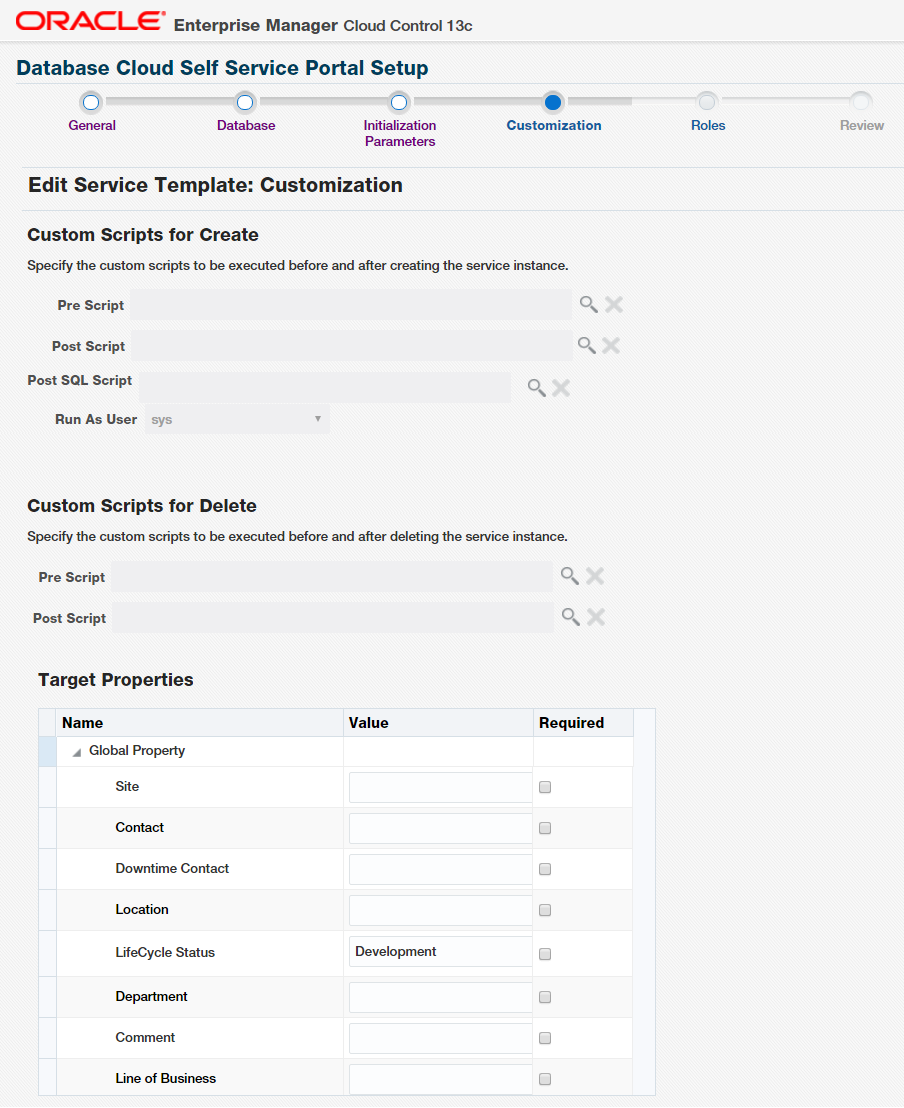
Figure 26: Customization for Service Template
We will continue in the next part of this article series.
Start the discussion at forums.toadworld.com