In this article we will learn how Toad for Oracle can help us debug PL/SQL code in very simple ways, allowing us to go through the code a line at a time, view variable content, start or stop execution of code, step in or out of called PL/SQL routines (such as functions and other called procedures) and finally, change the contents of a variable during execution.
In addition, we will work with the Toad Auto Debugger that inserts and removes output commands (DBMS_OUTPUT) for all expressions that are within our PL/SQL code.

Minimum Requirements from Oracle Databases to use Toad’s code debugging
To debug PL/SQL code using Toad for Oracle and in all Oracle databases, we must first have installed Oracle Probe API v2.0 or later.
To verify the version of Oracle Probe API, we must do the following:
- Ensure that there is a package called DBMS_DEBUG in the SYS schema.
- Know which version of Probe API we have within our schema. Then, we execute the following anonymous PL/SQL block in the SQL Editor with an enabled DBMS output window tab:
declare
probe_major_ver varchar2(10);
probe_minor_ver varchar2(10);
begin
dbms_debug.probe_version(probe_major_ver, probe_minor_ver);
dbms_output.put_line('MAJOR=' || probe_major_ver);
dbms_output.put_line('MINOR=' || probe_minor_ver);
end;
If the output of the DBMS Output shows:
MAJOR = 2
MINOR = 2
Then the version of Oracle Probe API that we have is 2.2.
- In addition, we must have the privilege DEBUG CONNECT SESSION or Oracle will not allow us to use DBMS_DEBUG.
grant DEBUG CONNECT SESSION to <my_schema>
Loopproc Procedure
For the demonstration of how to debug PL/SQL code, we are going to use the sample code included in the tool.
We select from the Menu Help –> Contents and in the Search box we enter loopproc, which is a very simple process without dependencies that allows us to perform the tests.
We select Debugging a Procedure or Function Tutorial to see the loopproc procedure code and store it in our schema.
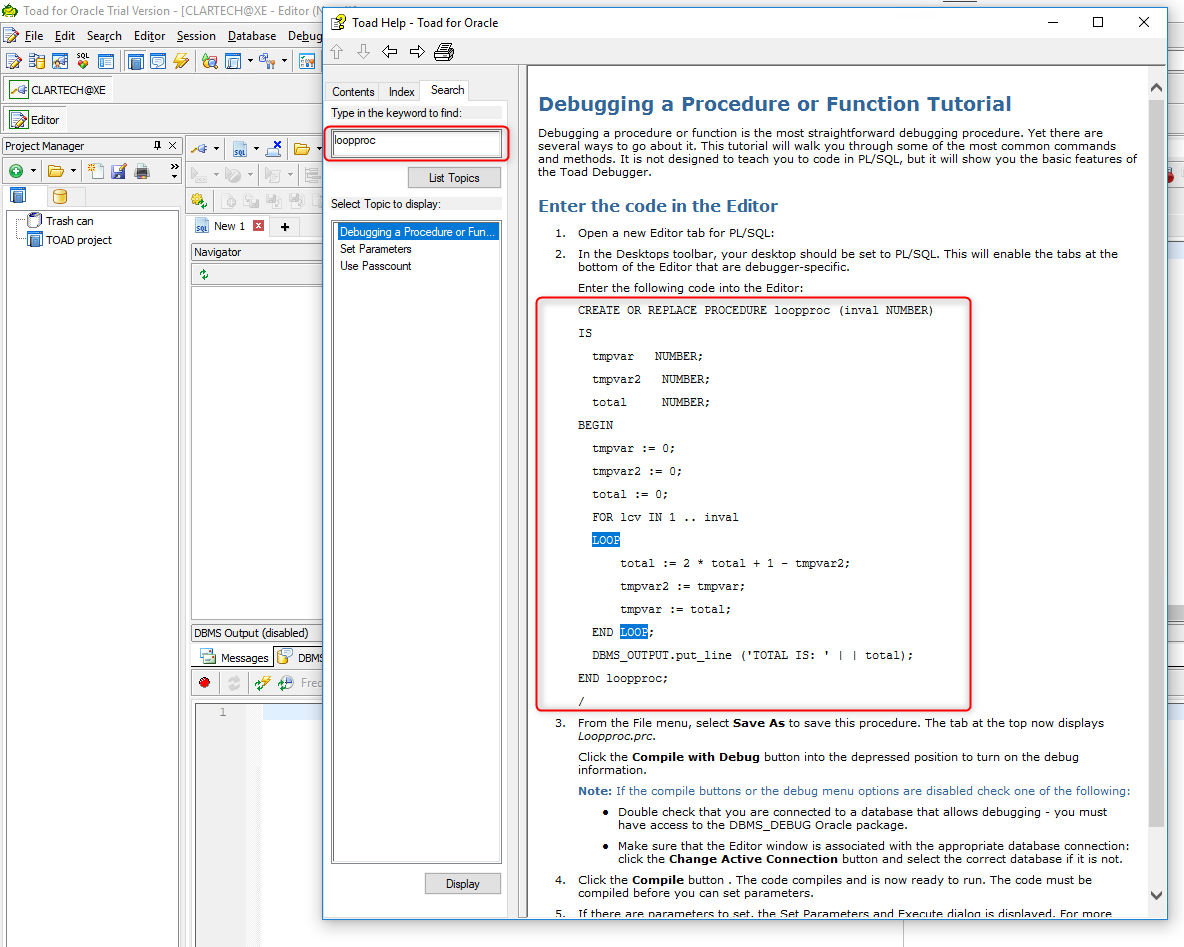
CREATE OR REPLACE PROCEDURE loopproc (inval NUMBER)
IS
tmpvar NUMBER;
tmpvar2 NUMBER;
total NUMBER;
BEGIN
tmpvar := 0;
tmpvar2 := 0;
total := 0;
FOR lcv IN 1 .. inval
LOOP
total := 2 * total + 1 – tmpvar2;
tmpvar2 := tmpvar;
tmpvar := total;
END LOOP;
DBMS_OUTPUT.put_line ('TOTAL IS: ' || total);
END loopproc;
/
The only consideration to make is that we need to remove the blank space within the concatenation operator (highlighted in yellow) because if we do not, the code will show error when saving.
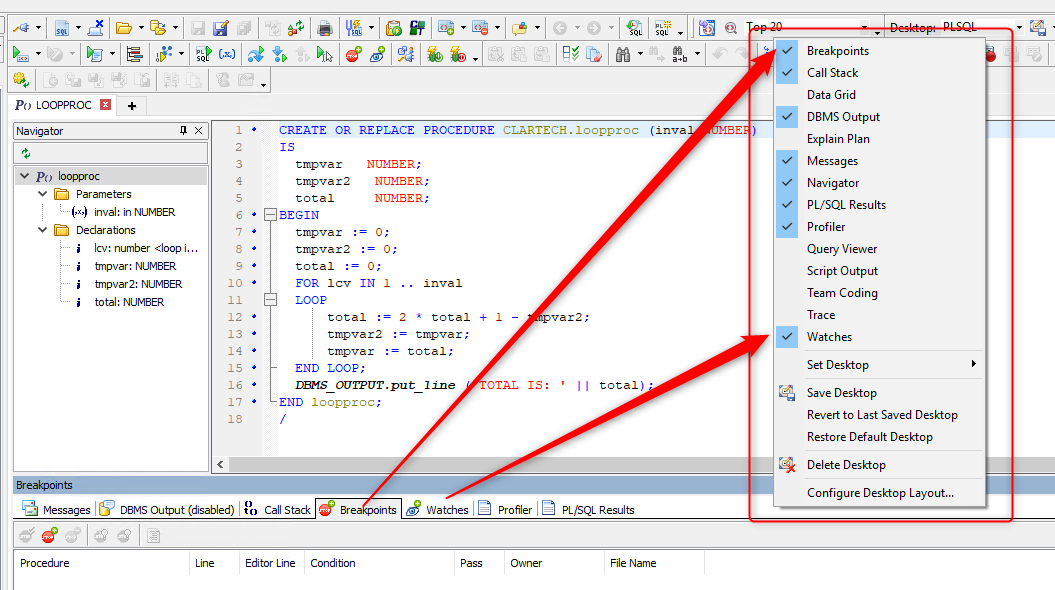
Once we have the procedure opened in our editor, it is necessary to know that in the lower part of our screen we can see different tabs which we will need enabled for this demonstration. The tabs required for this demonstration are Watches and Breakpoints.
To see these tabs, we simply click with the right mouse button on any of the enabled tabs so that a pop-up menu opens with options that we can check which will allow us to see the lower tabs.
Debug the PL/SQL Procedure
Although this procedure is very simple, it is still perfect for learning how to debug any PL/SQL code with Toad for Oracle.
To begin, we click on the Debug Menu –> Trace Into
The following confirmation message is displayed:
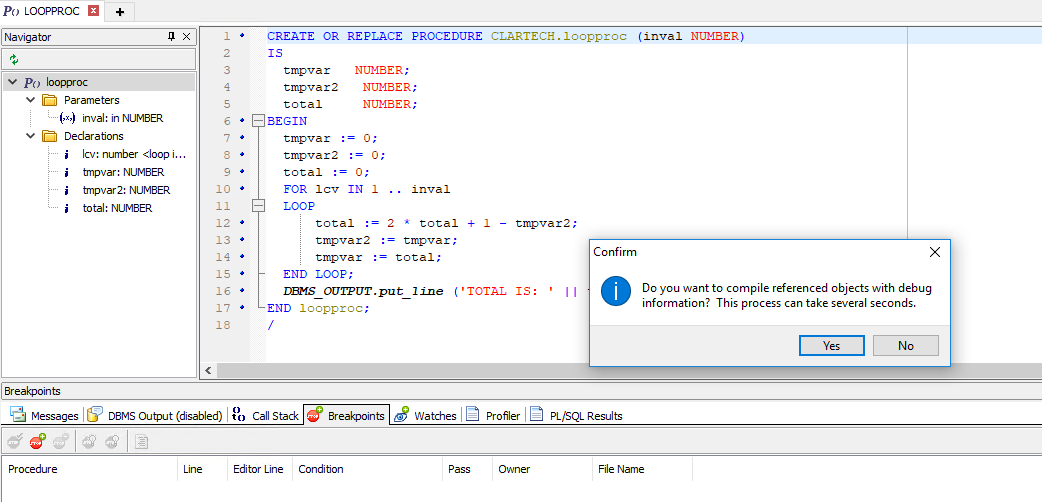
…which asks us if we want to compile the objects referenced with debugging information. Since in this code we do not have any object referenced, we click on the button No.
Another window called Set Parameters and Execute is shown in which we can configure the parameters and execute them.
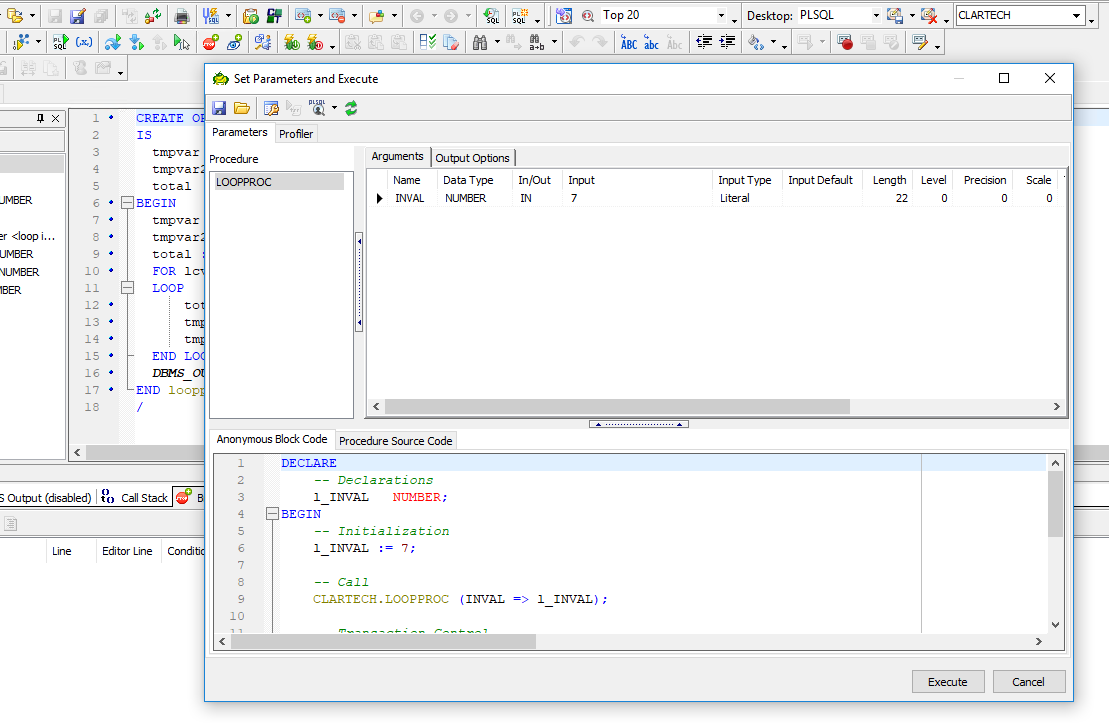
In the Arguments tab we will have all the parameters required to execute our procedure.
In order to modify the input of the parameter, we select the input cell that we want to modify and a calculator display appears in the case that it is numeric.
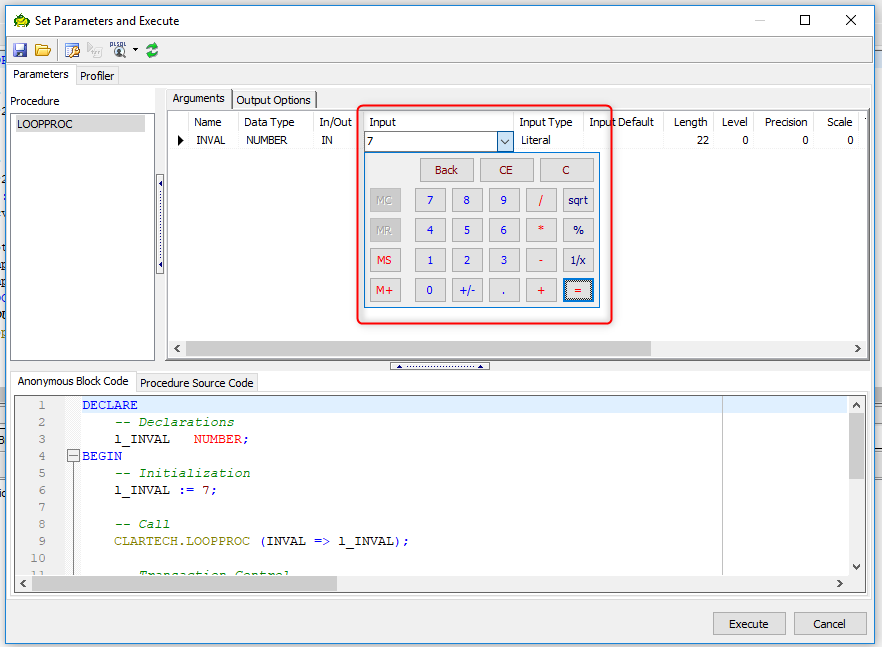
Enter the test value; for example, 9.
In the Output Options tab, we select the option Fetch into memory (view in grid) which automatically shows us the information of the data, in the case that we have a referential cursor in our code.
We click on the Execute button.
Now the debugging process begins; as we can see in the Watches tab, the initial information that each of the variables declared in our procedure takes. In this debugging stage we can go step by step or instruction by instruction on our code by clicking the Step over icon of the Execute toolbar.
To enable Smart Watches and see the results of each iteration, we have to click on the Enable Smart Watches control box in the Watches tab.
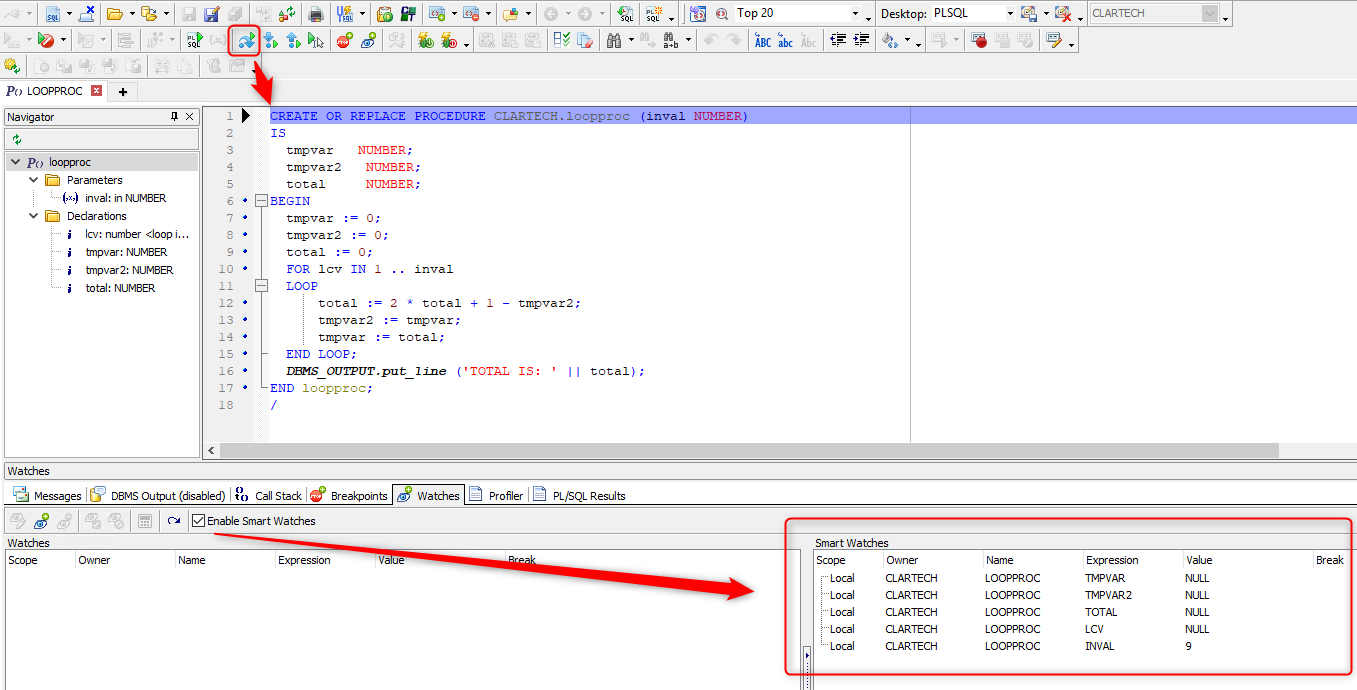
When we go through the code and enter the loop, we can see how the variables change their value in the Smart Watches. Also, if we want to see the value of each variable in particular, we can position ourselves above the variable in the PL/SQL code and see its current value.

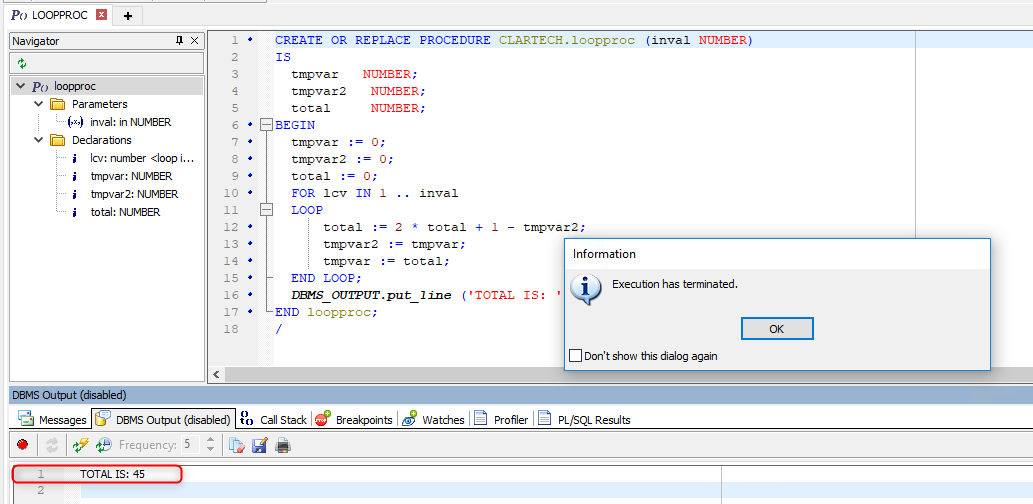
After finishing the loop and fulfilling the exit condition of the loop, the execution is finished by presenting an information message, which can be disabled by clicking on the check to not show this dialog again.
In the tab DBMS Output, we can see the result of the variable TOTAL in 45 having entered as the initial value of the variable INVAL in 9.
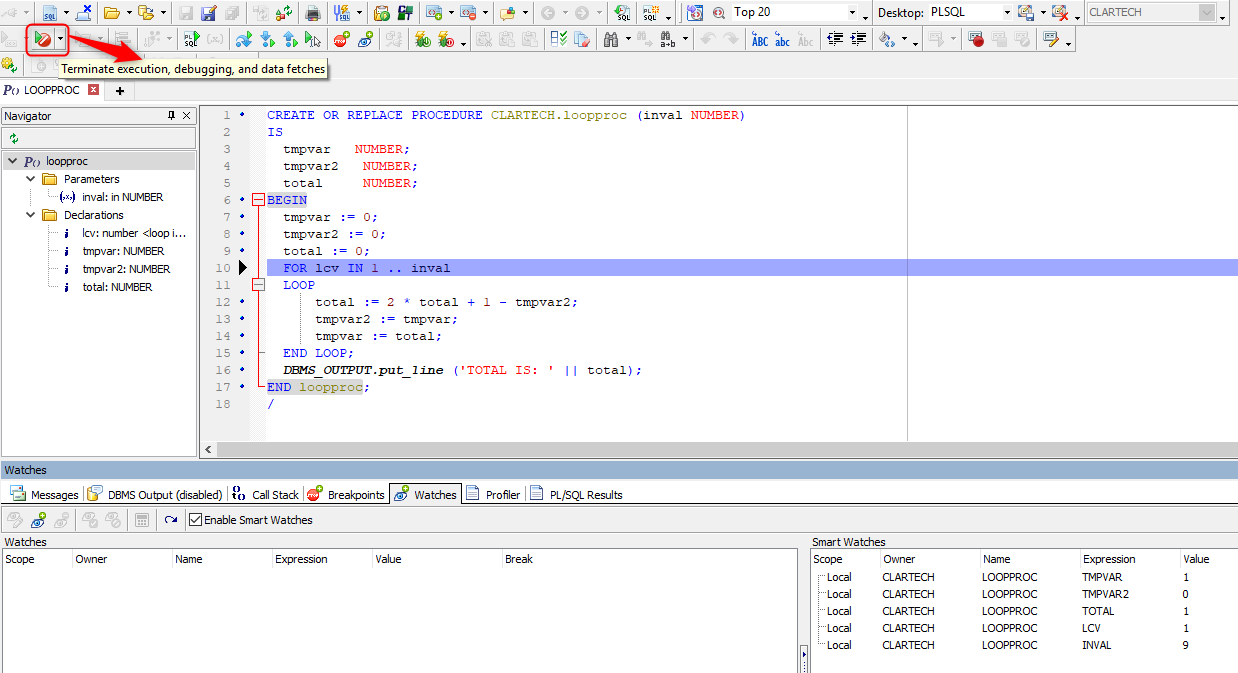
Once the debug execution is finished, the Watches tab will not show any variables.
If in the middle of executing the procedure we want to stop the debugging, we click on the icon Terminate execution, debugging, and data fetches.
Breakpoints
A breakpoint is a location in the code that you identify as a stop point. When the code is executed in debug mode, the execution will stop at the breakpoint.
This helps us developers see the current values of the variables in our PL/SQL code while it is running.
To insert a breakpoint in our code we click on the margin of the line of code where we want the code to stop when debugging starts. For example, enter the breakpoint in the margin of line 12 and the Toad will mark the entire line in red with a stop icon.
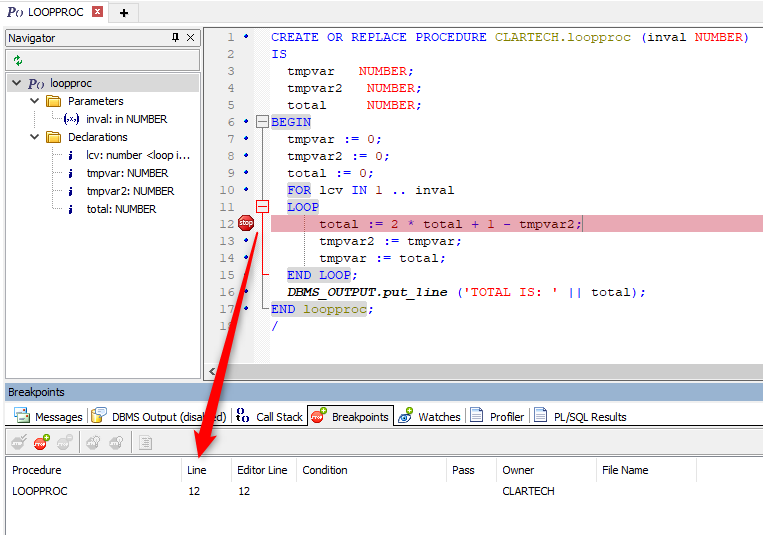
In the Breakpoints tab, all the interruption points that we have enabled in our code will be listed.
We can add conditions at our breakpoints.
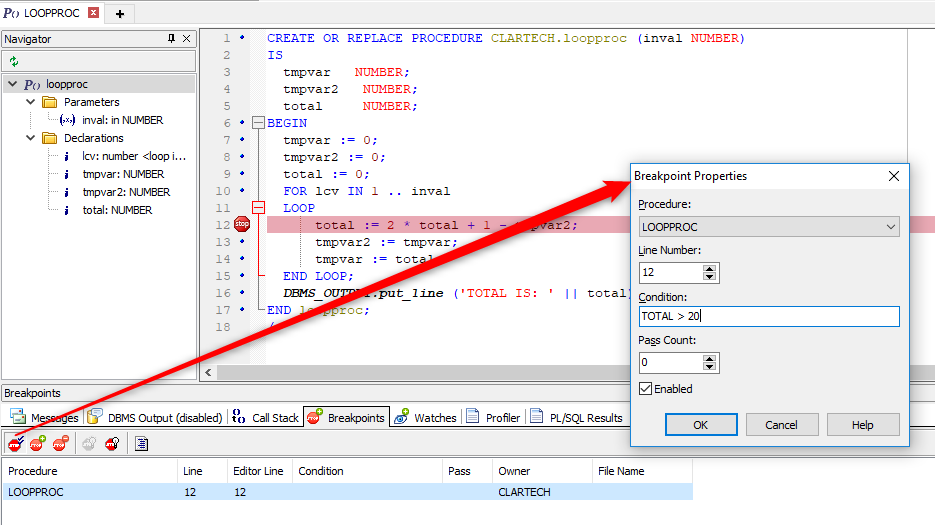
In this demonstration we are going to add a condition that the Total variable is greater than 20. To do this, we select the breakpoint from the grid; the icons that become enabled are: Edit, Add, Delete, Disable, and View Source.
We click on the Edit button. A modal window opens and we enter the condition TOTAL > 20 and click on the OK button.
This means that the code will be executed until the TOTAL is greater than 20. The debugging will then stop at the breakpoint on line 12.
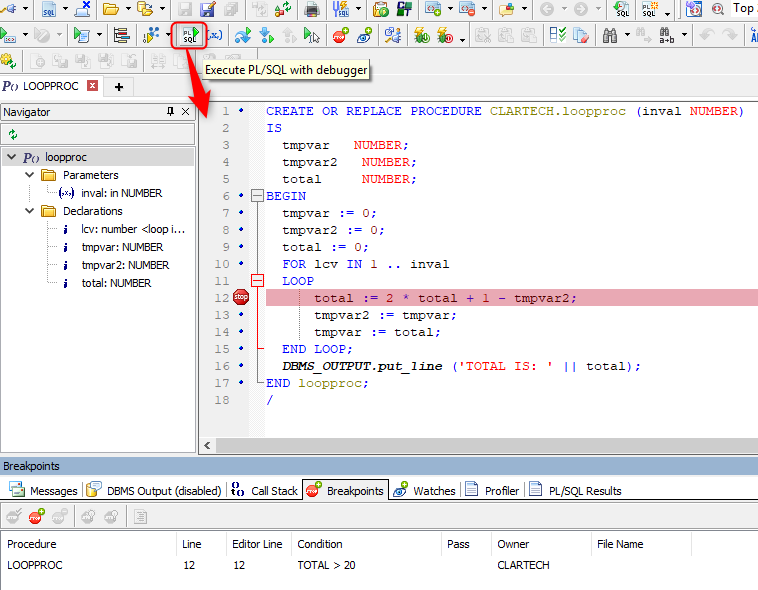
Once the breakpoint is established, we execute the code by clicking on the Execute PL/SQL with debugger icon.
Enter the value of the INVAL variable in 7 and click on the Execute button.
The code is executed until the condition of the breakpoint is met and line 12 changes from color red to color blue.
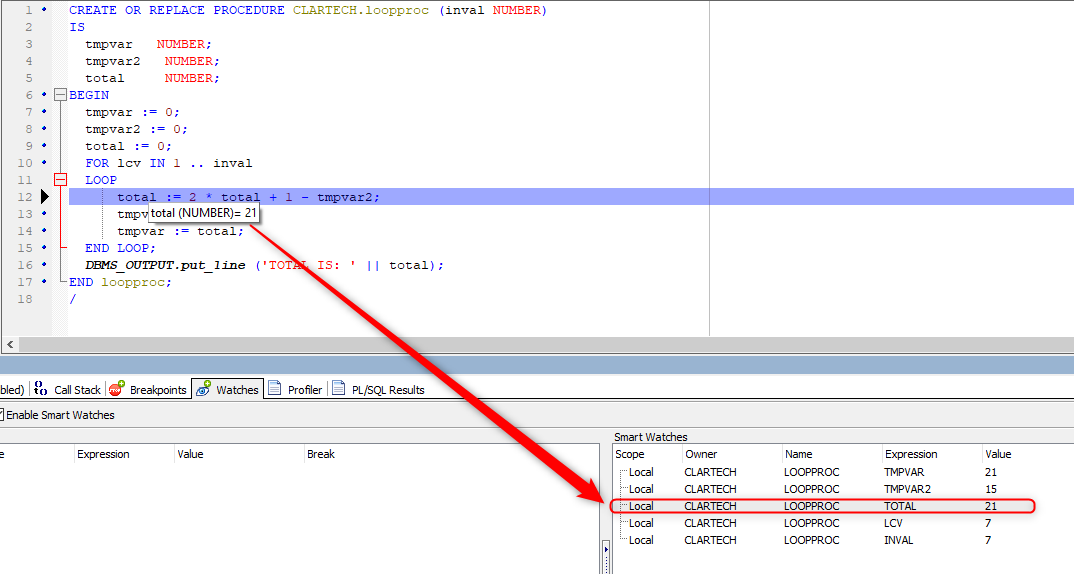
Since the value of the TOTAL variable is greater than 20, the debugging stops, and in the Watches tab we can see all the current values of the variables.
From this point on, we can continue executing the code with the Step over until the debugging finishes.
Change the Values of the Variables Live
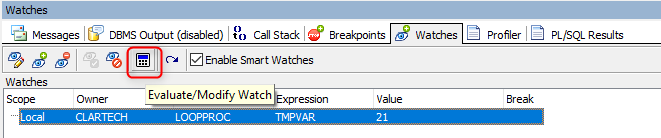
It may also happen that we need to change the values of the variables live. To do this, for example, from the Watches tab we select the variable TMPVAR from the box on the right, and then click on the icon Add Watch on the box on the left.

Select the new watches and click on the Evaluate/Modify Watch icon.
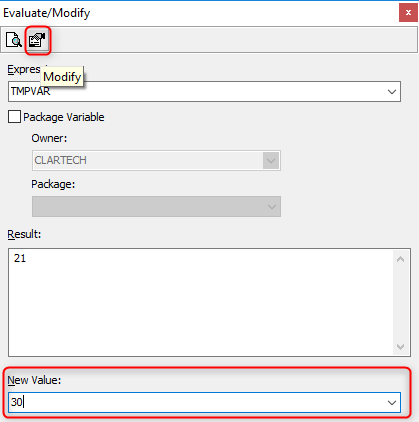
The popup window that allows us to modify the value of the variable TMPVAR is opened, and in this case, we can see that the result is 21. We enter the new value, for example 30, and we click on the Modify icon and close the window.
Immediately we can see in the Smart Watches the change of the value of the variable TMPVAR to 30.
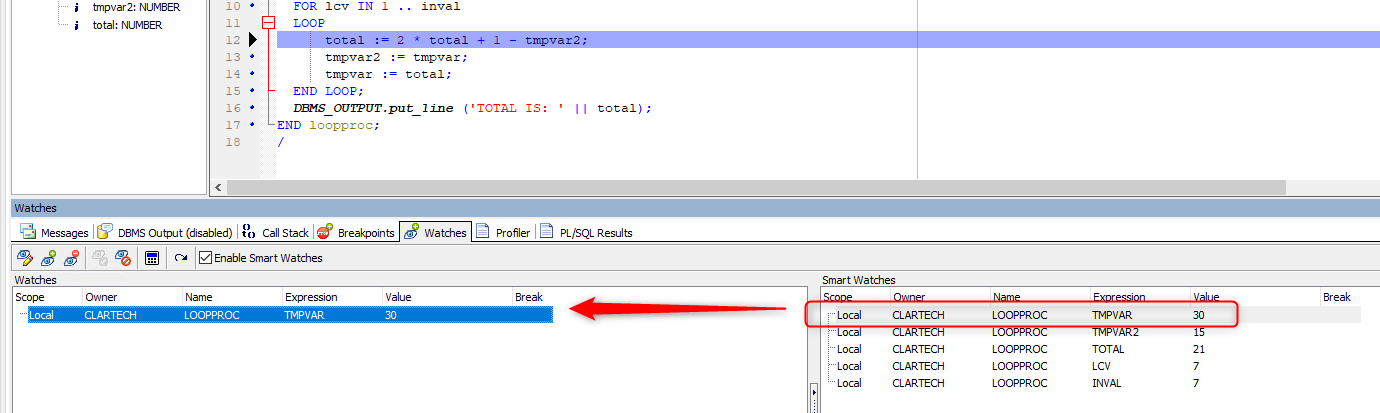
And we can continue to debug our code with the Step over and see the changes that occur in the different variables from the Smart Watches.
To eliminate the interruption point, click on the stop icon in the margin of line 12.
Work with Auto Debugger
To work with the auto debugger provided by Toad, we click on the icon Insert Auto Debugger output statements.
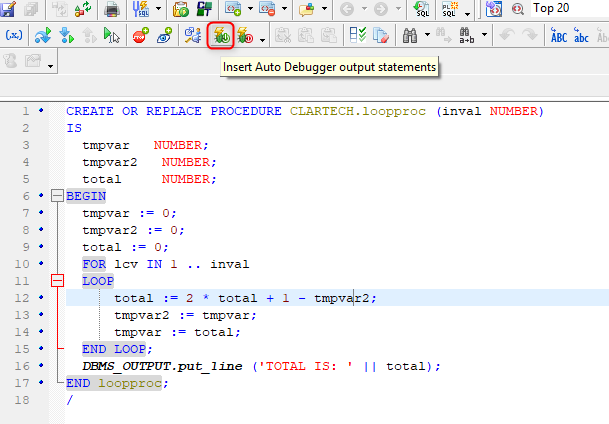
This functionality inserts lines of DBMS_OUTPUT.PUTLINE () code for each of our variables within our PL/SQL code:
CREATE OR REPLACE PROCEDURE CLARTECH.loopproc (inval NUMBER)
IS
tmpvar NUMBER;
tmpvar2 NUMBER;
total NUMBER;
BEGIN
— <Toad_79425423_1> *** DO NOT REMOVE THE AUTO DEBUGGER START/END TAGS
DBMS_OUTPUT.PUT_LINE('{Toad_79425423_1}');
DBMS_OUTPUT.PUT_LINE('{Toad_79425423_1}[— 1 —]');
DBMS_OUTPUT.PUT_LINE('{Toad_79425423_1}');
DBMS_OUTPUT.PUT_LINE('{Toad_79425423_1}[1] inval = ' || inval);
DBMS_OUTPUT.PUT_LINE('{Toad_79425423_1}[1] tmpvar = ' || tmpvar);
DBMS_OUTPUT.PUT_LINE('{Toad_79425423_1}[1] tmpvar2 = ' || tmpvar2);
DBMS_OUTPUT.PUT_LINE('{Toad_79425423_1}[1] total = ' || total);
— </Toad_79425423_1>
tmpvar := 0;
— <Toad_79425423_2> *** DO NOT REMOVE THE AUTO DEBUGGER START/END TAGS
DBMS_OUTPUT.PUT_LINE('{Toad_79425423_2}');
DBMS_OUTPUT.PUT_LINE('{Toad_79425423_2}[— 2 —]');
DBMS_OUTPUT.PUT_LINE('{Toad_79425423_2}');
DBMS_OUTPUT.PUT_LINE('{Toad_79425423_2}[2] inval = ' || inval);
DBMS_OUTPUT.PUT_LINE('{Toad_79425423_2}[2] tmpvar = ' || tmpvar);
DBMS_OUTPUT.PUT_LINE('{Toad_79425423_2}[2] tmpvar2 = ' || tmpvar2);
DBMS_OUTPUT.PUT_LINE('{Toad_79425423_2}[2] total = ' || total);
— </Toad_79425423_2>
tmpvar2 := 0;
— <Toad_79425423_3> *** DO NOT REMOVE THE AUTO DEBUGGER START/END TAGS
DBMS_OUTPUT.PUT_LINE('{Toad_79425423_3}');
…
…
…
END loopproc;
/
When executing this code by clicking on the Execute PL/SQL with debugger icon, a message will appear that we have to previously compile the procedure, so we click on the Yes button.
Then a message appears asking if we want to compile referenced objects, so we click on No because we don’t have objects referenced in our procedure.
Enter the value of the INVAL parameter; for example 5, and click on the Execute button.
Immediately upon completion of debugging, a new tab is added within the DBMS Output tab called Auto Debugger <number> which shows the value of each variable for each iteration.
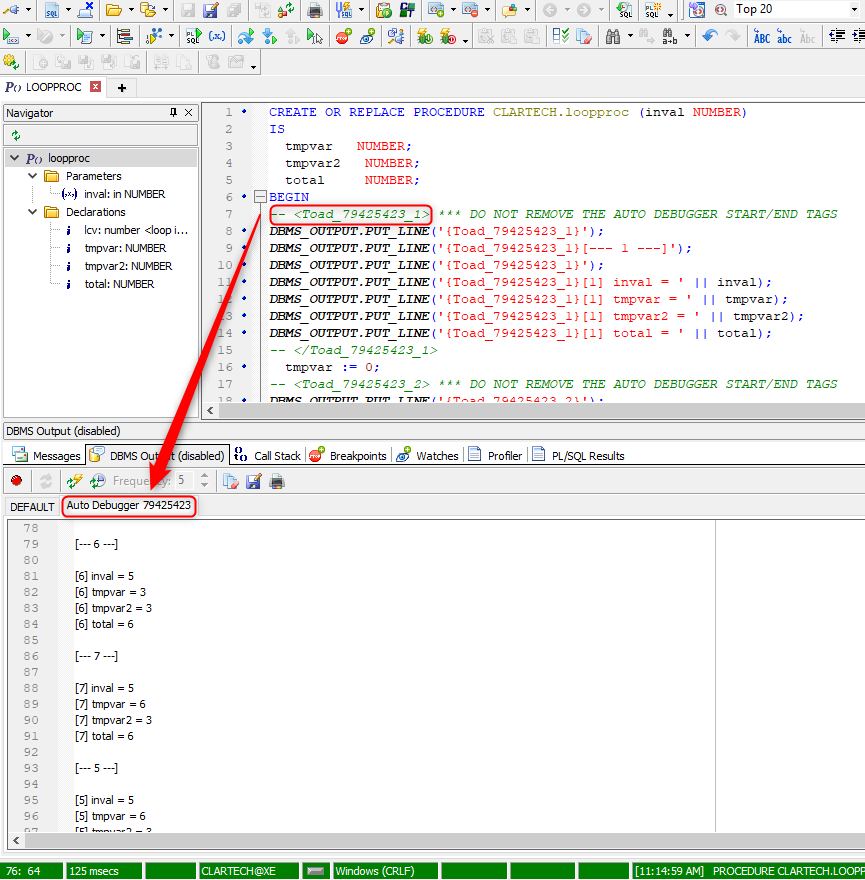
If we want to know in which sector of the PL/SQL code the variable [7] tmpvar = 6 is shown, we simply double-click on the variable inside the Auto Debugger tab and in this way the place where the variable is referenced is highlighted in the PL/SQL code.

To disable the Auto Debugger and remove all the tags from our code, click on the Remove Auto Debugger output statements icon.

Conclusion
We have gone through the different features that Toad provides us with to debug our PL/SQL codes. I invite you to use this great functionality and comment on how you are using it in debugging your PL/SQL codes.
Most Fortune 500 companies choose ToadTool for Oracle Application Developers, more widely known as Toad®, was designed by Oracle developer, Jim McDaniel, to make his job easier. It was so helpful that Jim decided to share it. Fast forward to more than 20 years later, Toad is a trusted tool used in most Fortune 500 companies and across the globe. There are many reasons why people buy Toad rather than staying with the “free” SQL Developer tool Oracle offers. One main reason developers and DBAs choose Toad for Oracle is to reduce time and effort to develop and manage Oracle databases. But did you know that with Toad for Oracle you can automate administration tasks and proactively manage your databases while embracing performance optimization and risk mitigation? Did you know Toad can now find and control sensitive data across all your Oracle databases? What else can Toad do that you didn’t know about? Which edition will benefit you the most? We’re so confident that you will love Toad, we’re offering ourtop 2 editions to you to try for free for 30 days.
|

Start the discussion at forums.toadworld.com