SharePlex is a database replication tool for replication in real-time. SharePlex does not incur a downtime for the source database, which makes it suitable for a high availability environment. SharePlex supports Oracle and SQL Server as source databases. SharePlex supports Oracle database’s different versions (10g, 11g, 12c) and editions (Standard and Enterprise) in different setups (single-instance, cluster, remote, cloud) and environments (ASM, RAC, Exadata). For replicating Oracle database data, SharePlex supports several data sources as target in addition to Oracle database – MySQL, SQL Server, PostgreSQL, EDB (EnterpriseDB) Postgres Advanced server, SAP Adaptive Server Enterprise (ASE), Teradata, JMS queues, SQL and XML file, and Apache Kafka. For replicating SQL Server the only supported target data sources are SQL Server and Oracle database.
In this tutorial we shall discuss using Toad for Oracle for database management with SharePlex. We shall replicate Oracle Database 12c running on Windows 2012 on AWS. To demonstrate Oracle database replication we shall replicate a table to another table in the same Oracle database instance. We shall use Toad for Oracle for the following database administration tasks.
- Set DBA User (SYSTEM) Password
- Enable Minimal Supplemental Logging
- Explore Database Schemas and Tables created by SharePlex
- Add Data to a SharePlex Demo Source Table
- Explore Replicated Data in a SharePlex Demo Target Table
This tutorial has the following sections.
- Setting the Environment
- Installing Oracle Database 12c
- Enabling Minimal Supplemental Logging in Oracle Database
- Running SharePlex Database Utility for Oracle Database
- Exploring the Shareplex Database Schemas and Tables
- Creating a SharePlex Configuration File
- Activating the Configuration File
- Adding Data to Shareplex DEMO_SRC Oracle Database Table
- Listing Replicated Data in DEMO_DEST Table
- Deactivating the Replication
Setting the Environment
SharePlex supports various distributions of Windows, Linux, AIX, HP-UX and Solaris. We shall be using Windows 2012 R2 installed on AWS EC2. For AMI choose the 1-Click Secured Windows File Server on Windows 2012 R2 shown in Figure 1.

Figure 1. Selecting an AMI
An EC2 instance for Windows 2012 is shown in the Dashboard in Figure 2.
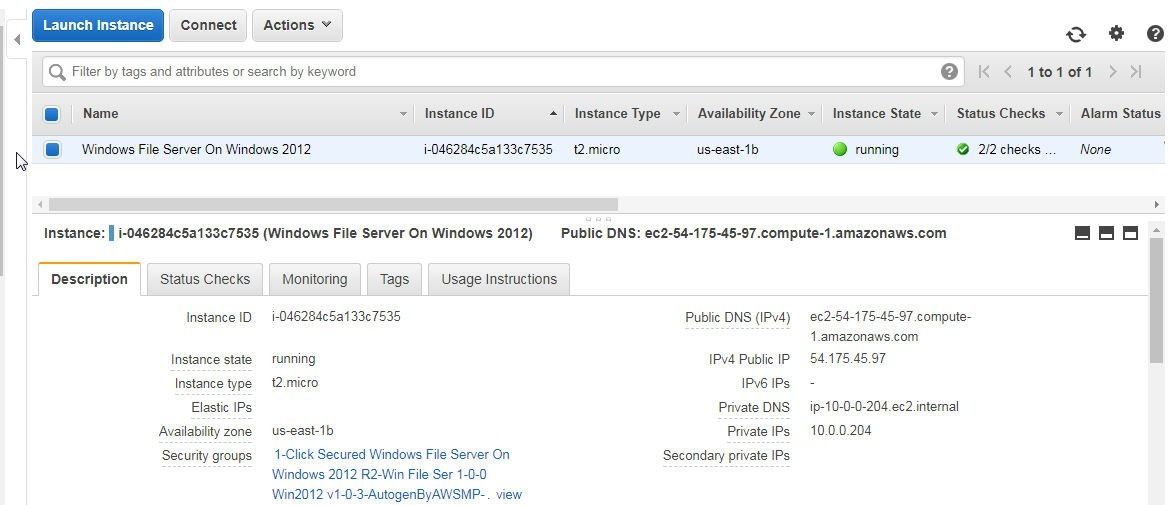
Figure 2. EC2 Instance running Windows 2012
Next, configure the Security Group associated with the EC2 instance to allow All Inbound/Outbound traffic if not already configured when launching the instance. If the EC2 instance is required to connect with database instances running remotely, the Inbound/Outbound rules need to be configured.
The Chrome RDP (Remote Desktop) is used to access a remote Windows instance running on EC2 from a local Chrome browser. To install Chrome RDP, search for “Chrome RDP” on Chrome Web Store. Click on Add To Chrome as shown in Figure 3.

Figure 3. Installing Chrome RDP
The following software must be installed on the Windows 2012 instance on AWS.
- SharePlex 9.0 for Windows 2003, 2008, 2012, 2012R2 (Oracle 10gR2 to 12c and SQL Server 2008R2, 2012)
- Oracle Database 12c R2
- Toad for Oracle (Toad for Oracle Developer Edition or Toad for Oracle DBA Edition)
The Windows 2012 running in a Chrome RDP (Remote Desktop) is shown in Figure 4.
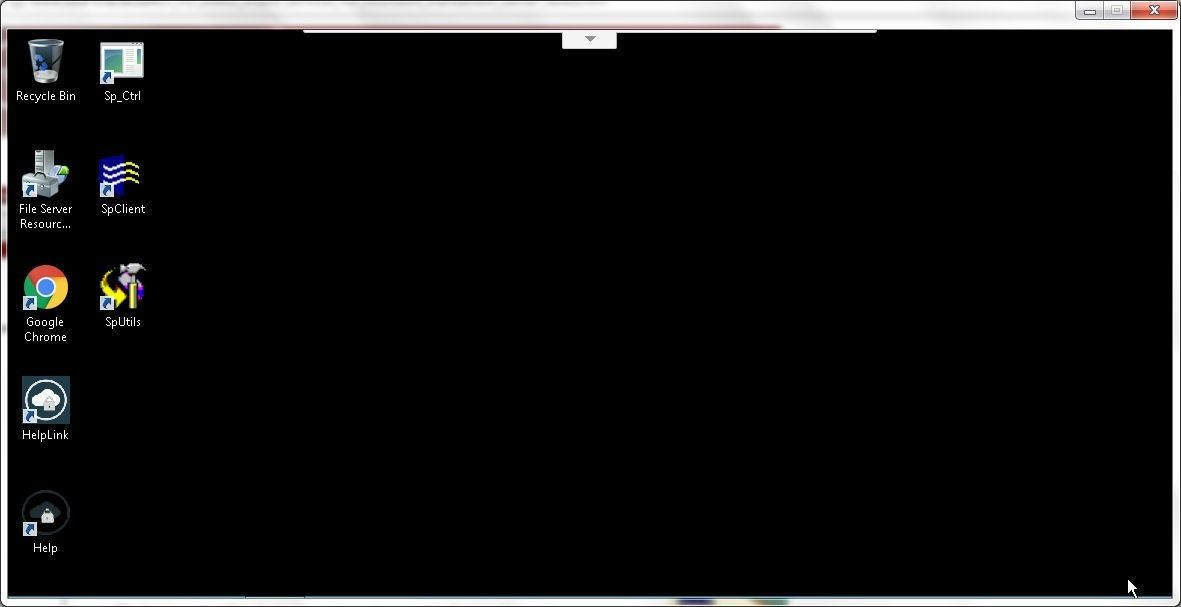
Figure 4. Chrome RDP (Remote Desktop) for Windows 2012
Installing Oracle Database 12c
Download Oracle Database 12c R2 (12.2.0.1.0) for Windows (x64) winx64_12201_database.zip from http://www.oracle.com/technetwork/database/enterprise-edition/downloads/oracle12c-windows-3633015.html as shown in Figure 5.
Figure 5. Downloading winx64_12201_database.zip
Extract the zip file to a directory (C:Oracle). To install Oracle Database 12c double-click on the setup application in the database directory as shown in Figure 6.
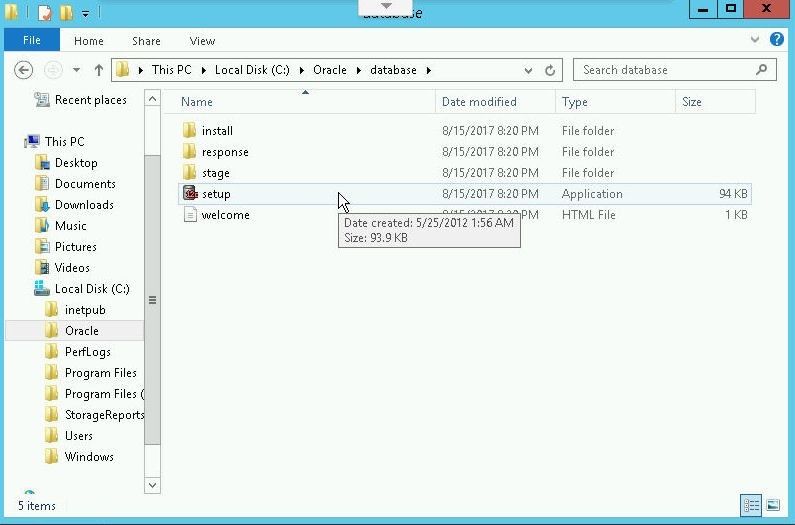
Figure 6. Using the setup Application to install Oracle Database 12c
Install Oracle Database with the Oracle Universal Installer. In Installation Option select Create and configure a database. In System Class choose Desktop Class. In Oracle Home User choose Use Virtual Account. The parameter or setting that we shall be using to connect to Oracle Database from SharePlex is the database name. The Global database name is set to orcldb as shown in Figure 7.
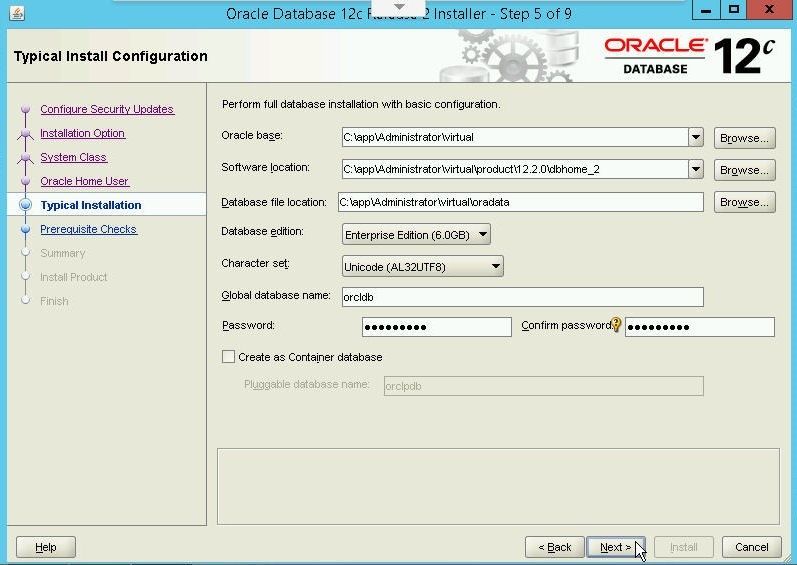
Figure 7. Global Database Name is orcldb
After the Prerequisite checks, a Summary of the installation gets displayed. Click on Install as shown in Figure 8.
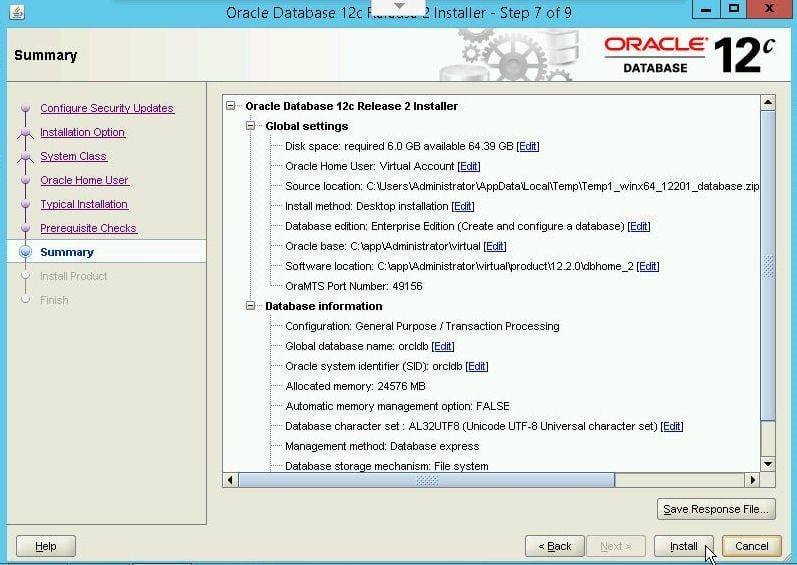
Figure 8. Install
Oracle Database 12c gets configured and installed, as shown in Figure 9.
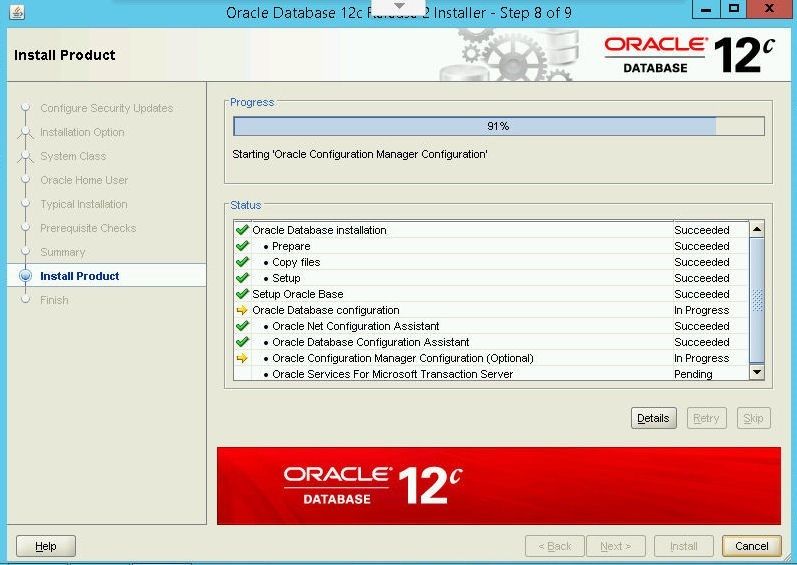
Figure 9. Configuring and Installing Oracle Database
Oracle Database gets installed, as shown in Figure 10.
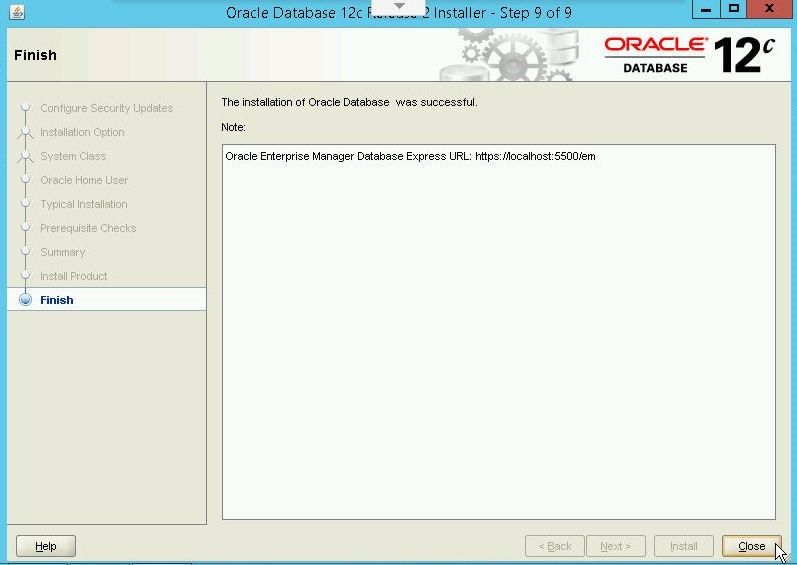
Figure 10. Oracle Database Installed
In a subsequent section we shall use the SharePlex Database Utility for Oracle (ora_setup) to configure Oracle Database to be used with SharePlex. When the ora_setup utility is run, an Oracle user needs to be provided; and we shall use SYSTEM user. To be able to use the SYSTEM user we need to set a password for the user and open the account. To update the SYSTEM user login with user SYS as SYSDBA with Toad for Oracle. First, add a Login Record for SYS user in Toad for Oracle as shown in Figure 11.
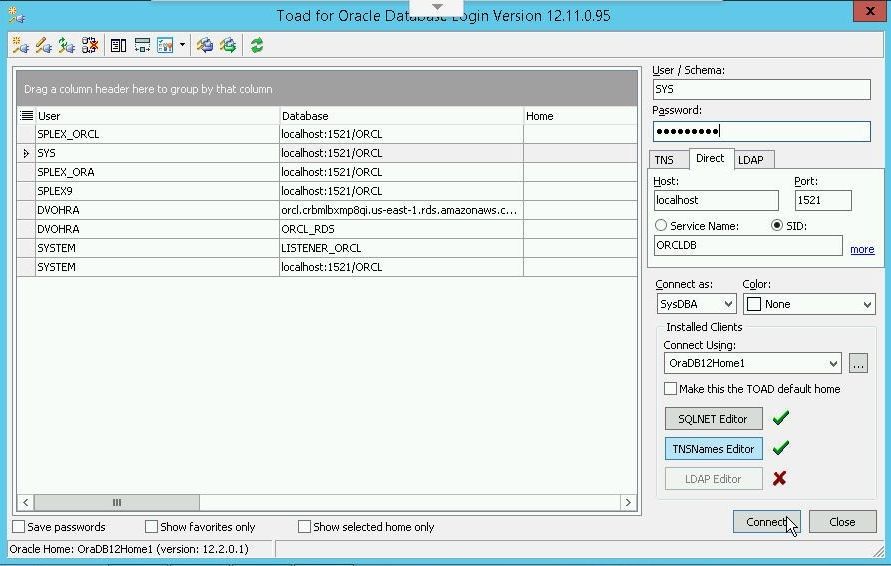
Figure 11. Connecting with User SYS AS SYSDBA in Toad for Oracle
A connection for user SYS gets added, as shown in Figure 12.

Figure 12. Connection Added for User SYS
Open a SQL Editor and add the following command to set password for user SYSTEM and unlock the account.
ALTER USER SYSTEM IDENTIFIED BY <PASSWORD> ACCOUNT UNLOCK
Click on Execute as script as shown in Figure 13.
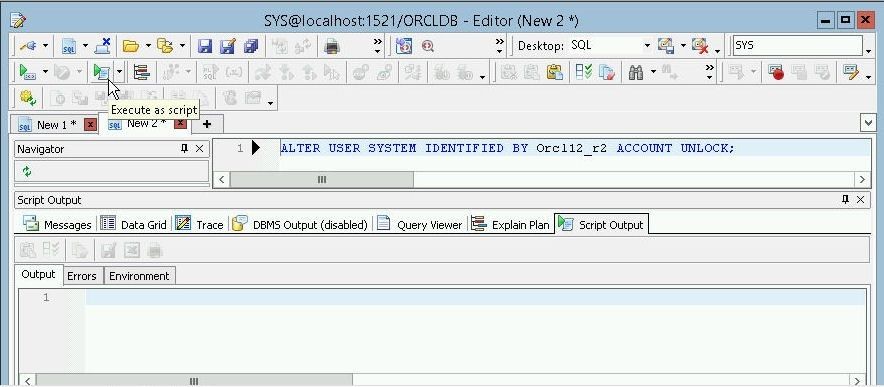
Figure 13. Execute as Script
The SYSTEM user gets modified, as shown by the output User altered in Figure 14.
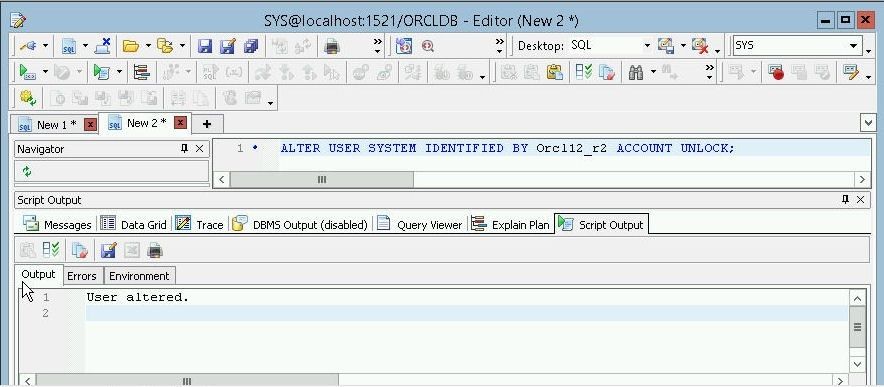
Figure 14. Setting Password for SYSTEM User
To be able to run the ora_setup database utility for Oracle Database we also need to install the Oracle Instant Client for Microsoft Windows (x64). Download and extract the instantclient-basic-windows.x64-12.2.0.1.0.zip. Copy the directory path for the directory in which the Oracle Instant Client for Microsoft Windows (x64) zip file is extracted and add the directory path at the beginning of the PATH environment variable. (The directory path should have sub-directories VC10, VC11, VC12).
Enabling Minimal Supplemental Logging in Oracle Database
For Oracle database replication the Oracle minimal level supplemental logging needs to be enabled. First, find whether minimal supplemental logging is already enabled with the following command in a SQL Editor.
SELECT supplemental_log_data_min FROM v$database;
The output is No, as shown in Figure 15.
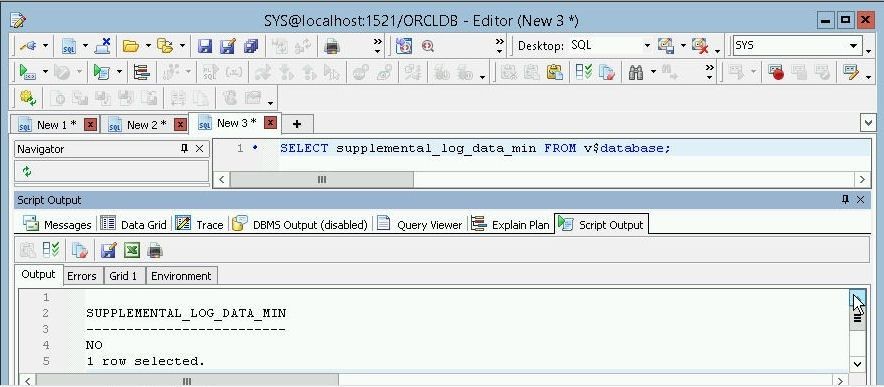
Figure 15. Oracle minimal level supplemental logging is not enabled
Enable the Oracle minimal supplemental logging with the following command.
ALTER DATABASE ADD SUPPLEMENTAL LOG DATA;
Click on Execute script to run the command and the output Database altered should get displayed, as shown in Figure 16.
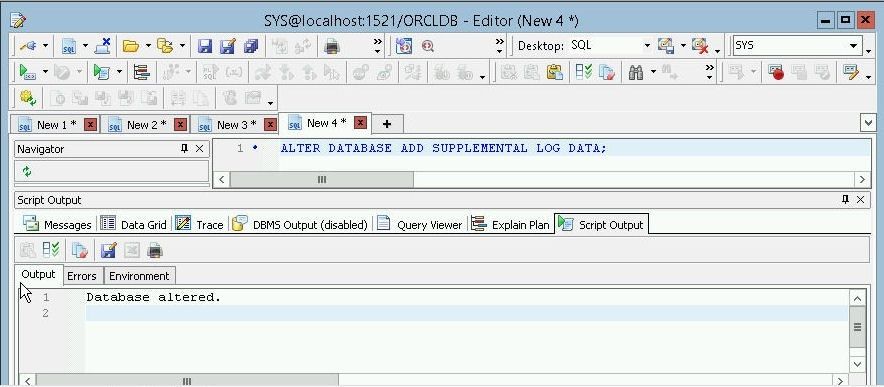
Figure 16. Adding Minimal Supplemental Logging
Subsequently, run the command to find whether minimal supplemental logging is enabled again. The output is YES, as shown in Figure 17.

Figure 17. Oracle minimal level supplemental logging is enabled
If the Oracle minimal level supplemental logging is not enabled an error message gets generated when the configuration file for replication is activated, as shown in Figure 18.

Figure 18. Oracle “Minimal supplemental logging is not enabled” error message
Running SharePlex Database Utility for Oracle Database
In this section we shall run the SharePlex Database Utility (ora_setup application) for Oracle Database to configure Oracle database for SharePlex. The ora_setup application is included in thebin directory of the SharePlex installation. The procedure to run the SharePlex Database Utility for Oracle Database is as follows.
- Shutdown SharePlex processes
- Run ora_setup
- Start SharePlex processes
First, stop the SharePlex processes using the SharePlex Utilities, which is SpUtils in Figure 4. Double-click on the SpUtils icon to start the SharePlex Utilities. Select the SharePlex Services tab. The Current State should be “Service Running”. Click on Stop as shown in Figure 19.
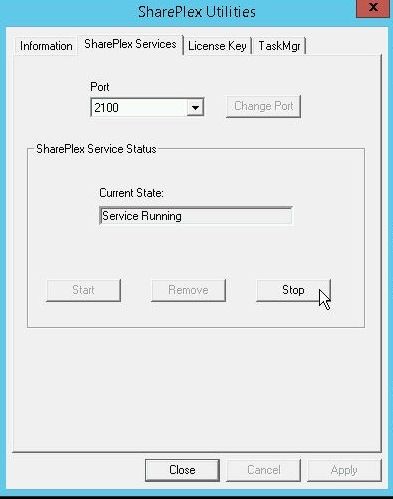
Figure 19. SharePlex Utilities>SharePlex Services>Stop
The Current State should become “Service Stopping. Please Wait”, as shown in Figure 20.
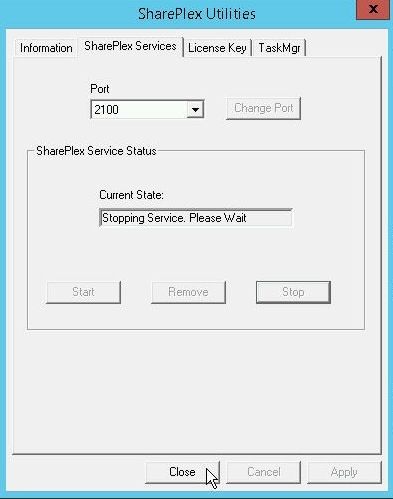
Figure 20. SharePlex Services Stopping
When SharePlex gets stopped the Current State becomes Service Stopped, as shown in Figure 21.
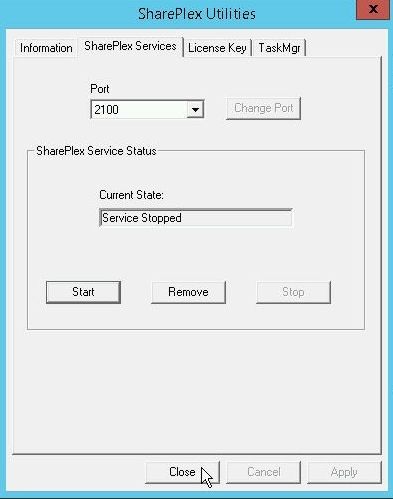
Figure 21. SharePlex Service Stopped
Next, run the ora_setup utility from the Windows 2012 OS command line.
Microsoft Windows [Version 6.3.9600]
(c) 2013 Microsoft Corporation. All rights reserved.
C:UsersAdministrator>ora_setup
The Oracle SharePlex setup process for port 2100 gets started, as shown in Figure 22. As the setup message indicates, "This process creates tables and user accounts needed to run Oracle SharePlex replication". Subsequently, the user is prompted to add the various parameters required for the setup. The first command prompt is "Will the SharePlex install be using a BEQUEATH connection?” A “BEQUEATH” connection is a connection to a local installation of Oracle Database. As we are indeed using a local Oracle Database, select the default setting of y, for “yes”. Click on Enter after adding each configuration parameter. Next command prompt is to provide the Oracle SID. Specify the SID orcldb as shown in Figure 22. The next command prompt is to provide a DBA user for orcldb. Specify DBA user as SYSTEM and click on Enter.
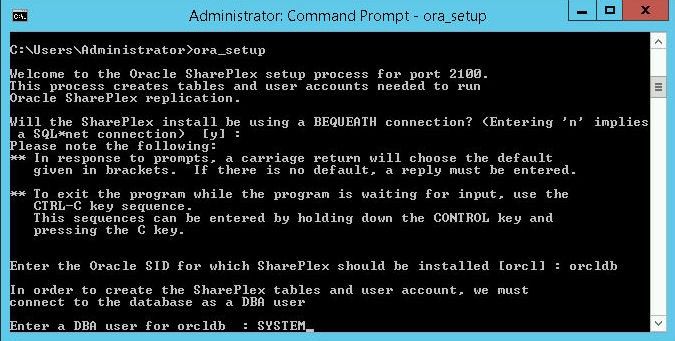
Figure 22. Running ora_setup
Specify the password for the SYSTEM user at the next command prompt. The username and password get validated and a connection gets established. A Current SharePlex user name gets displayed. At the command prompt “Would you like to create a new SharePlex user?” select y, the default setting. At the command prompt “Enter username for new user” select the default user splex with password splex as shown in Figure 23. If some other user is specified, the password needs to be specified twice for confirmation. The user gets granted unlimited tablespace privilege.
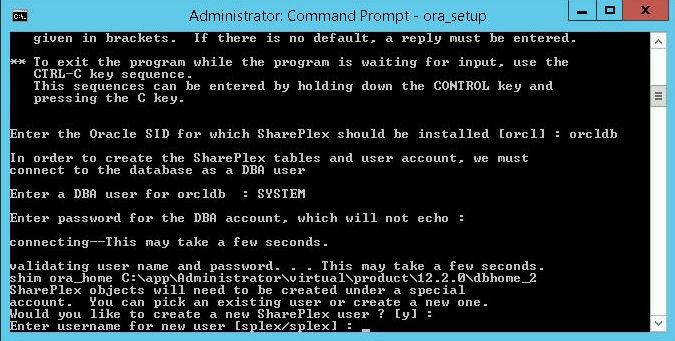
Figure 23. Selecting Default user splex
At the command prompt for Transparent Data Encryption, "Do you want to enable replication of tables with TDE?” select the default setting of “n“. Next, provide the tablespaces for use by SharePlex. For the default tablespace select the default setting of USERS. For the temporary tablespace select the default setting TEMP. For the index tablespace, the tablespace must be a PERMANENT tablespace. Specify the SYSTEM tablespace.
SharePlex objects get created. At the command prompt, "Will the current setup for sid: [orcl] be used as source” select the default value of “y”. The database setup gets completed, as shown in Figure 24.
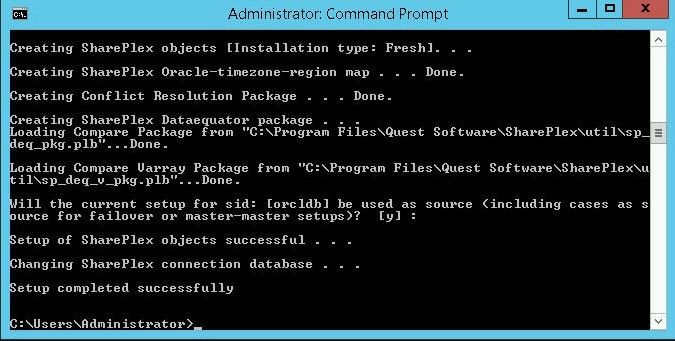
Figure 24. ora_setup Complete
The complete output from the ora_setup is listed:
Microsoft Windows [Version 6.3.9600]

(c) 2013 Microsoft Corporation. All rights reserved.

C:UsersAdministrator>ora_setup

Welcome to the Oracle SharePlex setup process for port 2100.
This process creates tables and user accounts needed to run
Oracle SharePlex replication.

Will the SharePlex install be using a BEQUEATH connection? (Entering 'n' implies
 a SQL*net connection) [ y ] :
Please note the following:
** In response to prompts, a carriage return will choose the default
   given in brackets.  If there is no default, a reply must be entered.

** To exit the program while the program is waiting for input, use the
   CTRL-C key sequence.
   This sequences can be entered by holding down the CONTROL key and
   pressing the C key.


Enter the Oracle SID for which SharePlex should be installed [orcl] : orcldb

In order to create the SharePlex tables and user account, we must
connect to the database as a DBA user

Enter a DBA user for orcldb  :

ora_setup: Program exit by user request.


C:UsersAdministrator>ora_setup

Welcome to the Oracle SharePlex setup process for port 2100.
This process creates tables and user accounts needed to run
Oracle SharePlex replication.

Will the SharePlex install be using a BEQUEATH connection? (Entering 'n' implies
 a SQL*net connection)  [ y ] :
Please note the following:
** In response to prompts, a carriage return will choose the default
   given in brackets.  If there is no default, a reply must be entered.

** To exit the program while the program is waiting for input, use the
   CTRL-C key sequence.
   This sequences can be entered by holding down the CONTROL key and
   pressing the C key.


Enter the Oracle SID for which SharePlex should be installed [orcl] : orcldb

In order to create the SharePlex tables and user account, we must
connect to the database as a DBA user

Enter a DBA user for orcldb  : SYSTEM

Enter password for the DBA account, which will not echo :

connecting--This may take a few seconds.

validating user name and password. . . This may take a few seconds.
shim ora_home C:appAdministratorvirtualproduct.2.0dbhome_2
SharePlex objects will need to be created under a special
account.  You can pick an existing user or create a new one.
Would you like to create a new SharePlex user ? [ y ] :
Enter username for new user [splex/splex] :

Warning:  This user is now being granted unlimited tablespace.
This privilege will remain in effect until it is explicitly changed.
Granting select on sys.user$ to splex

Do you want to enable replication of tables with TDE? [ n ] :

To enable replication of tables with TDE in the future, please rerun ora_setup.

Setup will now install SharePlex objects.

These are the existing tablespaces.

SYSTEM SYSAUX UNDOTBS1 TEMP USERS

Enter the default tablespace for use by SharePlex [USERS] :

Enter the temporary tablespace for use by SharePlex [TEMP] :

Enter the index tablespace for use by SharePlex [ ] : SYSTEM

Creating SharePlex objects [Installation type: Fresh]. . .

Creating SharePlex Oracle-timezone-region map . . . Done.

Creating Conflict Resolution Package . . . Done.

Creating SharePlex Dataequator package . . .
Loading Compare Package from "C:Program FilesQuest SoftwareSharePlexutilsp_
deq_pkg.plb"...Done.

Loading Compare Varray Package from "C:Program FilesQuest SoftwareSharePlexu
tilsp_deq_v_pkg.plb"...Done.

Will the current setup for sid: [orcldb] be used as source (including cases as s
ource for failover or master-master setups)?  [ y ] :

Setup of SharePlex objects successful . . .

Changing SharePlex connection database . . .

Setup completed successfully


C:UsersAdministrator>
Having configured Oracle database for use with SharePlex, start the SharePlex service. Click on Start as shown in Figure 25.
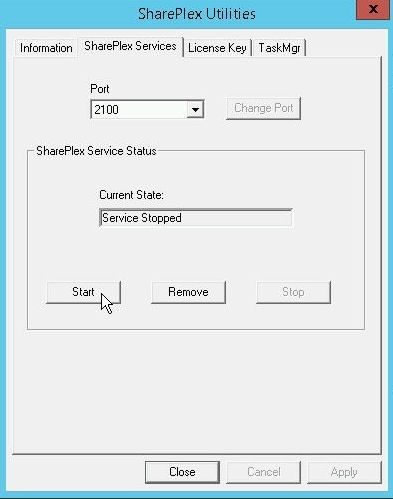
Figure 25. Starting SharePlex
The SharePlex service gets started, as shown in Figure 26. Click on Close.
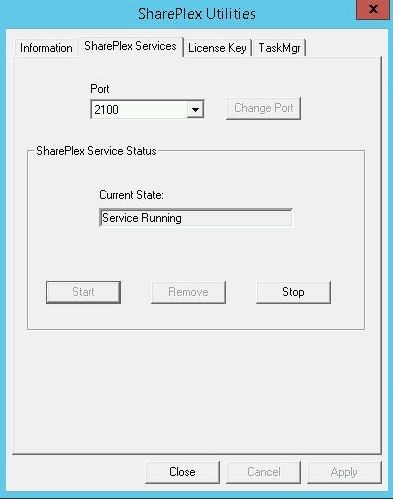
Figure 26. SharePlex Service Running
Exploring the Shareplex Database Schemas and Tables
SharePlex creates the required tables and users in the Oracle Database. In this section we shall explore the database schema/s and tables created by SharePlex. Create a new connection for user splex by selecting New Connection as shown in Figure 27.

Figure 27. New Connection
In the Toad for Oracle Login click on Add Login Record to add a new login record as shown in Figure 28.
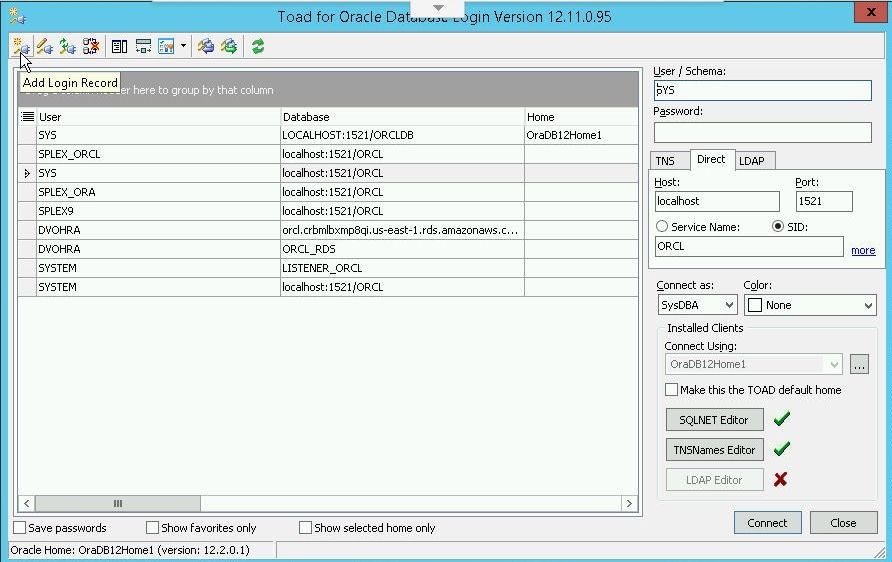
Figure 28. Add Login Record
In Add Login Record specify User/Schema as splex and Password as splex. Select the Direct tab and specify Host as localhost, Port as 1521, and SID as orcldb as shown in Figure 29. Click on Test to test the connection.
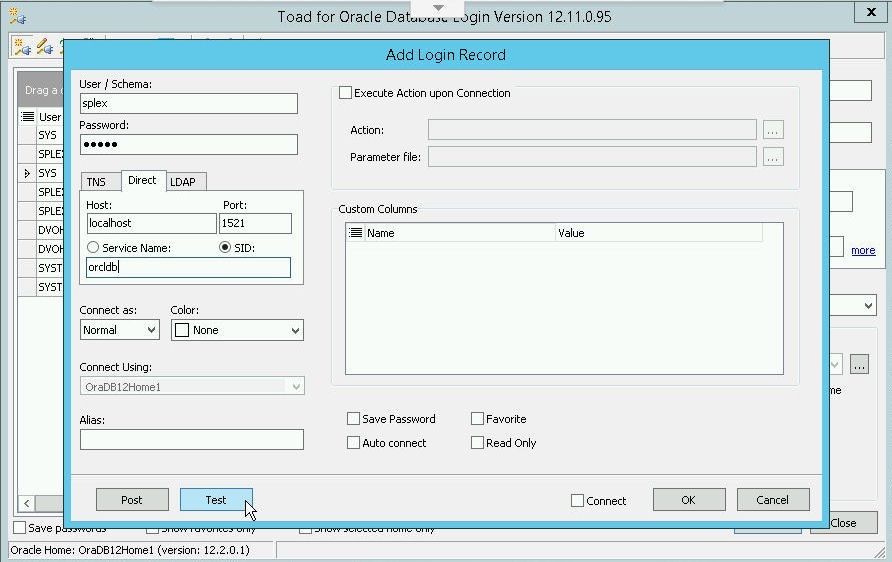
Figure 29. Testing a Login Record for splex
If the connection gets established a Success message gets displayed, as shown in Figure 30.
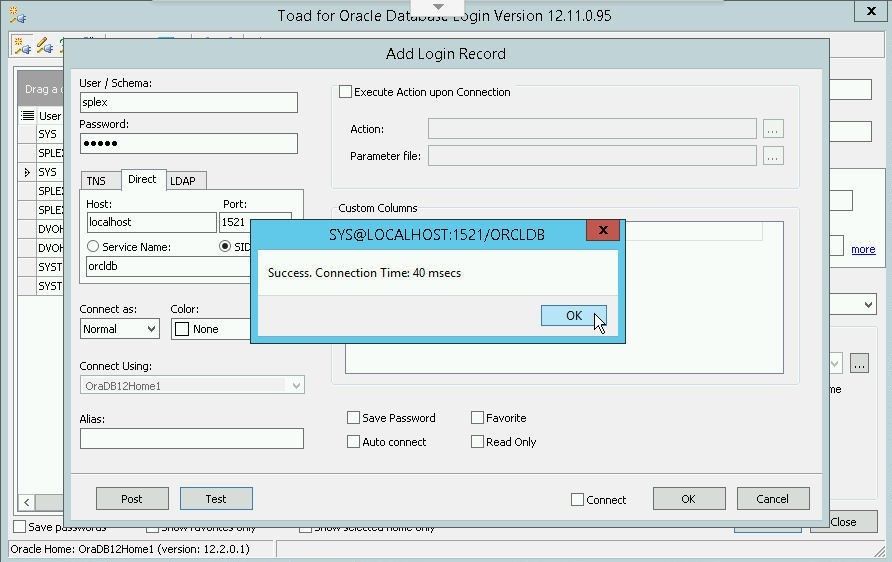
Figure 30. Success Message
Click on OK to complete the login configuration as shown in Figure 31.

Figure 31. Completing Login Record
A new Login Record gets added for splex as shown in Figure 32. Click on Connect to connect using the splex.
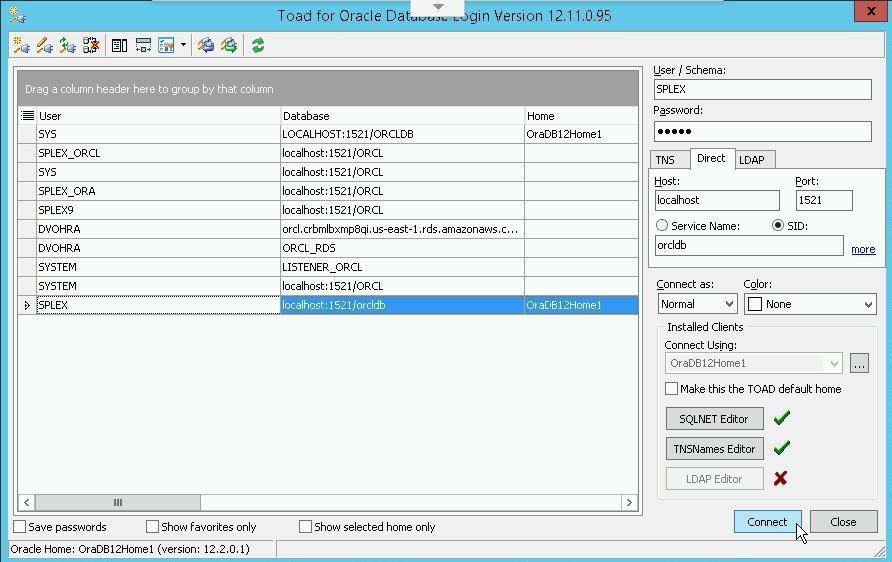
Figure 32. Connecting with the Splex User
A connection for the splex user gets added, as shown in Figure 33.
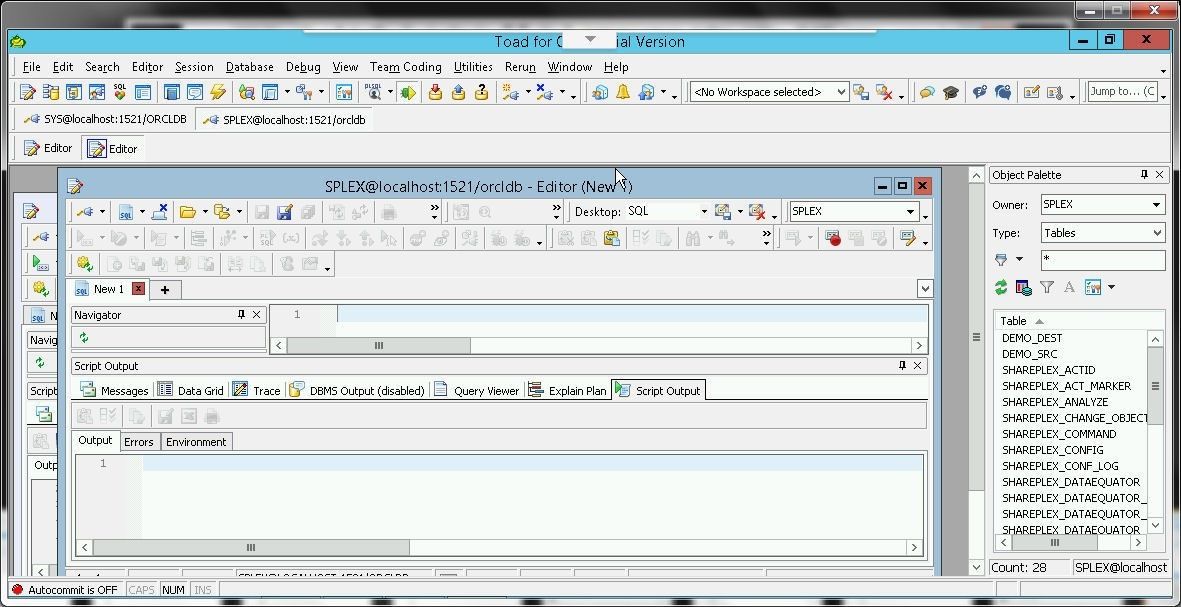
Figure 33. Splex User Connection
Next, we shall explore the database schemas and tables created by SharePlex. Click on Database>Schema Browser as shown in Figure 34.
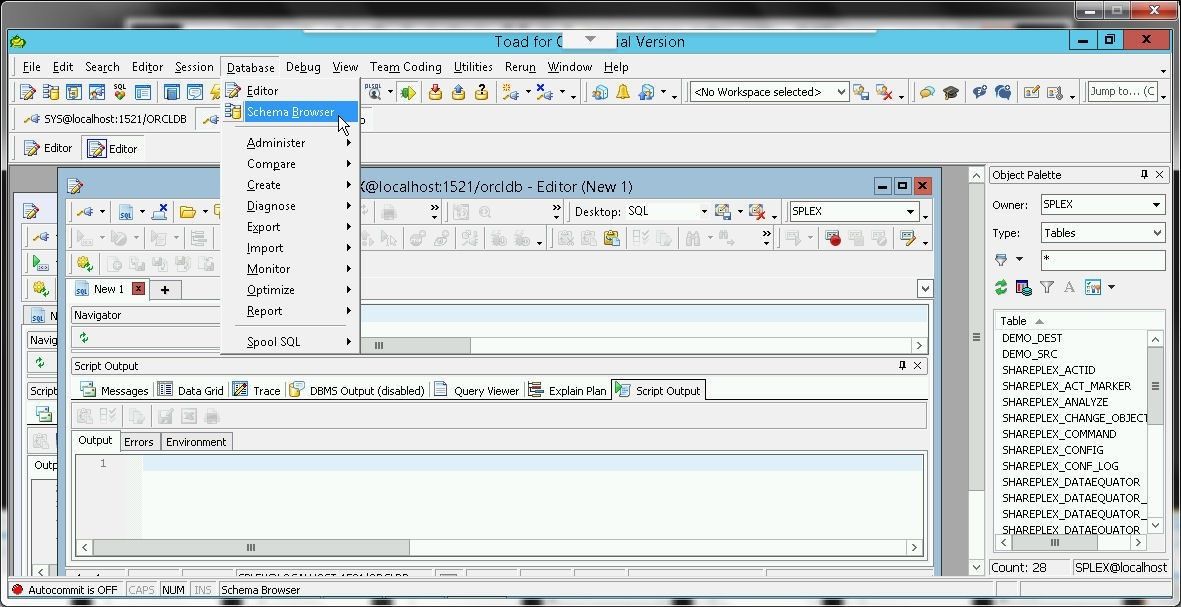
Figure 34. Database>Schema Browser
The Schema Browser displays the database tables in the SPLEX schema as shown in Figure 35.
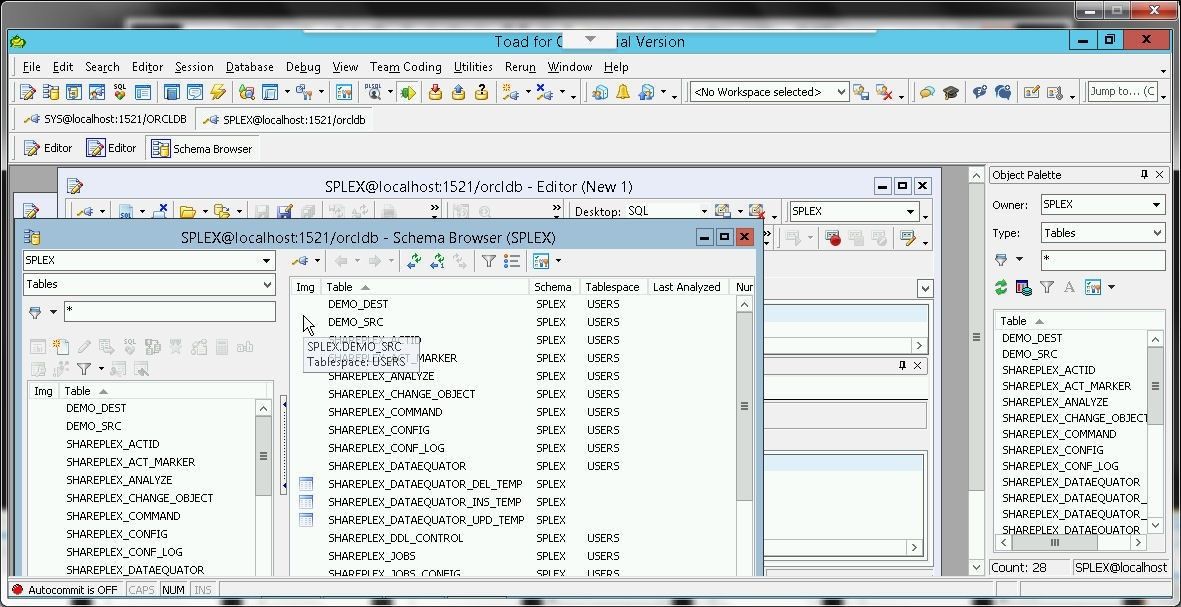
Figure 35. Database Tables in Schema SPLEX
To list the definition of the DEMO_SRC table right-click on the table and select Describe as shown in Figure 36.
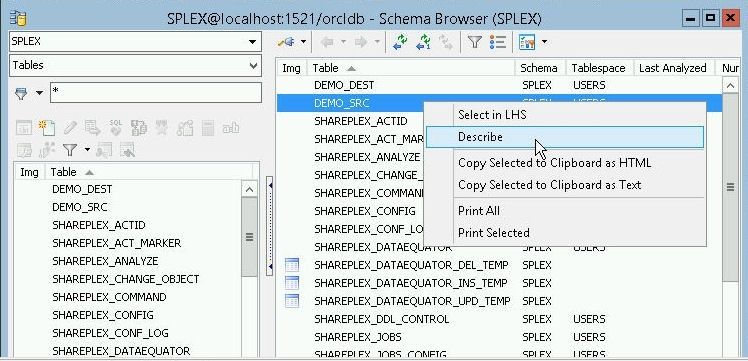
Figure 36. DEMO_SRC>Describe
The description for the SPLEX.DEMO_SRC table gets displayed, as shown in Figure 37.The Columns tab lists the table columns.
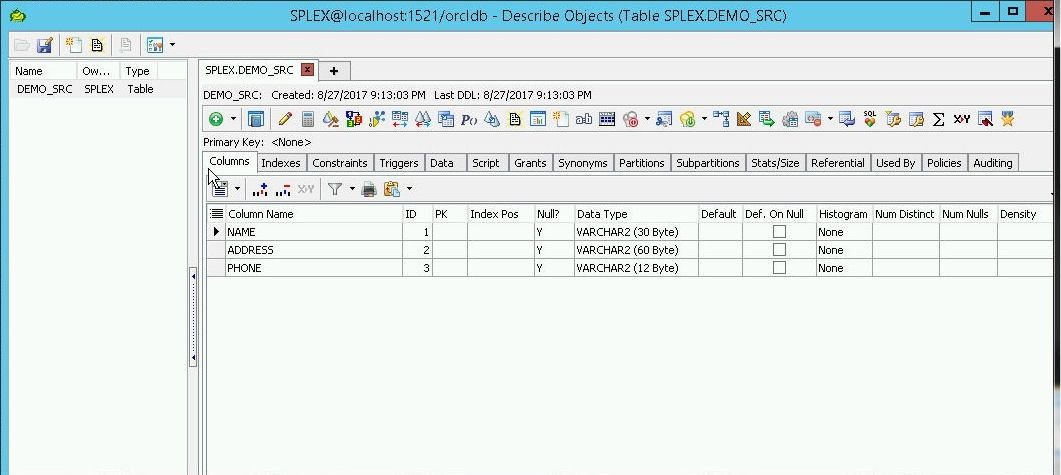
Figure 37. SPLEX.DEMO_SRC Table Description
To display the data in the DEMO_SRC table click on the Data tab as shown in Figure 38. The table is empty initially. In a later section we shall add data to the table for replication to the DEMO_DEST table.
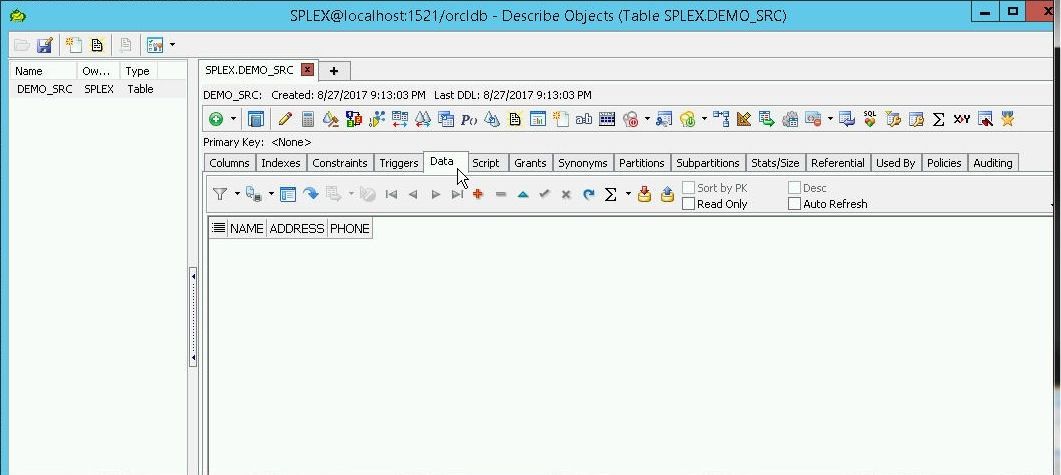
Figure 38. SPLEX.DEMO_SRC Table Data
The demo table SPLEX.DEMO_DEST is for replicating the data in the SPLEX.DEMO_SRC table. To describe the DEMO_DEST table right-click on the table in the Schema Browser and select Describe as shown in Figure 39.
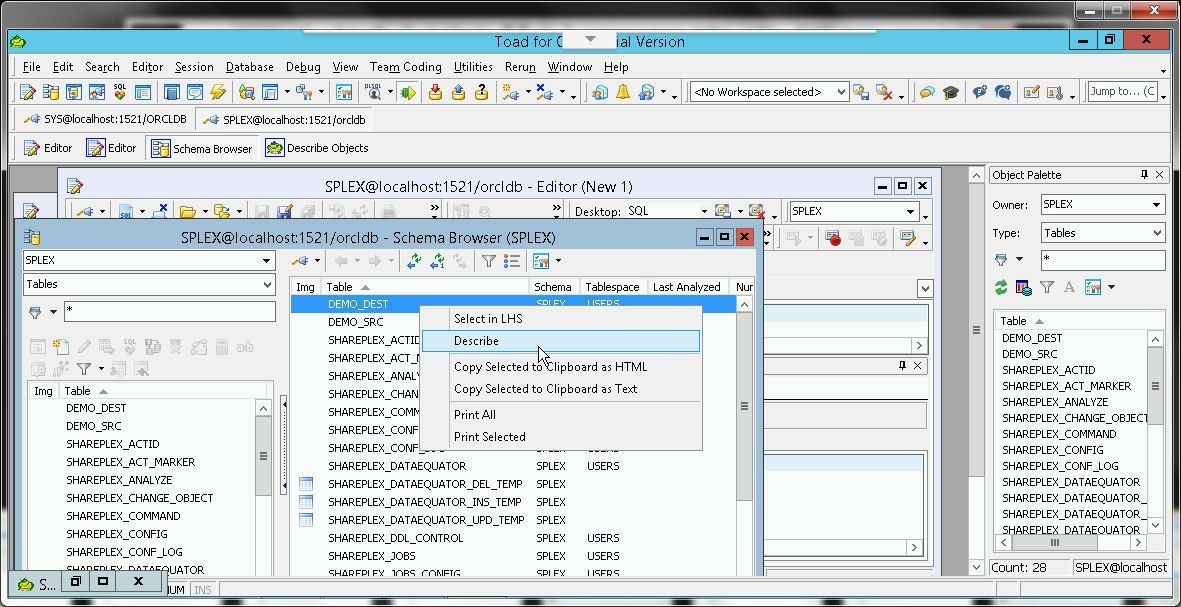
Figure 39. SPLEX.DEMO_DEST>Describe
The DEMO_DEST table description gets displayed, as shown in Figure 40.
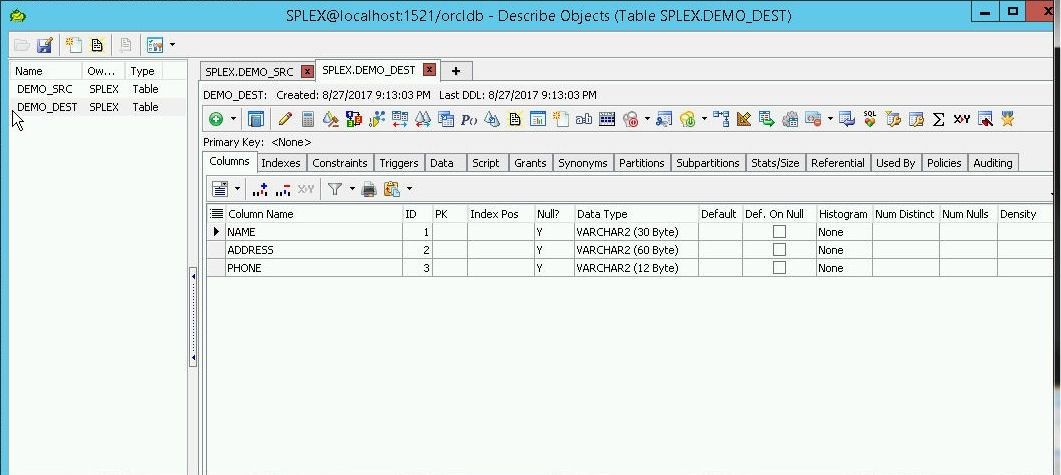
Figure 40. SPLEX.DEMO_DEST Table Description
Click on the Data tab to display the data in the SPLEX.DEMO_DEST table as shown in Figure 41. Initially the table is empty.
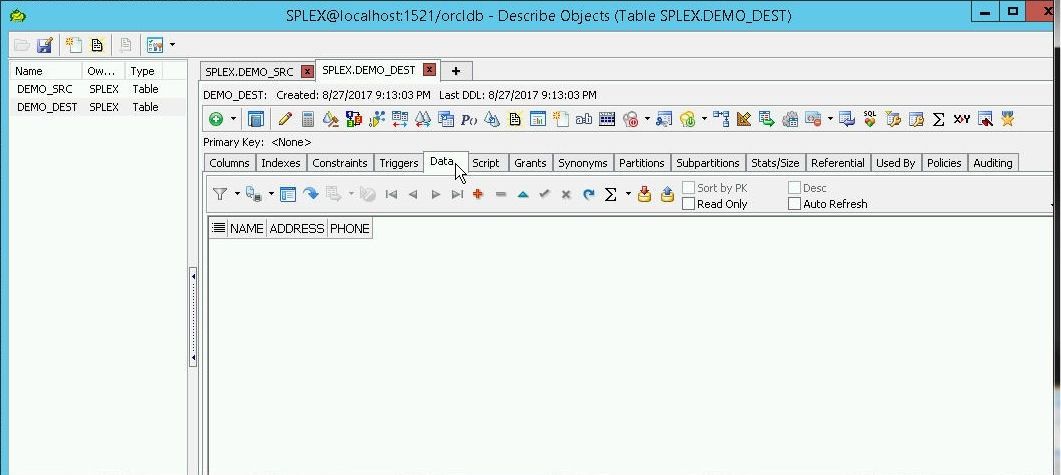
Figure 41. SPLEX.DEMO_DEST Table Data
Next, set auto refresh on the DEMO_SRC and DEMO_DEST tables so that when data is added to DEMO_SRC the schema browser automatically refreshes the data displayed by the Data tab. Click in the Auto Refresh checkbox to set auto refresh as shown in Figure 42. In the Auto Refresh Data Grid dialog specify interval for auto-refreshing as 5 and click on OK.
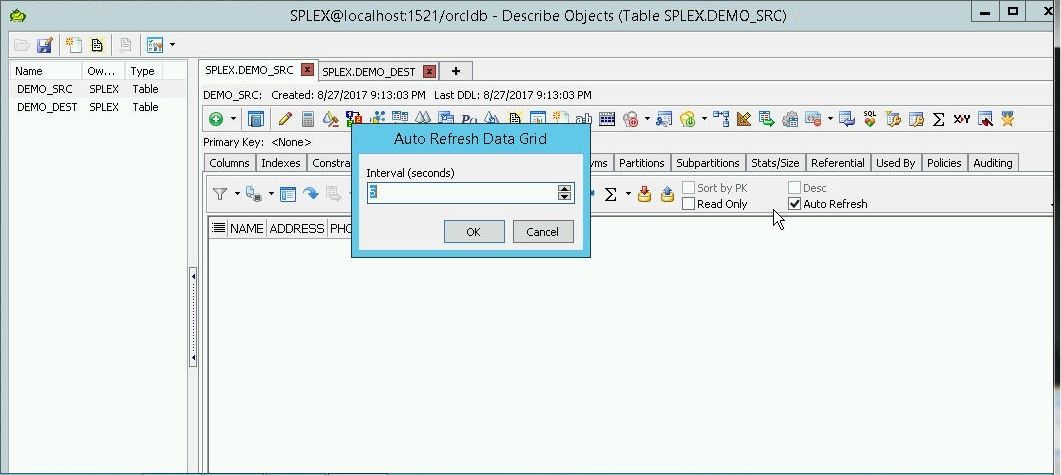
Figure 42. Setting Auto Refresh on DEMO_SRC Table
Similarly, set auto-refresh on the DEMO_DEST table as shown in Figure 43.
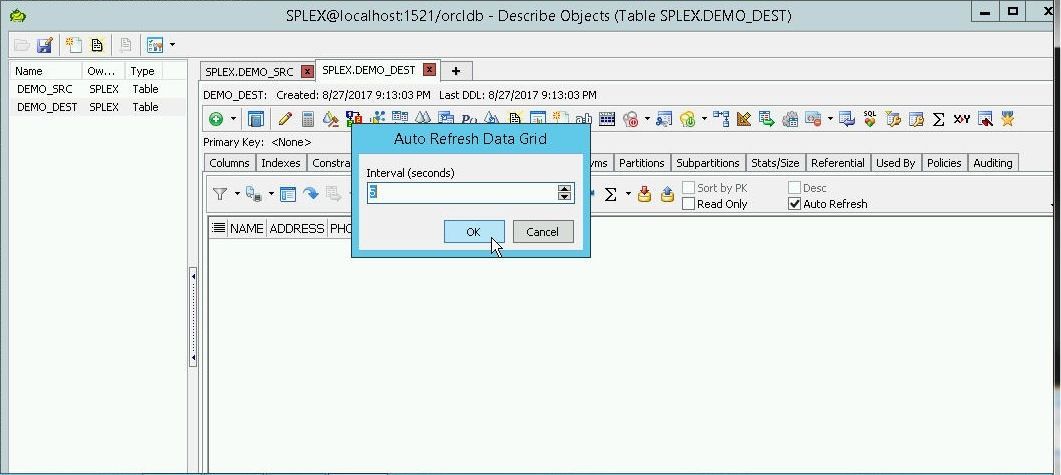
Figure 43. Setting Auto Refresh on the DEMO_DEST Table
The Shareplex created Tables may be explored by selecting Describe Objects in the Tool bar as shown in Figure 44.
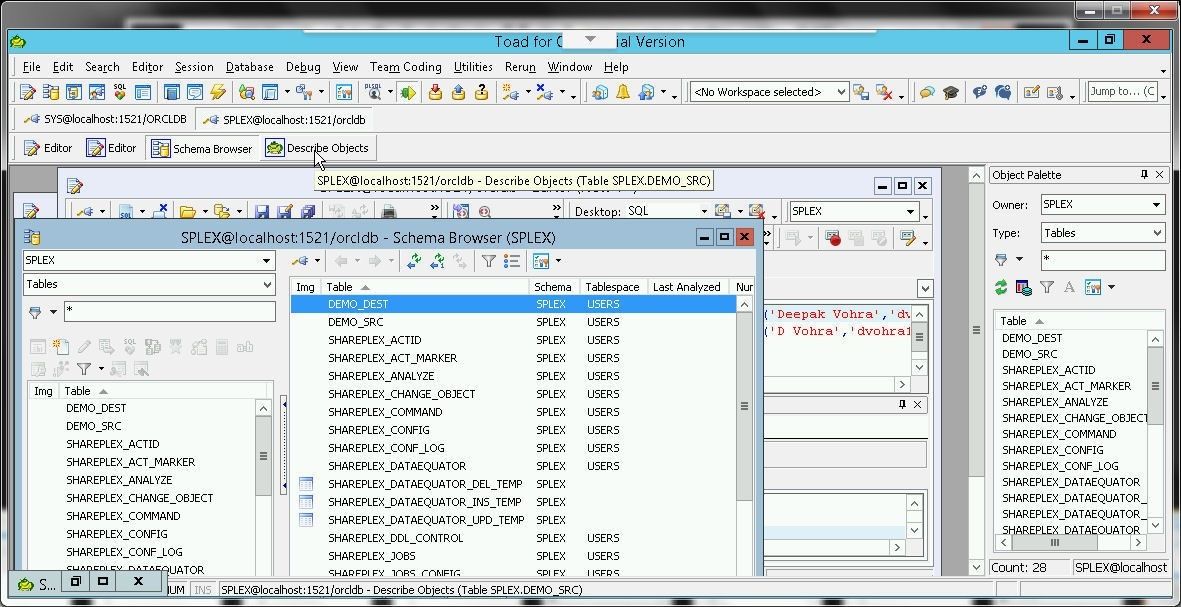
Figure 44. Selecting Describe Objects
We shall be using the demo tables splex.DEMO_SRC and splex.DEMO_DEST to demonstrate replication. The DEMO_SRC and DEMO_DEST table have the same table structure, each consisting of the following columns (Name and Type).
Name        Type
----------------
NAME        VARCHAR2(30)
ADDRESS     VARCHAR2(60)
PHONE       VARCHAR2(12)
Creating a SharePlex Configuration File
Having set up Oracle database for SharePlex user splex, next we shall create a SharePlex configuration file and start the replication. A replication is started by activating a configuration file. Configuration files are listed with the list config command as shown in Figure 46. Create a configuration file orcl-orcl with the following command.
create config orcl-orcl
The create config command does not generate any output.
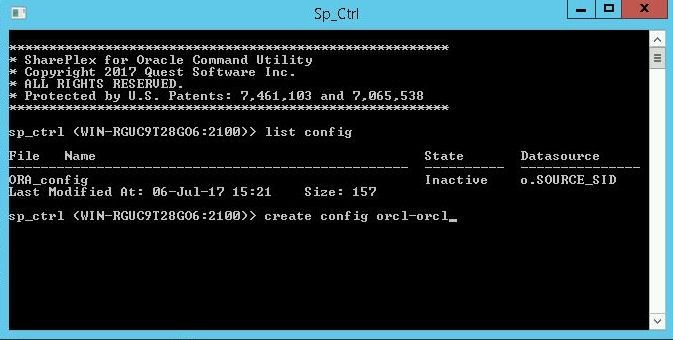
Figure 45. Listing Configs and creating a Config
Thecreate config command opens a text editor WordPad for Windows to add a configuration file, as shown in Figure 46.
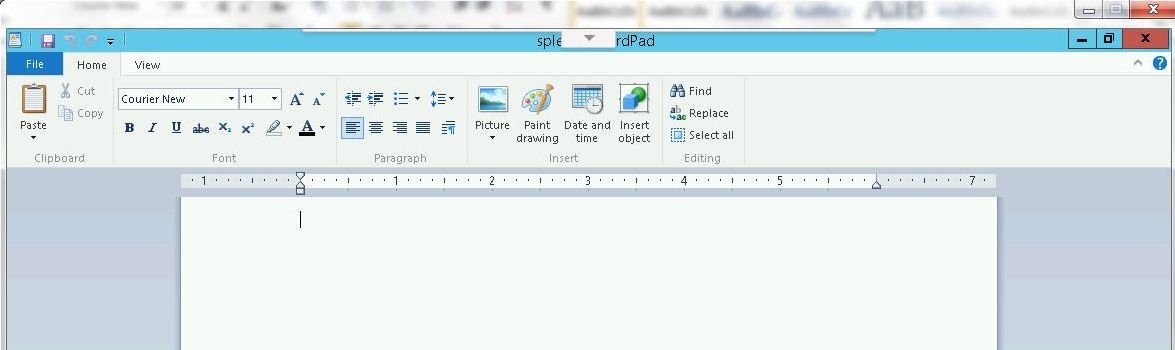
Figure 46. WordPad for Configuration File
Add the following configuration file listing to the WordPad.
Datasource:o.orcl
splex.DEMO_SRC splex.DEMO_DEST WIN-RGUC9T28GO6@o.orcl
The WordPad with the configuration file is shown in Figure 47.
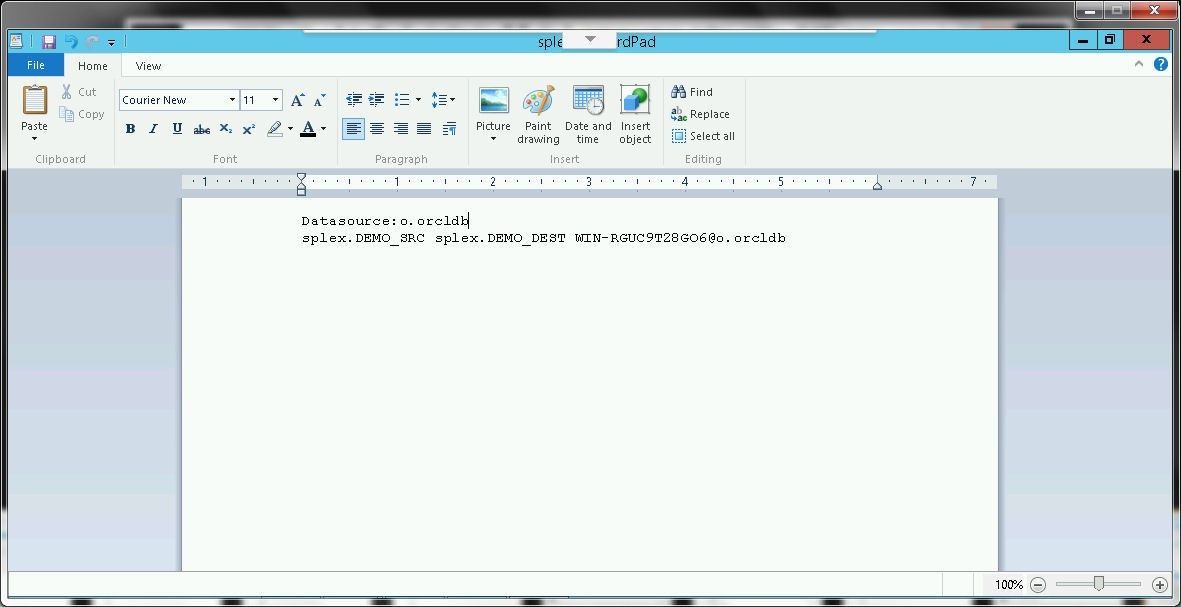
Figure 47. Configuration File in WordPad
The SharePlex user could be different for different users;splex is shown in WordPad in Figure 47. The first non-commented line of a configuration must be the database specification, which consists of the “Datasource” keyword followed by o.orcldb. The o.orcldb is for the Oracle database SID orcldb.
Click on File>Save to save the configuration file as shown in Figure 48.
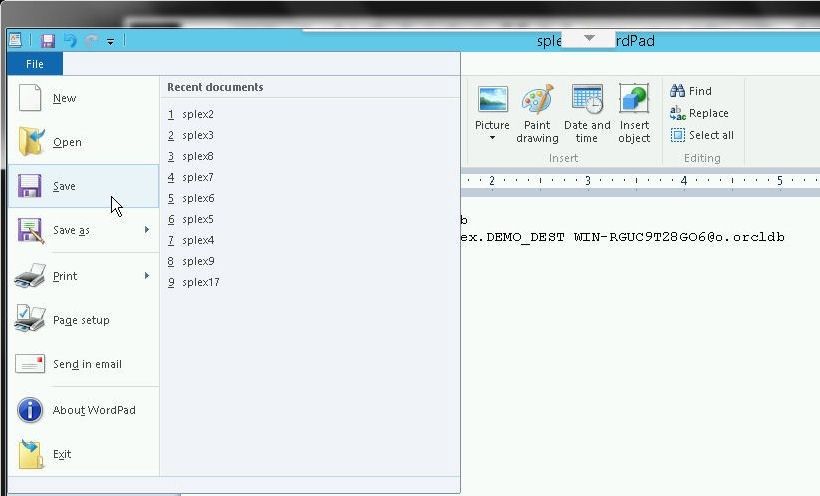
Figure 48. Saving Configuration File
Exit WordPad by selecting File>Exit as shown in Figure 49.
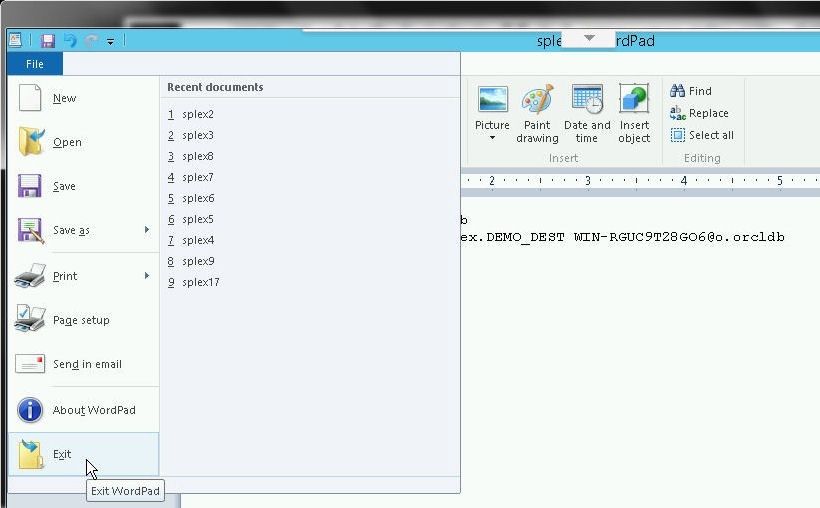
Figure 49. File>Exit
The create config command returns with no output when the configuration file WordPad is closed, as shown in Figure 50. List the configuration files with the list config command and the orcl-orcl configuration file gets listed. Initially the config file State is Inactive.
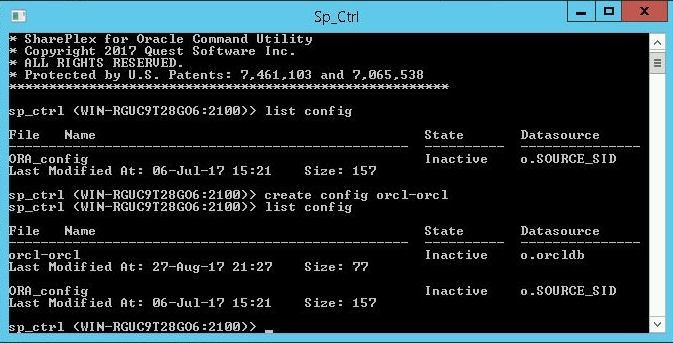
Figure 50. Listing the orcl-orcl Configuration File
The configuration file may be viewed with the view config command, as shown in Figure 51. Before activating the configuration file the file must be verified with the verify config command.
verify config orcl-orcl
If the config is valid the following output should get generated (Figure 51).
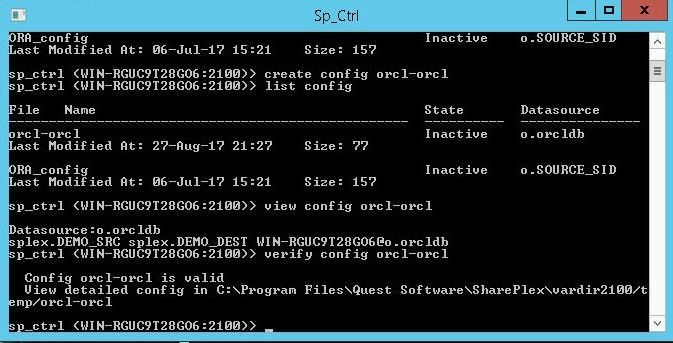
Figure 51. Viewing and Verifying the Config File
If the configuration file is not valid an error message such as the message shown in Figure 52 gets output.
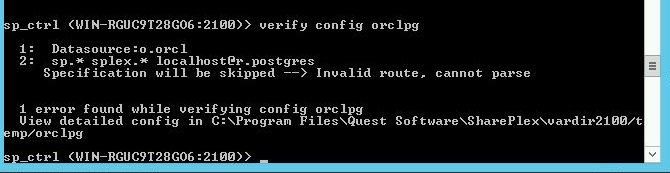
Figure 52. If configuration file is not valid an error message gets output
*******************************************************
* SharePlex for Oracle Command Utility
* Copyright 2017 Quest Software Inc.
* ALL RIGHTS RESERVED.
* Protected by U.S. Patents: 7,461,103 and 7,065,538
*******************************************************

sp_ctrl (WIN-RGUC9T28GO6:2100)> list config

File   Name                                         State       Datasource
--------------------------------------------------  ----------  ---------------
ORA_config                                          Inactive    o.SOURCE_SID
Last Modified At: 06-Jul-17 15:21    Size: 157

sp_ctrl (WIN-RGUC9T28GO6:2100)> create config orcl-orcl
sp_ctrl (WIN-RGUC9T28GO6:2100)> list config

File   Name                                         State       Datasource
--------------------------------------------------  ----------  ---------------
orcl-orcl                                           Inactive    o.orcldb
Last Modified At: 27-Aug-17 21:27    Size: 77

ORA_config                                          Inactive    o.SOURCE_SID
Last Modified At: 06-Jul-17 15:21    Size: 157

sp_ctrl (WIN-RGUC9T28GO6:2100)> view config orcl-orcl

Datasource:o.orcldb
splex.DEMO_SRC splex.DEMO_DEST WIN-RGUC9T28GO6@o.orcldb
sp_ctrl (WIN-RGUC9T28GO6:2100)> verify config orcl-orcl

  Config orcl-orcl is valid
  View detailed config in C:Program FilesQuest SoftwareSharePlexvardir2100/t
emp/orcl-orcl

sp_ctrl (WIN-RGUC9T28GO6:2100)> activate config orcl-orcl

sp_ctrl (WIN-RGUC9T28GO6:2100)> list config

File   Name                                         State       Datasource
--------------------------------------------------  ----------  ---------------
ORA_config                                          Inactive    o.SOURCE_SID
Last Modified At: 06-Jul-17 15:21    Size: 157

orcl-orcl                                           Active      o.orcldb
Last Modified At: 27-Aug-17 21:28    Size: 77      Internal Name: .conf.25
sp_ctrl (WIN-RGUC9T28GO6:2100)>
*******************************************************
* SharePlex for Oracle Command Utility
* Copyright 2017 Quest Software Inc.
* ALL RIGHTS RESERVED.
* Protected by U.S. Patents: 7,461,103 and 7,065,538
*******************************************************

sp_ctrl (WIN-RGUC9T28GO6:2100)> list config

File   Name                                         State       Datasource
--------------------------------------------------  ----------  ---------------
ORA_config                                          Inactive    o.SOURCE_SID
Last Modified At: 06-Jul-17 15:21    Size: 157


sp_ctrl (WIN-RGUC9T28GO6:2100)> create config orcl-orcl
sp_ctrl (WIN-RGUC9T28GO6:2100)> list config

File   Name                                         State       Datasource
--------------------------------------------------  ----------  ---------------
orcl-orcl                                           Inactive    o.orcldb
Last Modified At: 27-Aug-17 21:27    Size: 77

ORA_config                                          Inactive    o.SOURCE_SID
Last Modified At: 06-Jul-17 15:21    Size: 157

sp_ctrl (WIN-RGUC9T28GO6:2100)> view config orcl-orcl

Datasource:o.orcldb
splex.DEMO_SRC splex.DEMO_DEST WIN-RGUC9T28GO6@o.orcldb
sp_ctrl (WIN-RGUC9T28GO6:2100)> verify config orcl-orcl

  Config orcl-orcl is valid
  View detailed config in C:Program FilesQuest SoftwareSharePlexvardir2100/t
emp/orcl-orcl

sp_ctrl (WIN-RGUC9T28GO6:2100)> activate config orcl-orcl

sp_ctrl (WIN-RGUC9T28GO6:2100)> list config

File   Name                                         State       Datasource
--------------------------------------------------  ----------  ---------------
ORA_config                                          Inactive    o.SOURCE_SID
Last Modified At: 06-Jul-17 15:21    Size: 157

orcl-orcl                                           Active      o.orcldb
Last Modified At: 27-Aug-17 21:28    Size: 77      Internal Name: .conf.25


sp_ctrl (WIN-RGUC9T28GO6:2100)> DEACTIVATE CONFIG ORCL-ORCL
   File not found
sp_ctrl (WIN-RGUC9T28GO6:2100)> deactivate config orcl-orcl
sp_ctrl (WIN-RGUC9T28GO6:2100)> list config

File   Name                                         State       Datasource
--------------------------------------------------  ----------  ---------------
orcl-orcl                                           Inactive    o.orcldb
Last Modified At: 27-Aug-17 21:27    Size: 77

ORA_config                                          Inactive    o.SOURCE_SID
Last Modified At: 06-Jul-17 15:21    Size: 157

sp_ctrl (WIN-RGUC9T28GO6:2100)> view config orcl-orcl

Datasource:o.orcldb
splex.DEMO_SRC splex.DEMO_DEST WIN-RGUC9T28GO6@o.orcldb
sp_ctrl (WIN-RGUC9T28GO6:2100)> activate config orcl-orcl

sp_ctrl (WIN-RGUC9T28GO6:2100)>
sp_ctrl (WIN-RGUC9T28GO6:2100)> list config

File   Name                                         State       Datasource
--------------------------------------------------  ----------  ---------------
ORA_config                                          Inactive    o.SOURCE_SID
Last Modified At: 06-Jul-17 15:21    Size: 157

orcl-orcl                                           Active      o.orcldb
Last Modified At: 27-Aug-17 21:43    Size: 77      Internal Name: .conf.26


sp_ctrl (WIN-RGUC9T28GO6:2100)>
Activating the Configuration File
To start the replication the configuration file must be activated. The activate config command is used to activate the configuration file, and the command syntax is shown in Figure 53.

Figure 53. Command Syntax for activate config
The command does not generate any output if the activation has started successfully.
sp_ctrl (WIN-RGUC9T28GO6:2100)> activate config orcl-orcl
sp_ctrl (WIN-RGUC9T28GO6:2100)>
Subsequent to activating the configuration file, list the configuration files with list config and an active configuration file orcl-orcl gets listed, as shown in Figure 54.
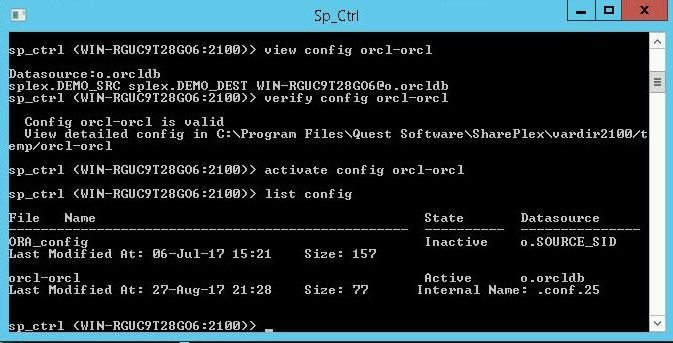
Figure 54. Active Configuration orcl-orcl
After a config file has been activated data added to the DEMO_SRC table gets replicated to the DEMO_DEST table. Next, we shall add data to the DEMO_SRC table to demonstrate replication.
Adding Data to Oracle Database DEMO_SRC Table
By default the DEMO_SRC table does not include any data. Connect to Oracle Database with user SYS as SYSDBA as shown in Figure 55.

Figure 55. Connecting with User SYS as SYSDBA
A connection gets created and a SQL Editor worksheet gets opened, as shown in Figure 56.

Figure 56. SQL Editor Worksheet for Connection with User SYS
Add some data to the DEMO_SRC table withINSERT statements.
INSERT INTO splex.DEMO_SRC(NAME,ADDRESS,PHONE) VALUES('Deepak Vohra','dvohra10@yahoo.com','555-555-555');
INSERT INTO splex.DEMO_SRC(NAME,ADDRESS,PHONE) VALUES('D Vohra','dvohra17@yahoo.com','555-555-555');
Copy the QL statements to the SQL Editor and click on Execute as script as shown in Figure 57.
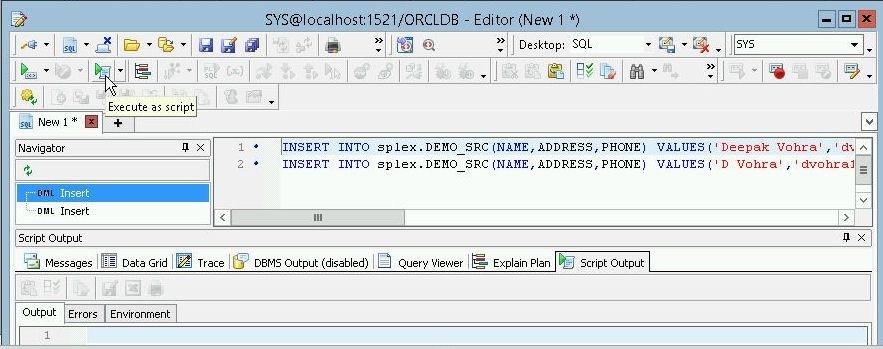
Figure 57. Running SQL Script to add Data to DEMO_SRC Table
Two rows of data get added, as shown by the output in Figure 58.

Figure 58. Data Added to DEMO_SRC Table
By default, transactions in Toad for Oracle are set to AutoCommit Off and the DEMO_SRC table still lists Data as empty, as shown in Figure 59.
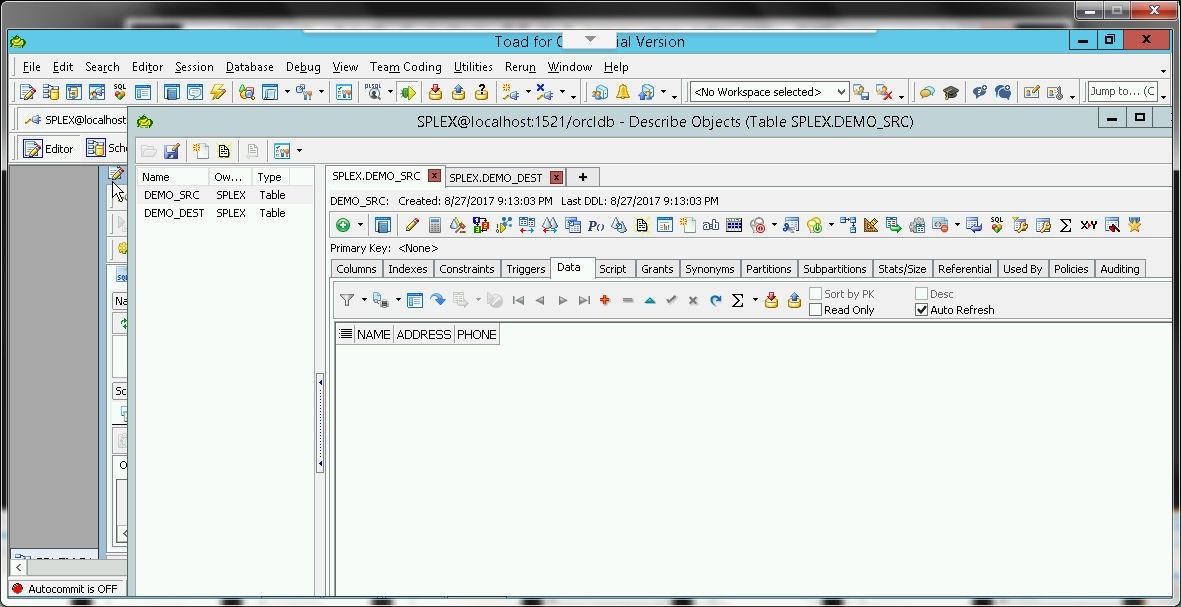
Figure 59. DEMO_SRC Table Empty even after running SQL Script
To commit the transactions click on the Commit button as shown in Figure 60.
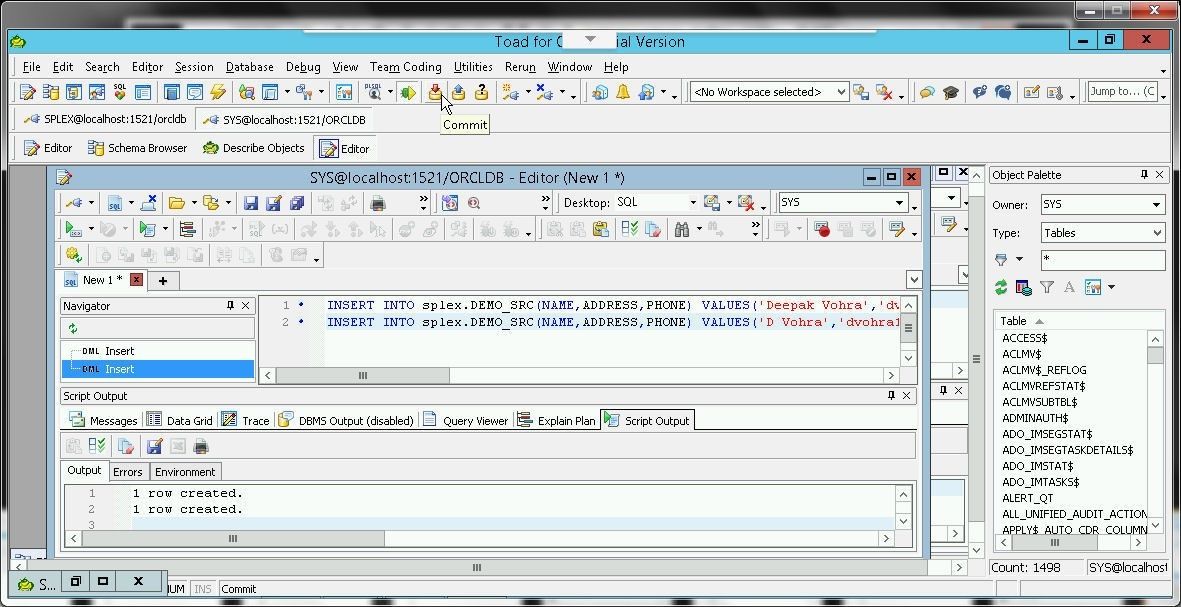
Figure 60. Committing Transactions
Subsequently, the DEMO_SRC table lists data, as shown in Figure 61.
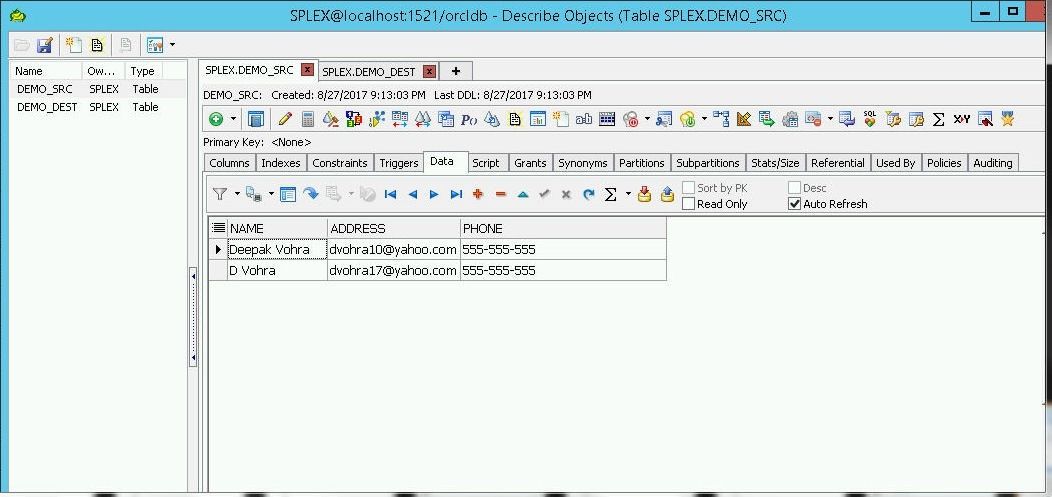
Figure 61. DEMO_SRC Table lists Data
Listing Replicated Data in DEMO_DEST Table
With the SharePlex replication configured in the config file orcl-orcl, which has been activated, the data added to DEMO_SRC table gets replicated to DEMO_DEST table. The Data tab in the DEMO_DEST table lists the data replicated from DEMO_SRC, as shown in Figure 62.
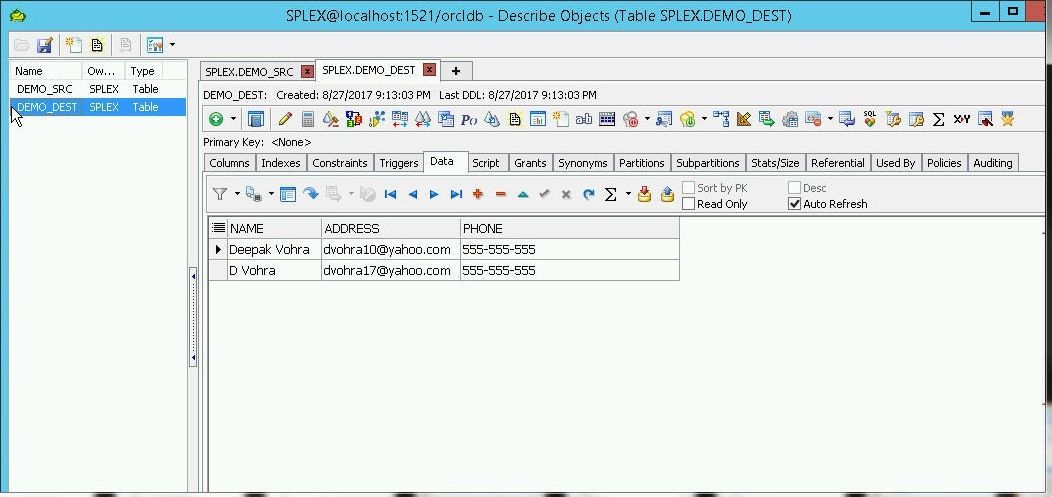
Figure 62. DEMO_DEST Data Replicated from DEMO_SRC
Deactivating the Replication
To deactivate the replication, deactivate the config orcl-orcl with thedeactivate config command. Subsequently list the configs; the orcl-orcl config is listed as Inactive.
sp_ctrl (WIN-RGUC9T28GO6:2100)> deactivate config orcl-orcl
sp_ctrl (WIN-RGUC9T28GO6:2100)> list config

File   Name                                         State       Datasource
--------------------------------------------------  ----------  ---------------
orcl-orcl                                           Inactive    o.orcldb
Last Modified At: 27-Aug-17 21:27    Size: 77

ORA_config                                          Inactive    o.SOURCE_SID
Last Modified At: 06-Jul-17 15:21    Size: 157
Conclusion
In this tutorial we discussed using Toad for Oracle with SharePlex for Oracle Database 12c R2 replication on Windows 2012. Toad for Oracle database management simplifies the task of exploring schemas and tables used by SharePlex. For the complete SharePlex 9.0 documentation including command syntax refer to https://support.quest.com .
Start the discussion at forums.toadworld.com