PostgreSQL database is one of the leading open source databases and often compared with MySQL database. While PostgreSQL is completely open source, MySQL has commercial versions also. PostgreSQL database provides some features that MySQL doesn’t. PostgreSQL is almost fully SQL standard (SQL:2011) compliant, while only some versions of MySQL database are SQL compliant. PostgreSQL provides high level of concurrency support, while MySQL has concurrency support in only InnoDB. While PostgreSQL supports JSON and other NoSQL features such as XML, MySQL has only JSON data type support and does not support other NoSQL features. Another advantage of PostgreSQL is that it supports indexing JSON data for faster access, while MySQL does not support indexing of JSON. PostgreSQL supports materialized views but MySQL does not. PostgreSQL supports multiple replication technologies including bidirectional replication and logical log streaming replication, whereas MySQL supports only standard replication technologies. PostgreSQL supports several programming languages, including C/C++, Java, JavaScript, .Net, and R while MySQL does not. PostgreSQL database is extensible with support to add new functions, new data types, and new index types, whereas MySQL is not extensible.
PostgreSQL is supported on most cloud provider,s including AWS, Google Cloud Platform, IBM Bluemix, and Azure. PostgreSQL could also be run on virtual machine instances on a cloud provider. In two articles we shall discuss using PostgreSQL database on a Linux-based VM on AWS EC2. The two articles have the following sections.
- Setting the Environment
- Creating an AWS EC2 Instance for PostgreSQL Database
- Connecting to the EC2 Instance
- Connecting to PostgreSQL Database
- Modifying the PostgreSQL Configuration to allow access from an external IP Address
- Configuring PostgreSQL ODBC Data Source
- Connecting to PostgreSQL Database with Toad Data Point
- Creating a Database Table with Create Table Wizard
- Exploring Database Objects
- Adding Table Data with SQL Editor
- Querying Table with Query Builder
- Exporting Resultset to Excel
- Dropping Table
- Disconnecting and Connecting
- Dropping Connection
- Stopping EC2 Instance
Setting the Environment
Download and install the following software.
-PostgreSQL ODBC Driver (as discussed in Using PostgreSQL Database on Localhost with Toad Data Point)
The only other prerequisite is an AWS account, which may be created at https://aws.amazon.com/resources/create-account/.
Creating an AWS EC2 Instance for PostgreSQL Database
In this section we shall create an AWS EC2 instance for PostgreSQL database. Login to AWS and select the EC2 service. On the EC2 dashboard click on Launch Instance to launch an EC2 instance. Select AWS Marketplace and search for “PostgreSQL”. Select an AMI; an Amazon Linux based AMI for PostgreSQL is used in this article, as shown in Figure 1.
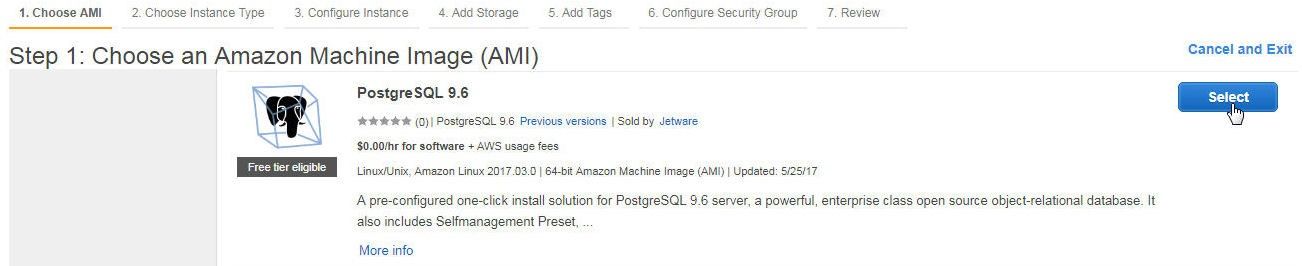
Figure 1. Selecting PostgreSQL 9.6 AMI
Next, choose an instance type; General Purpose t2.micro instance is used in our demo. In Configure Instance Details specify Number of Instances as 1 and select a VPC and Subnet to create the instance in. Select the option to Auto-assign Public IP. Click on Next: Add Storage. In Add Storage the Root Column type is configured by default. Increase the Size (GiB) as required if other software is also to be installed on the same instance; a 50 GiB is used in our demo. Click on Next: Add Tags. No tags need to be added, therefore click on Next: Configure Security Group. In Configure Security Group add/modify a rule to allow All traffic (Type) for All protocol in all supported port range for Source as Anywhere. Click on Review and Launch. In Review Instance Launch click on Launch as shown in Figure 2.

Figure 2. Launch
In Select an existing key pair or create a new key pair select a key pair as shown in Figure 3 and click on Launch Instances. If a key pair does not exist, create a new key pair.
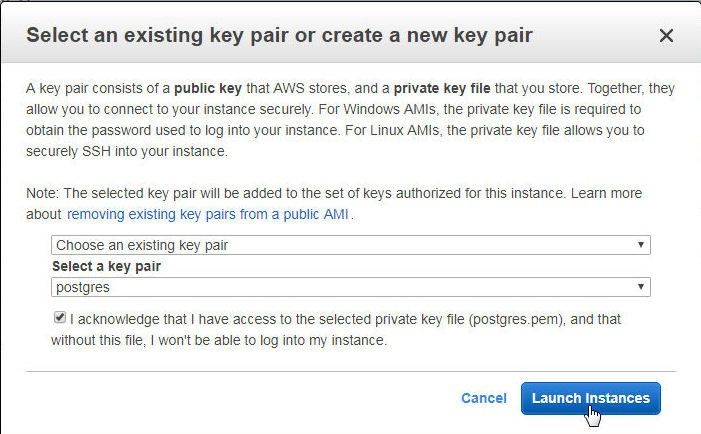
Figure 3. Launch Instances
An EC2 instance gets launched, as shown in Figure 4. By default a new EC2 instance is not assigned a name; a user-assigned name (Postgres) has been added.
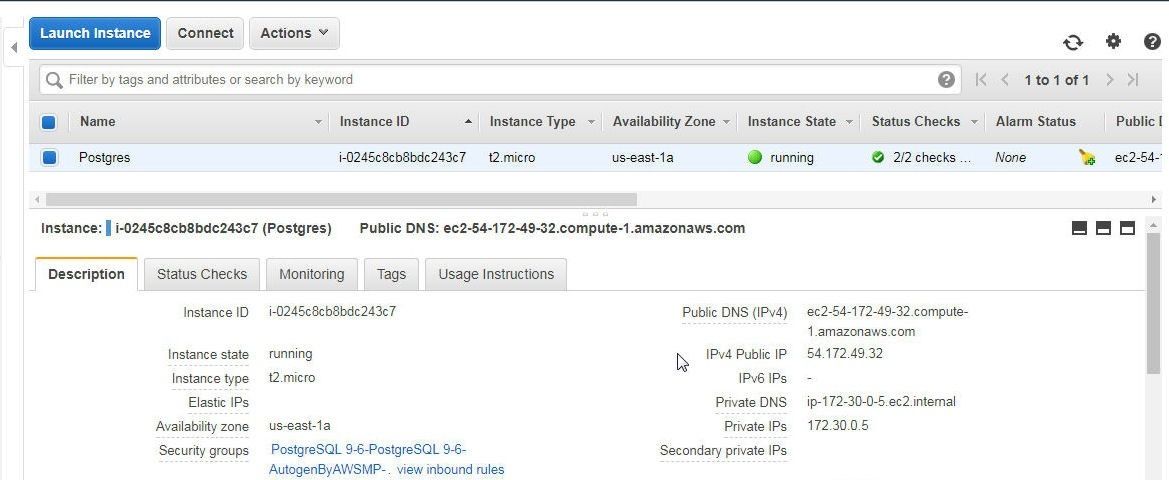
Figure 4. EC2 Instance created
Connecting to the EC2 Instance
Obtain the Public IP address of the EC2 instance from the dashboard as shown in Figure 5. From a local Linux machine, SSH login into the instance using the key pair with the user name as ec2-user.
ssh -i "postgres.pem" ec2-user@54.172.49.32
The Amazon Linux instance gets connected to, as shown in Figure 5.
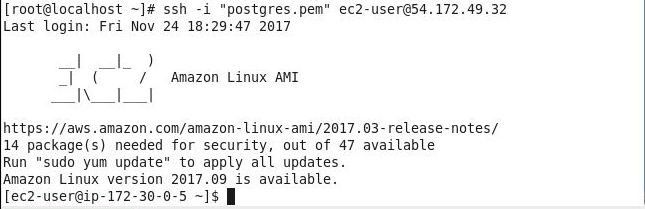
Figure 5. Connecting to EC2 Instance with SSH
Connecting to PostgreSQL Database
Having connected to the EC2 instance, connect to PostgreSQL database instance postgres that is running on the EC2 instance with the psql interactive shell.
psql postgres
The psql shell gets started, as shown in Figure 6.

Figure 6. Psql Shell
List database with the l command and schemas with the dn command as shown in Figure 7.
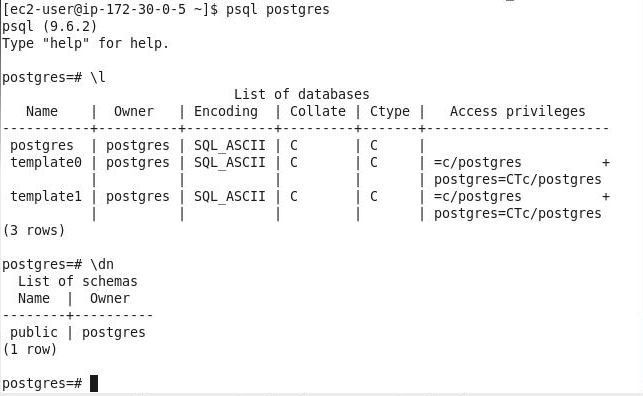
Figure 7. Listing databases and schemas
Modifying the PostgreSQL Configuration to allow access from an external IP Address
Because we shall be connecting to the PostgreSQL database on EC2 from a local machine we need to add a host record for the local machine, or a host record to allow access from all IP addresses in the pg_hba.conf file. But, first we need to find the directory location of the pg_hba.conf file. Run the following command in the psql terminal to list the pg_hba.conf file.
SHOW hba_file;
The directory location of the pg_hba.conf file gets listed, as shown in Figure 8.

Figure 8. Listing location of pg_hba.conf file
Having obtained the directory location of the configuration file pg_hba.conf, quit the psql shell and open the configuration file with vi as shown in Figure 9.

Figure 9. Using vi to open the pg_hba.conf file
The pg_hba.conf file gets opened in a vi editor, as shown in Figure 10.
Figure 10. The pg_hba.conf file in vi editor
By default the IPv4 local connections are configured to allow access only from the localhost, as indicated by the following line in the pg_hba.conf file.
host all all 127.0.0.1/32 trust
Modify the preceding line to the following to allow access from all IP addresses.
host all all all trust
The modified pg_hba.conf file is shown in Figure 11. Save the file with the :wq command.
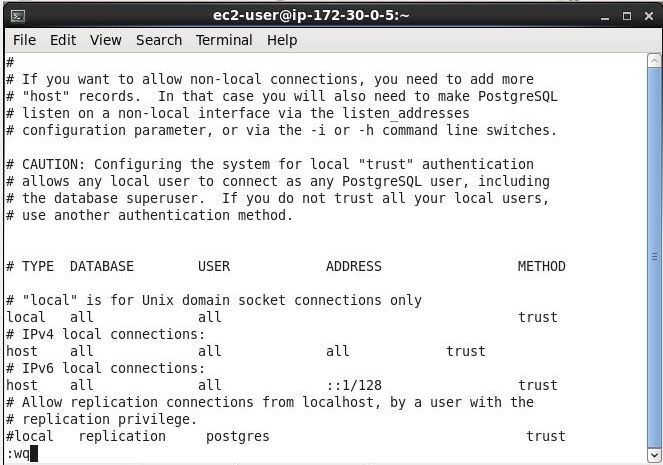
Figure 11. Modified pg_hba.conf file
After modifying the pg_hba.conf file the configuration must be reloaded. One option to reload the configuration is to restart the EC2 instance. Select Actions>Instance State>Reboot to restart the EC2 instance as shown in Figure 12.
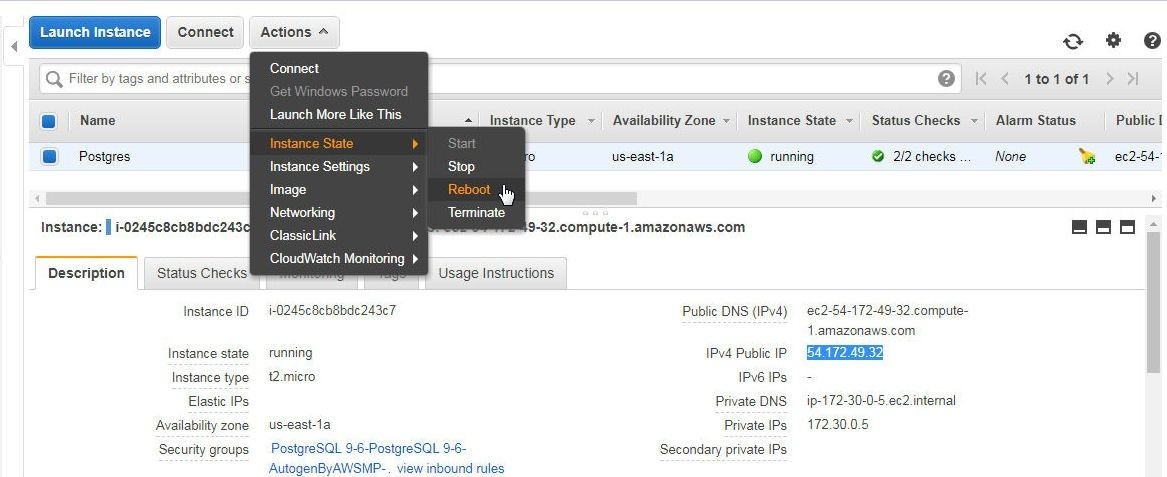
Figure 12. Rebooting EC2 Instance
Alternatively, the EC2 instance may be stopped by selecting Actions>Instance State>Stop and started again by selecting Actions>Instance State>Start as shown in Figure 13.
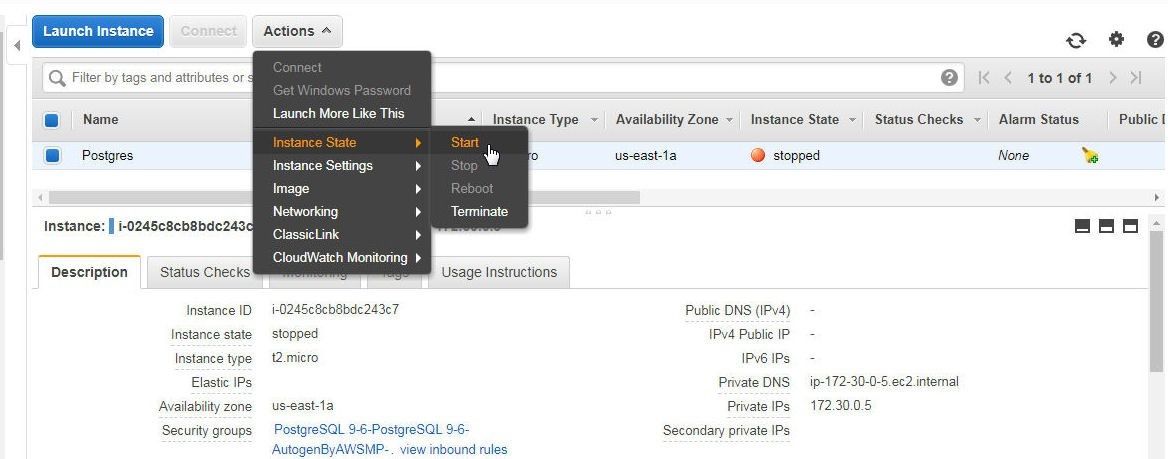
Figure 13. Starting a stopped EC2 Instance
Click on Yes, Start in Start Instances dialog to start the instance, as shown in Figure 14.
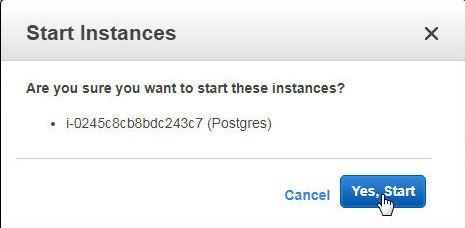
Figure 14. Starting EC2 Instance
When the EC2 instance is rebooted thepsql shell closes connection, as shown in Figure 15.
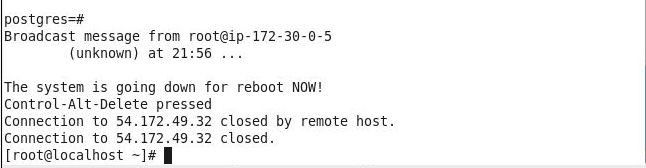
Figure 15. Psql Connection closed
After the EC2 instance restarts a new IPv4 Public IP is assigned to the instance, as shown in the EC2 dashboard in Figure 16.
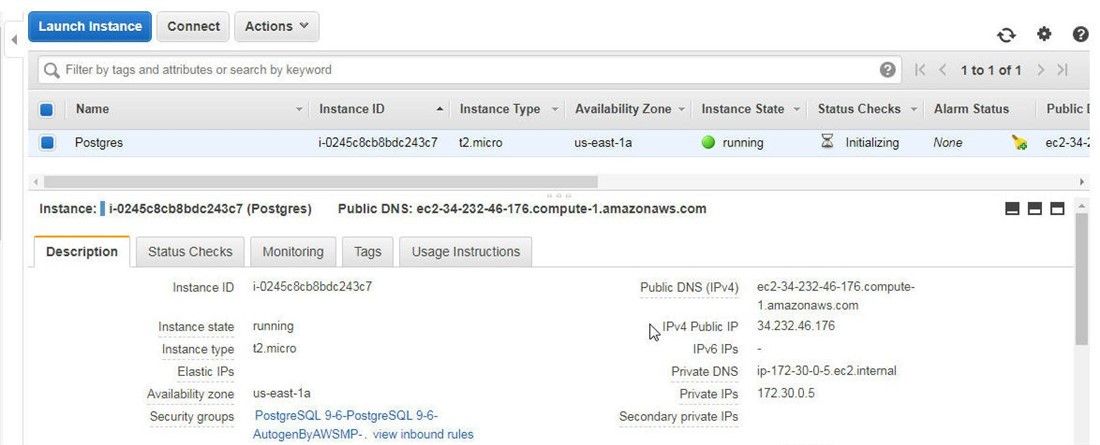
Figure 16. New IPv4 Public IP
Because the SSH connection got disconnected when the EC2 instance is rebooted, the SSH command must be run with the new IP address to SSH login to the EC2 instance.
ssh -i "postgres.pem" ec2-user@34.232.46.176
Configuring PostgreSQL ODBC Data Source
In this section we shall configure an ODBC Data Source for PostgreSQL database. Select Administrative Tools in Control Panel and select Data Sources (ODBC) in Administrative Tools as shown in Figure 17.
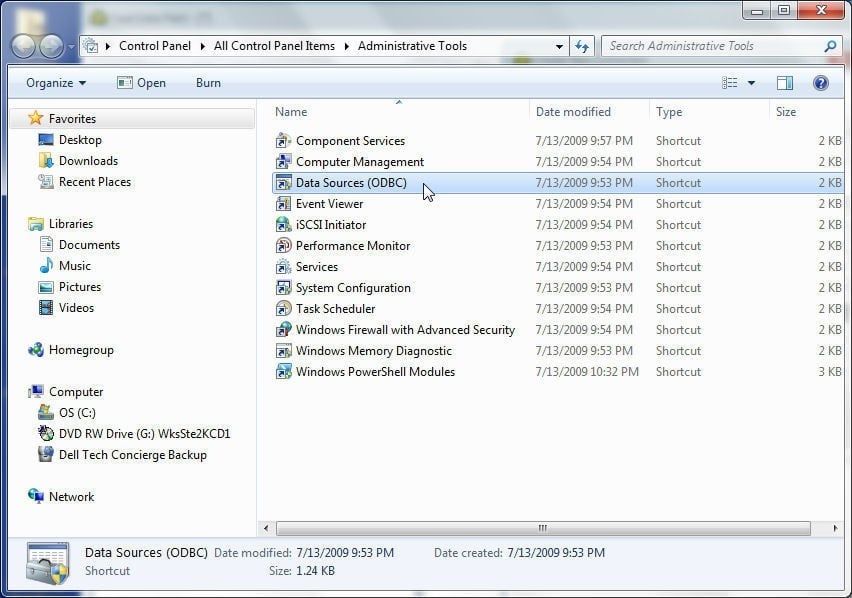
Figure 17. Selecting Control Panel>Administrative Tools>Data Sources (ODBC)
The ODBC Data Source Administrator gets started. Select the PostgreSQL35W data source if a previous configuration exists. Creating a new ODBC Data Source for PostgreSQL is discussed in Using PostgreSQL Database on Localhost with Toad Data Point. Click on Configure to configure an existing data source, as shown in Figure 18.
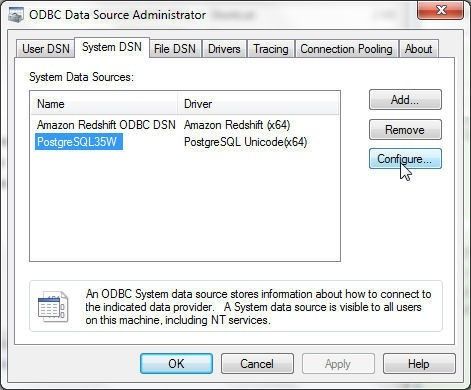
Figure 18. ODBC Data Source Administrator > Configure
The PostgreSQL Unicode ODBC Driver dialog gets launched. Specify Database as postgres and Server as the IPv4 Public IP or the Public DNS of the EC2 instance which may be obtained from the Dashboard in Figure 16. Specify Port as 5432 and specify User Name as postgres. Specify the Password for the postgres user and click on Test as shown in Figure 19.
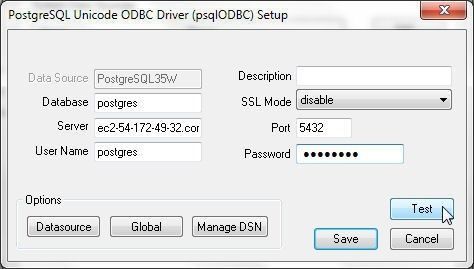
Figure 19. Testing ODBC Data Source
If the connection gets established a Connection successful message gets displayed in the Connection Test windows, as shown in Figure 20.

Figure 20. Connect Test successful
Click on Save to save the connection as shown in Figure 21.
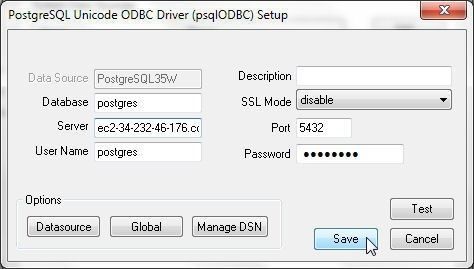
Figure 21. Saving ODBC Data Source
With the PostgreSQL ODBC Data Source configured to connect with PostgreSQL database on the EC2 instance, click on OK as shown in Figure 22.
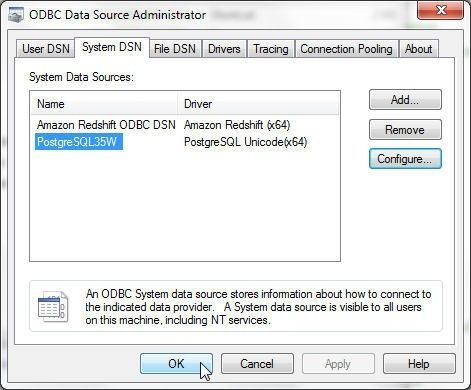
Figure 22. ODBC Data Source Administrator>OK
In this article we introduced using Toad Data Point with a PostgreSQL database instance that is running on AWS EC2. We got started by creating a new PostgreSQL database on EC2 and configuring an ODBC data source for the PostgreSQL database. In the continuation article, we will discuss connecting with the PostgreSQL database using Toad Data Point, creating a table, exploring database objects, querying a table, and managing the connection.
Start the discussion at forums.toadworld.com