This tutorial applies to Toad Data Point 4.3 or later.
Summary
This tutorial demonstrates how to publish an Automation script to Toad Intelligence Central. Publish your own script or use the one created in this tutorial.
Note: This feature is available in the Toad Data Point Professional edition only and requires access to a Toad Intelligence Central server.
In this tutorial you will learn:
- How to prepare an Automation script for publishing
- How to prepare the Intelligence Central server
- How to publish an Automation script to Toad Intelligence Central
- How to manage the published script
You will need:
- An Automation script: Use an existing script or create one using this tutorial.
- A Toad Intelligence Central server to which you can publish a script
To learn how to create an Automation script, see Getting Started with Automation.
Introduction
Toad Data Point allows you to create Automation scripts to automate tasks that you perform on a regular basis. You can schedule and run these scripts in Toad locally. In addition, you can publish an Automation script to Intelligence Central and run it on the Intelligence Central server. Scripts on Intelligence Central can be scheduled or run manually by the publisher and other users with proper privileges.
After publishing a script to Intelligence Central, you can track, manage, and run the script through Toad Data Point.
Create a Script
Follow these instructions to create a new script. Optionally, you can use an existing script, for example:
- Use your own script that includes a database connection and sends an email.
- Use the script created in the Automate Sending Email tutorial.
To create a new script
- Select Tools | Automation to open a new Automation window.
-
Click the Select to File activity to add it to the script design pane, or drag the activity from the Toolbox to the design pane. You will use this activity to export query results to a file which will be used as an email attachment.
- In the Activity Input tab, select a database connection.
- Enter a SQL query or select a SQL file.
- Select Excel in the Type field in the Export to File section.
-
Click
 in the Name field. Select a location and file name for the output file.
If you use a locally-stored output file, when the script runs on Intelligence Central the file is re-created in the same location on the Intelligence Central host computer. If you use this method, ensure that the account used to run the script on Intelligence Central has the proper permissions to create the file. Otherwise, use a network location for the output file.
-
Now click the Send Email activity to add it to the Automation workflow just after the Select to File activity.
Note: To use this activity, an SMTP service must be running. To run the script on Intelligence Central, the Intelligence Central server must be configured to support SMTP email transmission.
- In the From and To fields, enter your email address. For this tutorial, send the email to yourself.
- Click Email Server Settings to enter information about your email server.
- Enter appropriate information in the Subject and Body fields.
- Click Add Attachments. In the File Collection Editor, select the Excel file you specified as the output file in the Select to File activity and click Add.
- Let's instruct Toad to send an email if an error occurs.
- Click the Settings icon in the script design pane.
- In the Activity Input tab, select the Send email when an error occurs option.
- Click Compose Email to ensure the To and From fields and the Email Server Settings are specified.
- Click Run to save and run your script. After the script executes successfully, move to the next step to prepare the Intelligence Central server.
Note: If you use a macro-enabled Excel file (.xlsm) as the output file in the Select to File activity, you must use an existing .xlsm file stored in a shared network location and ensure that Microsoft Excel is installed on the Intelligence Central host computer.
Prepare the Intelligence Central Server
Because the destination Intelligence Central server may be slightly different than your local environment, an Automation script that runs successfully on your local machine may not run successfully on the Intelligence Central server. Review the following to help you prepare the Intelligence Central environment.
- Ensure Toad Data Point is installed.To schedule and run Automation scripts on Intelligence Central, Toad Data Point must be installed on the Intelligence Central host computer. When the Toad Intelligence Central Server Installer (3.0 or later) is used, Toad Data Point is automatically installed.
- For best results, ensure the version of Toad Data Point on the Intelligence Central host computer is the same (or later) as that used to create the script.
- Database connections. For the database connection in your script, ensure the corresponding database Client software, driver, and other necessary client files are installed on the Intelligence Central host computer. See Prepare to Publish Data to Toad Intelligence Central for more information.
- ODBC connections. For ODBC connections, verify that the system DSN name also exists on the Intelligence Central server and that it matches the system DSN name you defined locally.
- Ensure Microsoft Excel is installed. (For macro-enabled Excel files only) To execute a scheduled Toad Data Point Automation script that includes an instruction to run a macro in an Excel spreadsheet, Microsoft Excel must be installed on the Intelligence Central host computer.
- Configure SMTP. (For the Send Email activity) To run Toad Data Point Automation scripts that send email, the Intelligence Central server must be configured to support SMTP email transmission.
- Windows domain. For best results, the Toad Intelligence Central host computer should be in the same Windows domain as the client (publishing) computer.
Publish the Script
- When you are ready to publish your Automation script, open the script in the Automation window.
-
Click Publish in the Wizard bar to publish the script.
- Toad embeds Toad input files, linked SQL files, and other Automation scripts prior to publishing. (The Excel file generated by the Select to File activity is not embedded.) If Embed files into Automation script is not selected in your script Settings, Toad prompts you. If prompted, click Yes to proceed.
- If you do not have an Intelligence Central connection open, Toad prompts you to select one. Select a connection.
-
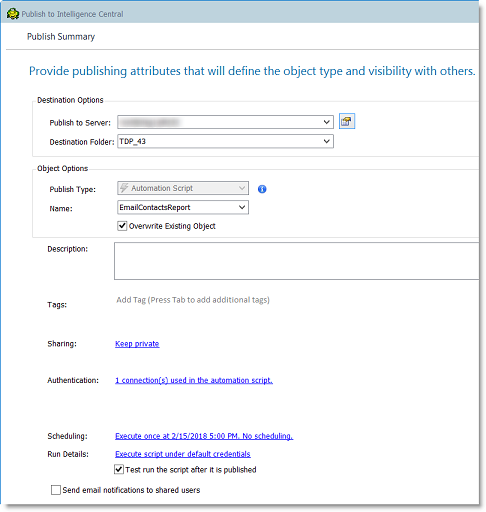
The Publish to Intelligence Central dialog opens. Use this dialog to specify your publishing options.
- Select the Intelligence Central server to which you want to publish. Then select a destination folder.
-
Enter a name to use for the script in Intelligence Central. This name displays in the Toad Object Explorer and in the Intelligence Central Web Console.
Note: The name must be unique among Automation scripts. No two scripts in the same Intelligence Central instance can have the same name (regardless of folder).
- Click Add Tag and enter a tag or select an existing tag. Tags can be used to filter objects in the Object Explorer.
-
Click the Sharing link. In the Sharing Settings page, you can select which users are allowed to view or manage the script. These settings can be changed later by users with manage privileges to the script. See Specify Sharing (Visibility) and Manage Privileges for more information.
For this tutorial, select Keep this data private. Click Apply to save your changes.
- Click the Authentication link. This page displays the connection information for all connections in the script. For connections in which you did not save the password in the Connection Properties dialog, enter the password now. Click Apply to save your changes and return to the Summary page.
- Select Test run the script after it is published. This instructs Toad to run the script once immediately after publishing. This is useful in order to test the database connections and the links to input files to uncover any issues.
- Click the Scheduling link. This page allows you to schedule execution of this script in Intelligence Central, either a single execution or a recurring execution. For this tutorial, you can select Execute once at and specify a time. Click Apply to save your changes.
-
Click the Run Details link. You must specify a user account under which to run the Automation script.
To specify a Windows user account, select Specify user to execute automation scripts and enter the user name and account credentials.
To use the default account, select Use default user to execute automation scripts. This account is the one under which the Toad Intelligence Central App Server runs.
Users with manage privileges to the script can change the run account after publishing, if necessary.
Click Apply to save your changes.
- There is no need to select Send email notifications to shared users because you did not specify users with which to share the object on the Sharing Settings page.
-
When you have finished specifying options, click Publish in the Publishing dialog. Toad publishes and test runs the script.
If the script errors, you can troubleshoot it using the script execution log and the error email.
Schedule, Run, and Manage the Script on Intelligence Central
After the script is published, you can view, run, and manage the script from the Object Explorer or the Script Manager in Toad.
- In the Connection/Navigation Manager, connect to the Intelligence Central server to which you published the script.
- When you are ready to run the script, right-click the script in the Object Explorer and select Operations | Run Script. When prompted, view the execution log. Close the Object Details pane when done.
- After script execution, right-click the script and select View Details. Use this window to quickly view script information, recent script execution logs, and connection information.
- Suppose you want to schedule the script to run every Monday at 1:00 AM. In the Object Explorer, right-click the script and select Operations | Schedule Automation. In the Alter Schedule dialog, select Weekly in the Set execution frequency field. Then specify 1:00 AM and select Monday. Click Execute to save the schedule.
-
To finish our tutorial, let's open the Script Manager. Right-click the script in the Object Explorer and select Operations | Manage Scripts.
- Use this window to view script and execution information for all scripts shared with you in Intelligence Central.
- Use this window (as well as the Object Explorer) to perform operations on scripts in Intelligence Central. The toolbar and the right-click menu provide access to available operations. A user with proper privileges can modify the following: script schedule, sharing privileges, manage privileges, run account credentials, and more.
Tip: Toad Data Point users can open and edit a published Automation script in Toad. Right-click the script in the Object Explorer and select Operations | Edit Script.
Using the Intelligence Central Web Console
Toad Intelligence Central users can view Automation scripts and perform limited operations through the Web Console. The Web Console allows users to view script status and execution logs, run and schedule the script, modify privileges, and modify the run account.
See the Toad Intelligence Central Quick Start Guide for more information.
Start the discussion at forums.toadworld.com