Introduction
In the first of two articles on using Toad Edge 1.1 with MySQL database that is running on AWS EC2 we discussed creating an EC2 instance using a MySQL AMI. Subsequently we obtained the password for the MySQL root user and connected to the database with a MySQL CLI. In this article we shall connect to the MySQL database running on an AWS EC2 instance using Toad Edge 1.1. This article has the following sections.
- Connecting to MySQL on EC2 with Toad Edge
- Creating a New Database
- Creating a New Database Table
- Adding Data to Table
- Querying Table
- Disconnecting and Removing a Connection
- Stopping or Removing EC2 Instance
Connecting to MySQL on EC2 with Toad Edge
In this section we shall connect to MySQL on EC2 with Toad Edge. Select Connect>New Connection as shown in Figure 1.

Figure 1. Connect>New Connection
The New MySQL Connection wizard gets started, as shown in Figure 2.
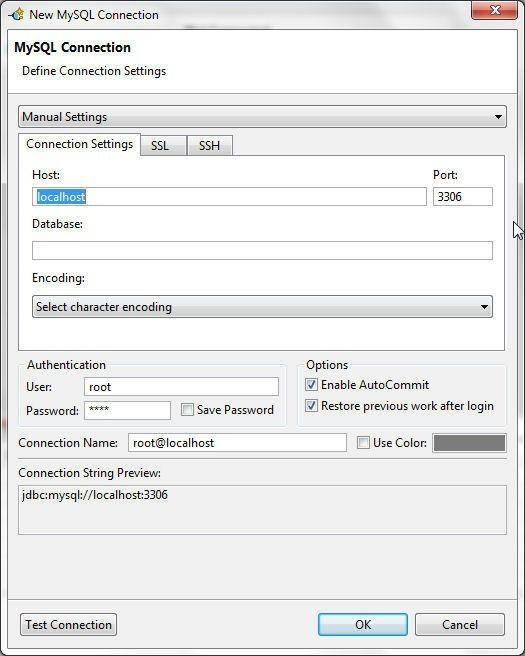
Figure 2. New MySQL Connection Wizard
The default for Host is localhost, which needs to be modified to the Public DNS of the EC2 instance. Obtain the Public DNS from the EC2 console as shown in Figure 3.
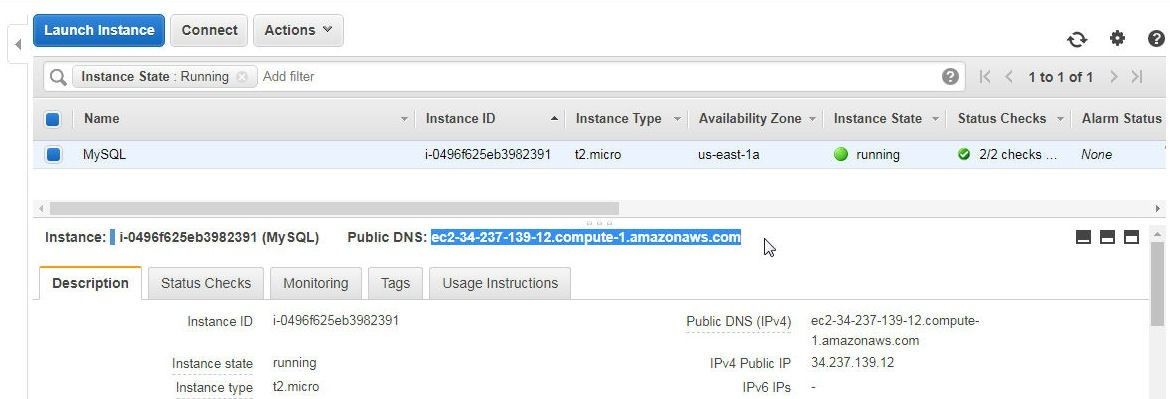
Figure 3. Public DNS
Specify the Public DNS in the Host field as shown in Figure 4. Specify Database as mysql. In Authentication specify user as root and specify Password as the password listed in the system log for the EC2 instance (Figure 14 of the first article in this series). Click on Test Connection to test the connection.
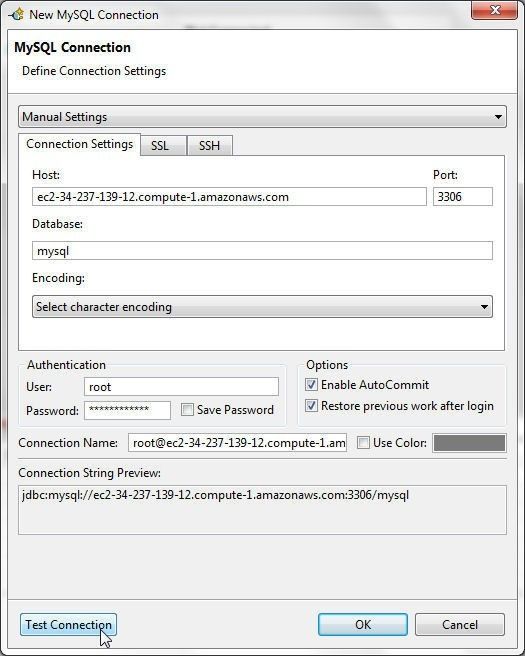
Figure 4. Test Connection
If a connection gets established the message Connection is OK gets displayed, as shown in Figure 5. Click on OK to create the connection in Toad Edge.
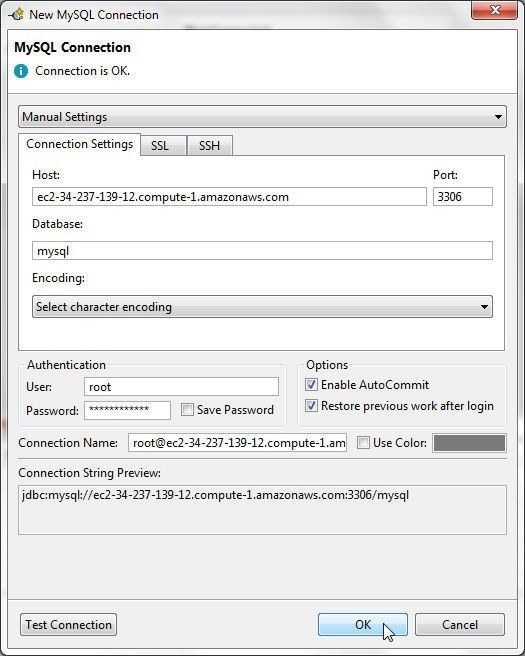
Figure 5. Creating a Connection
A new connection gets added to Toad Edge Connections view, as shown in Figure 6.
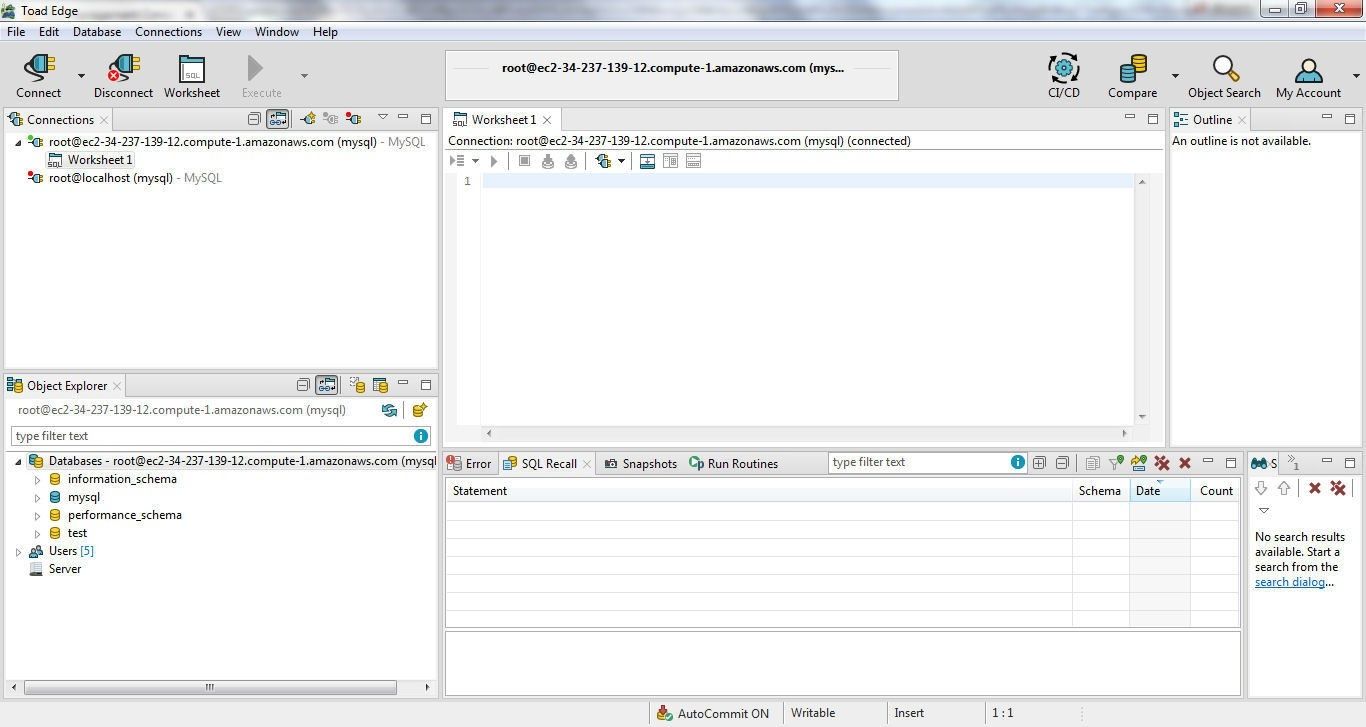
Figure 6. New Connection in Connections View
Creating a New Database
To create a new database click on Create a New Database as shown in Figure 7.

Figure 7. Create a New Database
In New Database wizard specify a database name (mysqldb) and click on Finish as shown in Figure 8.
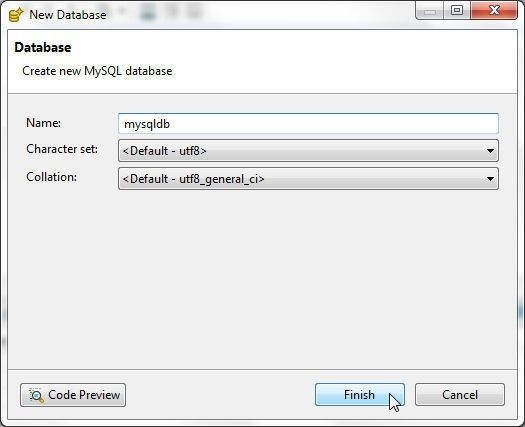
Figure 8. New Database wizard
A new database (mysqldb) gets added in Object Explorer in Databases as shown in Figure 9.
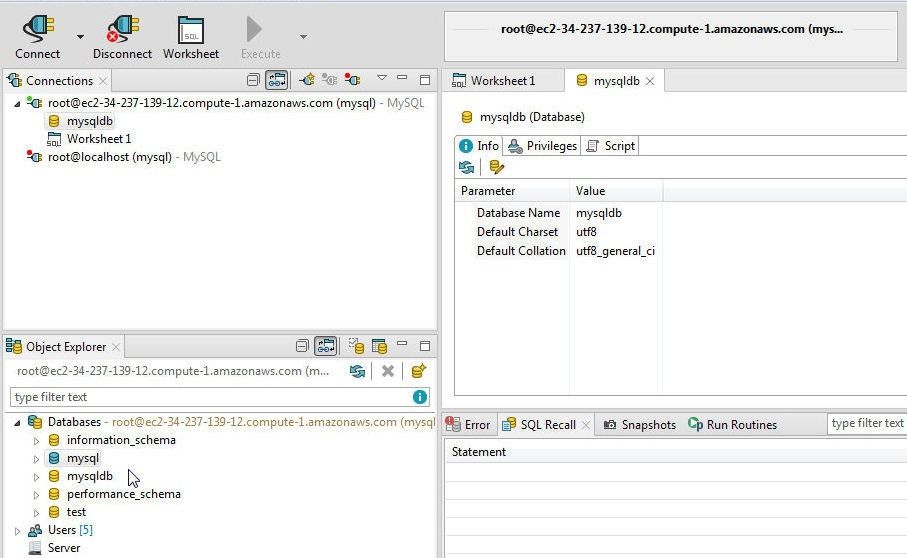
Figure 9. Object Explorer>Databases>mysqldb
To use the database set the database as the default database. Right-click on the database and select Set Database as Default as shown in Figure 10.
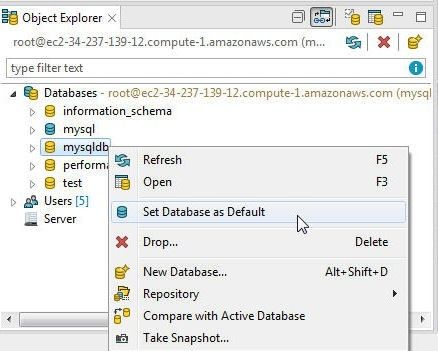
Figure 10. Set Database as Default
The mysqldb database gets set as the default database as indicated by the blue(ish) color in Figure 11.
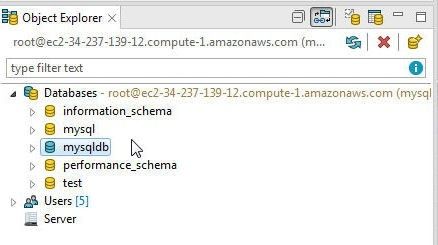
Figure 11. The mysqldb database set as default
List the databases with the following command.
mysql> show databases;
The output from the preceding command is shown in Figure 12.
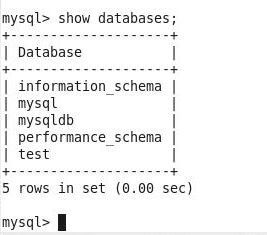
Figure 12. Listing Databases
To use the database in the MySQL CLI the following command sets the database as the current database.
mysql> use mysqldb;
The database gets set as the current database, as shown in Figure 13.
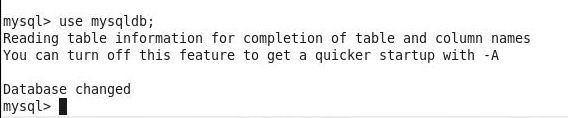
Figure 13. Setting Current Database as mysqldb
Creating a New Database Table
In the section we shall create a new database table using the New Table wizard. With the mysqldb as the default database select Database>New Database Object>Table as shown in Figure 14.
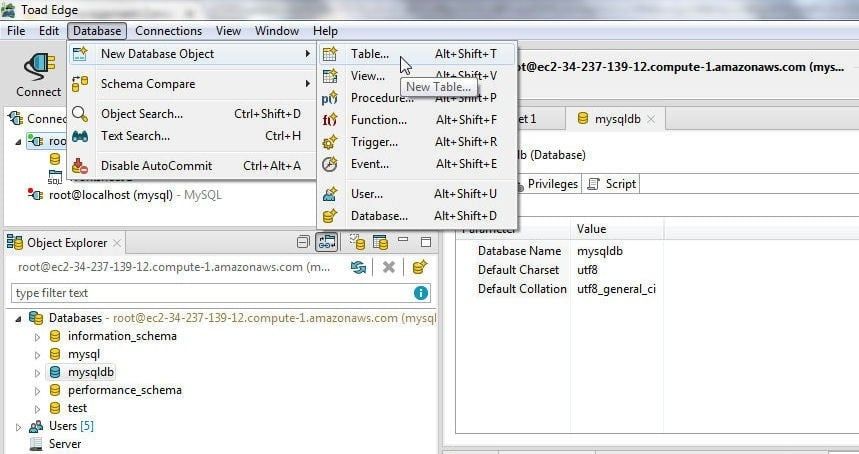
Figure 14. Database>New Database Object>Table
In the New Table wizard the database is selected as mysqldb, as shown in Figure 15. Specify a Table name such as wlslog. Click on Next.
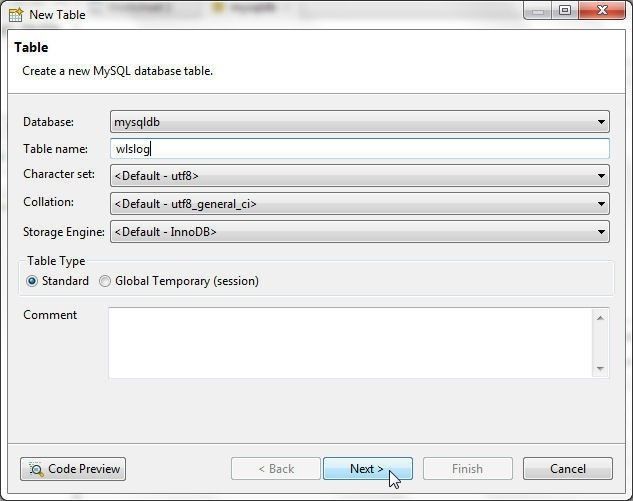
Figure 15. New Table wizard
In Table Columns click on New to add table columns as shown in Figure 16.

Figure 16. New Table>Table Columns>New
In New Column wizard specify a column name (logid as an example) as shown in Figure 17.
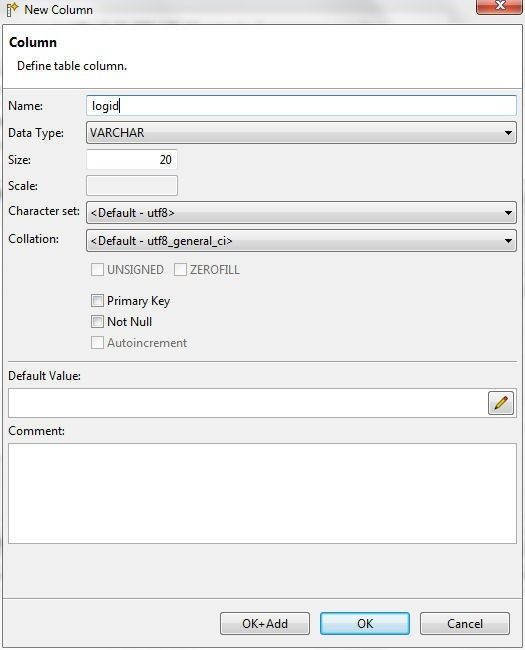
Figure 17. New Column wizard
Select Data Type for the column as INT as shown in Figure 18.
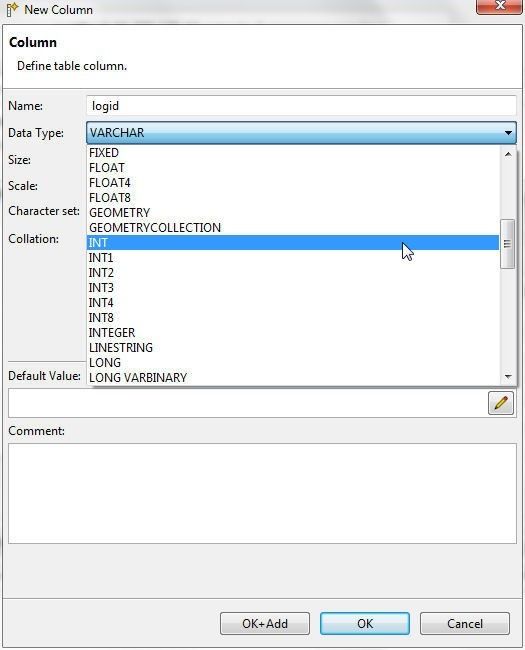
Figure 18. Selecting Data Type as INT
Specify a Precision (10) and select the Primary Key checkbox as shown in Figure 19. The Not Null checkbox gets selected when the Primary Key checkbox is selected.
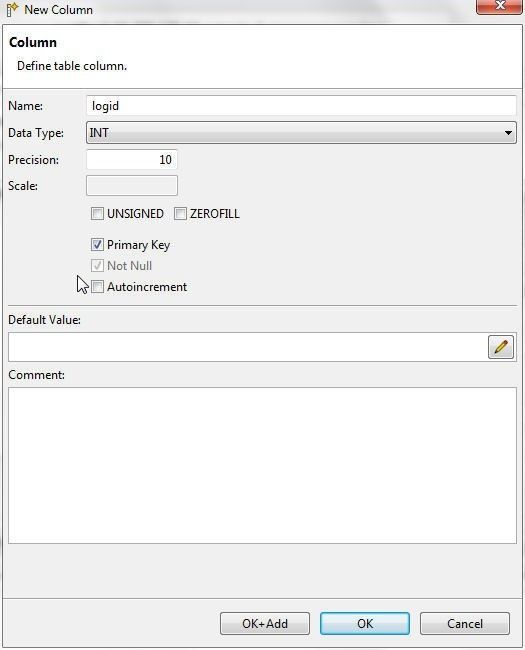
Figure 19. Selecting Primary key option
Click on OK+Add as shown in Figure 20.
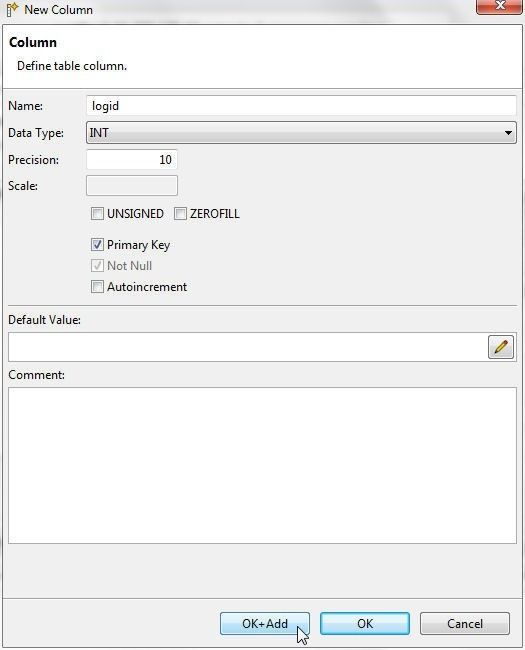
Figure 20. OK+Add
A column gets added and a new New Column wizard gets opened, as shown in Figure 21.
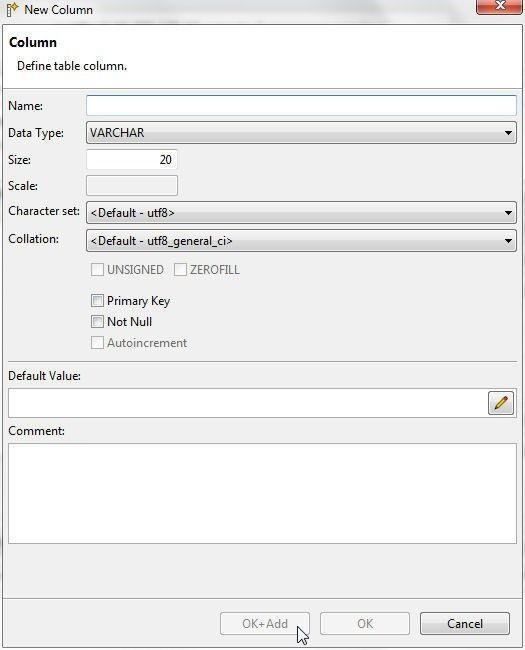
Figure 21. New Column wizard started for another column
Add another column (category for example) and click on OK+Add as shown in Figure 22.

Figure 22. Adding another Column
After all columns (logid, category, type, servername, code and msg) have been added click on Code Preview as shown in Figure 23.

Figure 23. Code Preview for Columns added
The Code Preview gets displayed, as shown in Figure 24. Click on Finish to create the database table.
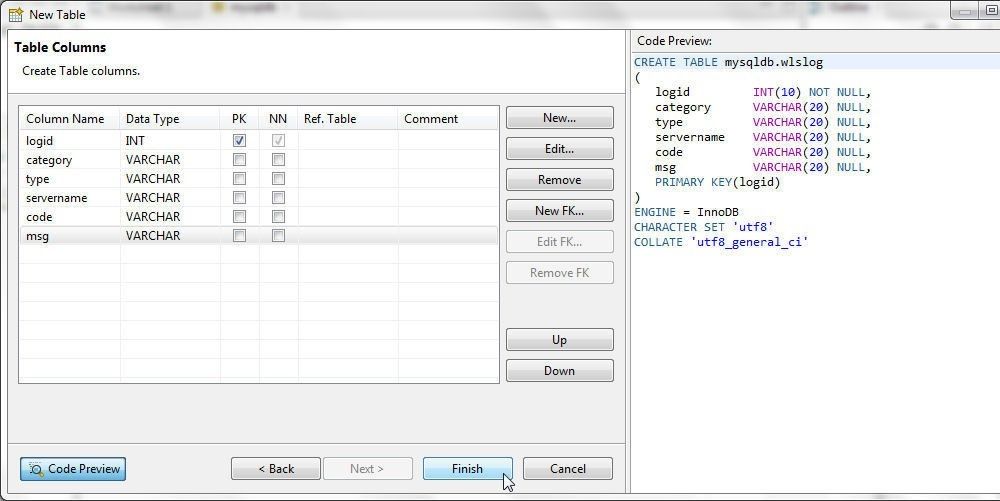
Figure 24. Completing New Table
The database table wlslog gets created, as shown by the Object Explorer>Databases>mysqldb>Tables>wlslog in Figure 25. AutoCommit is ON by default, as indicated by a message in lower bar in Figure 25.
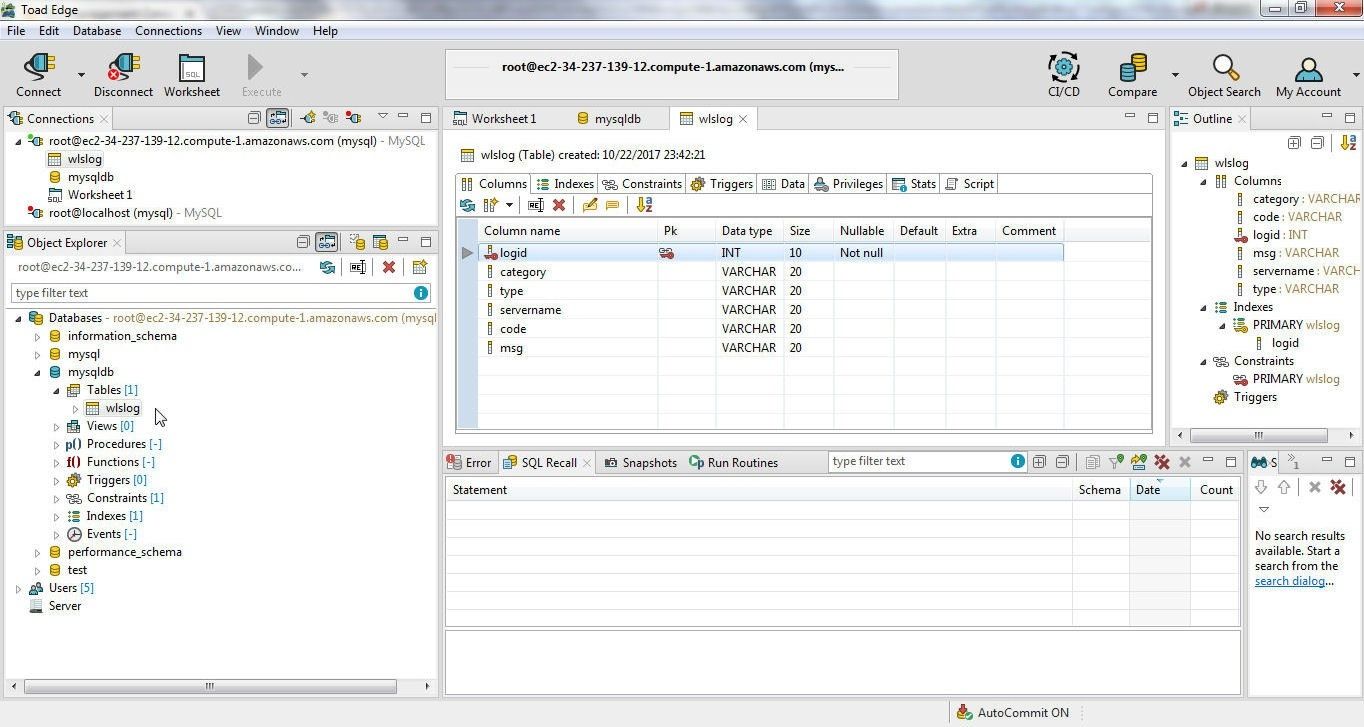
Figure 25. Table wlslog added to Object Explorer>Databases>mysqldb>Tables
Click on the wlslog table to display the table columns as shown in Figure 26.
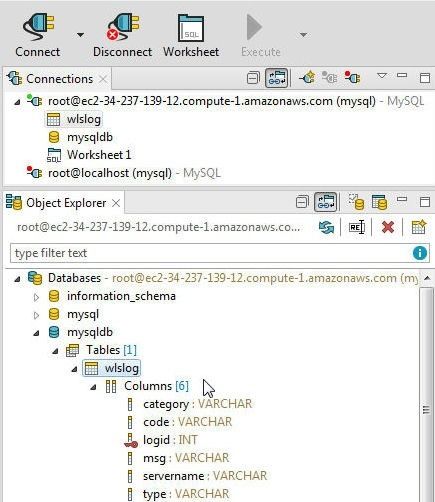
Figure 26. Table wlslog Columns
Table or table columns may be modified after being created. For example, the column size for the msg column is 20, as shown in Figure 27.
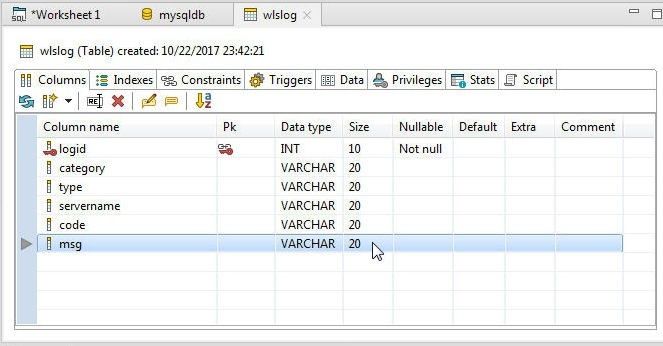
Figure 27. Column Size for msg Column
To edit data type right-click on the column and select Edit Data Type as shown in Figure 28. Other options include Add Column, Drop Column, Rename Column, Edit Column Comment, Edit Default Value, Set ‘Not null’ constraint, Add Constraint, and Sort Columns Alphabetically.
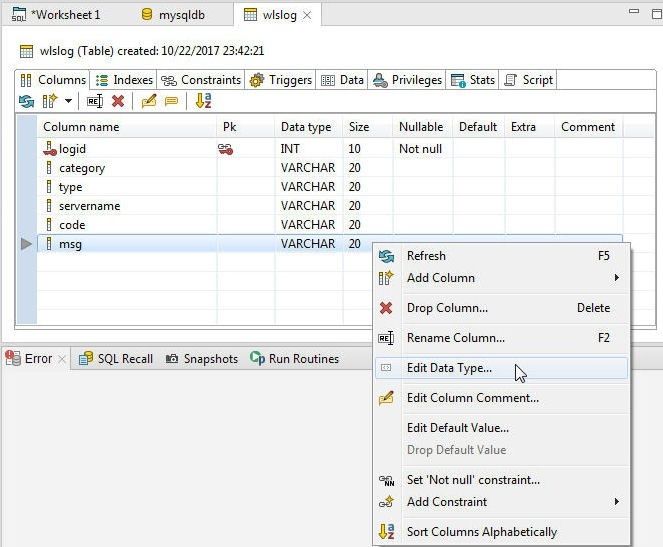
Figure 28. Edit Data Type and other Column Options
As an example, modify the column size for the msg column, which is set to 20 as shown in Figure 29. Double-click on the msg column size setting.
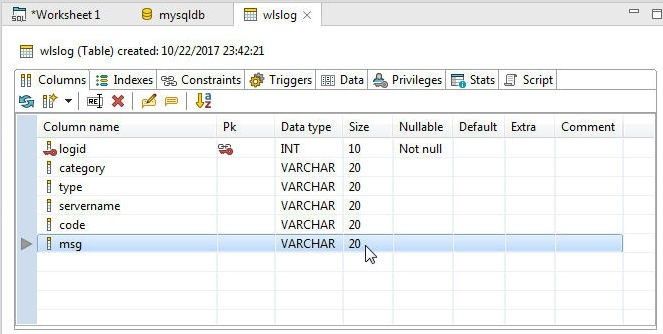
Figure 29. Column msg Size setting
The Edit Column Data Type wizard gets started, as shown in Figure 30.
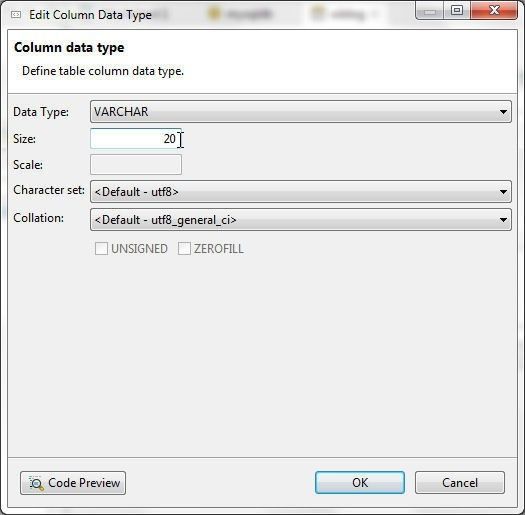
Figure 30. Edit Column Data Type
Modify the Size to 40 and click on OK as shown in Figure 31.

Figure 31. Modifying Column Size
The column size for the msg column gets set to 40, as shown in Figure 32.
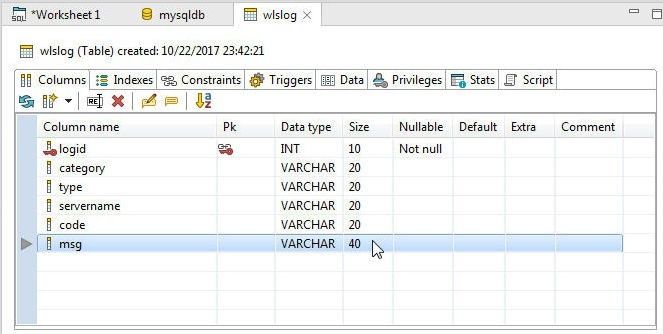
Figure 32. Modified Column Size
The table added may be listed in the MySQL CLI with the following command.
mysql> show tables;
The wlslog table gets listed, as shown in Figure 33.
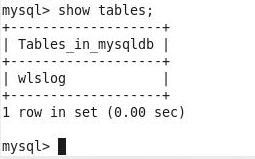
Figure 33. Listing wlslog Table
Adding Data to Table
In this section we shall add table data to the wlslog table using the Worksheet shown in Figure 34. One worksheet gets created by default for each new connection in Toad Edge.
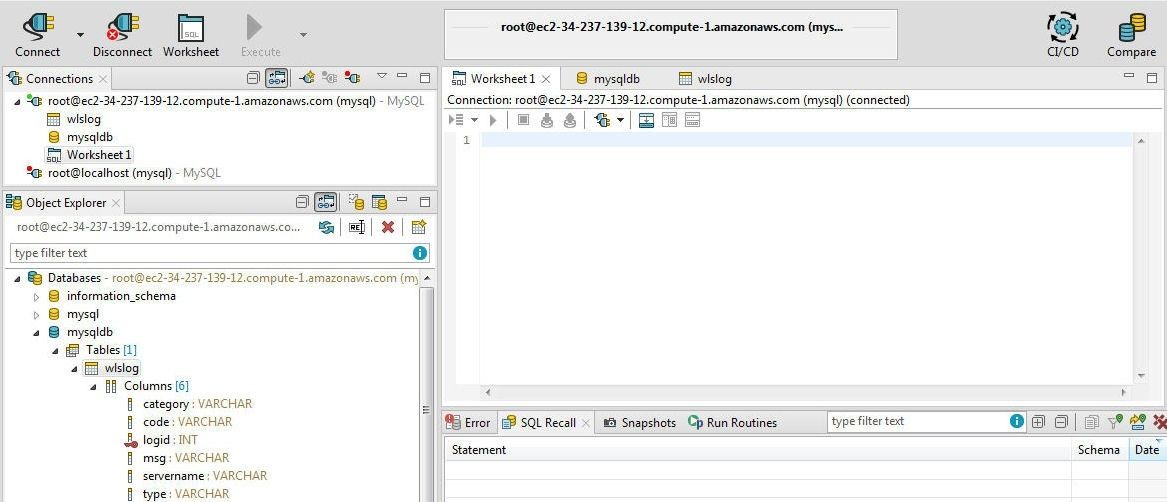
Figure 34. Worksheet1
Copy the following SQL script to add data to the Worksheet1.
INSERT INTO wlslog(logid,
                   category,
                   type,
                   servername,
                   code,
                   msg)
     VALUES (1,
             'Notice',
             'WebLogicServer',
             'AdminServer',
             'BEA-000365',
             'Server state changed to STANDBY');

INSERT INTO wlslog(logid,
                   category,
                   type,
                   servername,
                   code,
                   msg)
     VALUES (2,
             'Notice',
             'WebLogicServer',
             'AdminServer',
             'BEA-000365',
             'Server state changed to RUNNING');
Click on Execute All Statements to run the SQL Script, as shown in Figure 35.
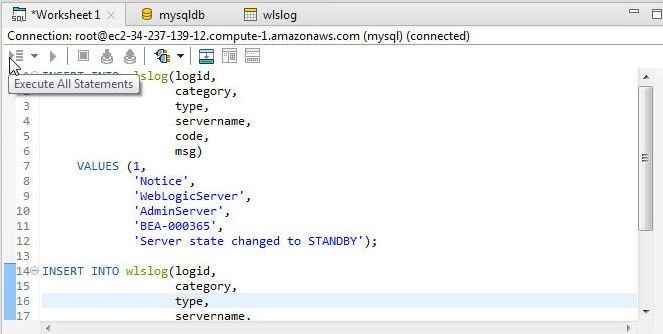
Figure 35. Execute All Statements
The two SQL statements get processed, as shown in SQL Recall in Figure 36.
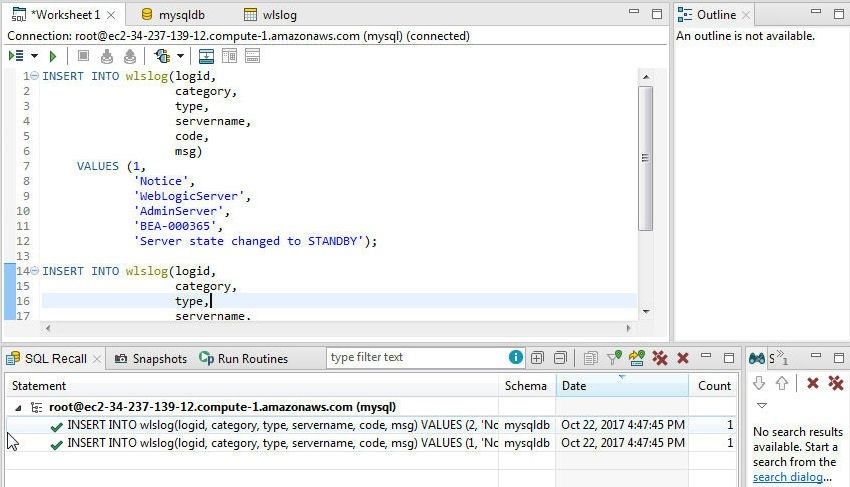
Figure 36. Two SQL Statements Processed
Run the following SQL statement in MySQL CLI to list the data added.
mysql> select * from wlslog;
The data added gets listed, as shown in Figure 37.
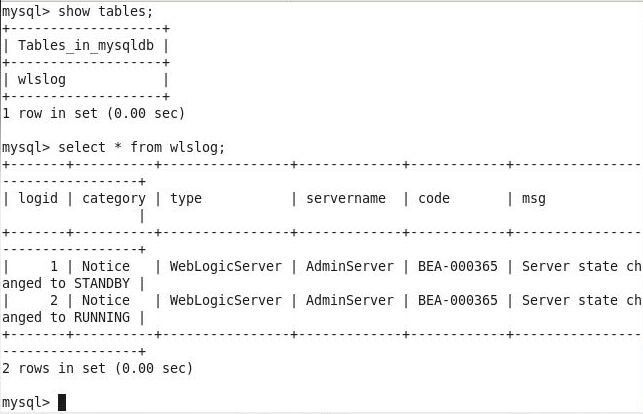
Figure 37. Listing Table Data
Querying Table
Next, we shall run a SQL query on the table created. Click on Open SQL Worksheet as shown in Figure 38.

Figure 38. Open SQL Worksheet
Add a SQL statement to the Worksheet2 to query the wlslog table as shown in Figure 39. The SELECT * FROM wlslog statement selects all columns.
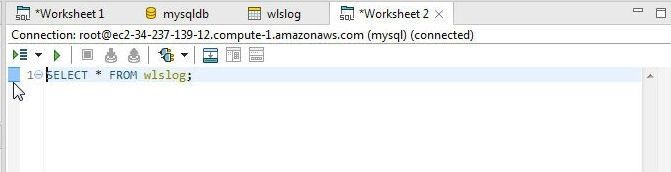
Figure 39. Adding a SELECT statement to Worksheet2
Click on Execute SQL Statement as shown in Figure 40 to run the query.
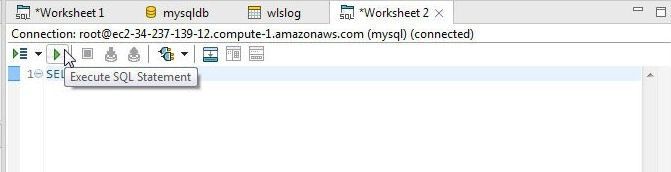
Figure 40. Execute SQL Statement
As SQL Recall in Figure 41 indicates, the SELECT statement gets run.
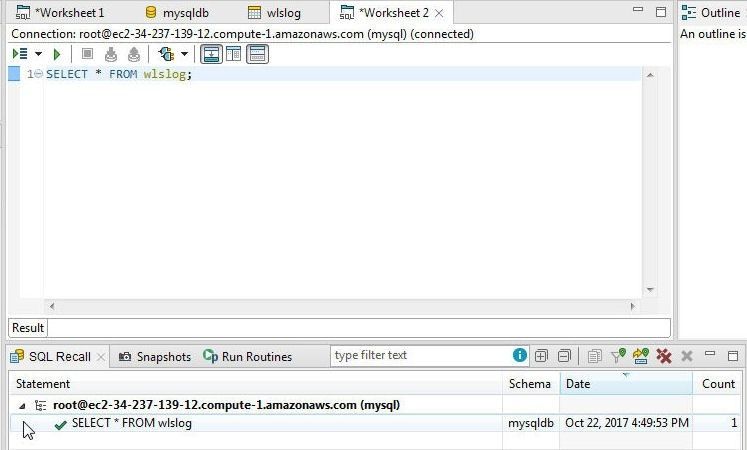
Figure 41. SQL Recall for SELECT statement
To display the result set click on Show Result Set as shown in Figure 42.
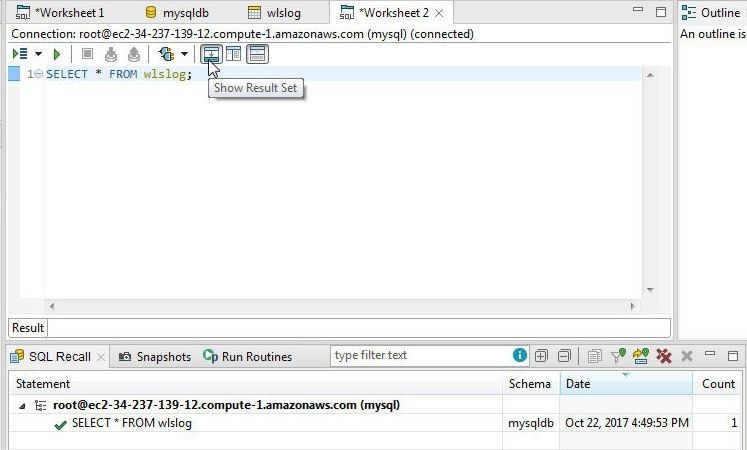
Figure 42. Show Result Set
The Result Set gets displayed, as shown in Figure 43.
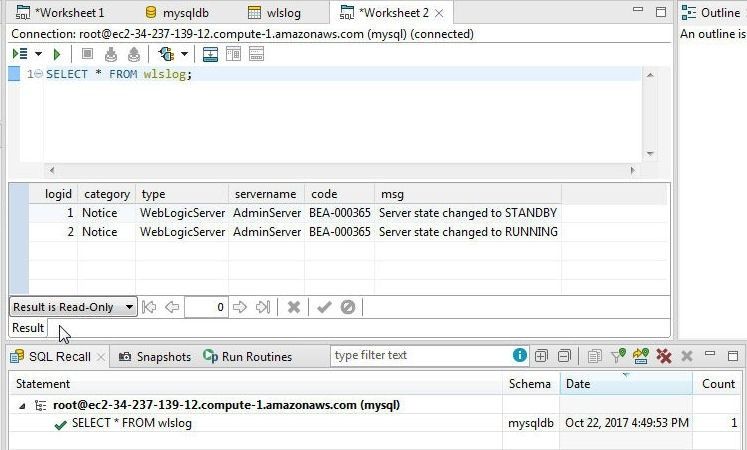
Figure 43. Result Set
Disconnecting and Removing a Connection
To disconnect the connection to the MySQL database on EC2 right-click on the connection and select Disconnect as shown in Figure 44.
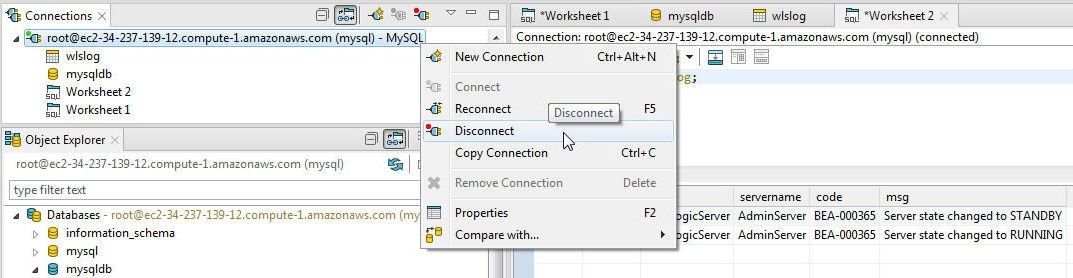
Figure 44. Disconnect
Disconnect may also be selected from the Connections in the tool bar as shown in Figure 45.
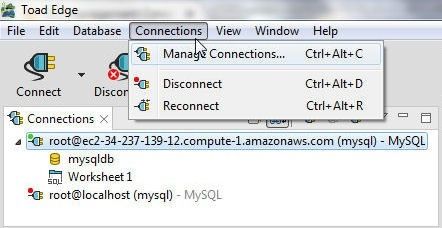
Figure 45. Connections>Disconnect
The connection gets disconnected, as shown in Figure 46. The icon for a disconnected connection has a red indicator and an icon for a connected connection has a green indicator.
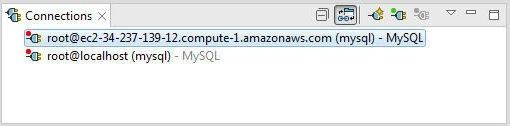
Figure 46. Disconnected Connection
To remove the connection right-click on the connection in Connections and select Remove Connection as shown in Figure 47.
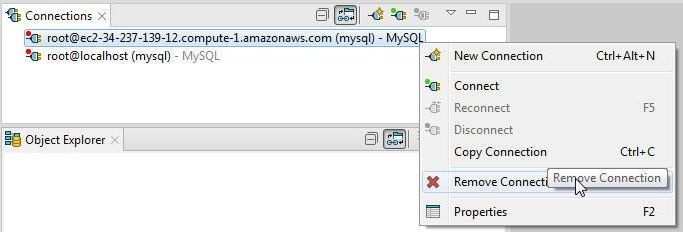
Figure 47. Remove Connection
In the Confirm dialog click on OK as shown in Figure 48.
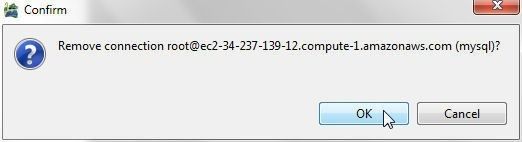
Figure 48. Confirm prompt
Stopping EC2 Instance
The EC2 instance may be stopped when not required to be used. To stop the EC2 instance select the EC2 instance in the EC2 Console and select Actions>Instance State>Stop as shown in Figure 49.
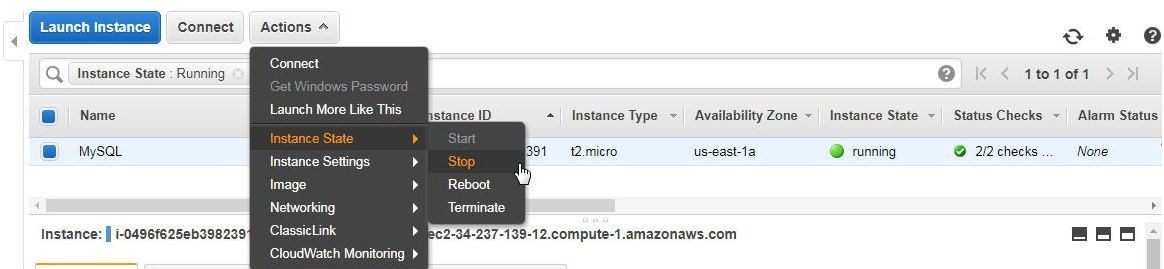
Figure 49. Stopping EC2 Instance
The other options are to Reboot and Terminate the EC2 instance.
Conclusion
In two articles we have discussed using a MySQL database instance running on an AWS EC2 instance. Toad Edge 1.1 is an integrated development environment (IDE) for using MySQL database with built-in wizards for connecting to a database, creating a new database, creating a database table, adding table data, and querying a table.
Start the discussion at forums.toadworld.com