In this topic, I would like to cover the base instance configuration of Db2 v11.1 to enable SSL connections from clients. In most situations, databases are accessed over a restricted network, but in some cases, it is necessary to allow access from an untrusted location.
One part of this task is authentication (which can be done also via certificates) and another part is the encrypted connection that protects the communication between server and client, making it unreadable for the attacker.
This post will cover configuration of Linux IBM Db2 v11.1 instance (other platforms are similar). It will allow you to connect to the database using any type of client which supports SSL connection. The configuration of the client will be covered in the further post.
Before starting (requirements):
- Create or use an existing IBM Db2 instance (The step-by-step guide how to install IBM Db2 v11.1 with help of Docker can be found in one of my previous posts – How to install IBM Db2 Developer Edition on Centos 7 using Docker)
- Make sure the connection concentrator is not enabled. If the parameter max_connections is greater than max_coordagents, the connection concentrator is activated. Update database manager to fix this requirement.
- Check that the location of GSKit is part of the PATH variable (Windows) or LIBPATH, SHLIB_PATH or LD_LIBRARY_PATH (Linux and Unix). Default location:
- Linux and Unix – sqllib/lib64/gskit (64 bit), sqllib/lib/gskit (32 bit)
- Windows – C:Program FilesIBMGSK8lib64 (64 bit), C:Program Files (x86)IBMGSK8lib (32 bit)
- Ensure that the path to GSKit binaries is in the PATH variable. (For Linux the default path is /opt/ibm/db2/V11.1/gskit/bin/)
Notes:
- GSkit is automatically installed when IBM Db2 is installed.
- SSL communication will always be in FIPS mode.
- SSL communication between the HADR databases is not covered in this post.
- Run all commands as instance owner.
As a first step, it is necessary to create a certificate folder, a key database and set up digital certificates. To create a certificate folder and a key database use the following command:
mkdir certs
cd certs/
gsk8capicmd_64 -keydb -create -db "server.kdb" -pw "Passw0rd" –stash
Command mkdir and cd will create the directory and change the location to the directory.
Command gsk8capicmd_64 is used for management of CA certificates. In our command we used the following options:
- -keydb – work with key database
- -create – create a key database
- -db – name of the file that is used as a key database
- -pw – password to the key database
- -stash – this option will create a stash file in the same location as the key database
The next step is to create a certificate for the key database. In this example, I will use a self-signed certificate. Creating a certificate signed by certificate authorities will be covered in another post. Here, I will create a self-signed certificate with a label mylabel.
gsk8capicmd_64 -cert -create -db "server.kdb" -pw "Passw0rd" -label "mylabel" -dn "CN=testcompany" -size 2048 -sigalg SHA256_WITH_RSA
The following options are used:
- -cert – command is for certificates
- -create – creates the certificate
- -db – indicates which database the certificate will be stored in
- -pw – password for the key store. The hyphen (-) can be used, and an interactive prompt will appear for password
- -label – label for the certificate to uniquely identify the certificate in the key database
- -dn – The X.500 distinguished name that will identify the certificate. Only a CN (common name) value is required. Other information can be added to the DN (distinguish name), such as O for an organization, C for a country and so on.
- -size – size of the key in bits
- -sigalg – signature algorithm used for the certificate. Algorithms for PKCS #12 are used.
Now it is necessary to extract the certificate file that will be distributed to clients to enable them to establish the SSL connection (client version 10.5 FP 5 and higher). The extracted certificate will be stored in the file server.arm.
gsk8capicmd_64 -cert -extract -db "server.kdb" -pw "Passw0rd" -label "mylabel" -target "server.arm" -format ascii –fips
The new options used here are:
- -extract – extract the certificate from the key database
- -target – name of the target file (server public key)
- -format – format of the exported file (ascii or binary)
- -fips – enable or disable Federal Information Processing Standards mode (true or false). True by default.
The system will generate the following files in the certs folder:
- server.arm
- server.crl
- server.kdb
- server.rdb
- server.sth
Now it is possible to configure the Db2 instance.
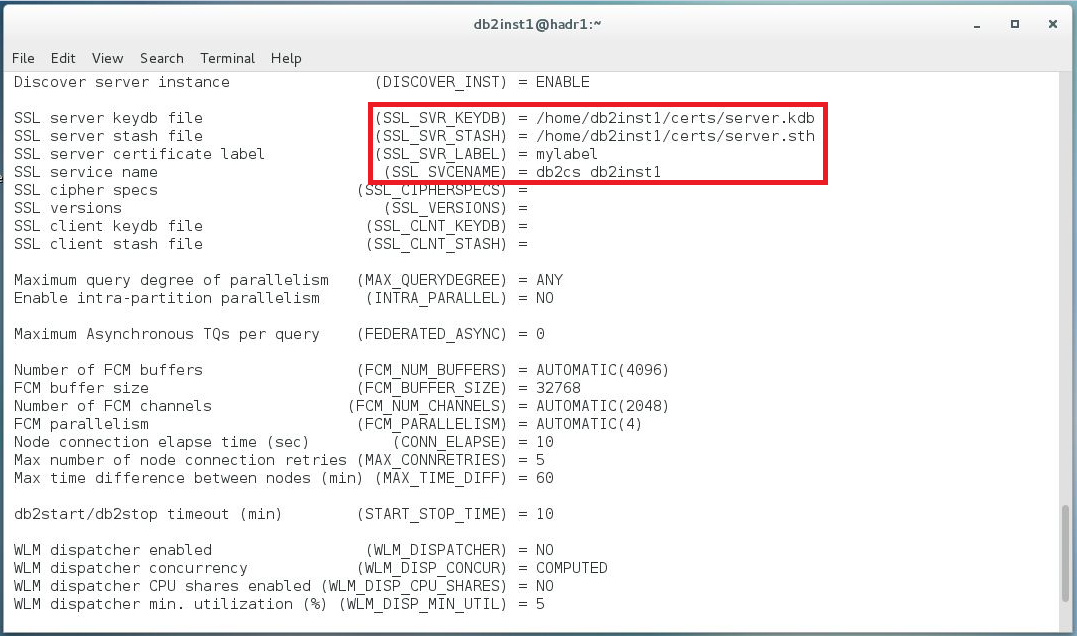
The first command sets up the option SSL_SVR_KEYDB. If this parameter is null, SSL support is not enabled, so the path to the key store file is required.
db2 update dbm cfg using SSL_SVR_KEYDB /home/db2inst1/certs/server.kdb
The following command sets up the SSL_SVR_STASH option (for a stash file).
db2 update dbm cfg using SSL_SVR_STASH /home/db2inst1/certs/server.sth
The SSL_SVR_STASH option needs to be set to enable SSL communication.
Both commands will return the warning SQL1362W. It can be ignored for now.
It is also necessary to set the SSL_SVR_LABEL and fill it with the value defined as a label when the certificate was created.
db2 update dbm cfg using SSL_SVR_LABEL mylabel
The SSL connections require a separate port. It can be defined as a service name or port number. The service name needs to be defined in /etc/services. My service name looks like this:
db2cs_db2inst1 50001/tcp
The service name is db2cs_db2inst1, port 50001, protocol TCP. This parameter is also required to enable SSL connections.
db2 update dbm cfg using SSL_SVCENAME db2cs_db2inst1
The last step before a restart of the instance is to set the environment variable for the instance. The database manager can support multiple protocols at the same time, but the following command will enable only SSL connections.
db2set -i db2inst1 DB2COMM=SSL
This command will allow SSL connections for instance db2inst1.
The last step is to restart the instance.
db2stop
db2start
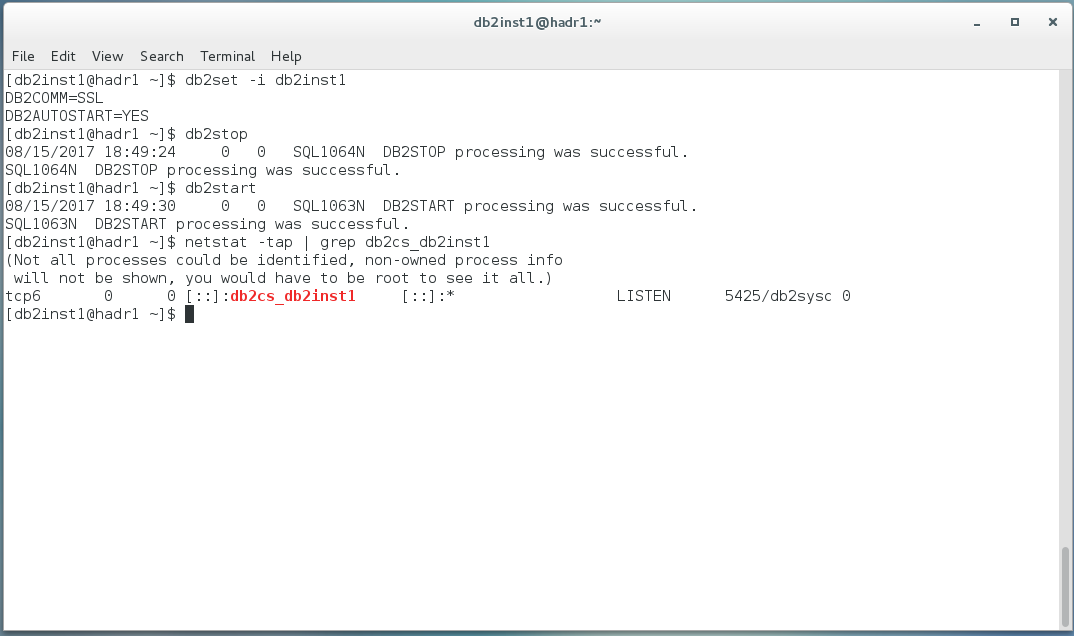
If you see no error during the start, the configuration was successful. You can do a quick check with netstat and see if the port for the service is listening. To establish the SSL connection from the client it is necessary to configure the client. These steps will be described in a future post.
Try Toad for IBM DB2 for free
Are you in a trial now or just learning about Toad for IBM DB2? Find out which edition is right for you with our Toad for IBM DB2 functional matrix.
Like what you’ve learned so far about Toad for IBM DB2, why not try it for free for 30 days?

Already in a trial? Buy it now. Or request pricing.
Learn moreLearn more about Toad for IBM DB2 so you can spend less time managingDB2 and more time innovating. Data sheet: Toad for IBM DB2 ebook: Toad for IBM DB2 Tips and Tricks Questions?Start a discussion about this blog in the Toad World® forum, Toad for IBM DB2 . |
Help your colleagues
If you think your colleagues would benefit from this blog, share it now on social media with the buttons located at the top of this blog post. Thanks!
Sources:
Start the discussion at forums.toadworld.com