Introduction
Toad Data Point is a relational data source access, query, and analytics tool that may be used to create a table, add table data, query a table, and prepare reports; all from a graphical user interface (GUI). Toad Data Point supports several data sources including file data sources (CSV, Excel and Access), relational data sources (including DB2, Oracle, MySQL, PostgreSQL, SQL Server), and Business Intelligence data sources (including Google Analytics and Oracle BI Enterprise). In this article we shall take a slightly different approach by connecting to a data source running on a managed service on the cloud. We shall be using Oracle Database on Amazon Web Services (AWS) Relational Data Service (RDS) as a data source.
This article has the following sections.
Setting the Environment
Creating an Oracle Database Instance on RDS
Creating a Connection with Oracle Database on RDS
Creating a Database Table
Adding Database Table Data
Committing Database Table Changes
Using Query Builder
Using SQL Editor
Setting the Environment
The only prerequisites are the following:
Create an Amazon Web Services account at https://aws.amazon.com/resources/create-account/.
Download and install Toad Data Point from https://www.quest.com/products/toad-data-point/.
The Toad Data Point dashboard is shown in Figure 1.
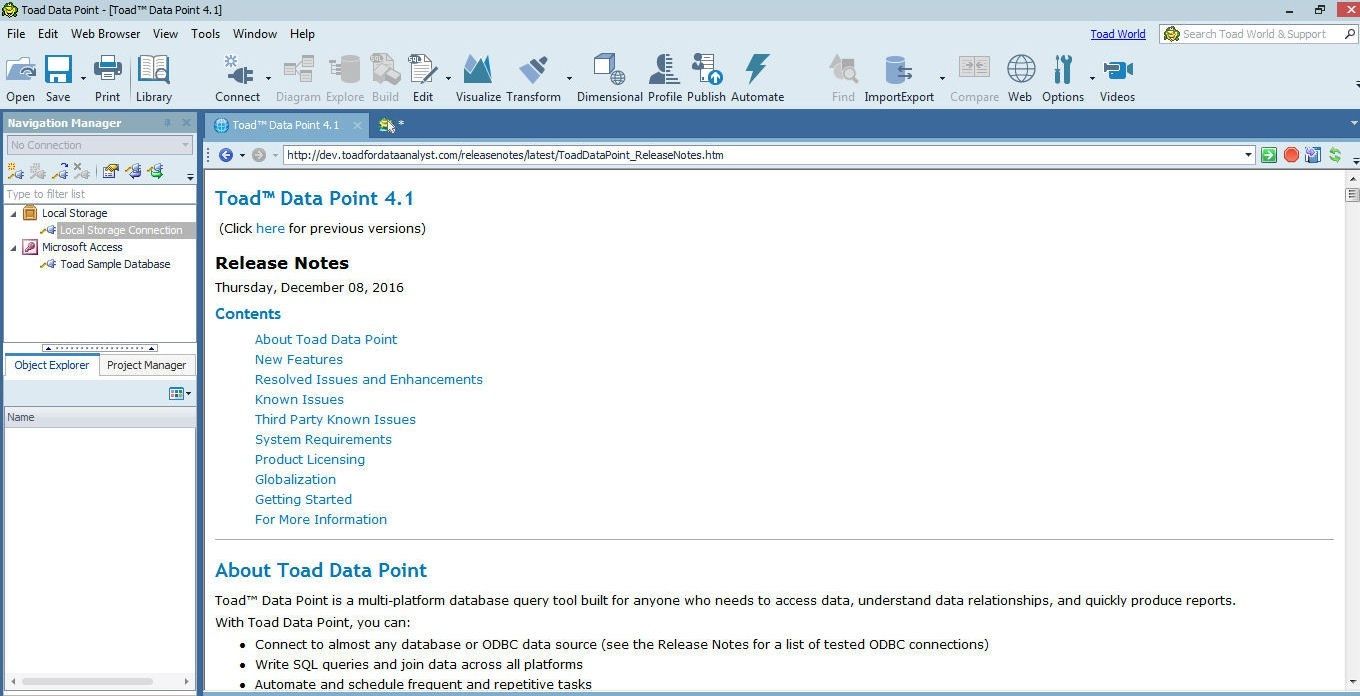
Figure 1. Toad Data Point Dashboard
Creating an Oracle Database Instance on RDS
First, we need to create an Oracle Database instance on RDS; for which, access the RDS service on AWS in the Database category or at https://aws.amazon.com/rds/. Click on Get Started Now to create a RDS instance as shown in Figure 2.

Figure 2. Starting RDS
In Select Engine select the Oracle SE DB Engine with Select as shown in Figure 3.
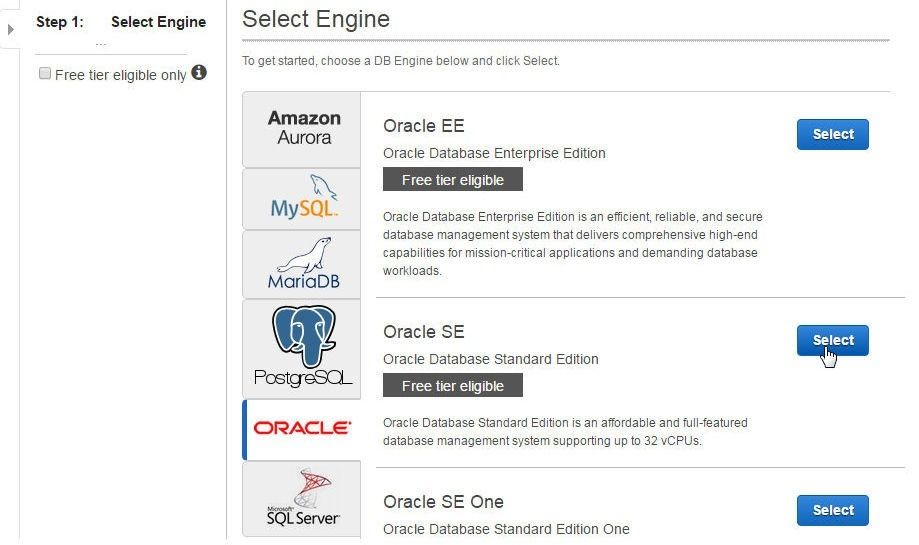
Figure 3. Selecting Oracle SE DB Engine
Select Oracle SE in Dev/Test in the Production? page. Click on Next Step as shown in Figure 4.
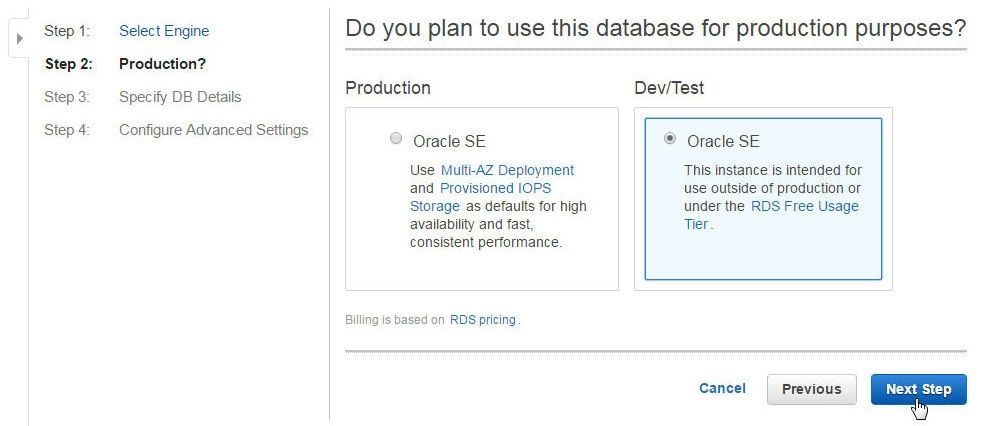
Figure 4. Selecting Dev/Test
In Specify DB Details select the checkbox “Only show options that are eligible for RDS Free Tier”. Select the default settings as shown in Figure 5 or customize the settings.
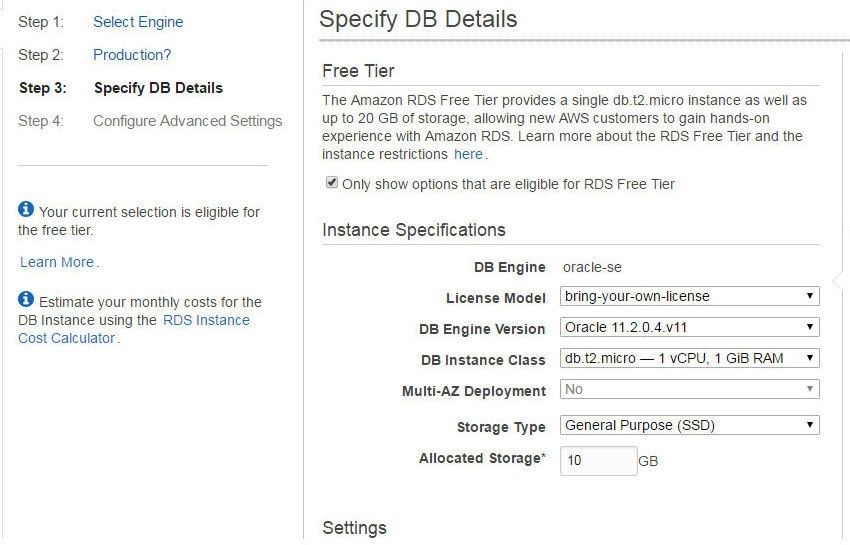
Figure 5. Specify DB Details
Specify a DB Instance Identifier (oradb) and specify the Master Username and Password as shown in Figure 6. Click on Next Step.
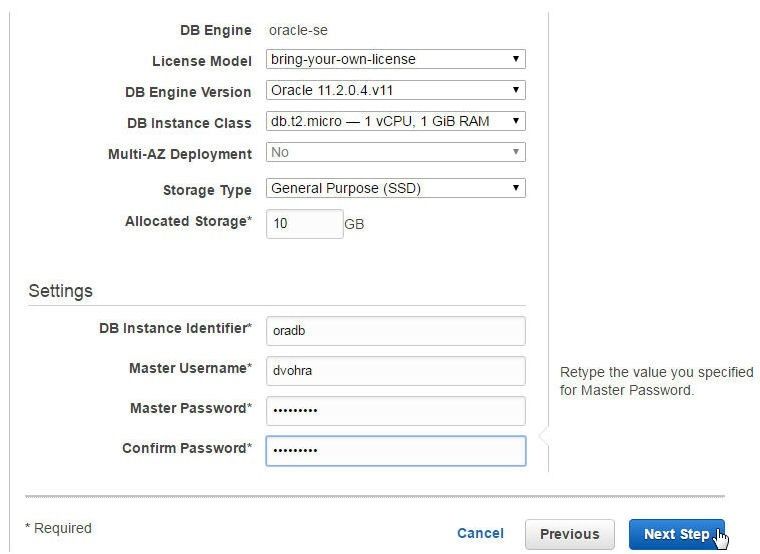
Figure 6. Specifying DB Instance Identifier
In Configure Advanced Settings specify the advanced options as shown in Figure 7. In Network & Security settings for VPC select Create new VPC and for Subnet Group select Create new DB Subnet Group. For Publicly Accessible select Yes. For Availability Zone select No Preference. For VPC Security Group (s) select Create new Security Group. Specify Database Name (ORCL), Database Port (1521) and keep the default settings for DB Parameter Group and Option Group.
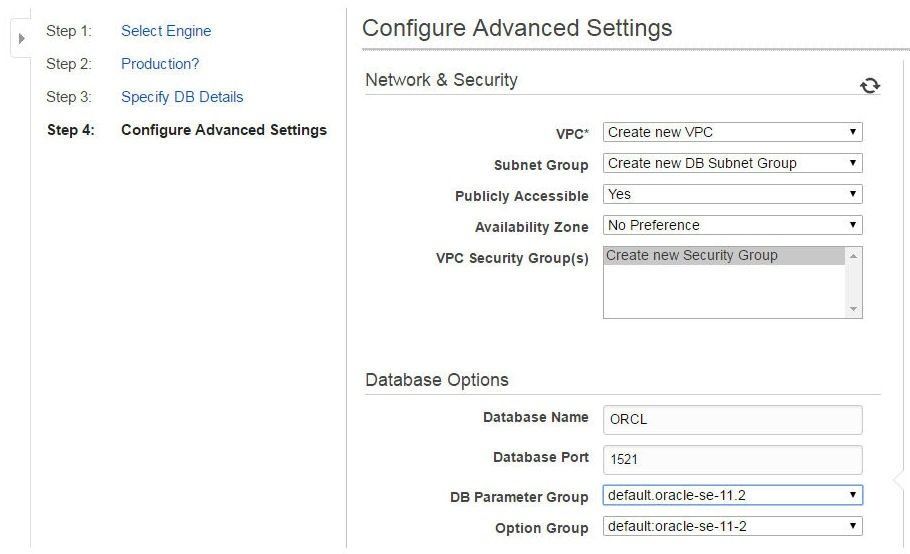
Figure 7. Specifying Advanced Options
Select the Character Set Name and Enable Encryption. Keep the default settings for Backup, Monitoring and Maintenance. Click on Launch DB Instance as shown in Figure 8.
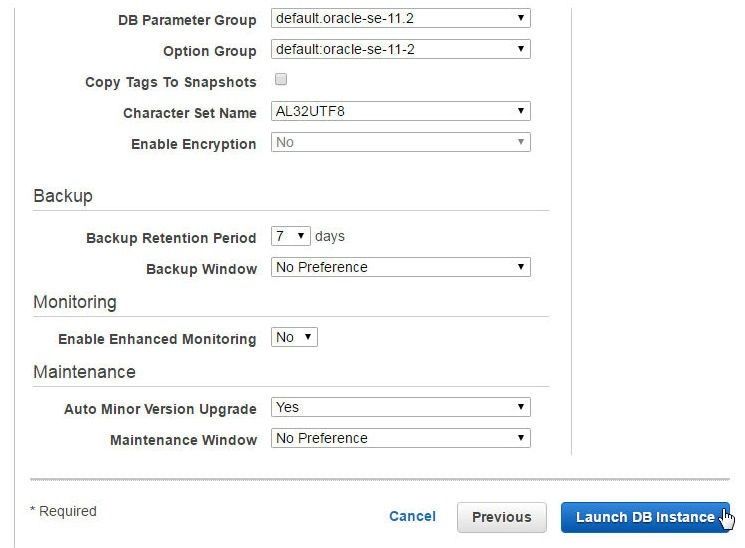
Figure 8. Launch DB Instance
The message “Your DB Instance is being created” gets displayed to indicate that the DB instance is starting. Click on View Your DB Instances as shown in Figure 9.
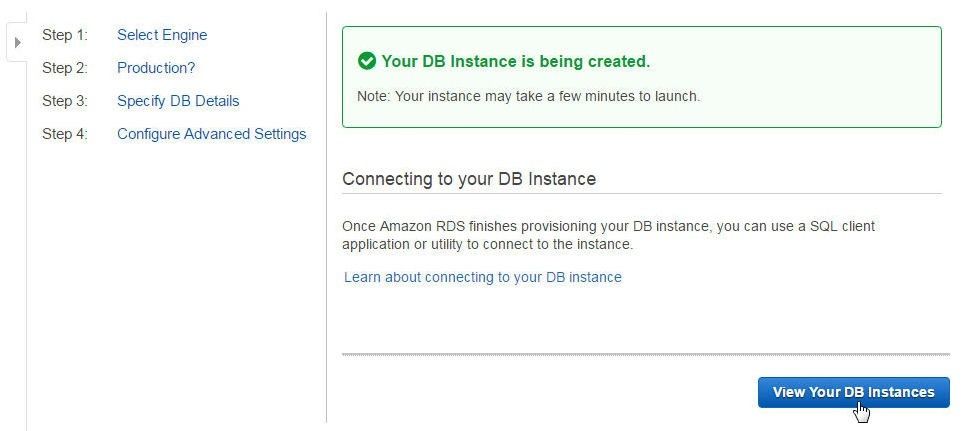
Figure 9. View Your DB Instances
The DB Instance for Oracle Database gets created and an Endpoint gets displayed, as shown in Figure 10.

Figure 10. DB Instance oradb Created
Creating a Connection with Oracle Database on RDS
Having created a data source, in this section we shall we shall create a connection with the data source. Click on Create a new connection as shown in Figure 11.
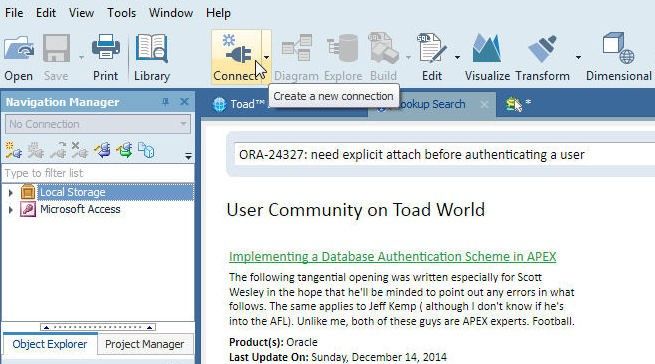
Figure 11. Create a new connection
In the list of data sources select Oracle as shown in Figure 12.

Figure 12. Selecting Oracle as Data Source
In the Create New Connection dialog the Group is pre-selected as Oracle because in the previous screen the Oracle database was selected as the data source. In the Login tab specify Database name as XE and specify a User name and Password, which must be the same as the Username and Password specified when creating the Oracle Database Instance on RDS. Select Connect as: Default. In the Oracle Client click on TNSName Editor for the TNSNames.ora file as shown in Figure 13.
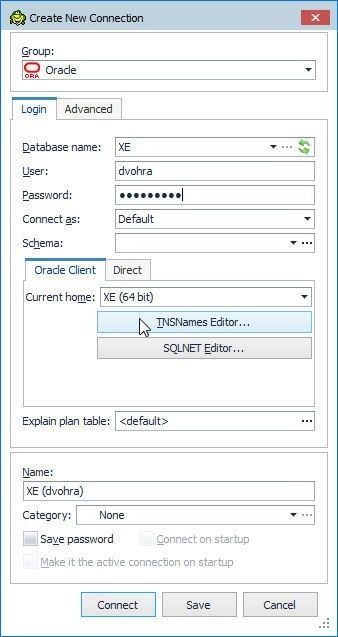
Figure 13. Create New Connection
We shall use the configuration values required in the TNSName Editor from the Configuration Details. The DB Name ORCL indicated in Figure 14 is the SID for the CONNECT_DATA in the TNSName Editor.
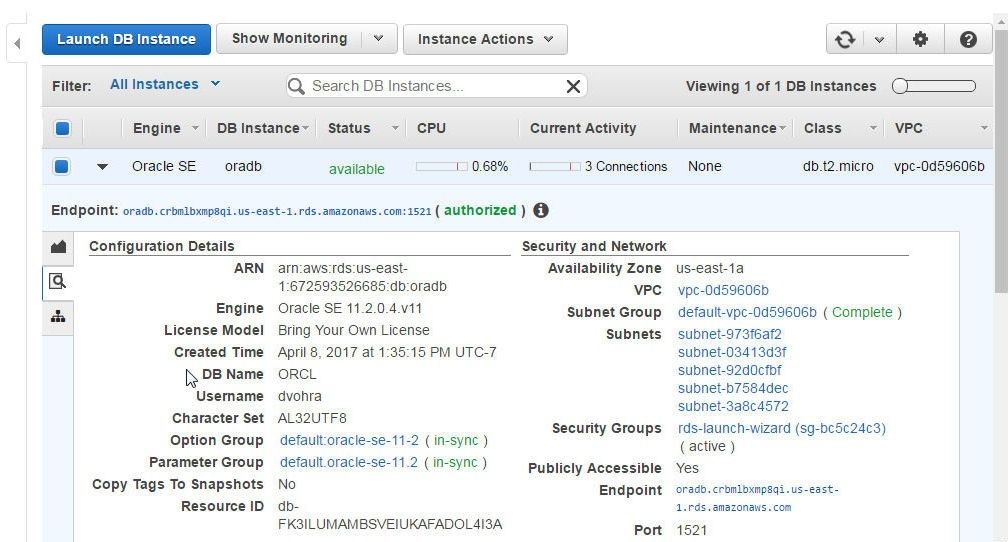
Figure 14. DB Name
The Endpoint indicated in Figure 15 is the HOST in the TNSName Editor. The Port is listed as 1521 and is to be used for the PORT in the TNSName Editor.

Figure 15. Endpoint and Port
The connect string for the XE database which was selected in Create New Connection is shown in Figure 16.
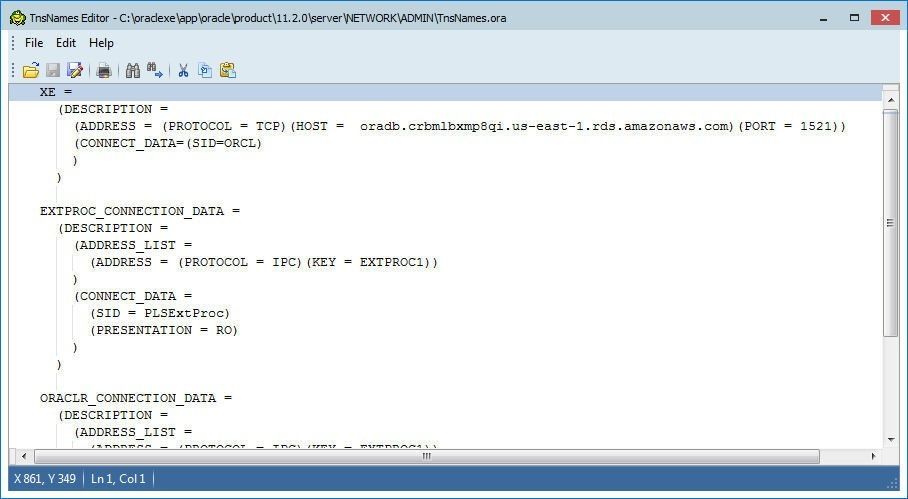
Figure 16. Connect String for the XE Database with HOST, PORT and SID specified
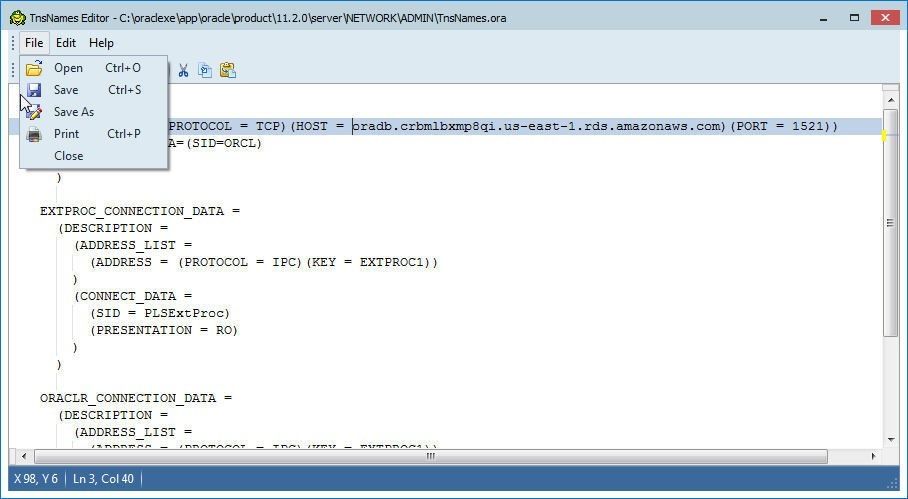
Click on File>Save to save the TNSNames.ora file as shown in Figure 17.
In the Create New Connection click on Connect to connect to the data source, which is Oracle Database, as shown in Figure 18.
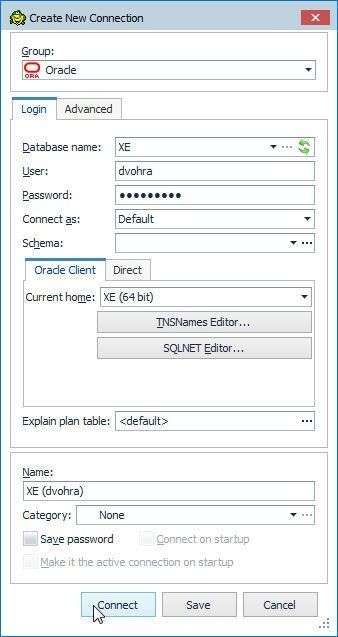
Figure 18. Connect
A new connection Oracle>XE gets created and added to the Navigation Manager, as shown in Figure 19.
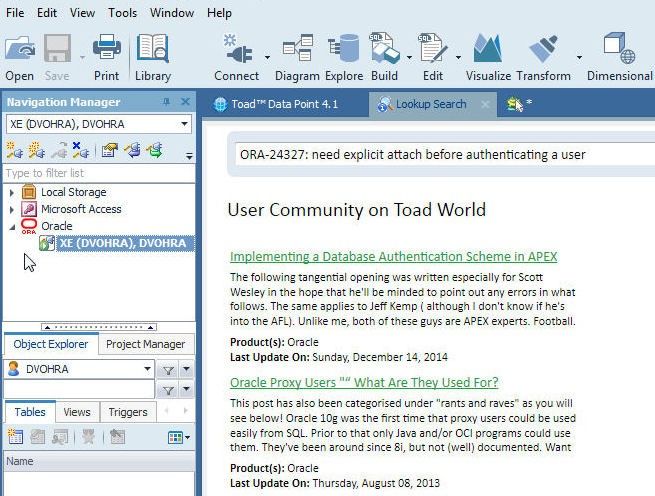
Figure 19. New Connection for Oracle Data Source
Right-click on the XE connection to display the different options as shown in Figure 20.
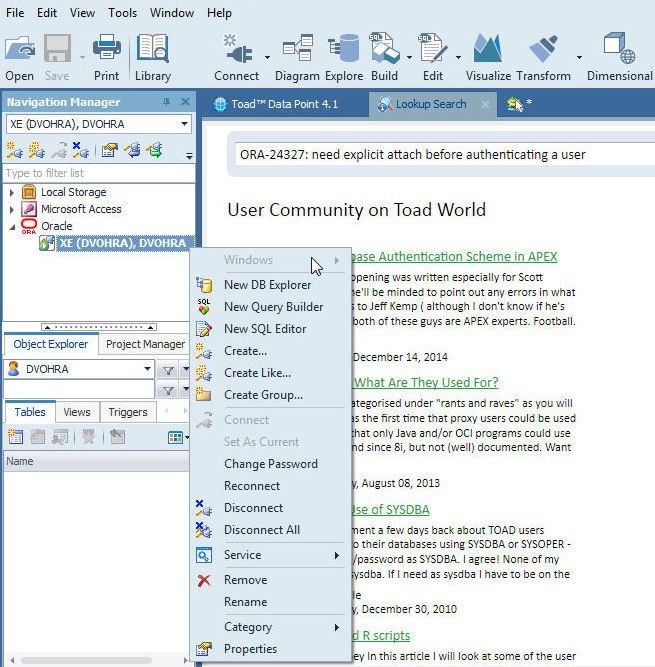
Figure 20. Connection Options
Creating a Database Table
To create a database table right-click on the Oracle>XE connection and select Operations>Create Table as shown in Figure 21.
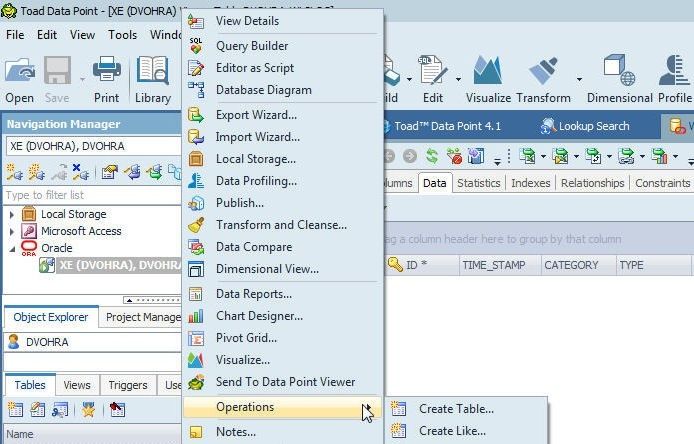
Figure 21. Selecting Operations>Create Table
The Create Table wizard gets displayed, as shown in Figure 22.

Figure 22. Create Table Wizard
Specify the table name in the Name field as WLSLOG as shown in Figure 23. Click on Add to add column names as shown in Figure 23. Specify 1st Column Name as ID, Type as VARCHAR(255), and select the Not Null checkbox. Click on the Set Primary Key to make the ID column as the primary key column. Click on Add to add other columns.
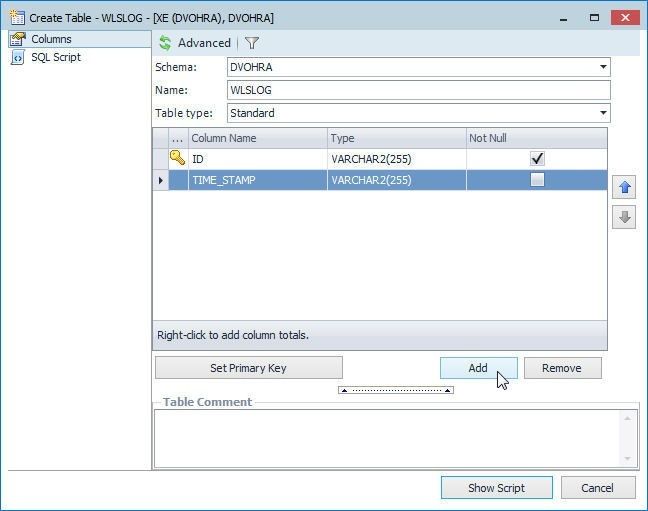
Figure 23. Adding the Primary Key Column
Add columns ID, TIME_STAMP, CATEGORY, TYPE, SERVERNAME, CODE, MSG as shown in Figure 24. Click on Show Script to list the script.
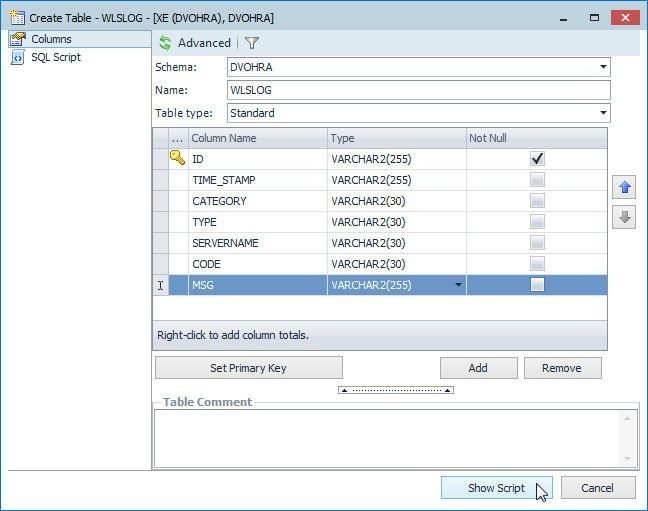
Figure 24. WLSLOG Table Columns
The SQL Script gets displayed, as shown in Figure 25. Click on Execute to run the SQL script.
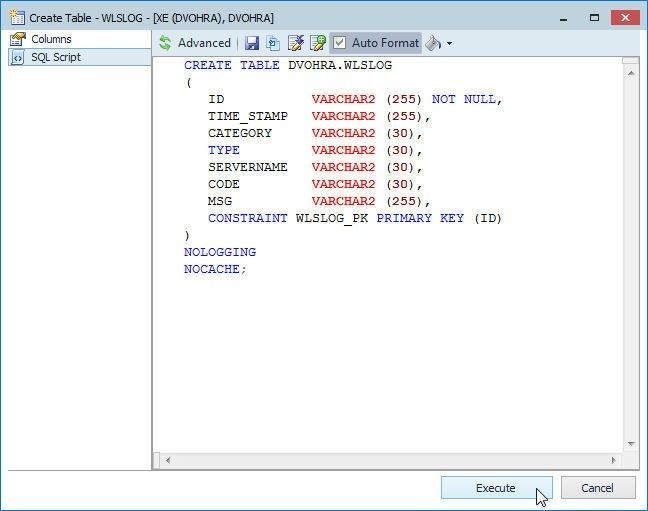
Figure 25. SQL Script for creating a table
A database table gets created, as indicated by the message in Figure 26.
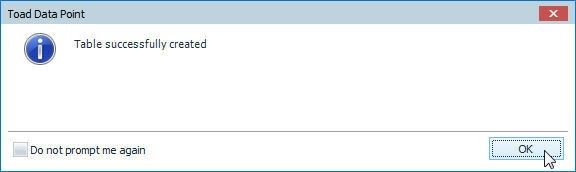
Figure 26. Database Table created
The WLSLOG table and the structure get listed in the Tables tab, as shown in Figure 27.
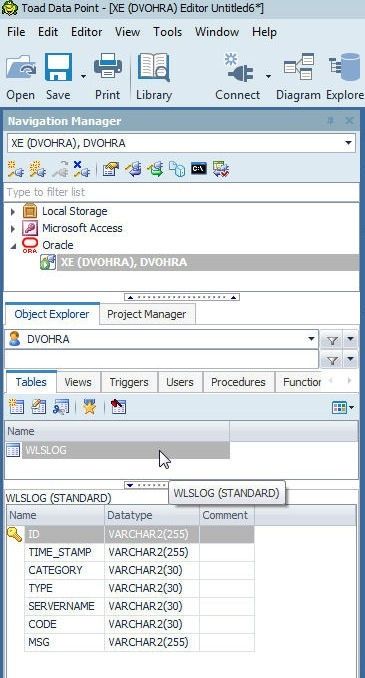
Figure 27. WLSLOG Table
Adding Database Table Data
In this section we shall add data to the WLSLOG table. We shall run the following SQL statements.
INSERT INTO WLSLOG (ID, TIME_STAMP, CATEGORY, TYPE, SERVERNAME, CODE, MSG) values ('logentry1','Apr-8-2014-7:06:16-PM-PDT',
'Notice','WebLogicServer','AdminServer','BEA-000365','Server state changed to STANDBY');

INSERT INTO WLSLOG (ID, TIME_STAMP, CATEGORY, TYPE, SERVERNAME, CODE, MSG) values ('logentry2','Apr-8-2014-7:06:17-PM-PDT',
'Notice','WebLogicServer','AdminServer','BEA-000365','Server state changed to STARTING');

INSERT INTO WLSLOG (ID,TIME_STAMP, CATEGORY, TYPE, SERVERNAME, CODE, MSG) values ('logentry3','Apr-8-2014-7:06:18-PM-PDT',
'Notice', 'WebLogicServer', 'AdminServer', 'BEA-000365', 'Server state changed to ADMIN');

INSERT INTO WLSLOG (ID,TIME_STAMP, CATEGORY, TYPE, SERVERNAME, CODE, MSG) values ('logentry4','Apr-8-2014-7:06:19-PM-PDT',
'Notice', 'WebLogicServer', 'AdminServer', 'BEA-000365', 'Server state changed to RESUMING');

INSERT INTO WLSLOG (ID,TIME_STAMP, CATEGORY, TYPE, SERVERNAME, CODE, MSG) values ('logentry5','Apr-8-2014-7:06:20-PM-PDT',
'Notice', 'WebLogicServer', 'AdminServer', 'BEA-000361', 'Started WebLogic AdminServer');

INSERT INTO WLSLOG (ID,TIME_STAMP, CATEGORY, TYPE, SERVERNAME, CODE, MSG) values ('logentry6','Apr-8-2014-7:06:21-PM-PDT',
'Notice', 'WebLogicServer', 'AdminServer', 'BEA-000365', 'Server state changed to RUNNING');

INSERT INTO WLSLOG (ID,TIME_STAMP, CATEGORY, TYPE, SERVERNAME, CODE, MSG) values ('logentry7','Apr-8-2014-7:06:22-PM-PDT',
'Notice', 'WebLogicServer', 'AdminServer', 'BEA-000360', 'Server started in RUNNING mode');
To run an Insert SQL statement right-click on the WLSLOG table and select Generate SQL>Insert Statement>To Editor as shown in Figure 28.
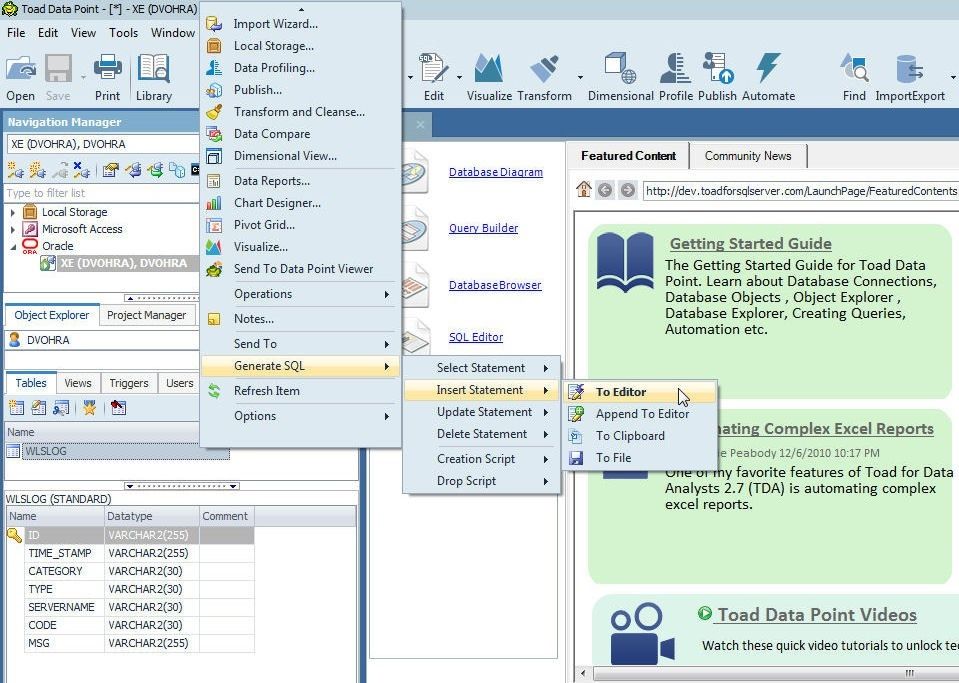
Figure 28. Generate SQ>Insert Statement>To Editor
An SQL Editor gets displayed for an INSERT INTO statement, as shown in Figure 29. The column names are pre-specified in the INSERT INTO statement and only the column values need to specified.
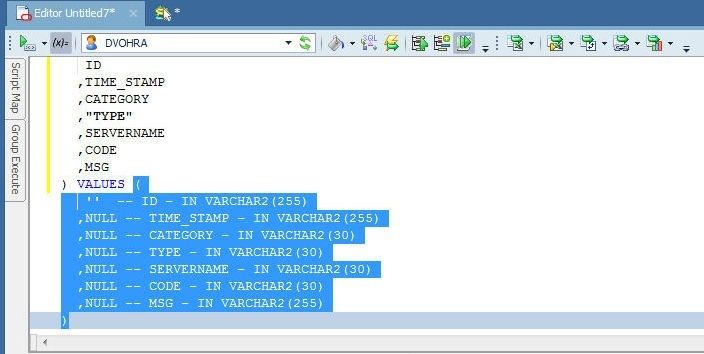
Figure 29. SQL Editor for Insert Statement
Copy the values from the first INSERT INTO statement listed earlier in this section to the statement in the SQL Editor and click on Run SQL as shown in Figure 30.
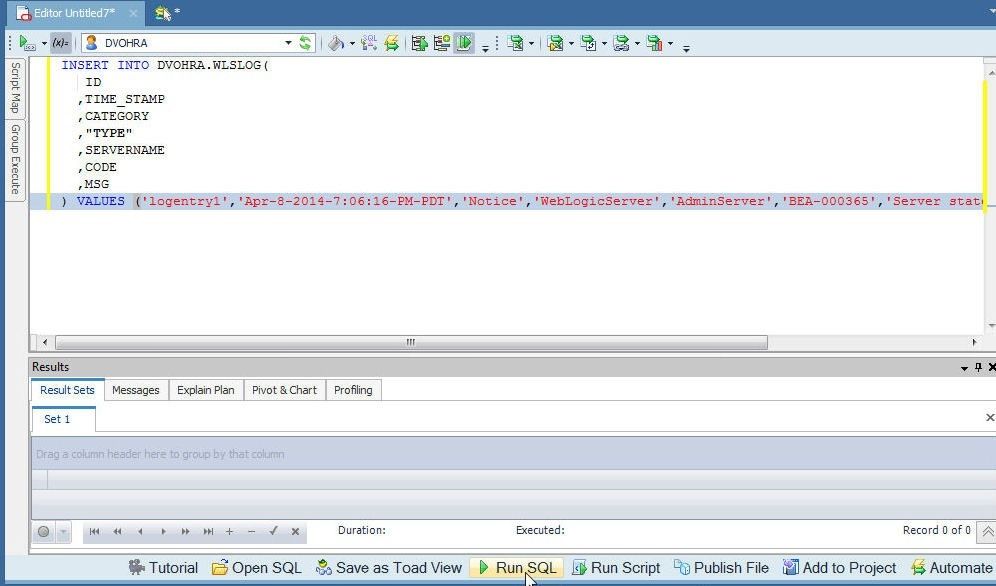
Figure 30. Run SQL Statement
A row of data gets added, as indicated by the “1 rows affected” message in Figure 31.
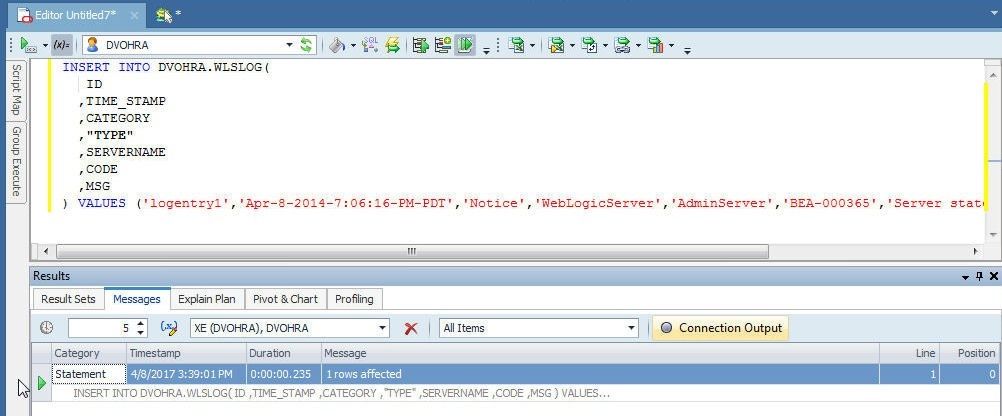
Figure 31. One data row added to WLSLOG Table
Similarly add other data rows by creating another SQL Editor or using the same one. A SQL Editor script may be saved with Save File As as shown in Figure 32.
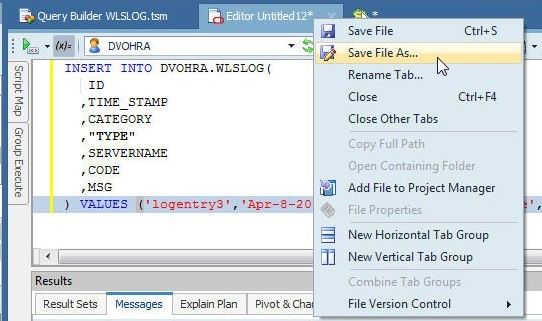
Figure 32. Save File As
Specify a File name (wlslog3) and click on Save as shown in Figure 33.
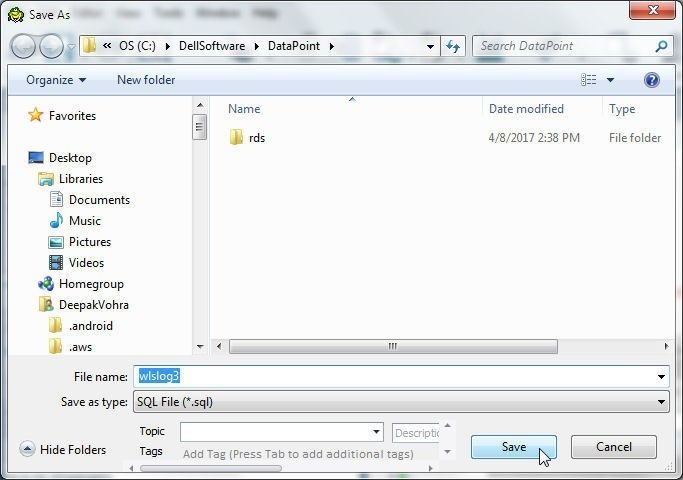
Figure 33. Saving a SQL Script
Click on Close to close a SQL script as shown in Figure 34.
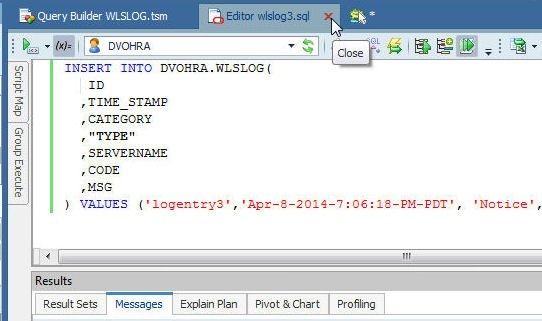
Figure 34. Closing a SQL Script
Click on Format SQL to format the SQL script as shown in Figure 35.
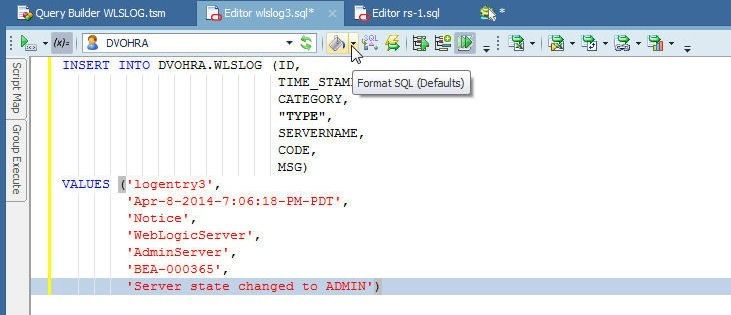
Figure 35. Format SQL
Similarly, run the other SQL statements as shown in Figure 36.
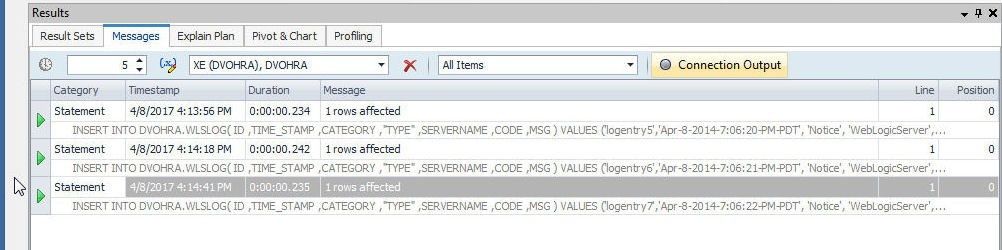
Figure 36. Running SQL Statements to add Table Data
Committing Database Table Changes
The data added with INSERT INTO SQL statements is not added to the database table till the connection is committed. A connection is committed or rolled back with two buttons: one with an upward blue arrow (for rollback) and the other with a downward red arrow (for commit), as shown in Figure 37. Click on the button to commit the connection.
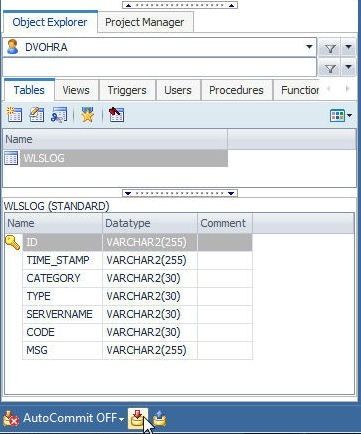
Figure 37. Buttons for Commit and Rollback
As indicated by the message “Connection committed” in Figure 38, the connection gets committed.
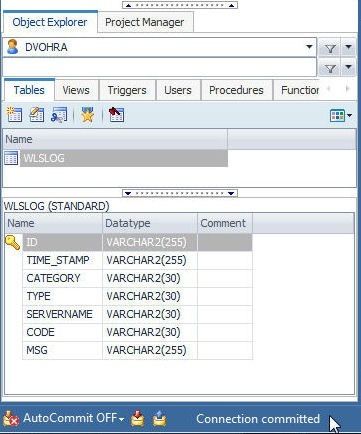
Figure 38. Connection committed
If a connection is to be rolled back, click on the button with the upward blue arrow as shown in Figure 39.
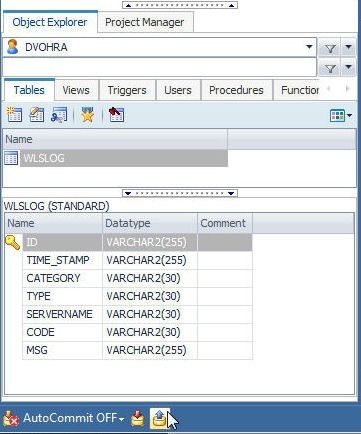
Figure 39. Rollback Button
As indicated by the message “Connection rolled back” in Figure 40, the connection gets rolled back.
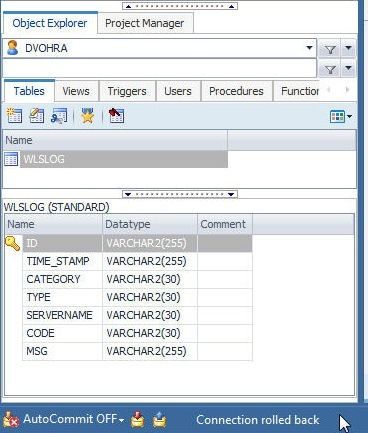
Figure 40. Connection Rolled Back
To auto commit connection, select Turn On as shown in Figure 41.
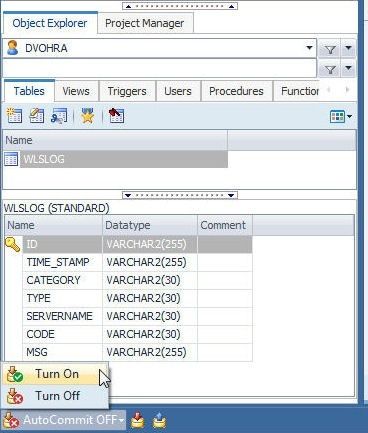
Figure 41. Setting AutoCommit On
AutoCommit gets set to On, as shown in Figure 42.
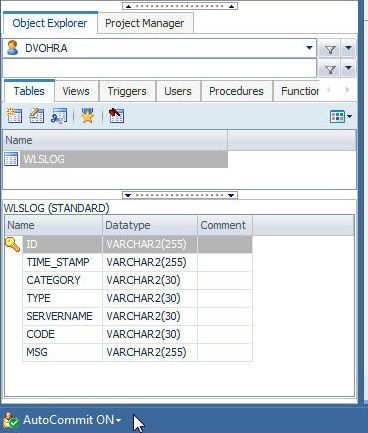
Figure 42. AutoCommit On
If the AutoCommit is Off and some changes have not been committed yet and the connection is reconnected with Reconnect, as shown in Figure 43, a dialog is displayed to either commit or rollback the pending changes before the connection is reconnected.
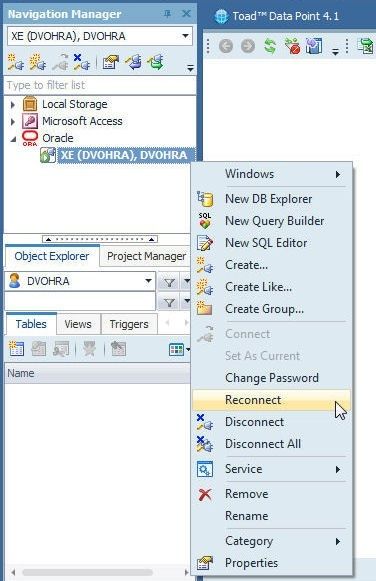
Figure 43. Reconnecting a Connection
Using Query Builder
Toad Data Point provides a Query Builder to query a data source. To use the Query Builder, right-click on the table WLSLOG and select Query Builder as shown in Figure 44.
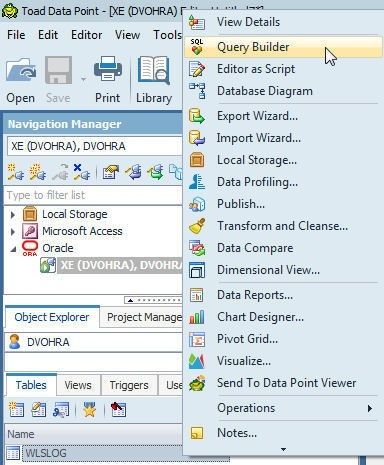
Figure 44. Selecting Query Builder for a Data Source
The Query Builder may also be selected from the New Query Builder option, shown in Figure 20 displayed from the XE connection. Another option is to select Build>Query Builder as shown in Figure 45.
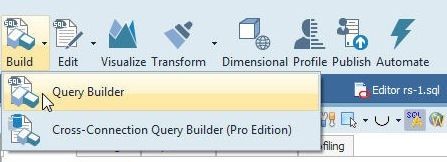
Figure 45. Build>Query Builder
The Query Builder gets displayed as shown in Figure 46.
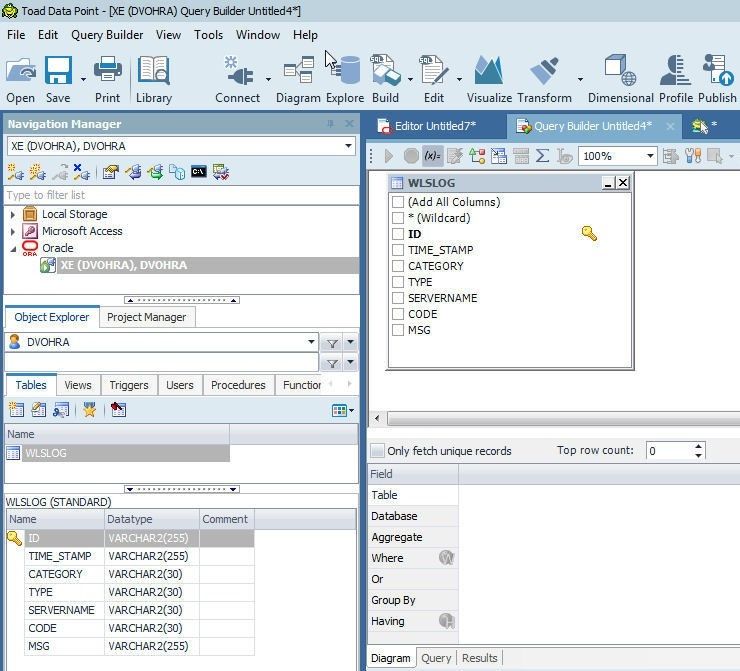
Figure 46. Query Builder
Select Add All Columns to select all columns for a query as shown in Figure 47. Click on Execute SQL to run the SQL query.
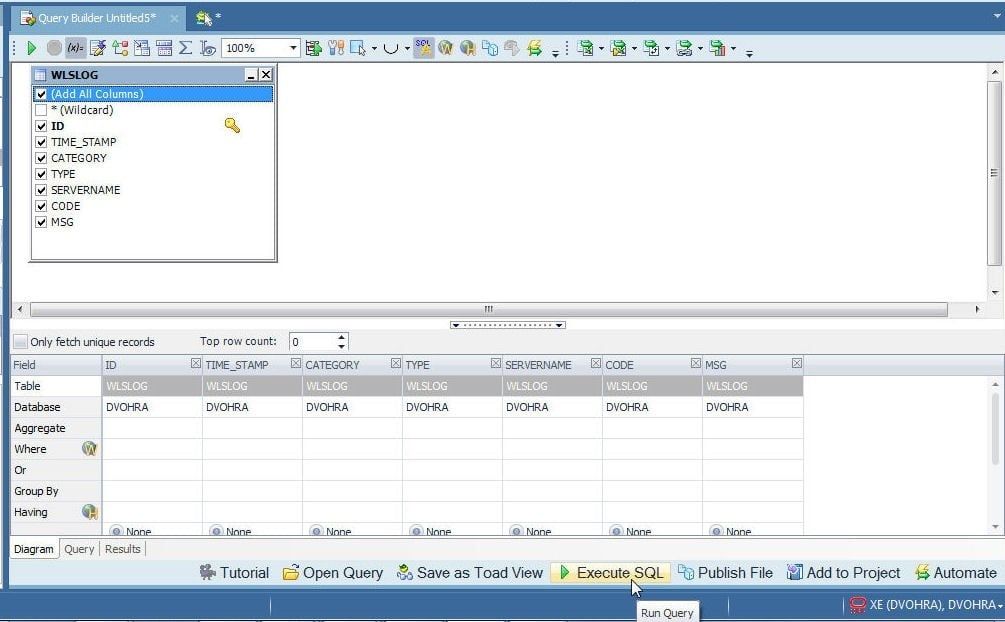
Figure 47. Selecting all columns
Select the Results tab for the results as shown in Figure 48. If data is added/removed from a table the Execute SQL must be run again to display a modified result set.
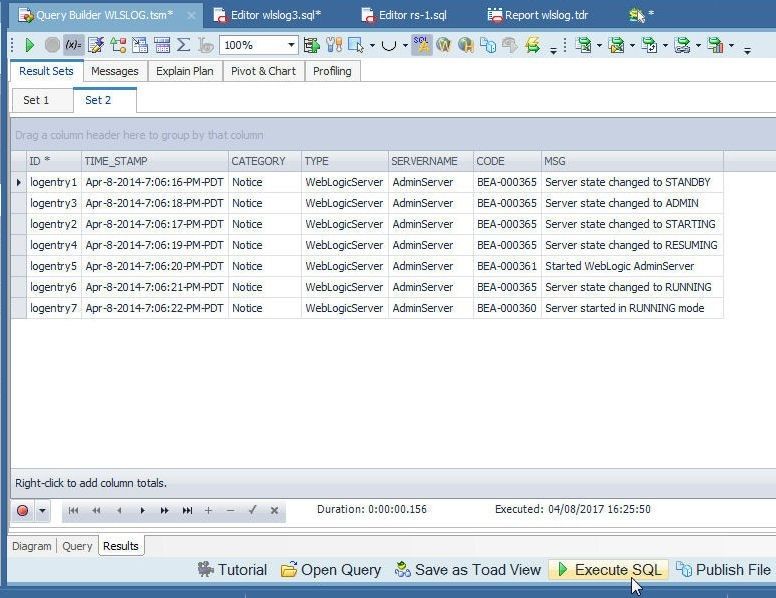
Figure 48. Query Results
The Query Results may be saved with Save File As, as shown in Figure 49.
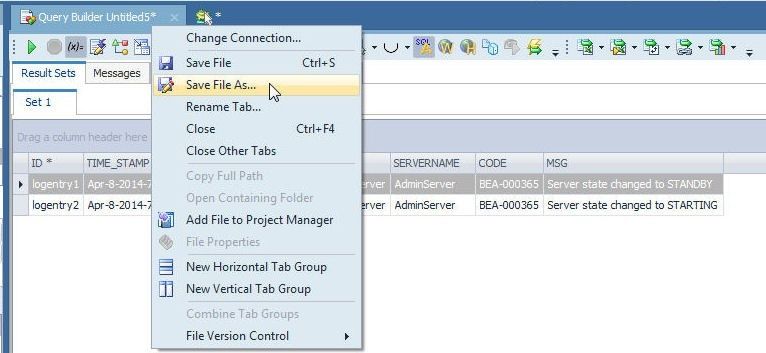
Figure 49. Saving Query Results
Click on Yes in the Save Results dialog as shown in Figure 50.
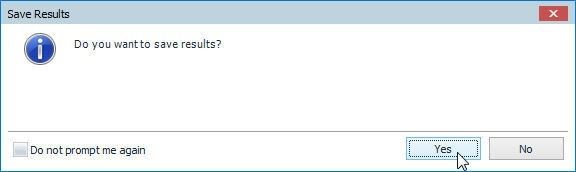
Figure 50. Save Results dialog
Specify the file name to save the query results and click on Save as shown in Figure 51.

Figure 51. Saving Query Results
Using SQL Editor for Query
A SQL query may also be run with the SQL Editor. From the WLSLOG select Generate SQL>Select statement>To Editor as shown in Figure 52.
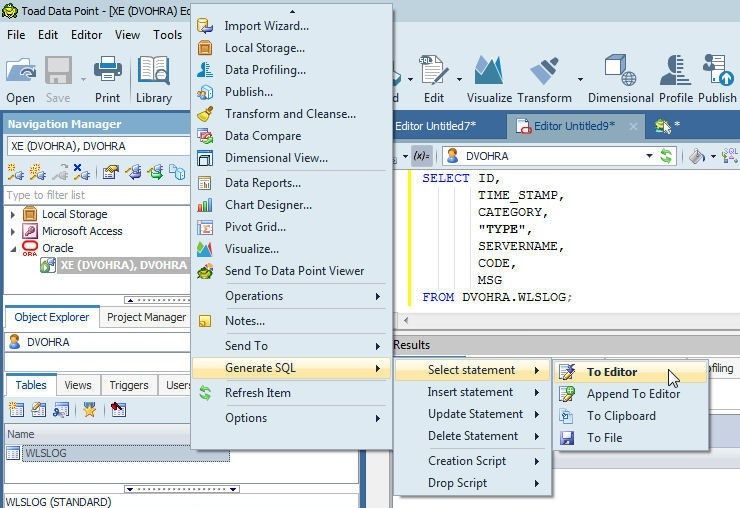
Figure 52. Selecting Generate SQL>Select statement>To Editor
The SQL Editor gets displayed with the default SQL Select statement. as shown in Figure 53. Click on Run SQL to display a result set.
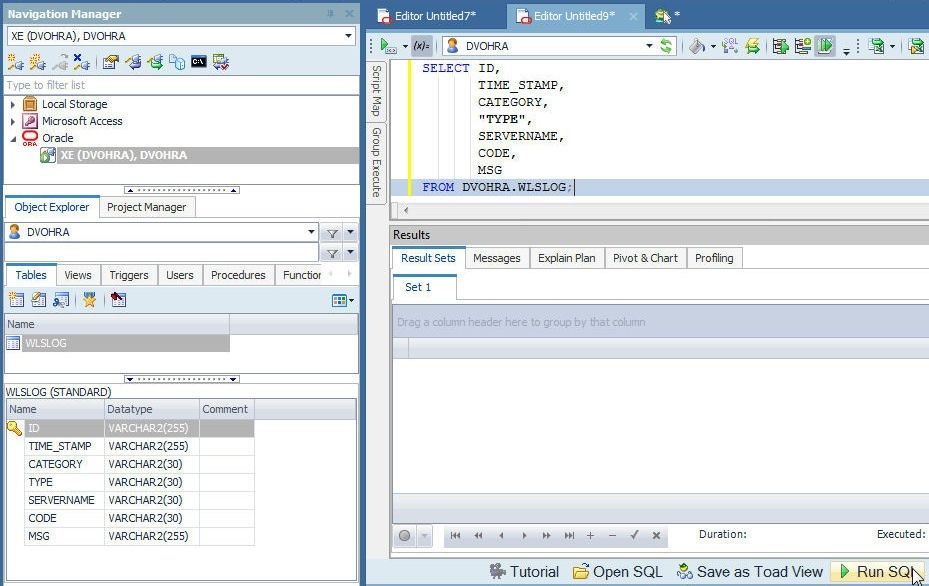
Figure 53. Select Statement in SQL Editor
The SQL Editor may also be selected from the Oracle>XE connection, as shown in Figure 54.
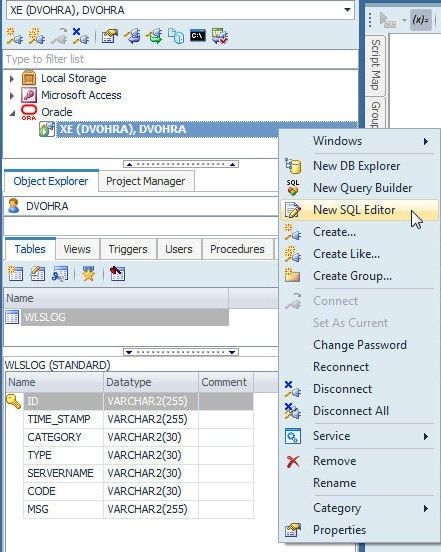
Figure 54. Selecting New SQL Editor
Specify a Select statement and click on Run SQL as shown in Figure 55.
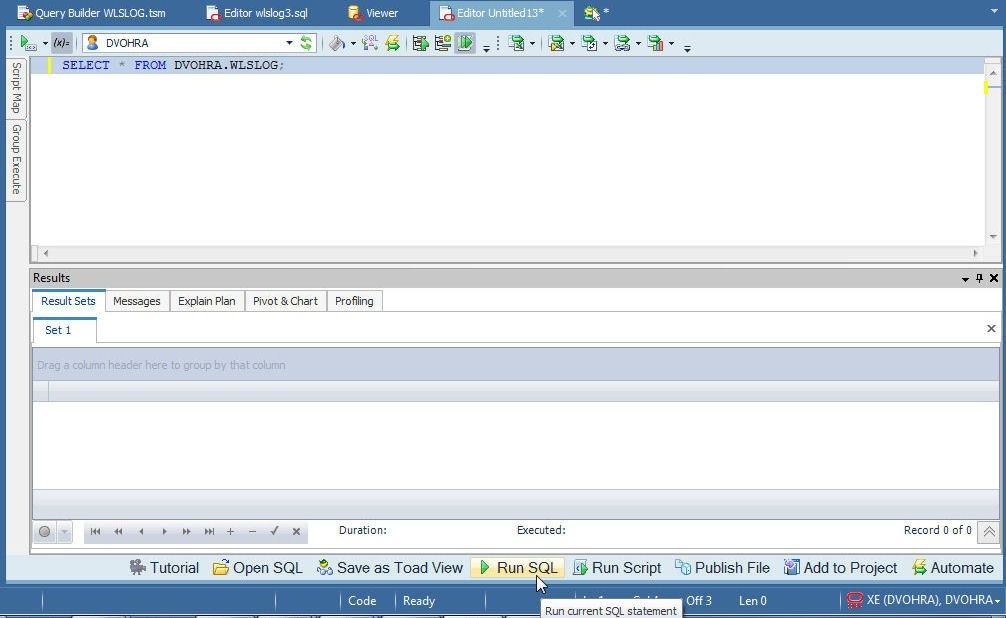
Figure 55. Running a Select Statement in SQL Editor
The result set gets displayed, as shown in Figure 56.
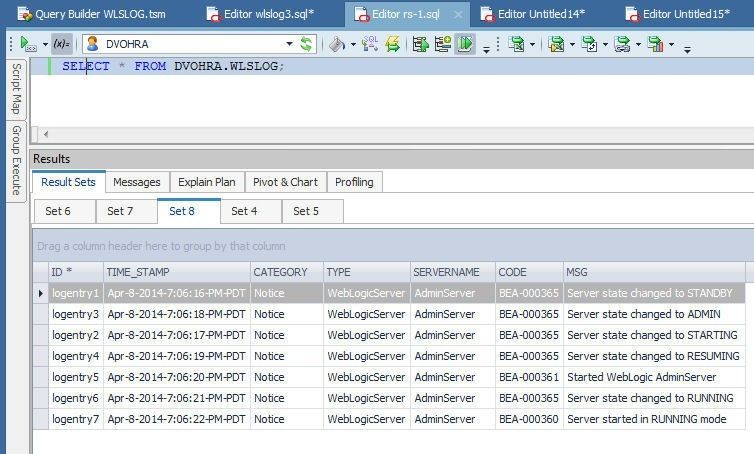
Figure 56. Result Set
The SQL Editor may also be selected from Edit, as shown in Figure 57.
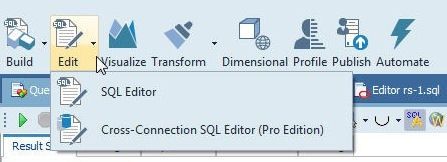
Figure 57. Edit>SQL Editor
Conclusion
In this article we discussed connecting to Oracle Database on RDS from Toad Data Point. Toad Data Point simplifies Oracle database development and management. In a subsequent article we shall discuss creating reports in Toad Data Point with Oracle database on AWS RDS as the data source.
Start the discussion at forums.toadworld.com