Introduction
Apache Solr is a leading enterprise search engine based on Apache Lucene. Apache Solr stores the data it indexes in the local filesystem by default. HDFS (Hadoop Distributed File System) provides several benefits, such as a large scale and distributed storage with redundancy and failover capabilities. Apache Solr supports storing data in HDFS. In this article we shall configure Apache Solr to store data in HDFS instead of the local filesystem. This tutorial has the following sections:
- Setting the Environment
- Deleting an Apache Solr Core
- Creating a Solr Collection
- Configuring Apache Solr
- Configuring Apache Hadoop
- Starting HDFS
- Starting Apache Solr
- Logging in to Apache Solr Admin Console
- Indexing Documents
- Querying Documents
- Listing HDFS Directories
Setting the Environment
The following software is required for this article:
– Apache Hadoop 2.x
– Apache Solr 5.x
– Java
Apache Solr 5.x is used in this tutorial; configuration for Apache Solr 4.x and 6.x could be slightly different. If not already created, create a directory /solr to install the software and set its permissions toglobal (777).
mkdir /solr
chmod -R 777 /solr
cd /solr
Download the Apache Solr 5.x solr-5.3.1.tgz file and extract the tgz file to the /solr directory.
wget http://apache.mirror.vexxhost.com/lucene/solr/5.3.1/solr-5.3.1.tgz
tar -xvf solr-5.3.1.tgz
Download Java 7 from http://www.oracle.com/technetwork/java/javase/downloads/jdk7-downloads-1880260.html and extract the gz file to the /solr directory.
tar zxvf jdk-7u55-linux-i586.gz
To use HDFS for storage, Hadoop 2.x is required. Download Hadoop 2.5.0 CDH 5.2 and extract the tar.gz file to the /solr directory.
wget http://archive-primary.cloudera.com/cdh5/cdh/5/hadoop-2.5.0-cdh5.2.0.tar.gz
tar -xvf hadoop-2.5.0-cdh5.2.0.tar.gz
Create symlinks for the Hadoop bin directory and the conf directory. Symlinks, also called symbolic links, are references or links to other files and are required due to the packaging structure of the Hadoop binaries.
ln -s  /solr/hadoop-2.5.0-cdh5.2.0/bin-mapreduce1  /solr/hadoop-2.5.0-cdh5.2.0/share/hadoop/mapreduce1/bin
ln -s  /solr/hadoop-2.5.0-cdh5.2.0/etc/hadoop  /solr/hadoop-2.5.0-cdh5.2.0/share/hadoop/mapreduce1/conf
Set the environment variables in the bash shell for Apache Hadoop, Apache Solr, and Java.
vi ~/.bashrc
export HADOOP_PREFIX=/solr/hadoop-2.5.0-cdh5.2.0
export HADOOP_CONF=$HADOOP_PREFIX/etc/hadoop
export JAVA_HOME=/usr/lib/jvm/java-1.7.0-openjdk-1.7.0.75/jre
export SOLR_HOME=/solr/solr-5.3.1/server/solr
export SOLR_CONF=/solr/solr-5.3.1/server/solr/configsets/basic_configs/conf
export HADOOP_MAPRED_HOME=/solr/hadoop-2.5.0-cdh5.2.0/share/hadoop/mapreduce1
export HADOOP_HOME=/solr/hadoop-2.5.0-cdh5.2.0/share/hadoop/mapreduce1
export HDFS_HOME=/solr/hadoop-2.5.0-cdh5.2.0/share/hadoop/hdfs
export HADOOP_CLASSPATH=$HADOOP_HOME/*:$HADOOP_HOME/lib/*:$HADOOP_CONF:$FLUME_CONF:$HDFS_HOME/*:$HDFS_HOME/lib/*:$HDFS_HOME/webapps/
export PATH=$PATH:$SOLR_HOME/bin:$JAVA_HOME/bin:$HADOOP_HOME/bin:$HADOOP_MAPRED_HOME/bin
export CLASSPATH=$HADOOP_CLASSPATH
export HADOOP_NAMENODE_USER=hadoop
export HADOOP_DATANODE_USER=hadoop
Creating an Apache Solr Collection
If the storage is to be based in HDFS we must first create a Solr collection and not create a Solr core. A Solr core gets created implicitly when a collection is created. Create a collection called “hdfs” with the Solr instance configuration from the basic_configs using the following command.
solr create_collection -c hdfs –d /solr/solr-5.3.1/server/solr/configsets/basic_configs
The “hdfs” collection gets created, as shown in Figure 1. A Solr core called hdfs_shard1_replica1 gets created implicitly.
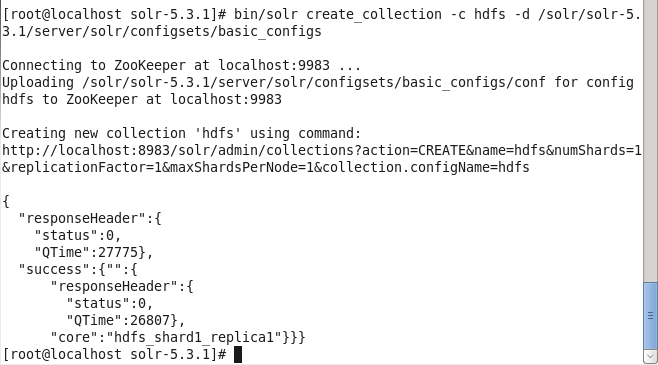
Figure 1. Creating an Apache Solr Collection
Configuring Apache Solr
We need to configure the Solr schema for the fields in a Solr document. We shall be using fields time_stamp, category, type, servername, code, and msg. Declare the fields in theschema.xml file in the /solr/solr-5.3.1/server/solr/configsets/basic_configs/conf directory with a <field/> element for each of the fields. Make the fields indexed by setting indexed to true.
<field name="time_stamp" type="string" indexed=“true”  stored="true"  multiValued="false" />
<field name="category" type="string" indexed=“true”  stored="true"  multiValued="false" />
<field name="type" type="string" indexed=“true”  stored="true"  multiValued="false" />
<field name="servername" type="string" indexed=“true”  stored="true"  multiValued="false" />
<field name="code" type="string" indexed=“true”  stored="true"  multiValued="false" />
<field name="msg" type="string" indexed=“true”  stored="true"  multiValued="false" />
The two fields Solr documents require are the id field and the _version_ field. The id field should be provided when a new document is added and the _version_ field is added automatically by the Solr server. Duplicate fields should be removed if any. The only configuration in the solrconfig.xml is to set auto commit to true.
<autoCommit>
    <maxTime>15000</maxTime>
    <openSearcher>true</openSearcher>
  </autoCommit>
To add the Solr dist jars to the runtime classpath of Solr, copy the jars in the dist directory to the lib directory in the Solr instance directory /solr/solr-5.3.1/server/solr/configsets/basic_configs.
mkdir /solr/solr-5.3.1/server/solr/configsets/basic_configs/lib
chmod -R 777 /solr/solr-5.3.1/server/solr/configsets/basic_configs/lib
cp /solr/solr-5.3.1/dist/*.jar   /solr/solr-5.3.1/server/solr/configsets/basic_configs/lib
Configuring Apache Hadoop
As we shall be using Apache Hadoop for storage, we need to configure Hadoop, but because only the HDFS is made use of for Solr storage and not the MapReduce, we won’t need to configure the MapReduce. We do need to set the fs.defaultFS and hadoop.tmp.dir configuration properties in the core-site.xml file, thefs.defaultFS being the NameNode URI and the hadoop.tmp.dir the Hadoop temporary directory. The core-site.xml may be edited in the vi editor with the following command.
vi /solr/hadoop-2.5.0-cdh5.2.0/etc/hadoop/core-site.xml
The core-site.xml is listed:
<?xml-stylesheet type="text/xsl" href="configuration.xsl"?>
<!-- Put site-specific property overrides in this file. -->
<configuration>
<property>
  <name>fs.defaultFS</name>
    <value>hdfs://10.0.2.15:8020</value>
    </property>
 <property>
     <name>hadoop.tmp.dir</name>
     <value>file:///var/lib/hadoop-0.20/cache</value>
  </property>
</configuration>
Create the Hadoop directory configured in hadoop.tmp.dir and set its permissions to global (777).
sudo mkdir -p /var/lib/hadoop-0.20/cache
sudo chmod -R 777  /var/lib/hadoop-0.20/cache
We also need to set the following HDFS configuration properties in the hdfs-site.xml file.
|
Property |
Description |
Value |
|
dfs.permissions.superusergroup |
The Hadoop superusergroup |
hadoop |
|
dfs.namenode.name.dir |
NameNode storage directory |
file:///data/1/dfs/nn |
|
dfs.replication |
Replication factor |
1 |
|
dfs.permissions |
Permissions checking. Setting to false disables the permissions checking on HDFS files. The chgrp, chown and chmod always check permissions. |
false |
The hdfs-site.xml may be edited in a vi editor with the following command.
vi /solr/hadoop-2.5.0-cdh5.2.0/etc/hadoop/hdfs-site.xml
The hdfs-site.xml is listed:
<?xml version="1.0" encoding="UTF-8"?>
<?xml-stylesheet type="text/xsl" href="configuration.xsl"?>
<!-- Put site-specific property overrides in this file. -->
<configuration>
 <property>
   <name>dfs.permissions.superusergroup</name>
   <value>hadoop</value>
  </property>
  <property>
    <name>dfs.namenode.name.dir</name>
    <value>file:///data/1/dfs/nn</value>
  </property>
  <property>
    <name>dfs.replication</name>
    <value>1</value>
   </property>
   <property>
     <name>dfs.permissions</name>
     <value>false</value>
   </property>
</configuration>
Create the NameNode storage directory and set its permissions to global (777).
sudo mkdir -p /data/1/dfs/nn
sudo chmod -R 777 /data/1/dfs/nn
Starting HDFS
First, format the NameNode storage.
hadoop namenode –format
After the preceding command exits start the HDFS cluster, which comprises of the NameNode and the DataNode.
hadoop namenode
hadoop datanode
As we shall be storing Solr data in HDFS we need to create a directory in the HDFS for Solr data. Create the Hive warehouse directory called /solr in HDFS and set its permissions to global (777).
hadoop dfs -mkdir -p hdfs://10.0.2.15:8020/solr
hadoop dfs -chmod -R 777 hdfs://10.0.2.15:8020/solr
The output from the preceding commands is shown in Figure 2.
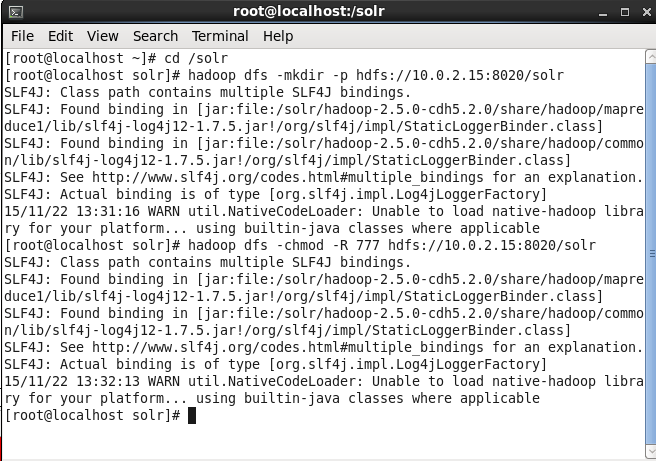
Figure 2. Creating a Directory in HDFS for Apache Solr Storage
Starting Apache Solr
When Solr is started using the default storage we use the following command.
solr start
When using HDFS storage we shall be using a slightly different command with additional command parameters. Solr must use the HdfsDirectoryFactory to store data in HDFS. Specify the HDFS directory in which to store data with the solr.hdfs.home property. We also need to specify the locking mechanism to use as hdfs with the solr.lock.type setting.
Run the following command to start Apache Solr server using HDFS for storage and indexing.
bin/solr start -c -Dsolr.directoryFactory=HdfsDirectoryFactory -Dsolr.lock.type=hdfs -Dsolr.hdfs.home=hdfs://10.0.2.15:8020/solr
Solr server gets started. Find the Solr server status with the following command.
solr status
The status lists one Solr node running, as shown in Figure 3.
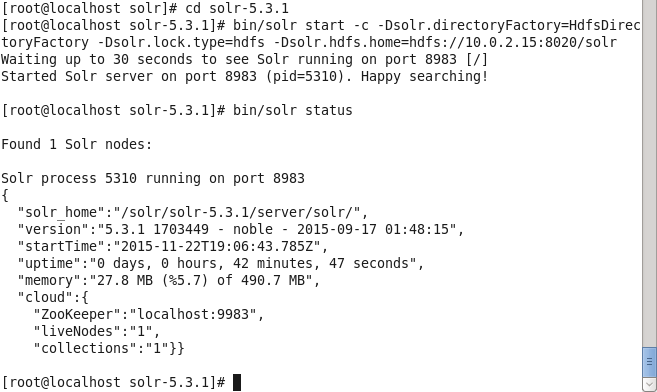
Figure 3. Starting Apache Solr and finding Status
Logging in to Apache Solr Admin Console
Next, login to the Apache Solr Admin Console using the URL http://localhost:8983/solr/. In the Core selector display the available cores. The hdfs_shard1_replica1 core gets listed, as shown in Figure 4.
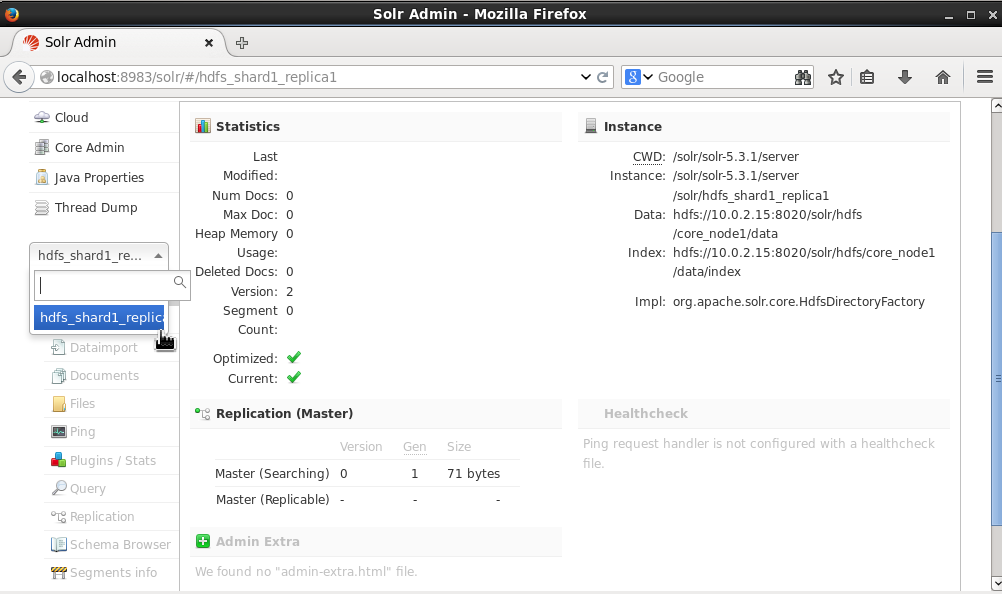
Figure 4. Logging in to Apache Solr Admin Console
Indexing Documents
We shall be indexing log data in XML format with the sample data. Create the following Solr format XML document to add.
<add>
<doc>
<field name="id">wlslog1</field>
  <field name="time_stamp">Apr-8-2014-7:06:16-PM-PDT</field>
  <field name="category">Notice</field>
  <field name="type">WebLogicServer</field>
  <field name="servername">AdminServer</field>
  <field name="code">BEA-000365</field>
  <field name="msg">Server state changed to STANDBY</field>
</doc>
<doc>
<field name="id">wlslog2</field>
  <field name="time_stamp">Apr-8-2014-7:06:17-PM-PDT</field>
  <field name="category">Notice</field>
  <field name="type">WebLogicServer</field>
  <field name="servername">AdminServer</field>
  <field name="code">BEA-000365</field>
  <field name="msg">Server state changed to STARTING</field>
</doc>
<doc>
<field name="id">wlslog3</field>
  <field name="time_stamp">Apr-8-2014-7:06:18-PM-PDT</field>
  <field name="category">Notice</field>
  <field name="type">WebLogicServer</field>
  <field name="servername">AdminServer</field>
  <field name="code">BEA-000360</field>
  <field name="msg">Server started in RUNNING mode</field>
</doc>
</add>
Select the hdfs_shard1_replica1 core and select Documents as shown in Figure 5.
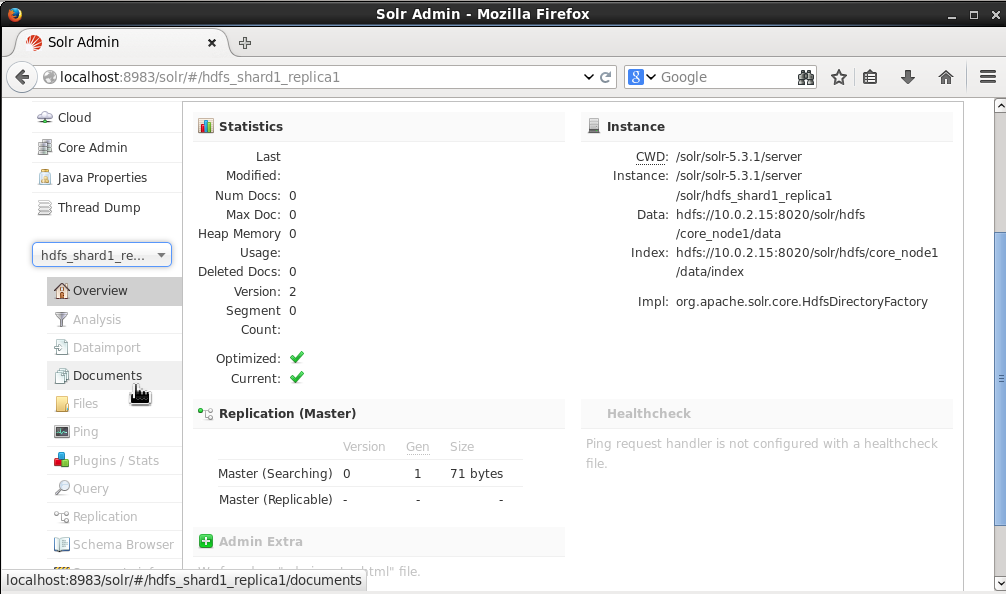
Figure 5. Selecting Core>Documents
The default Request-Handler is /update. Select Document Type as XML. In the Document (s) field add the XML document. Click on Submit Document as shown in Figure 6.

Figure 6. Adding Data to Solr
The “success” status shown in Figure 7 indicates that the documents have been indexed (in HDFS).
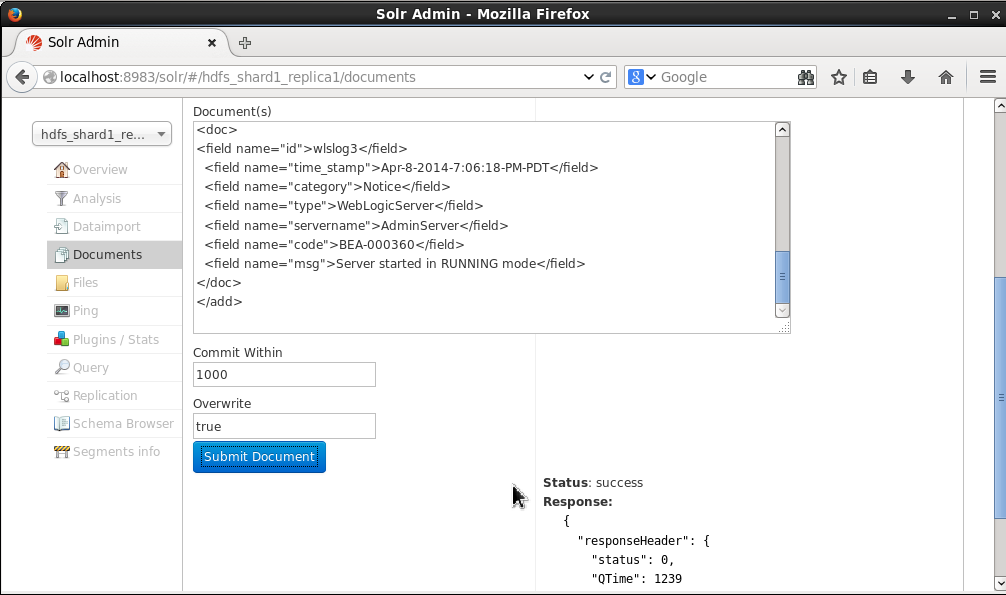
Figure 7. Status of adding Documents
Querying Documents
The indexed documents may be searched, just like the documents indexed in the local filesystem. Select Query as shown in Figure 8 and set the Request Handler to /select (the default setting). Using the default query of *:* all the documents indexed would get listed when a query is run.
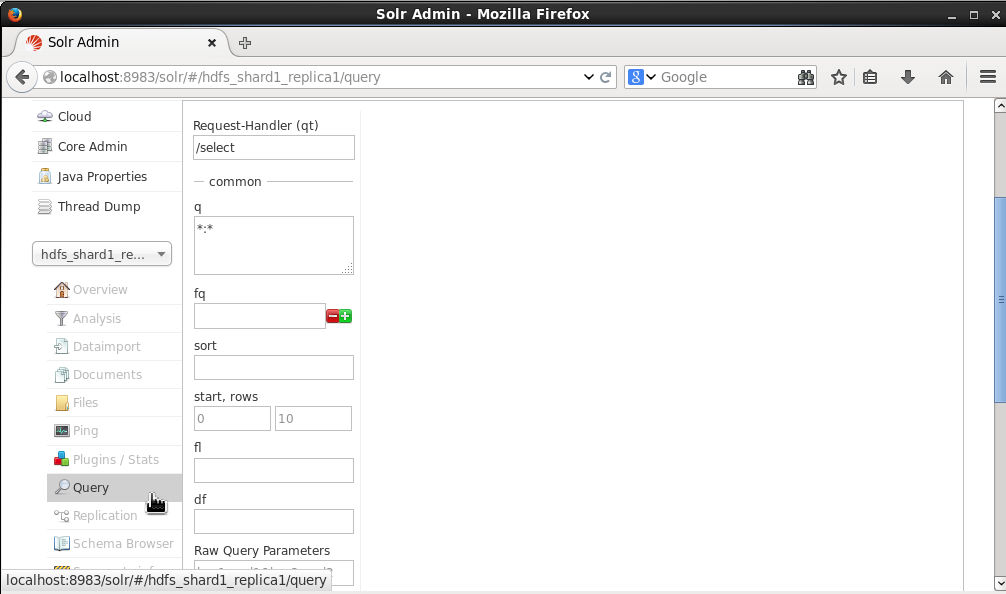
Figure 8. Query
Click on Execute Query as shown in Figure 9.
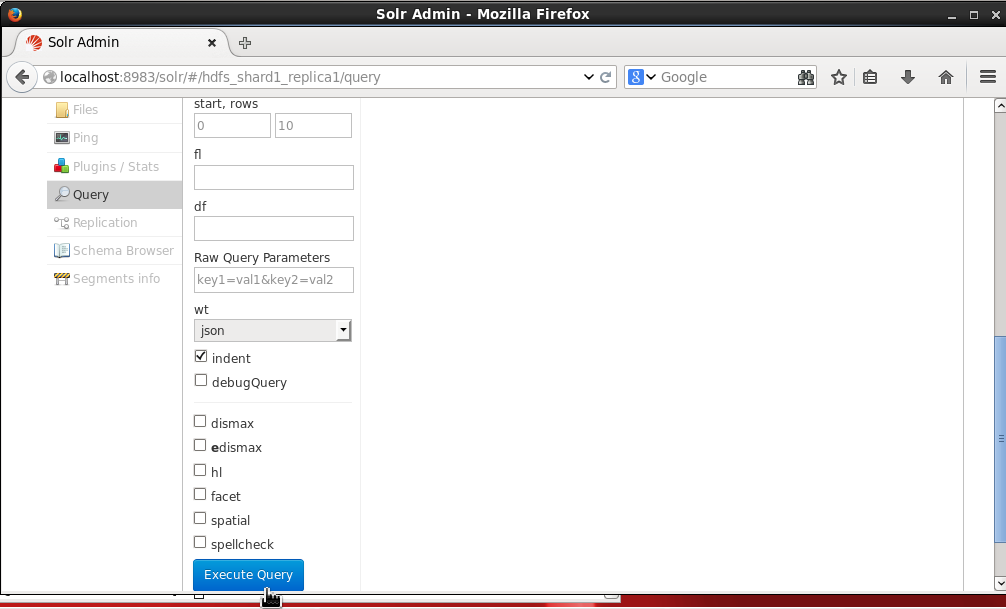
Figure 9. Execute Query
The three documents indexed get listed, as shown in Figure 10.
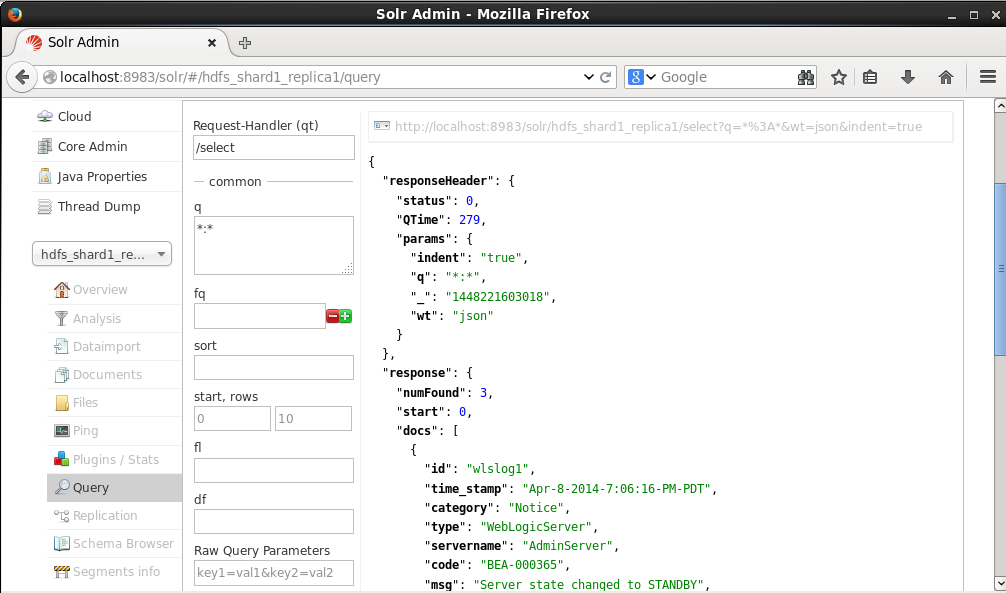
Figure 10. Query Result
The _version_ field has been added to each document, as shown in Figure 11.

Figure 11. The _version_ field is added to each Document
Listing HDFS Directories
Earlier, we created the /solr directory in HDFS, and specified the directory when starting Solr server. The Solr data gets indexed in the/solr directory. Run the following command to list the files and directories in the HDFS directory /solr.
hadoop dfs –ls hdfs://10.0.2.15:8020/solr
Two items ,“hdfs” and “wlslog”, get listed, as shown in Figure 12. The hdfs directory is for Apache Solt storage on HDFS. The “wlslog” is some other HDFS data storage directory for Solr not used in the tutorial.
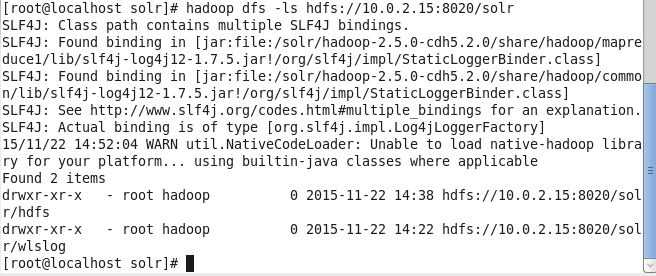
Figure 12. The //solr/hdfs Directory is for Apache Solr Storage
Run the following command to list the files and directories in the /solr/hdfs directory in HDFS.
hadoop dfs –ls hdfs://10.0.2.15:8020/solr/hdfs
The /solr/hdfs/core_node1 used for the Solr core in this article gets listed, as shown in Figure 13.
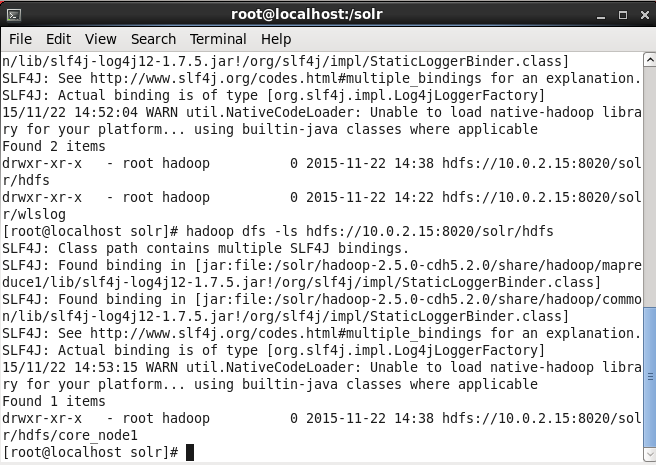
Figure 13. Listing the HDFS Directory for Apache Solr Core
Summary
In this article we used HDFS, which provides the benefits of reliability and durability in a large scale distributed storage, for indexing Solr data. We installed and configured Apache Hadoop 2x. We started HDFS and created a directory in the HDFS for Solr data. We started Solr server using the HdfsDirectoryFactory and hdfs lock type. Subsequently we indexed and queried data in Solr from the Solr Admin.
Start the discussion at forums.toadworld.com