Introduction
Oracle Database Resource Manager enables you to limit database resources. Oracle has been enhanced in this regard in its new versions; for example, in 12.1.0.1, Database Resource Manager supports multi-tenant architecture. One of the most common performance issues that DBAs have when they are consolidating several databases into a single database by using pluggable databases is that all the PDBs try to use as much of the resources as they can. The PDBs compete for resources. Even more critical, sessions inside PDBs that don’t have high importance can make a critical PDB slow. This can be a serious performance problem that can impact multiple users and applications.
Oracle Database Resource Manager lets you specify how much of the resources you want to assign for every pluggable database; you can assign more resources to those PDBs that are more important and minimal resources for those with low importance. This prevents the low-importance PDBs from impacting the high-importance PDBs.
Within a PDB or a non-CDB also, all the sessions compete for the resources assigned to the PDB. Sessions that have low importance can be using most of the resources, impacting the more important sessions. When Database Resource Manager is not used, a single session inside a PDB might use 95% of the resources that the whole CDB has assigned. This makes all the rest of PDB severely slow. Inside a PDB or inside a non-CDB, Database Resource Manager enables us to assign resources to Consumer Groups, which comprise a group of users. You can group users into a Consumer Group with high importance and make another Consumer Group for the users that have low importance, and assign resources to them appropriately.
New Features in Oracle Database 12.2.0.1
- SESSION_PGA_LIMIT: The maximum amount of PGA in MB that sessions in a Consumer Group can allocate before being terminated.
- Oracle Enterprise Manager Database Express (EM Express) supports Database Resource Manager.
Example:
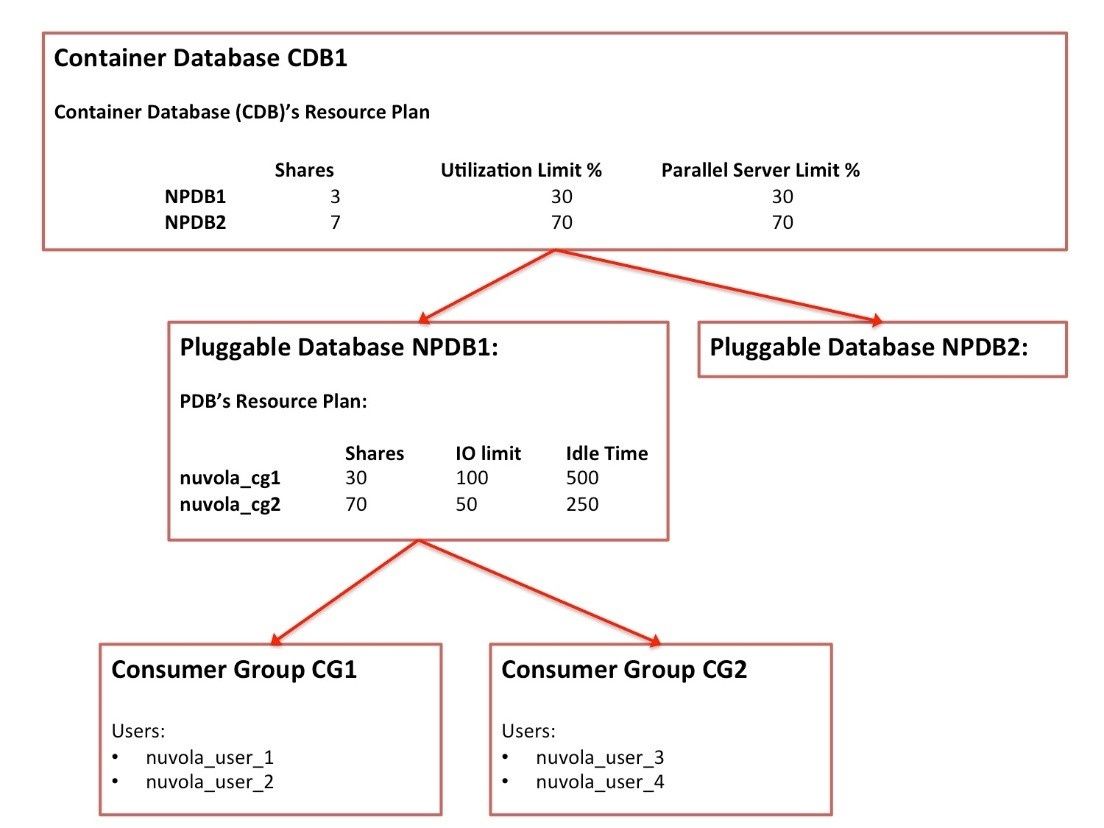
In this article we will see how to set up a Database Resource Manager configuration for a Container Database with two pluggable databases. The version that we will use for this example is Oracle Database 12.2.0.1 Enterprise Edition.
- CDB Name: CDB1
- PDB Names: NPDB1 and NPDB2
We will assign the following resources:
Assigning resources at Container Database Level
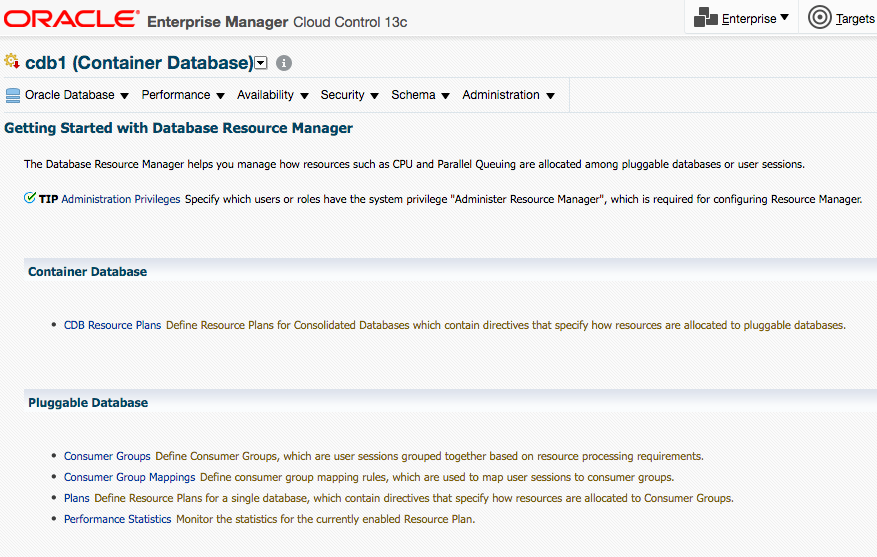
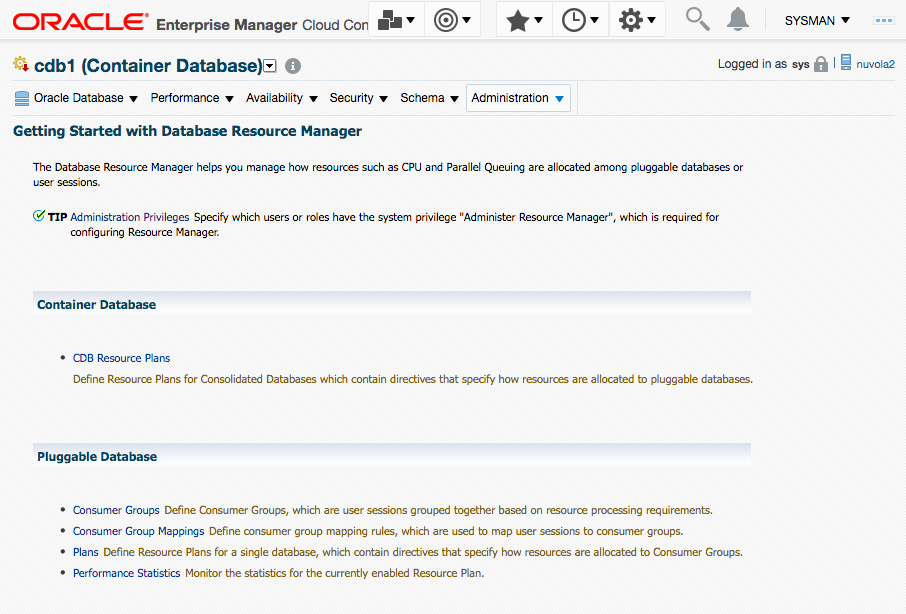
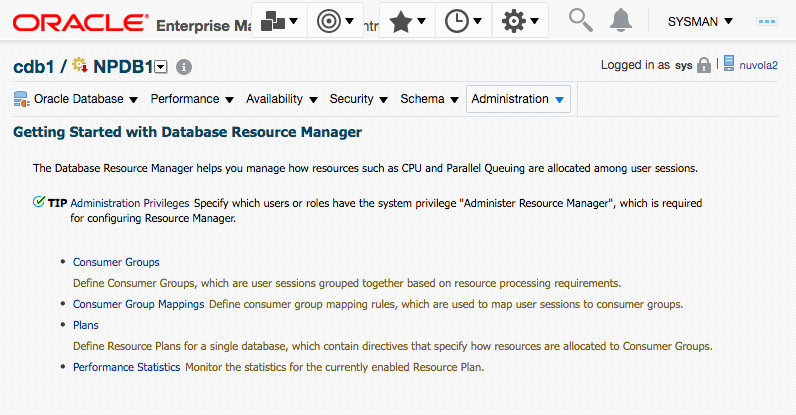
Go to the “Home Page” of the Container Database (CDB); in this case the CDB’s name is “CDB1”. In “Administration”–>“Resource Manager” you will see the following page.
Click on the option “CDB Resource Plans” and you will see the following page:
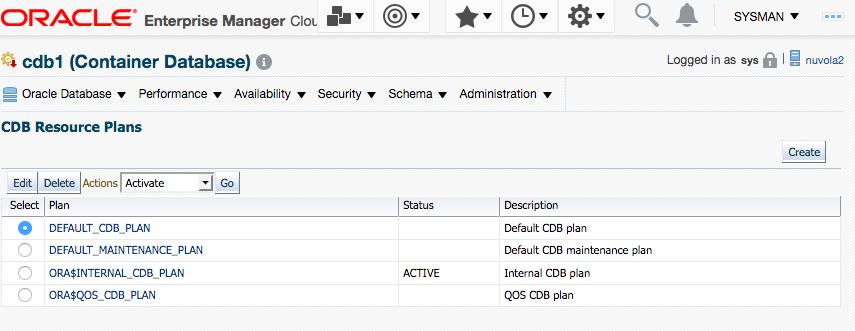
Click on the bottom “Create”. We will create a new CDB Resource Plan for our two pluggable databases NPDB1 and NPDB2.
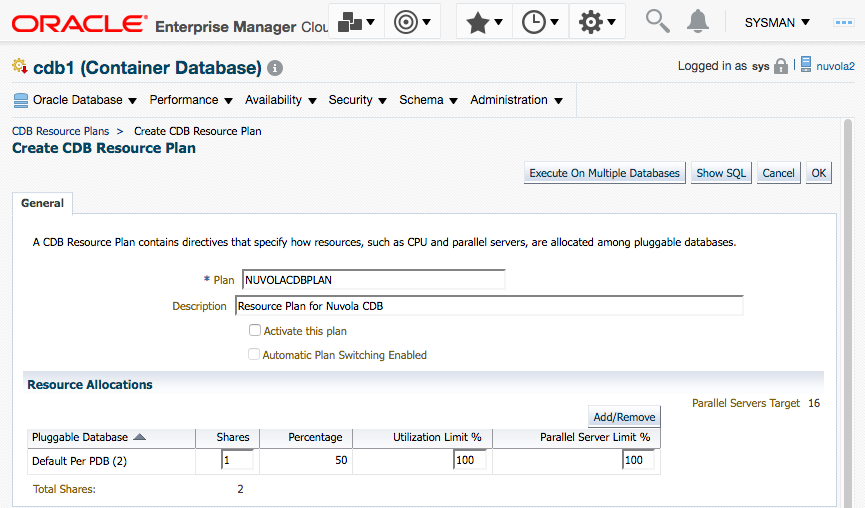
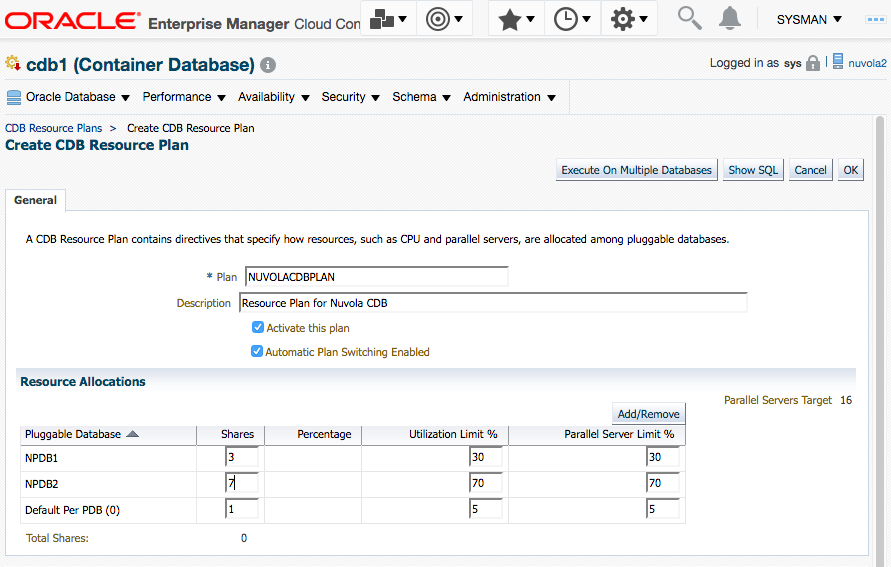
In this page, you will have to specify the name of the CDB Resource Plan, a description and a set of resources. The resources that you can assign are: Shares, Utilization Limit %, Parallel Server Limit %. However, there are more resources that you can assign. This is a downside of Oracle Cloud Control, because it is not synchronized with the options provided by the Oracle Database version (in this case 12.2.0.1) regarding the resources. For instance, if we were using an Oracle Database 11.2.0.4 then Oracle Cloud Control should show us the resource options that 11.2.0.4 offers us, and if we were using 12.1.0.2 then it should show us the resource options that that version offers us, and so on.
Unfortunately, Oracle Cloud Control 13.2 (in this example) and in previous versions offers us only the basic resource options. Of course, you can always change the SQL Statement, but that is another story.
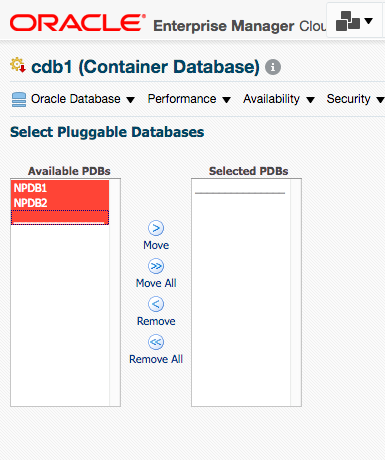
Click on the Button “Add/Remove” to add the pluggable databases NPDB1 and NPDB2. You will see the following page, where you have to transfer from the left side to the right side those pluggable databases you want to assign resources to. In this example, both pluggable databases were selected. Click in the button “Assign”.
Then you will see the two PDBs listed; then we can assign them resources. In this example we have assigned some percentages and numbers to both PDBs and we have selected the option “Activate this Plan”.
If you click on the button “Show SQL” you can see the SQL Statement that will be used to create the Resource Plan and to assign the resources. Click on the button “Return”.

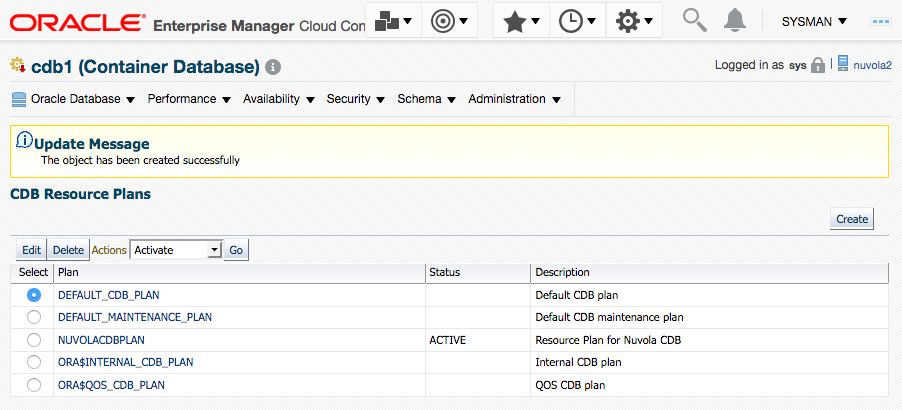
Click on the button “OK”. This will create the Resource Plan.
SQL> select plan_id, plan, comments from dba_cdb_rsrc_plans where plan='NUVOLACDBPLAN';

   PLAN_ID PLAN            COMMENTS
---------- --------------- ------------------------------
     73553 NUVOLACDBPLAN   Resource Plan for Nuvola CDB

SQL> show parameters resource

NAME                         TYPE   VALUE
------------------------------------ ----------- -----------------resource_limit                    boolean     TRUE
resource_manage_goldengate         boolean     FALSE
resource_manager_cpu_allocation     integer     1
resource_manager_plan              string      NUVOLACDBPLAN

SQL> select plan, pluggable_database, shares, utilization_limit, parallel_server_limit, memory_min,
memory_limit from DBA_CDB_RSRC_PLAN_DIRECTIVES where plan='NUVOLACDBPLAN';

PLAN              PLUGGABLE_DATABASE                    SHARES  UTILIZATION  PARAL  MEMORY_MIN   MEMORY_LIMIT
---------------   ---------------------------- ------- ------------ ------ ------------ ------------
NUVOLACDBPLAN   ORA$DEFAULT_PDB_DIRECTIVE   1          100  100
NUVOLACDBPLAN   ORA$AUTOTASK                            90  100
NUVOLACDBPLAN   NPDB1                       3           30   30
NUVOLACDBPLAN   NPDB2                       7           70   70
As I said before, in Cloud Control 13.2 you cannot specify all the options available. There two options that are not shown for Oracle Database 12.2.1.0; they are the following:
- memory_limit: This parameter is applicable only to Oracle Exadata storage for configuring the Database Smart Flash Cache.
- memory_min: This parameter is applicable only to Oracle Exadata storage for configuring the Database Smart Flash Cache.
When I was reading the documentation I thought that these parameters were to limit the usage of the SGA for the PDBs, but it seems that they work only for Exadata. Perhaps in upcoming versions? I hope!
If you want to add a value for those resources you have to modify the CDB Plan Directive manually, as I show you below:
SQL> exec DBMS_RESOURCE_MANAGER.CREATE_PENDING_AREA();
PL/SQL procedure successfully completed.


SQL> BEGIN
  DBMS_RESOURCE_MANAGER.UPDATE_CDB_PLAN_DIRECTIVE(
    plan                  => 'NUVOLACDBPLAN',
    pluggable_database    => 'NPDB1',
    new_shares                => 3,
    new_utilization_limit     => 30,
    new_parallel_server_limit => 30,
    new_memory_limit=>30,
    new_memory_min=>30);
END;
/  2    3    4    5    6    7    8    9   10   11

PL/SQL procedure successfully completed.

SQL> BEGIN
  DBMS_RESOURCE_MANAGER.UPDATE_CDB_PLAN_DIRECTIVE(
    plan                  => 'NUVOLACDBPLAN',
    pluggable_database    => 'NPDB2',
    new_shares                => 7,
    new_utilization_limit     => 70,
    new_parallel_server_limit => 70,
    new_memory_limit=>70,
    new_memory_min=>70);
END;
/  2    3    4    5    6    7    8    9   10   11

PL/SQL procedure successfully completed.

SQL>
SQL> exec DBMS_RESOURCE_MANAGER.VALIDATE_PENDING_AREA();

PL/SQL procedure successfully completed.

SQL>
SQL> exec DBMS_RESOURCE_MANAGER.SUBMIT_PENDING_AREA();
PL/SQL procedure successfully completed.
Then you can query if the values were set correctly:
SQL> select plan, pluggable_database, shares, utilization_limit, parallel_server_limit,
 memory_min, memory_limit from DBA_CDB_RSRC_PLAN_DIRECTIVES where plan='NUVOLACDBPLAN';


PLAN          PLUGGABLE_DATABASE          SHARES  UTILIZATION_LIMIT PARALLEL_SERVER_LIMIT MEMORY_MINMEMORY_LIMIT
--------------- ------------------------- ------- ----------------- --------------------- ---------- -----------
NUVOLACDBPLAN   ORA$DEFAULT_PDB_DIRECTIVE    1                 100               100
NUVOLACDBPLAN   ORA$AUTOTASK                                             90               100
NUVOLACDBPLAN   NPDB1                        3                  30                30         30          30
NUVOLACDBPLAN   NPDB2                        7                  70                70         70          70
Assigning resources at pluggable database level:
Now go back to the “Home page” of the Container Database “CDB1”. “Administration”–> “Resource Manager”. We will select this time the option “Consumer Groups”. The Consumer Groups receive the resources assigned by Resource Plan Directives.
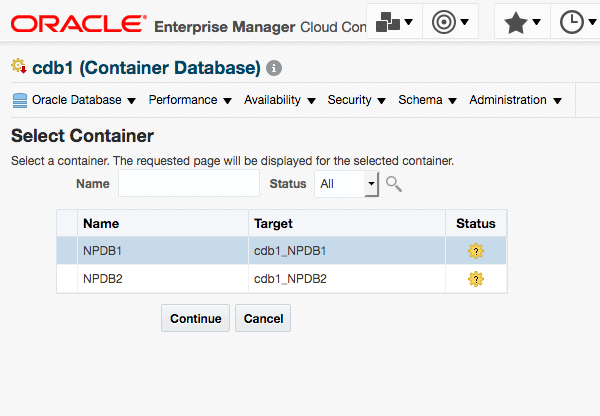
We will see the following page where we have to select in which pluggable database we want to create the Consumer Groups. In this example, we will select the PDB called “NPDB1”. Click on the button “Continue”.
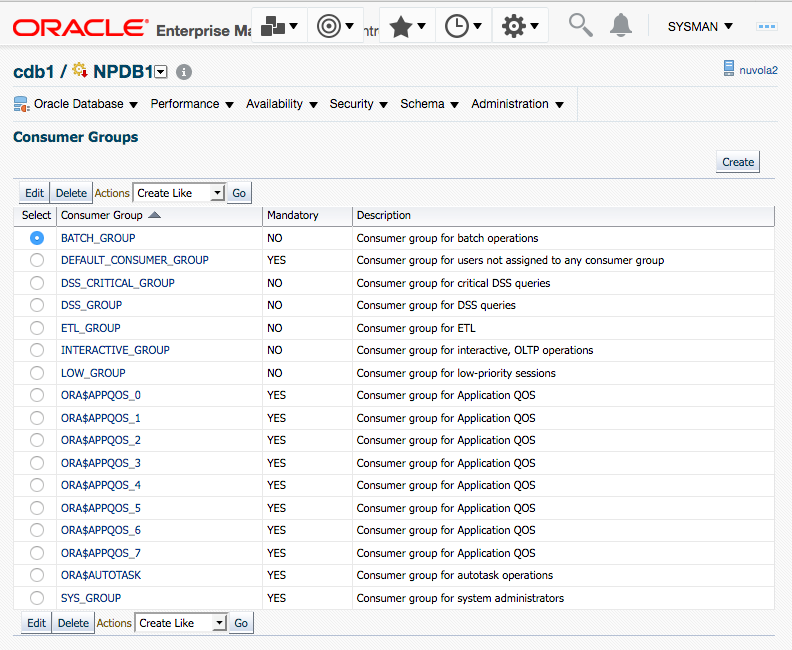
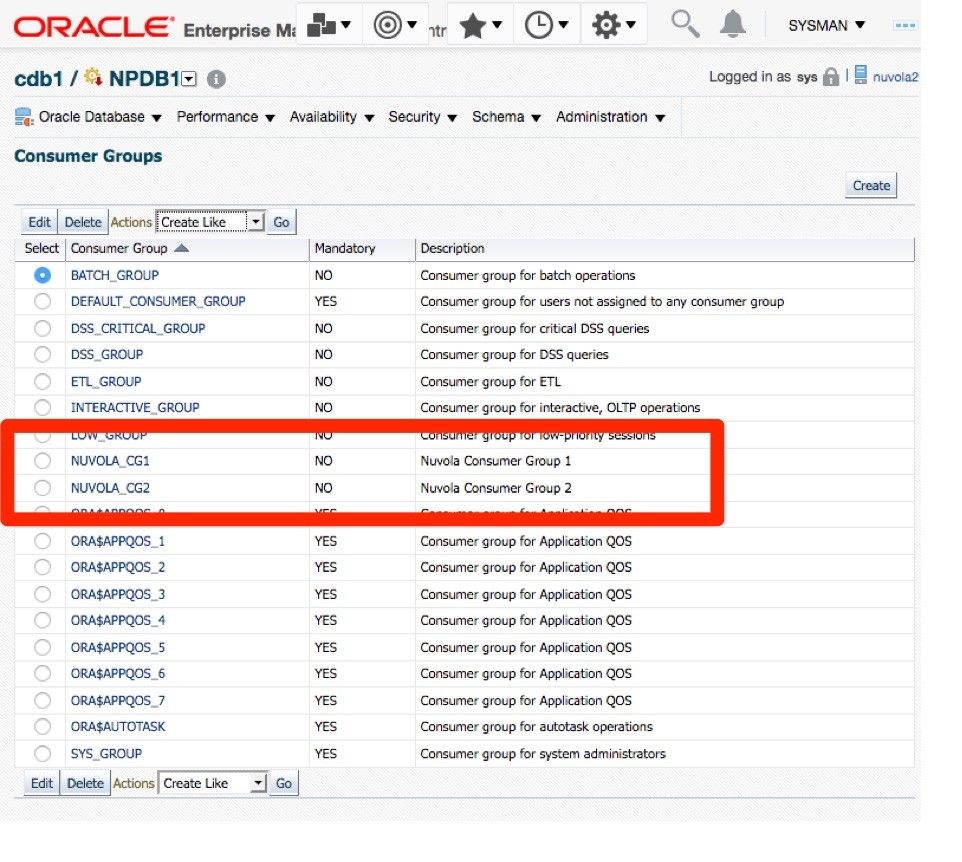
In the following page, all the Consumer Groups will be listed. There are several already created by default. We will click on the button “Create”.
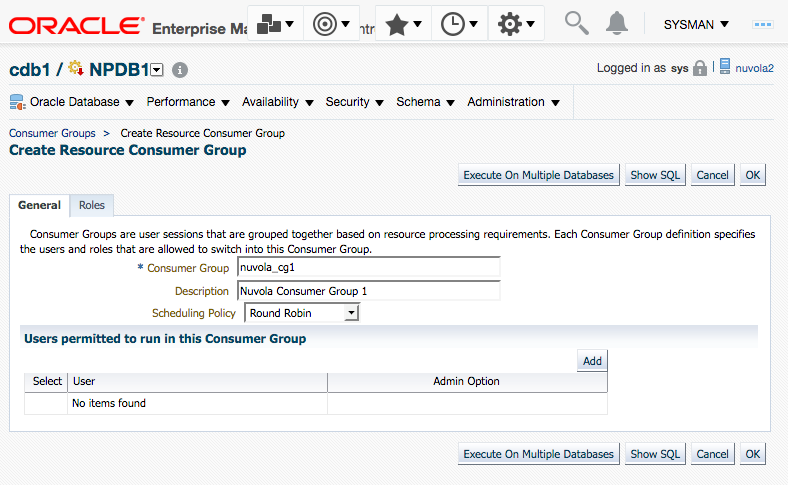
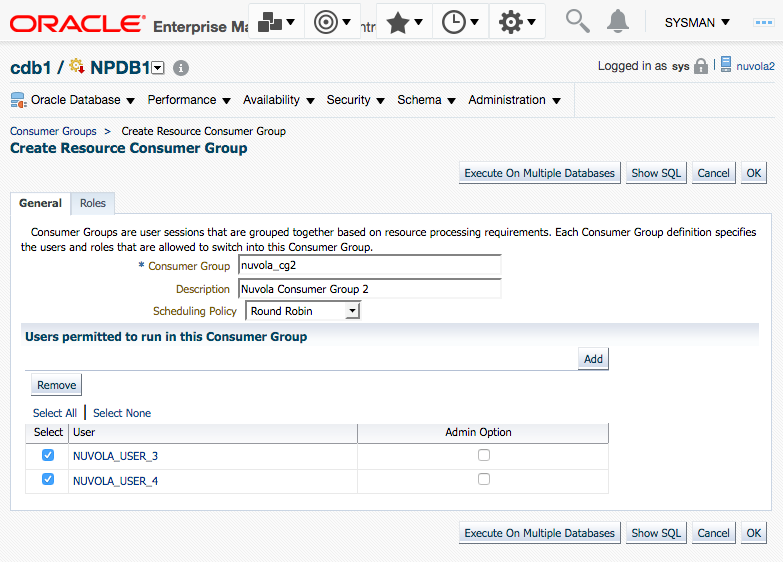
In the following page we have to specify the name of the Consumer Group and a description. The name of the Consumer Group will be called “nuvola_cg1”. Click on the button “Add” so what we can add Users that will inside this Consumer Group.
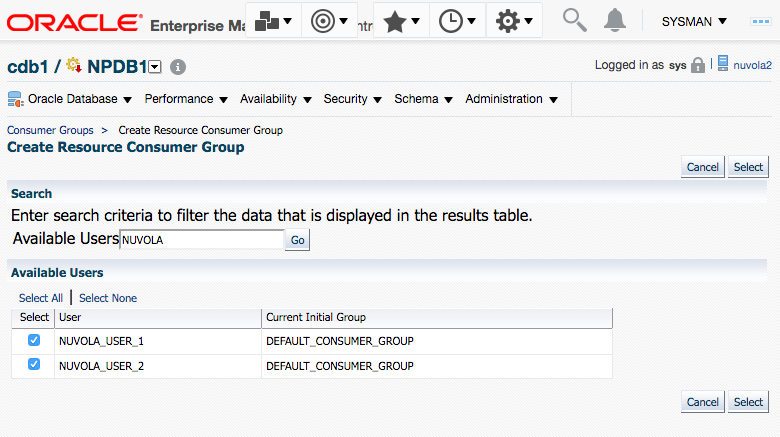
The users that exist in the PBD will be listed. In this example, I have filtered the users by the string “Nuvola”. The users “NUVOLA_USER_1” and the user “NUVOLA_USER_2” will be added to this Consumer Group. Click on the button “Select”.
We will repeat the last two steps to create another Consumer Group.This time it will be called “nuvola_cg2”. For this Consumer Group, the users “NUVOLA_USER_3” and “NUVOLA_USER_4” will be added.
You will see the two Consumers Group created in the following page:
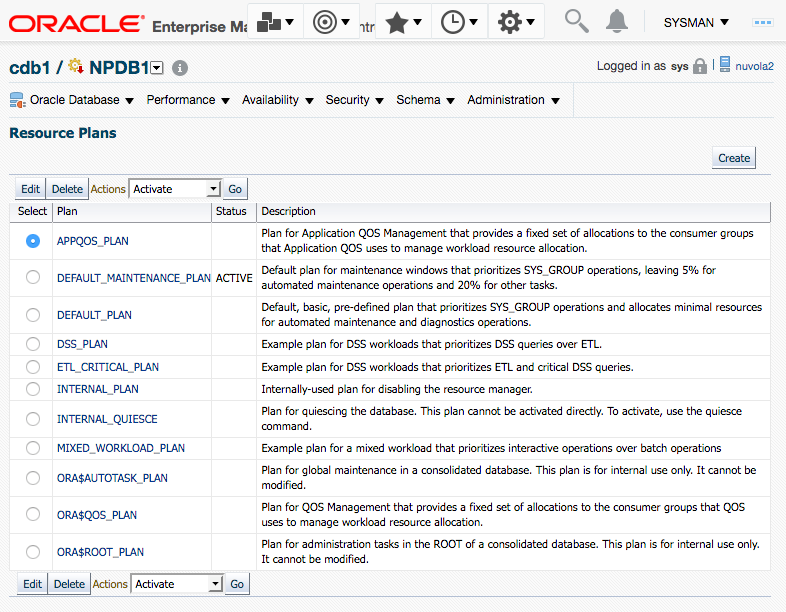
Now there is only one step pending. To Create the Resource Plan Directive. A Resource Plan Directive specifies how the resources will be assigned to Consumer Groups. For this Go back to the “Home page” of the pluggable database “NPDB1”. “Administration”–> “Resource Manager”. We will select this time the option “Plans”.
There are some Resource Plans already created by default. We will click on the button “Create”.
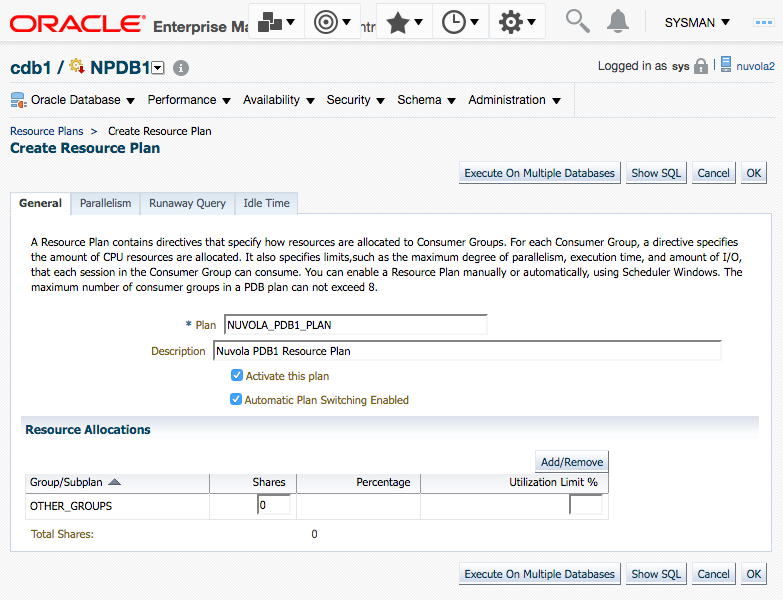
On this page we have to specify the name of the PDB Resource Plan and a description; in this case the plan will be called “NUVOLA_PDB1_PLAN”. Also on the second part of the page, “Resource Allocations”, we will specify the “Directive” where we specify how much of the resources will be assigned to each Consumer Group. Click on the button “Add/Remove” to add the Consumer Groups that we created previously.
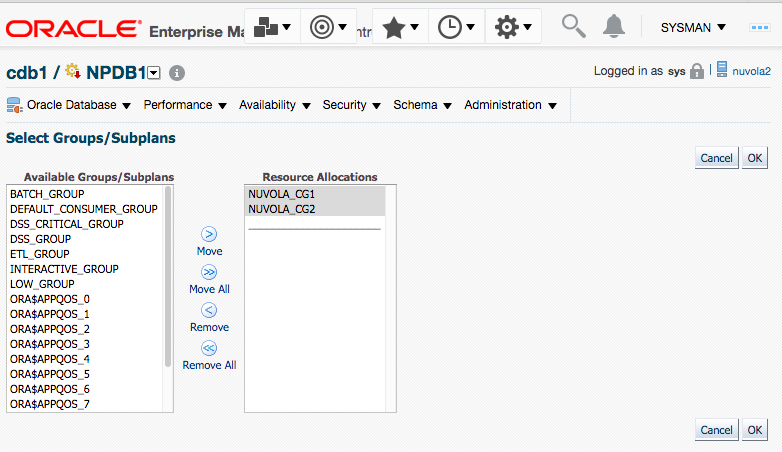
Select the two Consumer Groups that we created; in this example they are “NUVOLA_CG1” and “NUVOLA_CG2”. Click on the button “OK”.
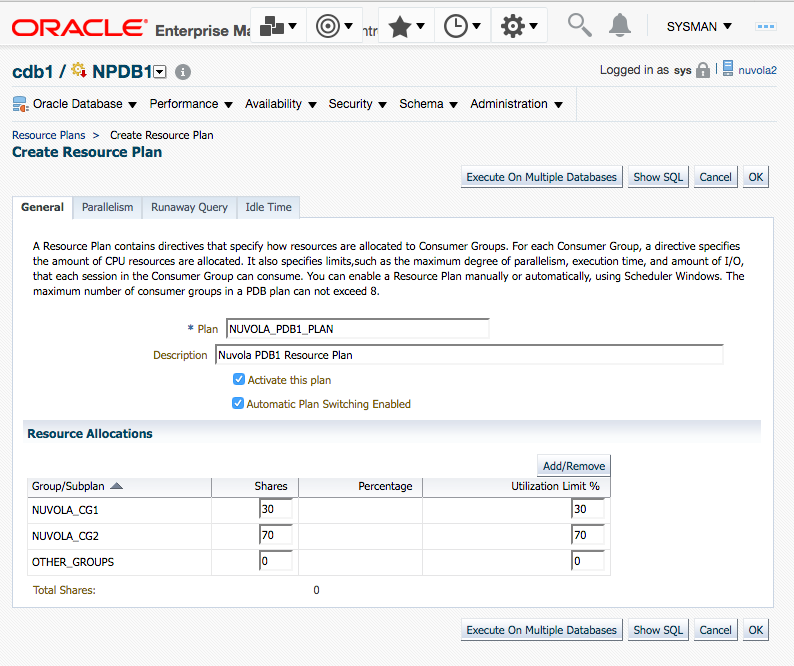
The two Consumer Group will be added and then we can assign them resources. In this section, it is important to note that only the following resources can be added:
General Tab:
- Shares
- Utilization Limit %
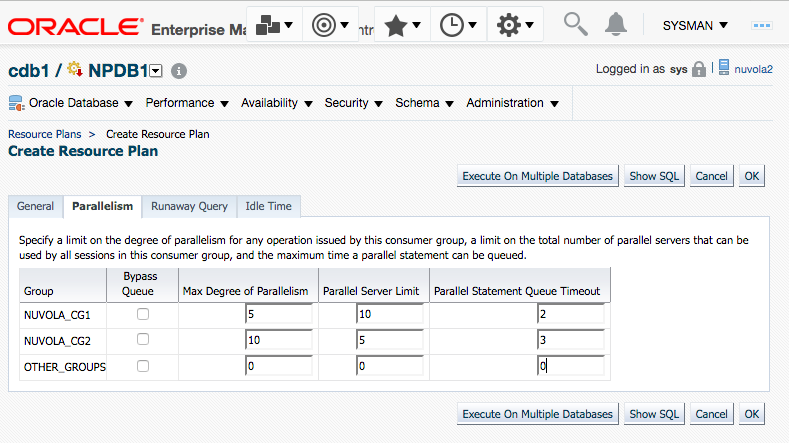
Parallelism Tab:
- Bypass Queue
- Max Degree of Parallelism
- Parallel Server Limit
- Parallel Statement Queue Timeout
Runaway Query Tab:
- Elapsed time Limit (Secs)
- CPU Time limit (Secs)
- IO Limit (MBs)
- IO Request Limit (Requests)
- Action
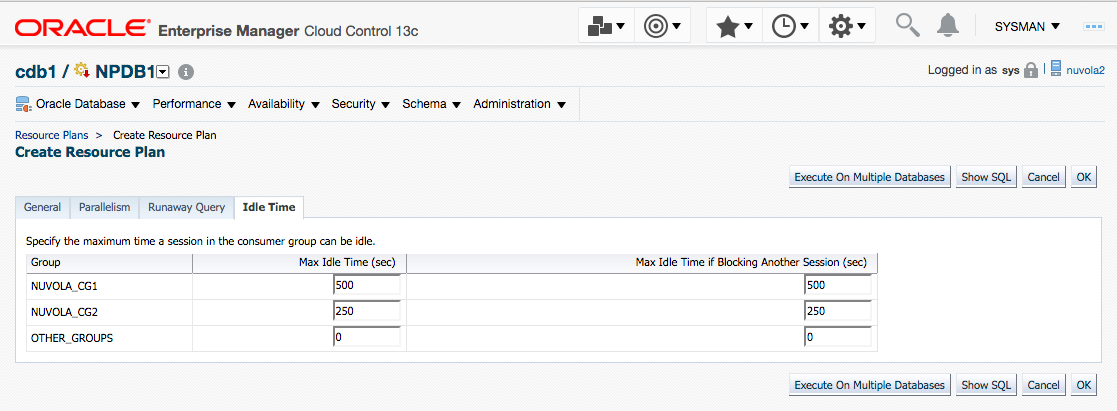
Idle Time Tab:
- Max idle time
- Max idle time if blocking another session
However, as in the CDB Resource Plan, there are others resources that also can be specified manually but that are not present in Cloud Control/ for instance, UNDO limit. Again, a downside of Oracle Cloud Control. If you want to see all the resources that you can specify review the documentation: http://docs.oracle.com/database/122/ARPLS/DBMS_RESOURCE_MANAGER.htm#ARPLS73823
Click on tab “General”. Specify the resources that you want and click on the button “OK”.
Click on tab “Parallelism”. Specify the resources that you want and click on the button “OK”.
Click on tab “Runaway Query”. Specify the resources that you want and click on the button “OK”.

Click on tab “Idle Time”. Specify the resources that you want and click on the button “OK”.
We can review with SQL Statements whether the PDB Resource Plan, its Directive, and the Consumer Groups were created successfully. We will login to the PDB called “NPDB1”:
SQL> alter session set container=npdb1;
Session altered.
We can review a couple of Resources using the view DBA_RSRC_PLAN_DIRECTIVES:
SQL> select plan, group_or_subplan, max_idle_time, max_utilization_limit, parallel_queue_timeout,
 utilization_limit from dba_rsrc_plan_directives where plan like '%NUVOLA%'

PLAN            GROUP_OR_SUBPLA MAX_IDLE_TIME MAX_UTILIZATION_LIMIT
---------------- --------------- ------------- ---------------------
NUVOLA_PDB1_PLAN NUVOLA_CG1         500                       30
NUVOLA_PDB1_PLAN NUVOLA_CG2         250                       70
NUVOLA_PDB1_PLAN OTHER_GROUPS                                  0
As I said before, Oracle Cloud Control doesn’t show all the options for resources. For instance, if you want to assign Undo Limit or PGA limit for a Consumer Group then you have to modify the Plan Directive manually as I show below:
SQL> exec DBMS_RESOURCE_MANAGER.CREATE_PENDING_AREA();

PL/SQL procedure successfully completed.

SQL> BEGIN
DBMS_RESOURCE_MANAGER.UPDATE_PLAN_DIRECTIVE(
plan=>'NUVOLA_PDB1_PLAN',
group_or_subplan=>'NUVOLA_CG1',
new_undo_pool=>100,
new_session_pga_limit=>120);
END;
/  2    3    4    5    6    7    8

PL/SQL procedure successfully completed.

SQL> exec DBMS_RESOURCE_MANAGER.VALIDATE_PENDING_AREA();
PL/SQL procedure successfully completed.

SQL> exec DBMS_RESOURCE_MANAGER.SUBMIT_PENDING_AREA();
PL/SQL procedure successfully completed.


SQL>  select plan, group_or_subplan, UNDO_POOL,max_idle_time, max_utilization_limit from dba_rsrc_plan_directives where plan like '%NUVOLA%';

PLAN             GROUP_OR_SUBPLA   UNDO_POOL  MAX_IDLE_TIME   MAX_UTILIZATION_LIMIT
---------------- ----------------- ---------- --------------- ---------------------
NUVOLA_PDB1_PLAN NUVOLA_CG1              100           500                   30
NUVOLA_PDB1_PLAN NUVOLA_CG2                            250                   70
NUVOLA_PDB1_PLAN OTHER_GROUPS                                                 0
Conclusion
If you are consolidating non-CDBs databases into a CDB database with several PDBs it is highly recommended that you implement Database Resource Manager. In this article I presented a step-by-step ecample that you can use as a recipe to implement a Database Resource Manager configuration and assign resources properly across PDBs and across Consumer Groups.
Start the discussion at forums.toadworld.com