We started to detail the concept and workings of Consolidation Planning for the Cloud, using Oracle Enterprise Manager Cloud Control 13c, in the previous partsof this article series. This is Part VIII.
To recap, in the previous part of the series, we talked about the new Oracle Enterprise Manager 13c feature of the Database Consolidation Workbench. As far as licensing is concerned, this is part of the Oracle Real Application Testing (RAT) Database Option.
The older Host Consolidation Planner did not by itself take into account the Oracle Exadata features, such as Smart Scan, that would effectively reduce the CPU utilization and allow more servers to be consolidated on Exadata. The difference is that the new Database Consolidation Workbench now takes these Exadata features into account when conducting consolidation to Exadata machines.
The Database Consolidation Workbench provides automation in all consolidation phases, from planning to deployment and validation. Consolidation to the Oracle Private/Public Cloud and consolidation to Exadata can be among the possible scenarios you can try out. As part of the workbench, you can run SQL Performance Analyzer (SPA)’s Exadata simulation, which will help assess the benefit for Exadata Smart Scans for phantom servers.
Another interesting feature we talked about was that in the Migrate phase, the consolidation plan can actually be implemented, and the source databases migrated to the new consolidation platform. This would be done by using Enterprise Manager’s provisioning features, but of course it would require one of the main Enterprise Manager packs – the Database Lifecycle Management pack (DBLM) for Oracle Database—to be licensed and enabled.
We will now see the Database Consolidation workbench in action.
Creating a Database to Server (D2S) Project and Scenario
First, create a new Database Consolidation project. As the consolidation type, select Database to Server (D2S) as seen in Figure 1-36. This is when you are consolidating existing databases to a new server, for example Exadata consolidation. All the databases, if the workload is found to be suitable, will be consolidated onto the new server.
The second possibility is Database to Database (D2D), where you would consolidate existing databases onto an Oracle 12c Multi-tenant database.
There is also a third possibility: consolidation onto the Oracle Public Cloud. However, this is not seen on the screen but is available as a Phantom destination option when creating a scenario for a Database to Server or Database to Database project.
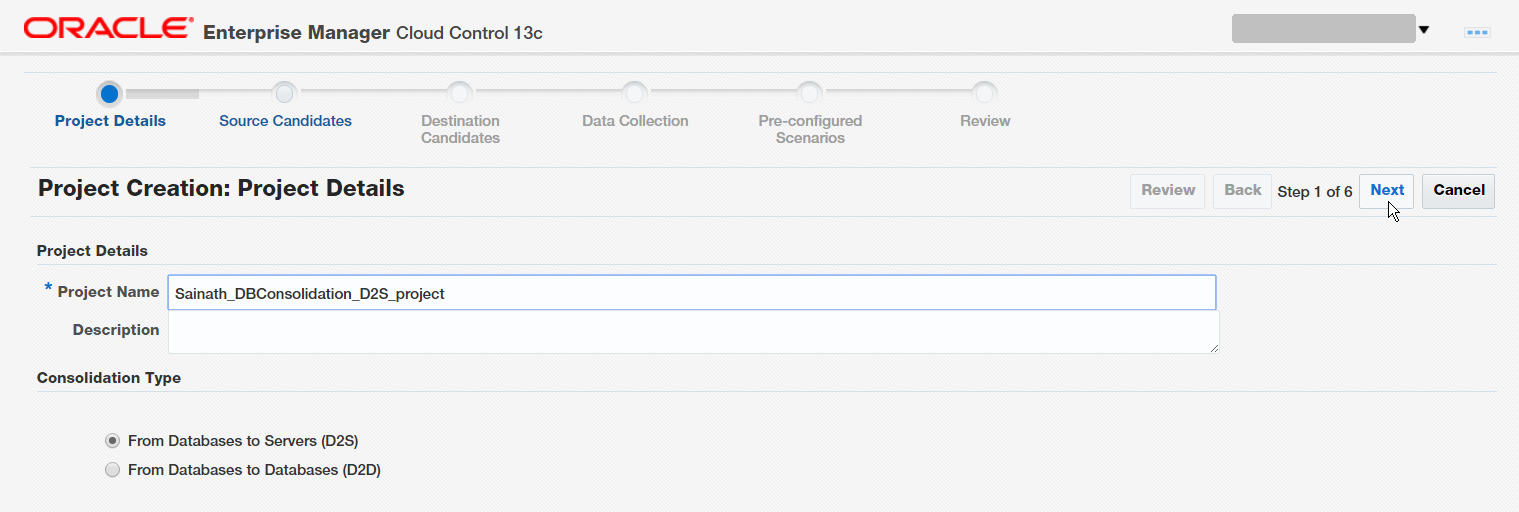
Figure 1-36. Creating a D2S project
Click on Next. This brings up the Source Candidates screen as displayed in Figure 1-37.
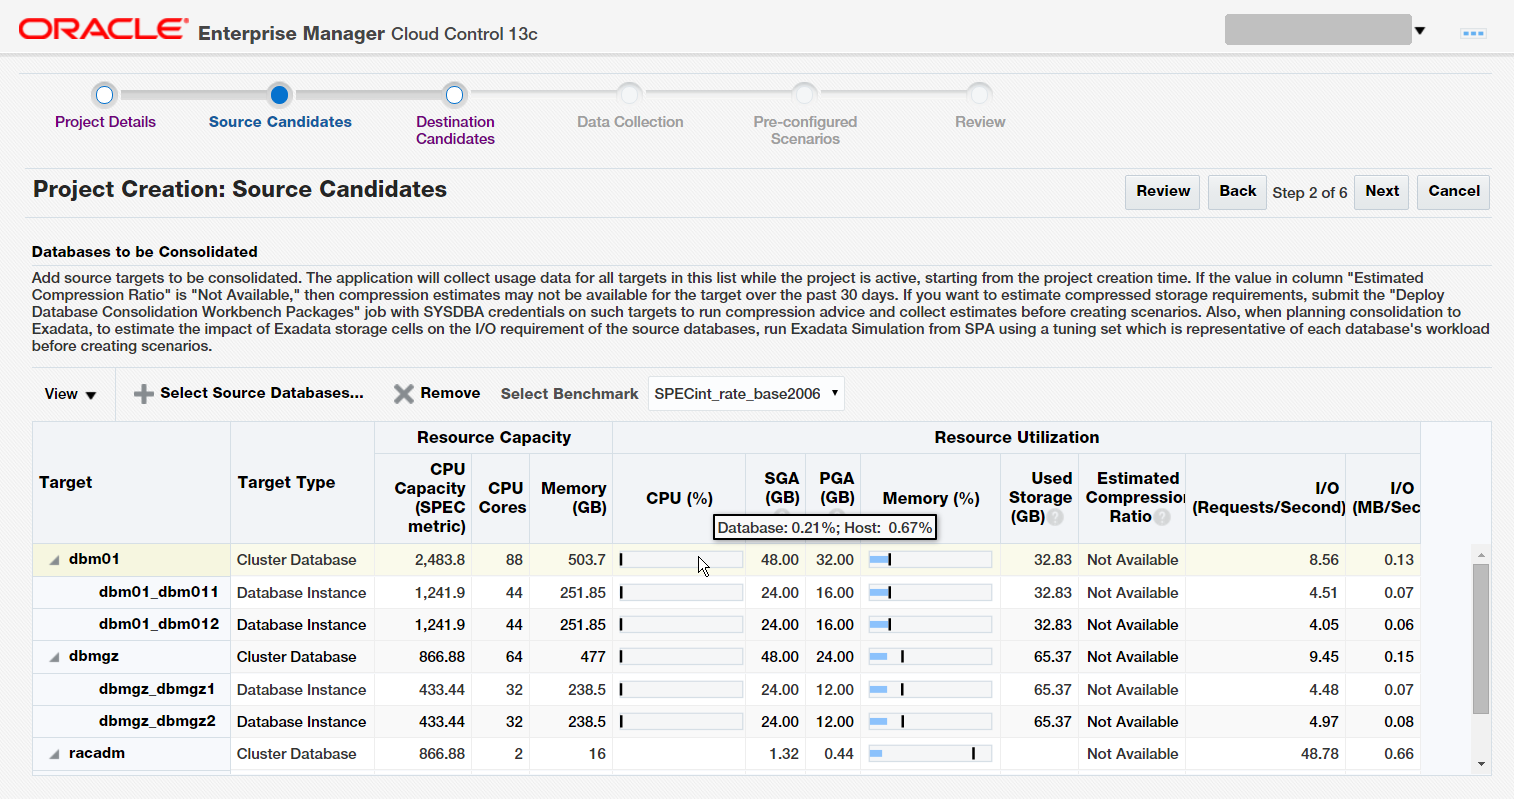
Figure 1-37. Source Candidates screen
In this screen, add the source database targets to be consolidated. Usage data will be collected for all targets in this list. Since the value in column "Estimated Compression Ratio" is "Not Available," it signifies that compression estimates were not available for the target over the past 30 days. If you want to estimate compressed storage requirements, submit the "Deploy Database Consolidation Workbench Packages" job with SYSDBA credentials on such targets to run compression advice and collect estimates, before creating scenarios.
Also, when planning consolidation to Exadata, to estimate the impact of Exadata storage cells on the I/O requirement of the source databases, you can run Exadata Simulation from SPA using a tuning set which is representative of each database's workload, before creating scenarios.
In the next pre-configured scenarios screen (Figure 1-38), we are using new Phantom Exadata database machines.
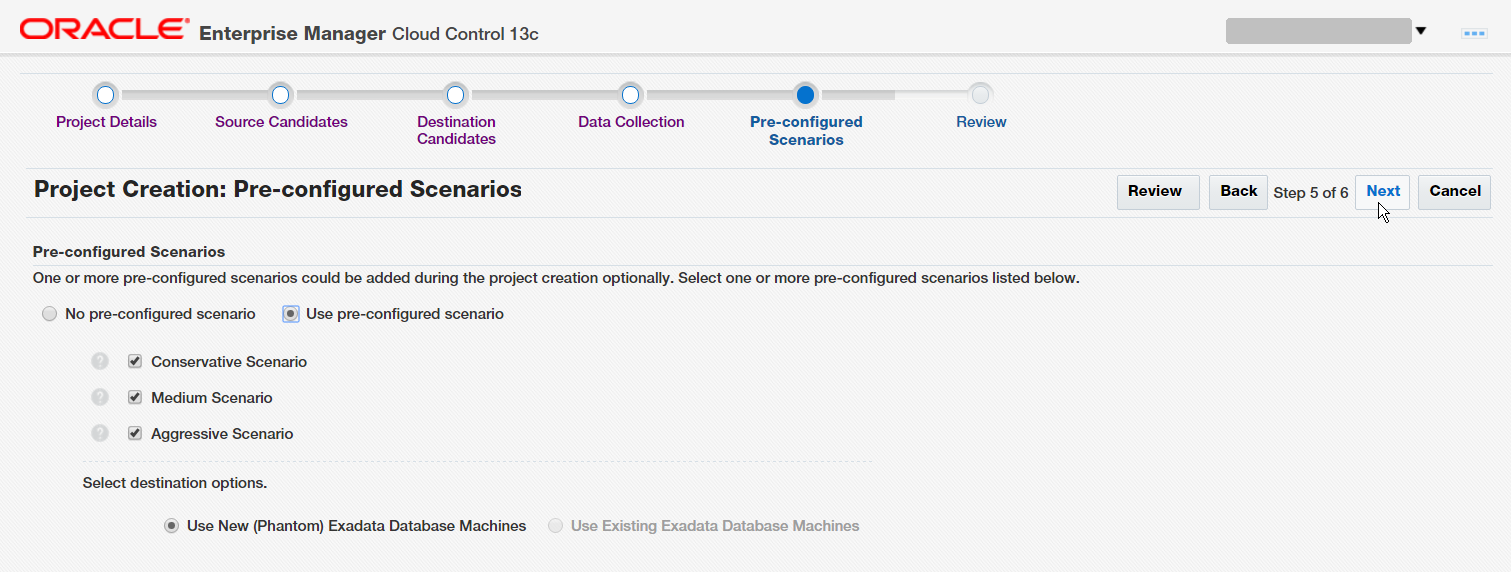
Figure 1-38. Pre-configured scenarios
When the project is submitted, the data collection starts and then reaches the minimum days. The project, when ready, shows an advisor finding in Figure 1-39.

Figure 1-39. Advisor Findings
The full text of the finding is as follows: “The average wait time for the log file sync event for this source database is 32.01ms. This indicates excessive time to write redo information to redo log files on disk possibly due to slow disks that store the online logs or un-batched commits. This may require tuning SQL (commit frequency, use of NOLOGGING option), checking disk contention and enhancing disk throughput prior to consolidation planning.”
As mentioned in the finding, tuning of the source databases should be attempted and completed prior to proceeding further with consolidation planning.
Next, we create a what-if scenario for the D2S project. This is seen in Figure 1-40.
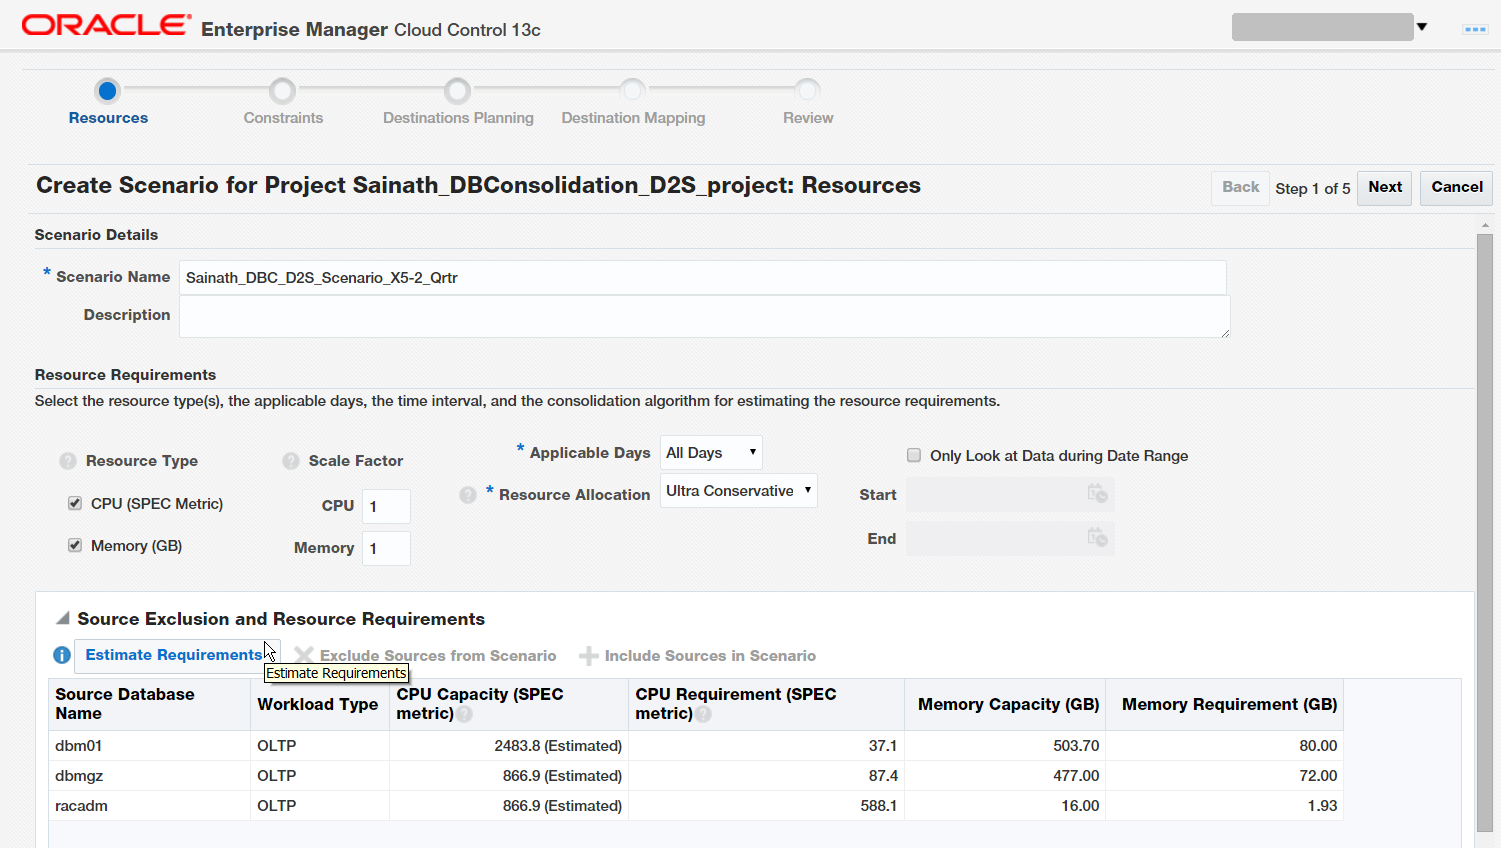
Figure 1-40. Create Scenario for D2S project
We will be attempting consolidation onto an X5-2 Quarter rack, so have named the scenario accordingly. The scale factor indicates what type of load we are expecting in the future, so if we input a scale factor of 5, it means the consolidated load will be increasing by a factor of 5 in the days to come. A separate scale factor can be used for CPU and Memory. In this case, we have used a scale factor of 1 only.
You can estimate resource usages by obtaining the average (“Aggressive”), the 80th percentile (“Medium”), or the maximum (“Conservative”) of average hourly usage across the specified data range. Specify “Ultra Conservative” to use the highest usage observed across the specified data range.
Click on the “Estimate Requirements” button. The estimate figures appear for the CPU capacity. Click on Next. The Constraints screen appears as seen in Figure 1-41.
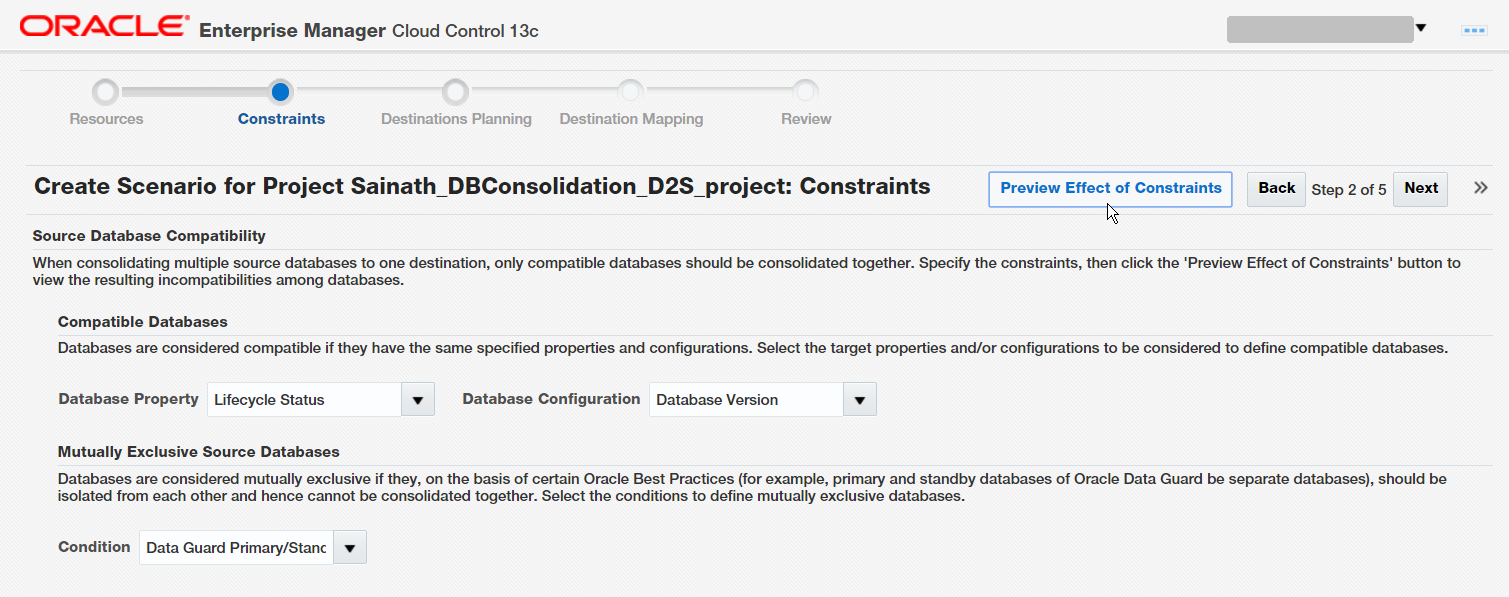
Figure 1-41. Constraints
We have chosen a few constraints for the source databases on this screen. The options for Database Property are: Lifecycle Status, Department, and Location. You can set Database Configuration to: Database Version, Database Edition, Operating System, or Network Domain. Under Mutually exclusive source databases, the Condition can be: Data Guard Primary/Standby Databases.
You can click on “Preview Effect of Constraints” to see how these constraints will affect the consolidation scenario; the incompatibilities will be found and displayed.
Click on Next. The Destinations Planning screen appears (Figure 1-42).
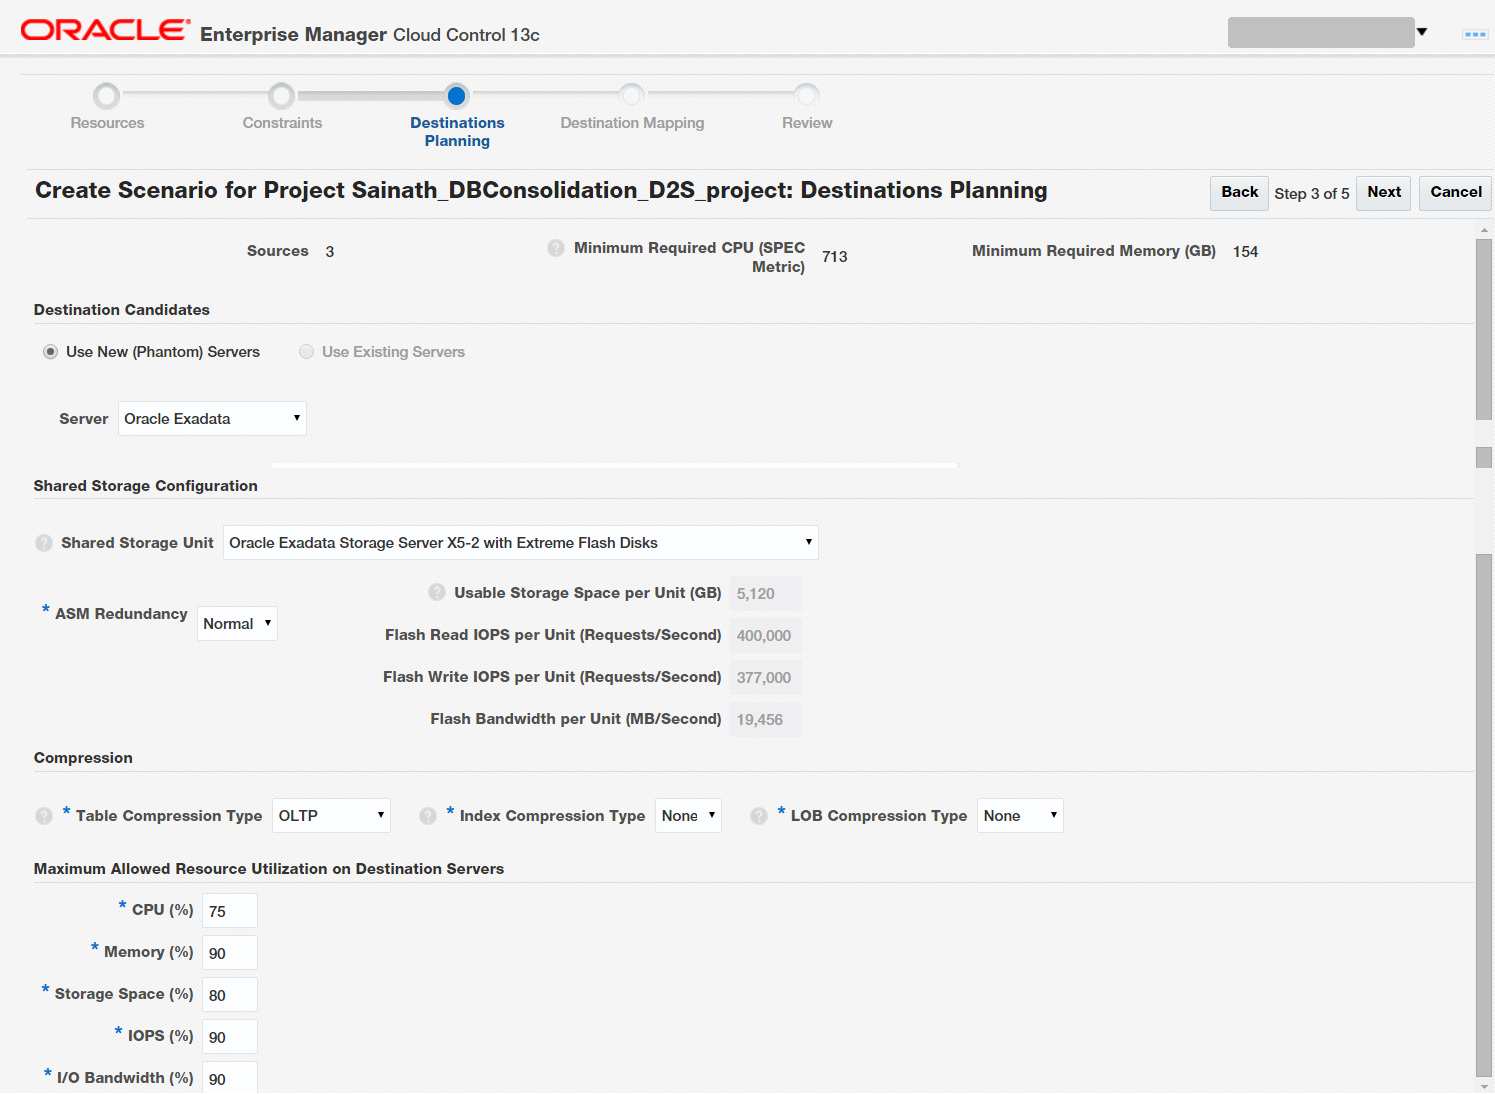
Figure 1-42. Destinations Planning
Here you can select the New (Phantom) server to be either Oracle Exadata, Oracle Compute Cloud or a Generic Server. This is how we can include the Oracle Public Cloud in the planning.
In the Shared Storage Configuration section, we have selected the Exadata Storage server. The ASM Redundancy can be selected as Normal or High. The Table Compression Type can be selected as None, OLTP, Query High, Query Low, Archive High, or Archive Low. The Index Compression Type can be None, High, or Low; and the LOB Compression Type can be None, High, Medium, or Low.
Figure 1-43 shows the various options available for the Shared Storage unit.
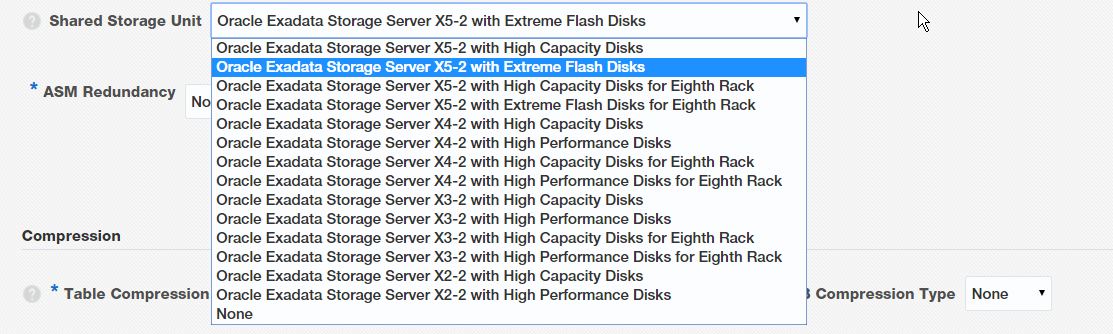
Figure 1-43. Shared Storage unit options
In this installation of our consolidation planning article series, we saw the Database Consolidation workbench in action, creating a Database to Server (D2S) Project and what-if Scenarios for consolidation onto an X5-2 Quarter rack. Consolidation Planning using Oracle Enterprise Manager Cloud Control 13c greatly assists in such what-if scenarios, and also for planning for the move to the Oracle cloud. We will continue this series in Part IX. Part IX is here.
(This article is a modified excerpt from Chapter I of the new book by the author titled “Oracle Database Cloud Cookbook with Oracle Enterprise Manager 13c Cloud Control” published by Oracle Press in August 2016. For more information on the book, see here.)
Start the discussion at forums.toadworld.com