Introduction
Deploying MySQL on Amazon RDS has more benefits than traditional datacenter deployment; for example we don’t have to purchase and manage hardware for replacing failed disks or upgrading the servers. Amazon RDS is priced pay-as-you-go, converting upfront capital expenditure into day-to-day operational expenses.
It’s noteworthy that provisioning MySQL in the cloud is not much different than any other platform, although we need to design a proper architecture for this new scenario to get good performance and effectively use the capabilities of the cloud. A best practice when deploying MySQL in Amazon RDS is to set up a read replica topology using AWS Management Console. This replication configuration enables elastic scale-out beyond the capacity of one MySQLinstance for read-heavy workloads as well as high availability for the whole solution.
In this article, I'll show how to design and execute a MySQL read replica configuration using AWS Management Console step by step.
How does MySQL replication work?
MySQL replication is conceptually very simple:
- There are database changes (write queries, data structure changes such as create/alter, etc) on the master instance that are recorded on the binary log
- The binary log is transferred to the replication slave instance
- And finally, the changes are applied to the replication slave instance using the binary log
The slave instance connects to the master instance (as any other MySQL client) to request for new changes to the database recorded in the binary log. On the master side, a thread is created to serve the requests from the slave.
On the slave side, two threads are spawned to support the communication with the master:
- IO thread – connects to the master, reads the binary log and creates a local copy named relay log. We can check the actual activity of this thread by executing the statement “show slave status” and checking the variables:
- Master_Log_File – the last file copy from the master
- Read_Master_Log_Pos – the position in the relay log of the binary log copied from the master
- SQL thread – replays the database changes from the relay log stored locally. We can also check the actual activity of this thread by executing the statement “show slave status” and checking the variables:
- Relay_Master_Log_File – the binary log from the master that this thread is working on
- Exec_Master_Log_Pos – the position in the binary log from the master that this thread is executing
Replication Lag
One common problem related to the replication process is replication lag. In this case, we need to know which replication thread (IO and SQL threads) is responsible for the bottleneck.
In real-world scenarios, it’s not common that the IO thread (copying the binary log) is the bottleneck, but high latency connections causing long delays can have a negative impact on the replication. We can solve this problem by enabling slave compression protocol.
Most of the time, the replication lag is due to the SQL thread on applying the changes to the slave instance. The common causes are:
- Hardware degradation (reduced performance due to failures)
- Different hardware/server provisioning (IOPS, number of CPU, RAM, IO-sub-system, etc.)
- Different version and configuration at the OS and MySQL
We can also dig more to discover the nature of the bottleneck, using the command vmstat, and monitoring the procs section to check which “r” and “b”column displays high values. If “r” column displays high values, then it’s a CPU-bound replication workload, otherwise it’s an IO-bound replication workload.
If we are dealing with a CPU-bound workload, we need to check to see if there are updates that touch millions of rows replayed by SQL thread, because these queries can be very heavy on execution.
If we’re dealing with an IO-bound workload, we can try to fix the problem by increasing the RAM so the working set fits on the memory or creating a configuration (through RAID and fast disk such as SSD) to increase the IOPS. This scenario can be accomplished easily using Amazon RDS because we just scale up the database instance to a more powerful one (with more CPU and memory) or just buy more IOPS without the upfront cost and time consuming effort of upgrading the datacenter hardware.
Now that we’ve talked about the conceptual part of MySQL replication, let’s see how we can implement it in Amazon RDS.
Implementing MySQL replication in Amazon RDS
Step01. Create the master instance
Go to the Amazon RDS console, choose Instances in the navigation bar and click on the Launch DB Instance button. Then select the MySQL engine and Dev/Test option.
Then we need to specify the instance settings as shown in the figure 01.
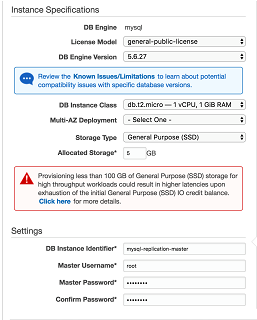
Figure 01
We may specify the advanced settings and finally click on Launch DB Instance button.
Step02. Create the slave instance
Now that we have the master instance, it’s very straightforward to create a slave instance as a read replica. Go to your instance and click on the Instance Actions button and select Create Read Replica option as shown in the figure 02.
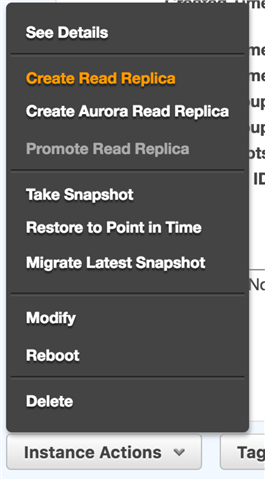
Figure 02
Similar to creating a master instance, we also need to specify the instance settings for the slave instance and specify the replica source, as shown in the figure 03. In this case, we’re going to use the same computing resources (RAM, CPU) as the master instance. If you want to access to the read replica from your own environment, it’s very important to set the field Public Accessible to Yes.
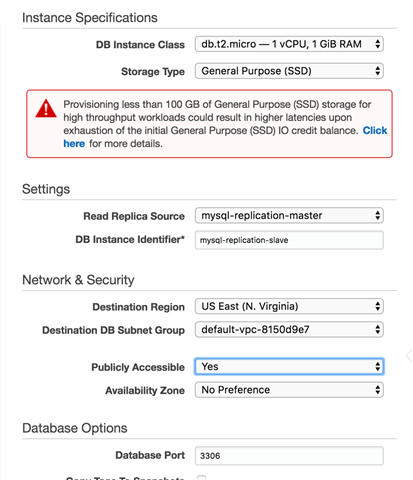
Figure 03
We need to wait for a few minutes while the master instance is modified for the replication settings and the slave instance is created with the proper settings pointing to the master.
Step03. Validate the replication process
Now we can do some changes to the master instance and verify that the changes are replicated correctly onto the slave instance.
Let’s open a connection to the master instance, create a database and sample table. Let’s also add some records to the sample table as shown in the listing 01.
master-mysql> create database replication_db; |
Listing 01
Now let’s open another connection to the slave instance to see if the replication is working okay. Let’s check the existence of the database and sample table and finally display the rows.
slave-mysql> use replication_db; |
Listing 02
Remember that we can monitor the status of the replication process by executing show master status and show slave status commands as shown in listing 03.
master-mysql> show master status\G; |
Listing 03
Conclusion
In this article, I've explained the principles and concepts of MySQL replication. I’ve also executed a walkthrough for implementing MySQL replication in Amazon RDS named read replica. Now you can apply these ideas and demo to your own replication solution.
Start the discussion at forums.toadworld.com