In this article we will learn how to install Oracle Database 18c on Windows 10 Enterprise for research and education.
Before we start installing, we need to know the minimum requirements for Oracle Database 18c.
Windows x64 Minimum Hardware Requirements
System Architecture: Processor: AMD64 and Intel EM64T
Physical memory (RAM): 2 GB minimum
Virtual memory (swap):
- If physical memory is between 2 GB and 16 GB, then set virtual memory to 1 times the size of the RAM
- If physical memory is more than 16 GB, then set virtual memory to 16 GB
Disk space:
- Typical Install Type total: 10 GB
- Advanced Install Types total: 10 GB
Video adapter: 256 colors
Screen Resolution: 1024 X 768 minimum
It’s important to know that Oracle Database 18c is only available for 64 bit Windows systems, just as for Oracle 12c. Therefore, we can’t install Oracle Database 18c in our PC if it’s running a 32 bit Windows OS.
Moreover, Oracle Database 18c is only available for Windows 10 Professional, Enterprise and Education Editions. This means we can’t install Oracle Database 18c if we are using Windows 10 Home Edition.
As we mentioned before, we will be installing Oracle Database 18c on Windows 10 Enterprise 64 bit version, but if you want to install it on Windows 7 or 8 then you can still follow these steps as the installation process is the same, but first please check the compatibility.

Download Software from OTN
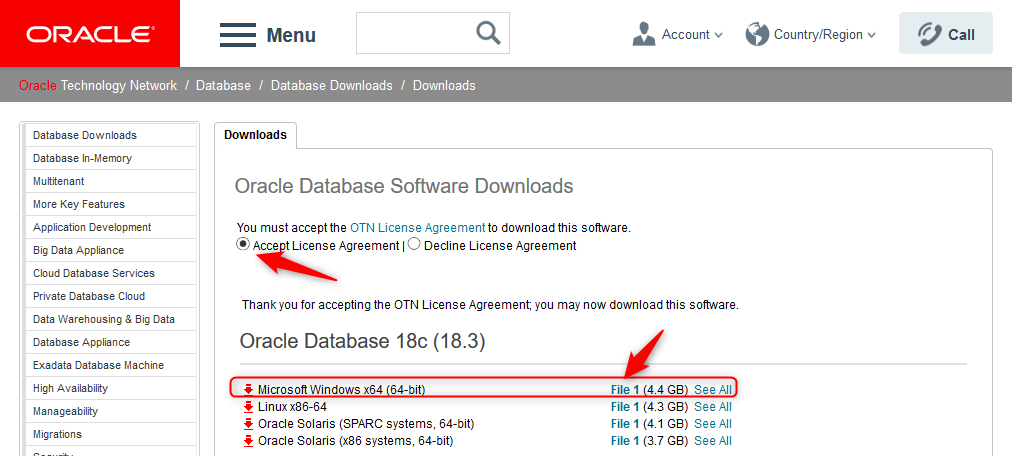
To install Oracle Database 18c we have to download the software, which we can do by visiting the OTN page: http://www.oracle.com/technetwork/database/enterprise-edition/downloads/index.html
We accept the license agreement and choose the Windows version to download ->Click on File 1
To download the files, we must login to the Oracle website. If we have a valid account on this site, we can download the software; otherwise we can register on the page and create an account, which is completely free.
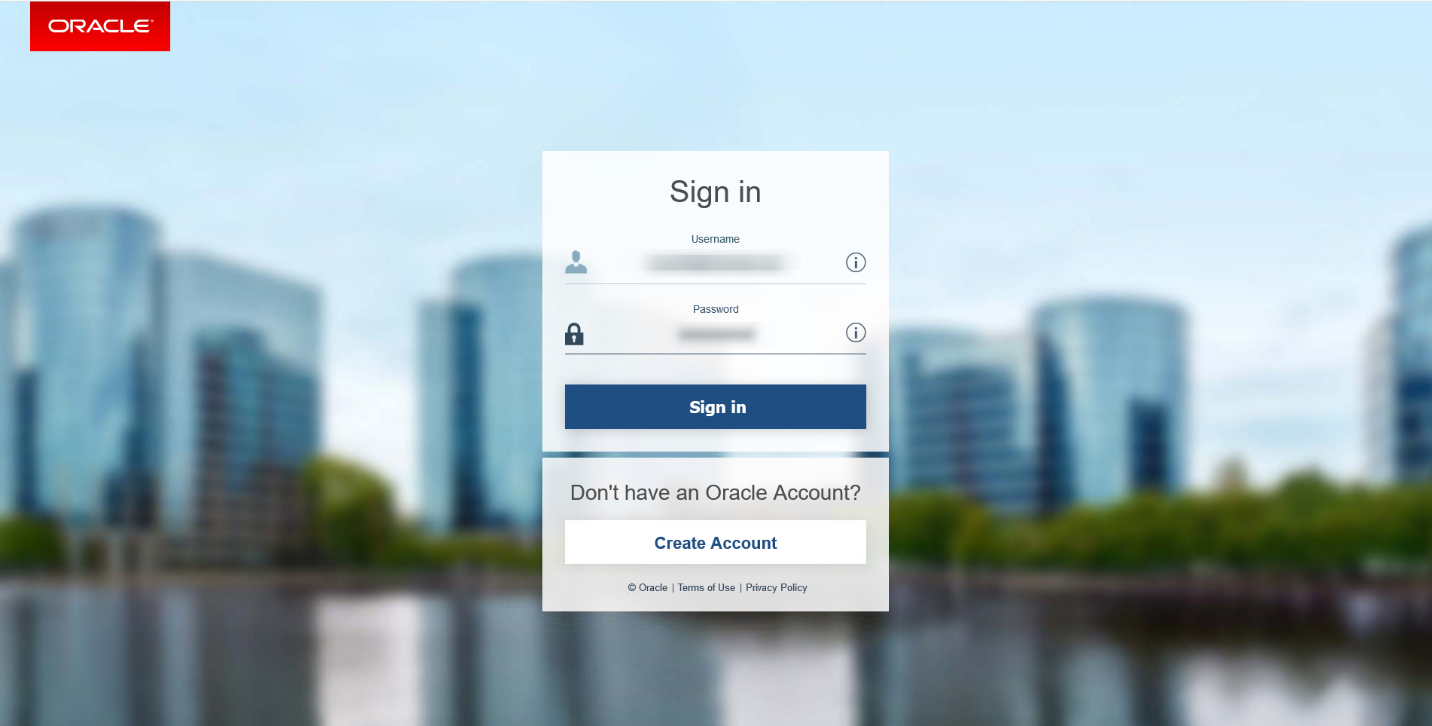
After we fill in the username and password and click on the Sign In button, the files will start downloading automatically.
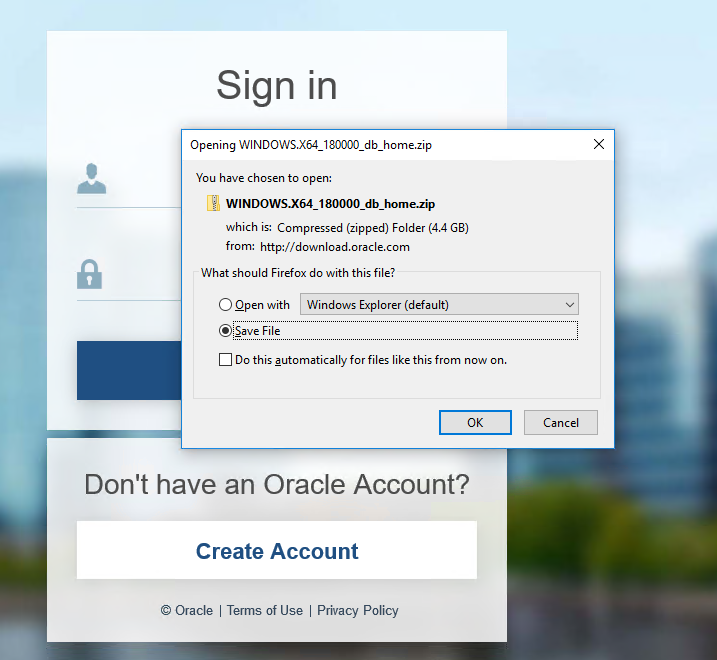
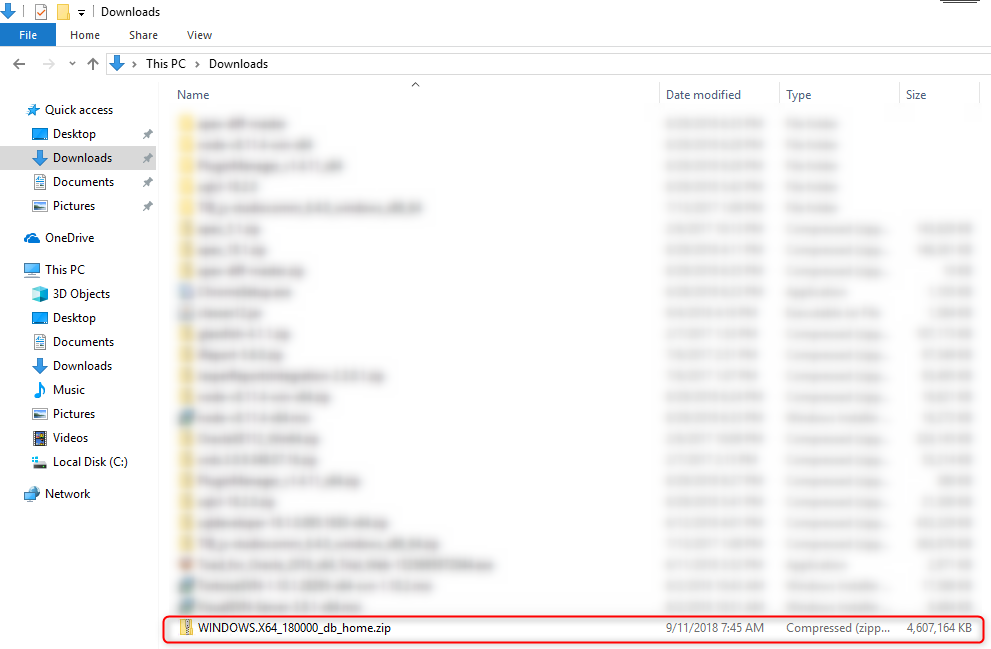
As we can see the file is compressed and zipped.
Extracting the Files
To proceed to the next step, we need to extract the content of file, but before doing that it’s very important to know that with Oracle 11g or 12c we were allowed to set the location of our db_home directory, but starting with Oracle Database 18c we are introduced to a new concept: Image Based Installation.
In Image Based Installation the Oracle Universal Installer of 18c takes the location of our setup.exe file and assigns it as its db_home location. That’s why before we start extracting the content of this file, we first need to decide where we want to create our db_home directory.
We don’t want to create our db_home in the downloads folder. That's why we will first create a folder inside the C drive and name it Oracle18c.
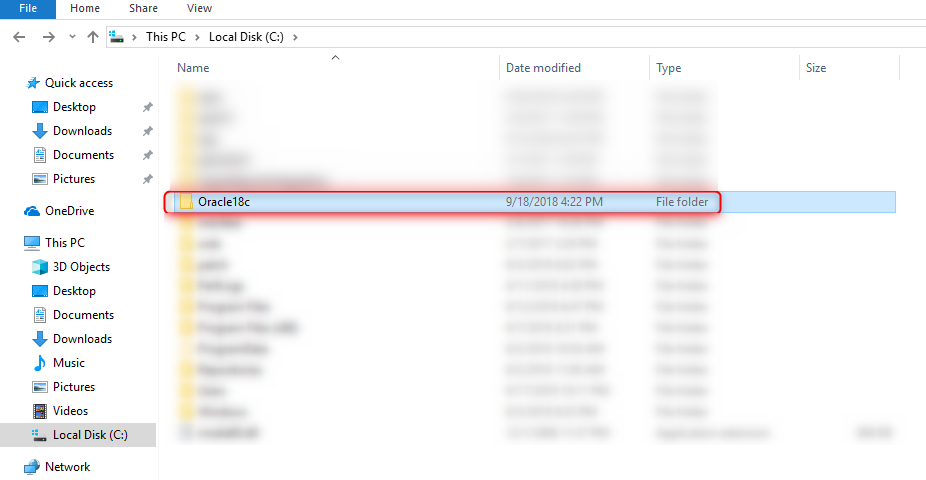
The name for this folder cannot contain any spaces.
Now we are going to extract the contents of the file that we just downloaded into this folder. As the file is approximately 10 GB in size, this extraction process will take some time.
Before beginning the installation of Oracle Database 18c, we need to verify that we are connected to our Windows as an administration user. If we are not, we must log in to our Windows as an administrative user. Not doing so will cause an installation error and crash the entire process.
Oracle Database 18c Installation
To begin the installation of the Oracle Database 18c, we must first go to the Oracle18c folder; for example, in my case, C:\Oracle18c. and then locate the setup.exe file.
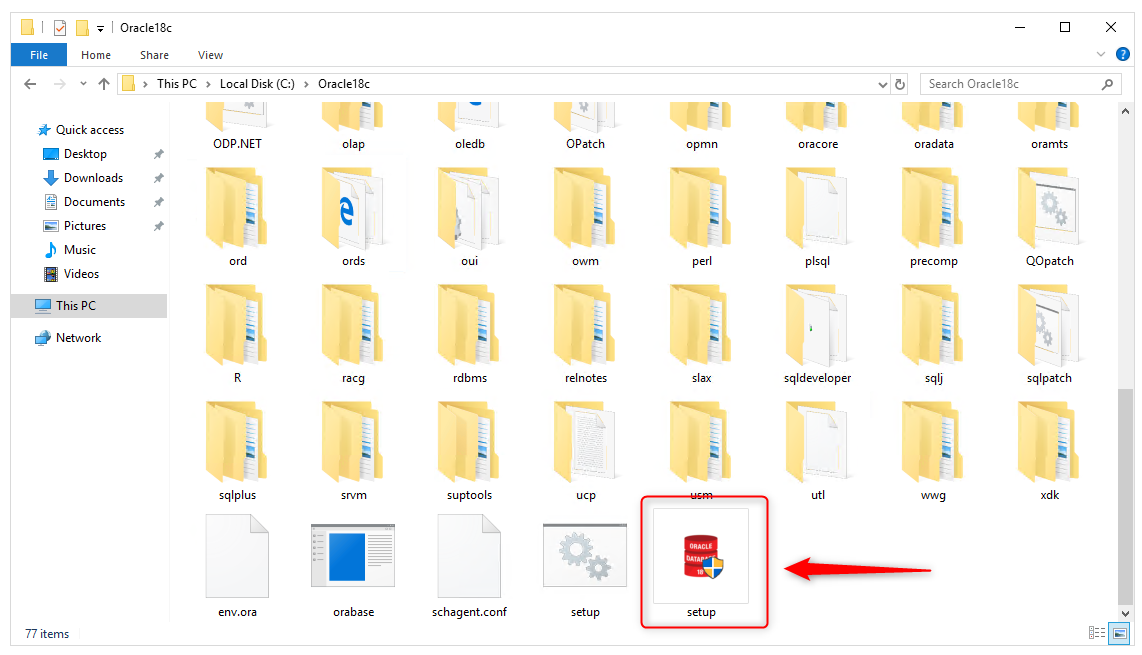
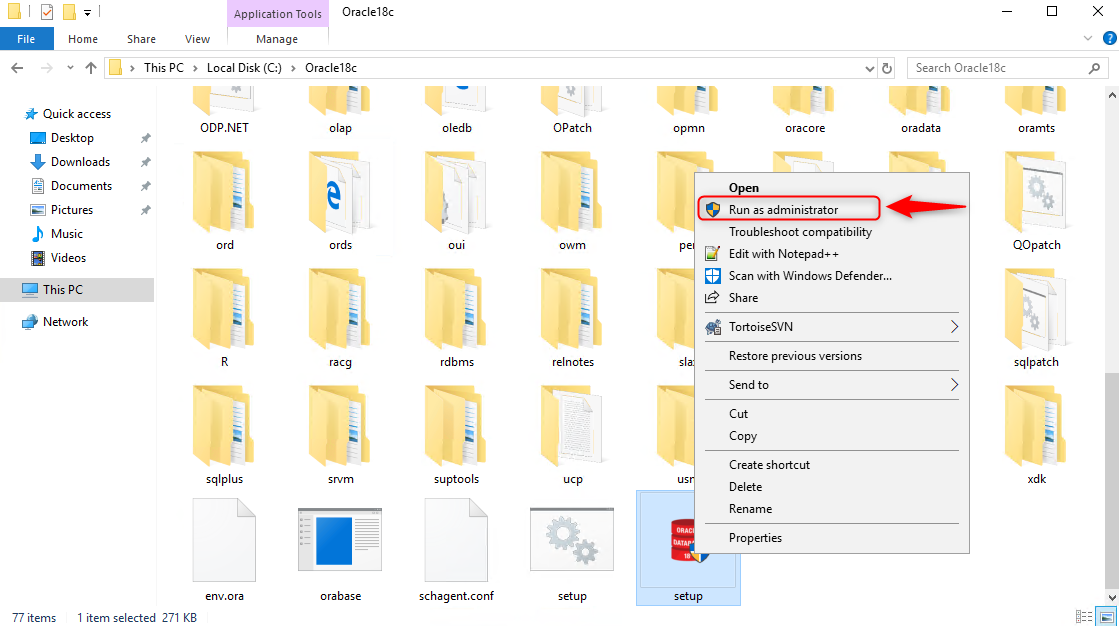
Right click on setup.exe file and choose run as administrator.
We see Screen 1: “Configuration Option”
Here we are presented with two installation options:
The first is to “Create and configure a single instance database”. Choosing this option will not only configure an Oracle Database Server on our machine but also create a starter database for us. We can choose this database for learning and practice purposes.
The second option is “Set Up Software Only”. As the name suggests, it will only configure the Oracle Server software on our machine. No database will be created. We need to create the database manually using the DBCA utility. We choose this option when we are configuring a RAC or planning to perform an upgrade.
For our demo, we will choose the first option, which will configure the software as well as create a database for us.
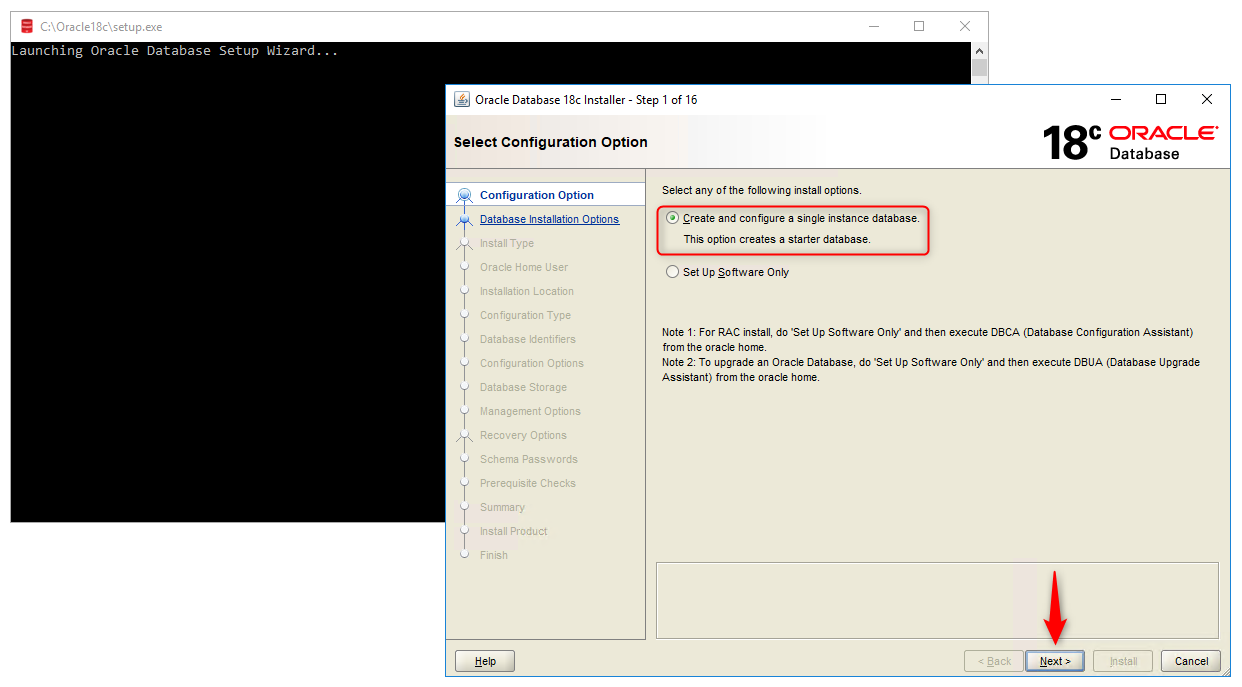
Click on Next button to move next screen.
We see Screen 2: “System Class”.
Here we are presented with two class options:
Desktop class: We choose this option if we are installing on a laptop- or desktop-class system. This option includes a starter database and allows minimal configuration.
Server class: We choose this option if we are installing on a server-class system, which Oracle defines as a system used in a production data center. This option allows us for more advanced configurations options.
We select the first option, Desktop class, because we will be installing the Oracle Database 18c on Windows 10 Enterprise 64bit.
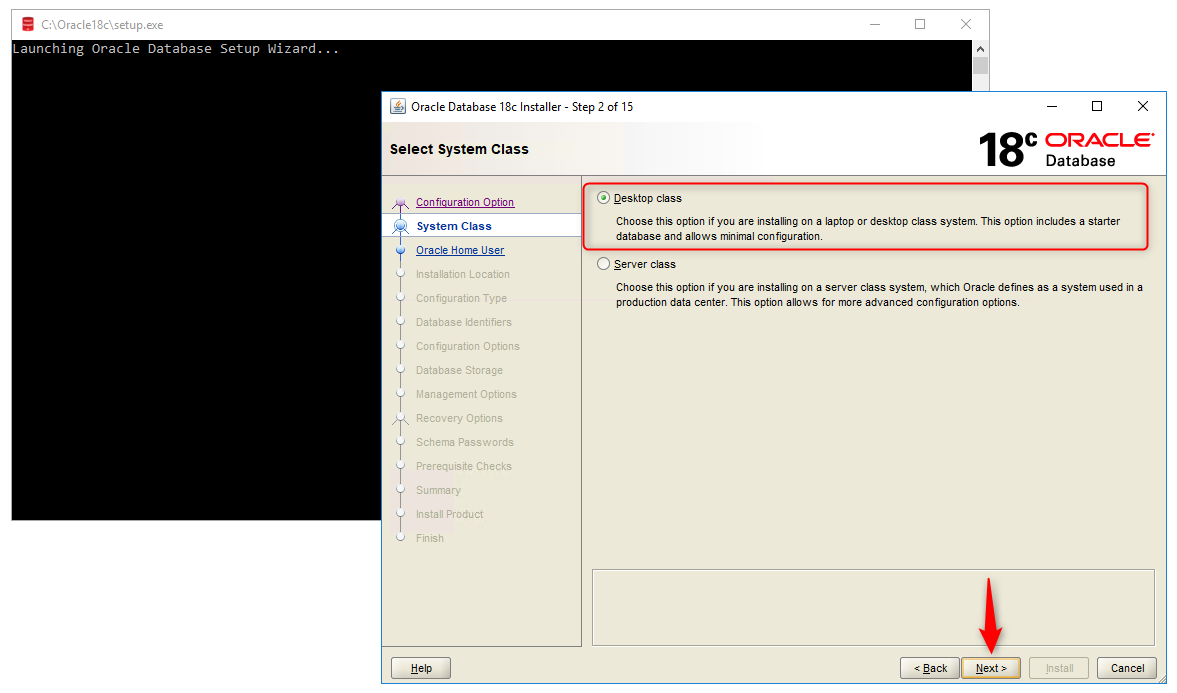
Click on the Next button to move to the next screen.
We see Screen 3: “Oracle Home User”. The Oracle server creates four Windows User Groups:
User Virtual Account: This type of account is the Oracle Home User for Oracle Database Single Instance installation. The account allows us to install Oracle Database, and create and manage database services without passwords.
Use Existing Windows User: This type of account can be a Windows Local User, a Windows Domain User or a Windows Managed Services Account (MSA). We must provide a username and password for a Windows Local or Domain User. For the MSA account, which is a managed domain account, we only need to provide the username. For an Oracle RAC Database or an Oracle Grid Infrastructure installation, we can only use a Windows Domain User Account.
Create New Windows User: Here we need to provide the username and password for the Windows Local User that we want Oracle Universal Installer to create, and then confirm the password. The new user that is created is denied interactive logon privileges to the Windows computer. However, a Windows administrator can manage this account like other Windows accounts.
Use Windows Built-in Account: In this case, no username or password is required. Oracle creates Windows Services using Windows Built-in Accounts (LocalSystem or LocalService).
For Database Server installations, Oracle recommends that we use a standard Windows User Account (instead of a Windows Built-in Account) as the Oracle Home User for enhanced security.
In this step, we will to create a new user which will be completely dedicated to our Oracle Database 18c. We select the third option, “Create a New Windows User”.
Username: Oracle
Password: <mypassword>
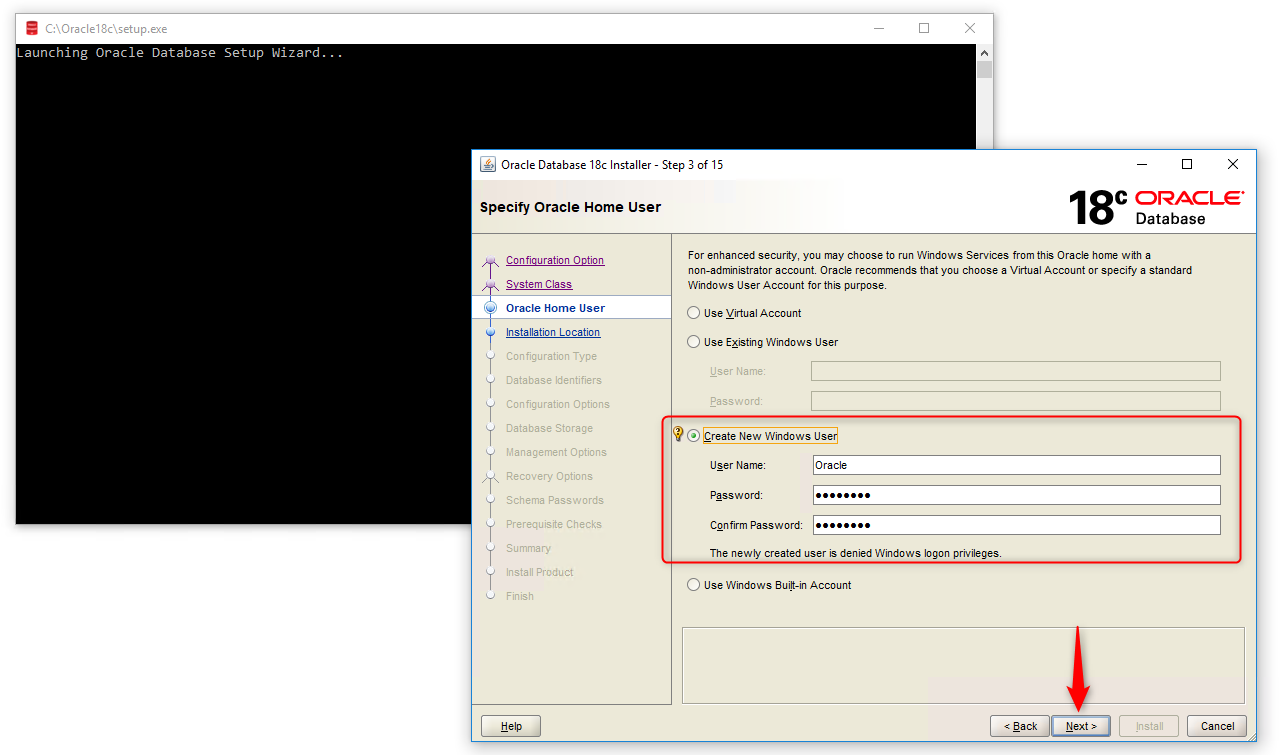
As we mentioned before, the newly created user is denied Windows logon privileges, so we don’t login to Windows using this account. We will name this user as Oracle. However, we can manage this user like any other Windows user we have.
Note that we can’t change this Oracle Home user once the installation is done, so be careful when creating it.
Click on the Next button.
Screen 4: “Typical Installation”.
This step is very important because here we will be configuring the installation settings.
The Oracle Base directory is a top-level directory for Oracle software installations. We can set whatever location we want as our Oracle Base.
The Software Location is the Oracle home path where the Oracle Database binaries for this installation are placed. Prior to 18c we were allowed to set this Oracle Home location, but now, as we can see, the location is already set and we can’t modify it.
The installer takes the location of the Setup files and assigns it as the Oracle Home location. That’s why we extracted our installation files in a separate directory.
Database File Location is the location where Oracle Database files such as data files, redo log files, control files, server parameter files and password file are stored. These are the most important files of Oracle Database. The default data file location is $ORACLE_BASE/oradata for a single node Oracle Real Application Clusters (Oracle RAC), single instance, and desktop-class installations. For multi-node Oracle RAC installations, the default location is under any shared mount point discovered across the selected set of nodes.
We will use the default location.
Database Edition: There are two options here. Enterprise Edition and Standard Edition 2. We will select the Enterprise Edition.
Character set: we will use the default Unicode standard.
Starting with Oracle Database 12c Release 2 (12.2), the default database character set of a database created from the General Purpose/Transaction Processing or the Data Warehousing template is Unicode AL32UTF8.
Unicode is the universal character set that supports most of the currently spoken languages of the world. It also supports many historical scripts (alphabets). Unicode is the native encoding of many technologies, including Java, XML, XHTML, ECMAScript, and LDAP. Unicode is ideally suited for databases supporting the Internet and the global economy.
Below, we have three fields: Global Database Name, Password and Pluggable Database Name; these fields are the most import settings. We will need them in the future to connect with our database. Therefore, it’s very important that write them down somewhere.
Global Database Name is the name that identifies the database. It must be unique to distinguish the database from all other databases in a network.
The Global Database Name will be the name of our database as well as serve as our database SID. We will need this while making connection with our database using tools such as Toad for Oracle. By default, it’s set as ORCL.
If we want, we can change and give it any other name, but make sure to remember it. It’s a good practice to write it down somewhere as our Database SID.
Global Database Name is composed of a database unique name (db_unique_name), a delimiter (a period), and a database domain name (db_domain). The name has the following format: db_unique_name.db_domain.
Where:
- db_unique_name is the name of the database. It can contain a maximum of 30 characters, as long as the first eight characters are unique. The characters can be alphanumeric (a-z, 0-9), underscore (_), dollar ($), and pound (#).
- db_domain is the computer environment used for the database. It should contain no more than 128 characters; alphanumeric (a-z, 0-9), underscore (_), pound (#), and periods (.).
Now we need to enter the passwords. This password is for the SYS and SYSTEM database privilege, write it down somewhere to remember it.
Minimum Password Requirements
We must provide usernames and passwords that comply with the following requirements:
- Password cannot exceed 30 characters.
- No empty password fields.
- Username cannot be the same character string as a password.
- The SYS account password cannot be change_on_install. (case-insensitive)
Password Recommendations
Oracle recommends the following guidelines when prompted for a password.
- Contains at least one lowercase letter.
- Contains at least one uppercase letter.
- Contains at least one digit.
- Is at least 8 characters in length.
- Uses the database character set, which can include the underscore (_), dollar ($), and pound sign (#) characters.
- Should not be an actual word.
Next, we need to make sure to check “Create as Container database” to create our database as a container database.
Pluggable Database Name: Here we have to specify a unique name for a pluggable database, in this case, we use the default name, orclpdb.
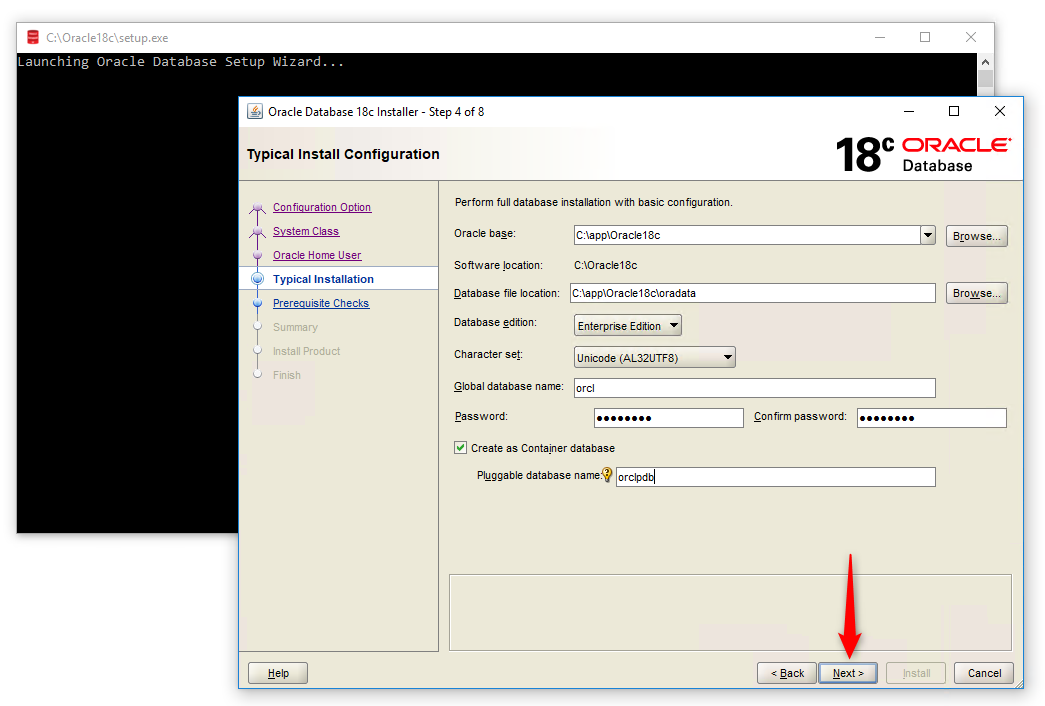
Click on the Next button.
In the next step, Oracle Universal Installer (OUI) will check the prerequisites, such as hardware compatibility. If everything goes well, we can install it, but if there are any errors, the OUI will show us the errors in this screen. As we can see, we don’t have errors!
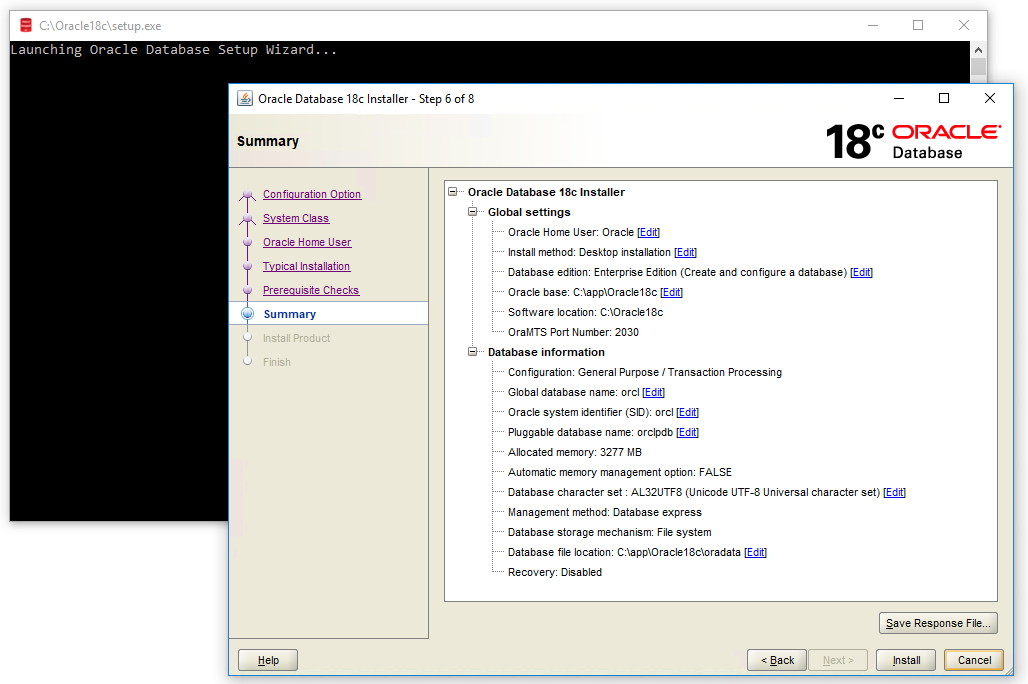
Now, click on the Install button and the installation of Oracle Database 18c will start.
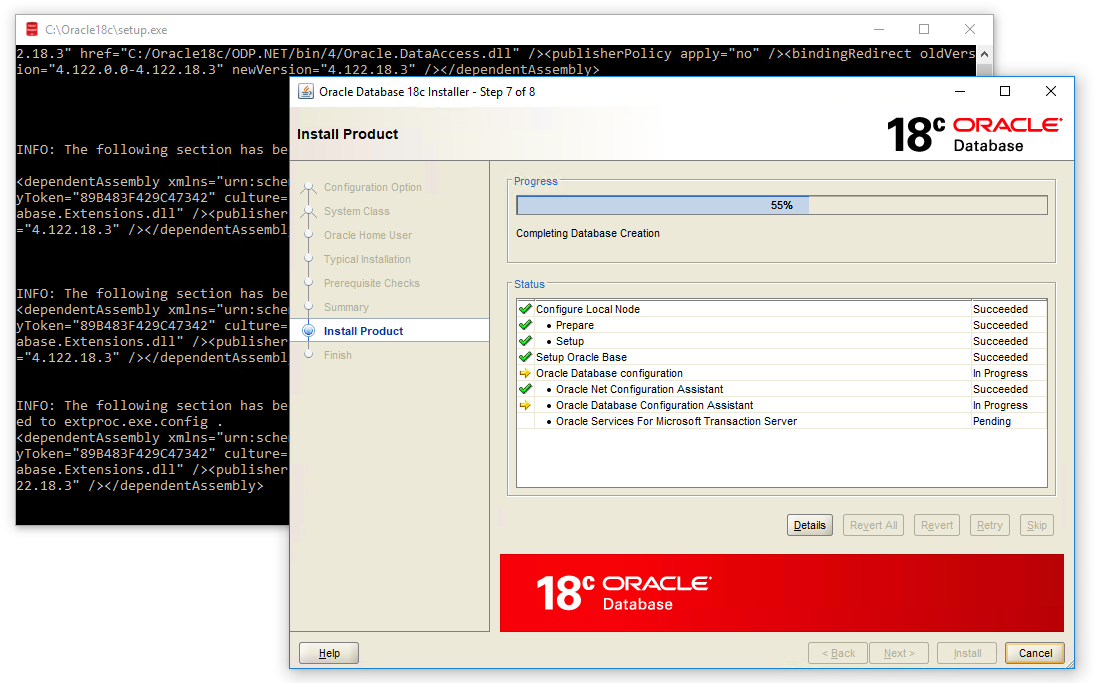
As Oracle Database 18c is very robust software, this installation will take some time depending on our hardware.
The installation is done.
In this installation we don’t get DBCA for database creation as we did with Oracle 12c or 11g. The new Oracle Database 18c Universal Installer has simplified the process.
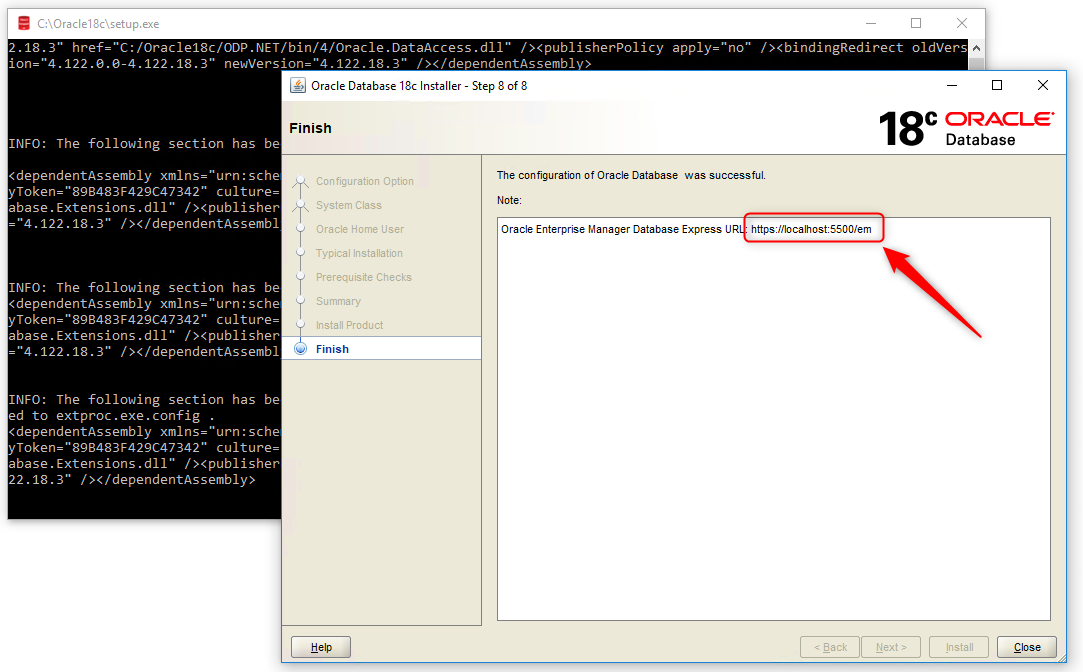
The last thing that we need to do is to copy and save the link: https://localhost:5500/em
This is the link for Oracle Database 18c Enterprise Manager.
Now we have Oracle Database 18c installed on our machine.
Connect to Oracle Database 18c using Toad for Oracle
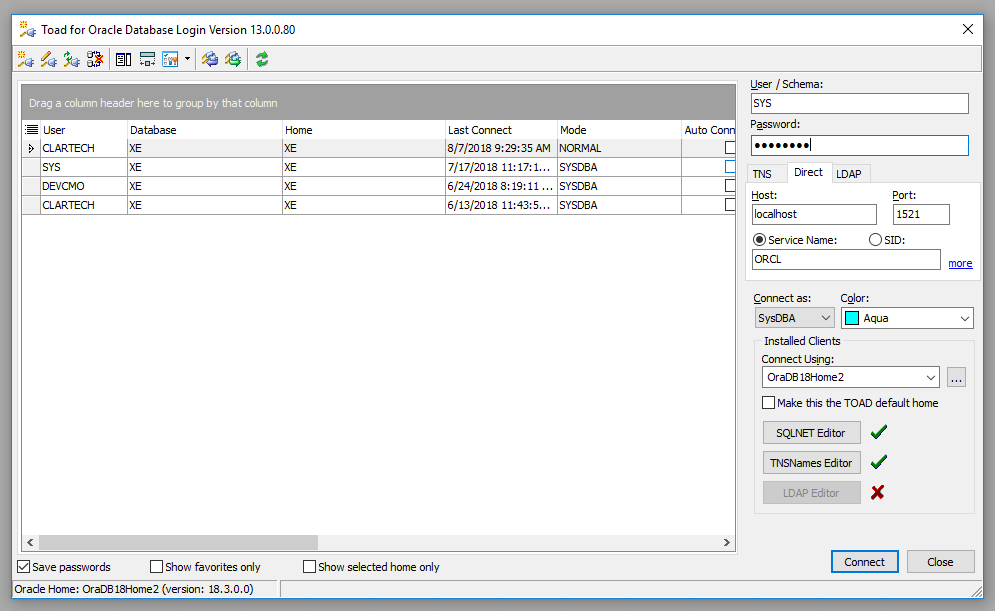
We open the Toad for Oracle tool and the Login window appears.
User / Schema: SYS or SYSTEM
Password: <my_password>
Select the TNS tab:
Database: ORACLR_CONNECTION_DATA
Or you can select the Direct tab:
Host: localhost
Port: 1521
SID: orcl
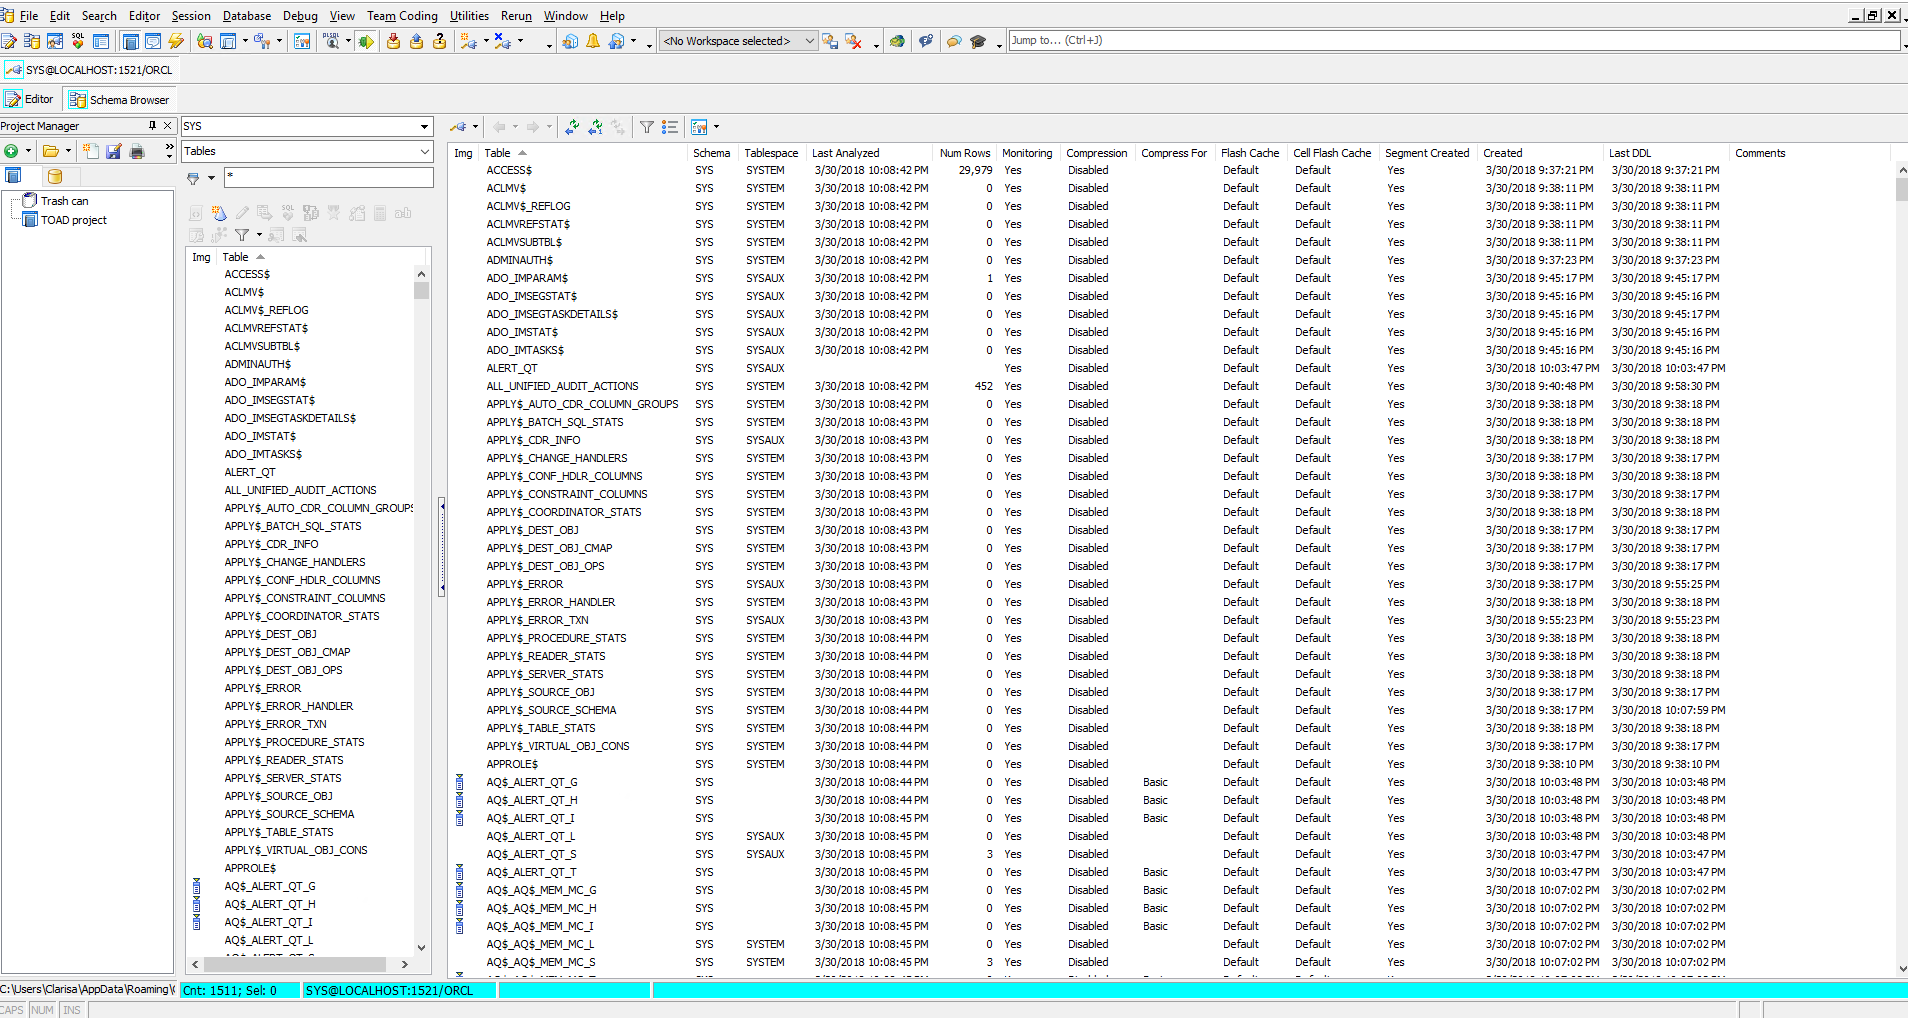
Now, we can see the objects in our new Oracle Database 18c.
Conclusion
We have reached the end of this tutorial, where we have learned how to install the Oracle Database 18c in a Windows environment.
Most Fortune 500 companies choose ToadTool for Oracle Application Developers, more widely known as Toad®, was designed by Oracle developer, Jim McDaniel, to make his job easier. It was so helpful that Jim decided to share it. Fast forward to more than 20 years later, Toad is a trusted tool used in most Fortune 500 companies and across the globe. There are many reasons why people buy Toad rather than staying with the “free” SQL Developer tool Oracle offers. One main reason developers and DBAs choose Toad for Oracle is to reduce time and effort to develop and manage Oracle databases. But did you know that with Toad for Oracle you can automate administration tasks and proactively manage your databases while embracing performance optimization and risk mitigation? Did you know Toad can now find and control sensitive data across all your Oracle databases? What else can Toad do that you didn’t know about? Which edition will benefit you the most? We’re so confident that you will love Toad, we’re offering our top 2 editions to you to try for free for 30 days.
|

I have an issue with the login!
I also get a smaller login box that pops up and asks for username and password. I assumed it was the Oracle username, as in the article.
Thanks
Bret
Try removing Container name and replace the username with SYSTEM and your password